display Peugeot 207 CC 2014 Owner's Guide
[x] Cancel search | Manufacturer: PEUGEOT, Model Year: 2014, Model line: 207 CC, Model: Peugeot 207 CC 2014Pages: 232, PDF Size: 11.11 MB
Page 52 of 232
2
i
i
COMFORT
50
207CC_EN_CHAP02_CONFORT_ED01-2014
When the engine is cold, to prevent
too great a distribution of cold air,
the air fl ow will only reach its opti-
mum level gradually.
In cold weather, it favours the distri-
bution of warm air to the windscreen,
the side windows and the footwells
only. On entering the vehicle, if the in-
terior temperature is much colder
or warmer than the comfort value,
there is no need to alter the value
displayed in order to obtain the re-
quired level of comfort. The system
corrects the temperature differ-
ence automatically and as quickly
as possible.
The air conditioning can only operate
with the engine running.
The driver and front passen-
ger can each set the tempera-
ture to suit their requirements. Turn dial
2 or 3 to the left to reduce
the value or to the right to increase it.
A setting around 21 enables you to
obtain an optimum level of comfort.
Depending on your requirements, a set-
ting between 18 and 24 is usual.
In addition, it is recommended that you
avoid a left/right setting difference of
more than 3.
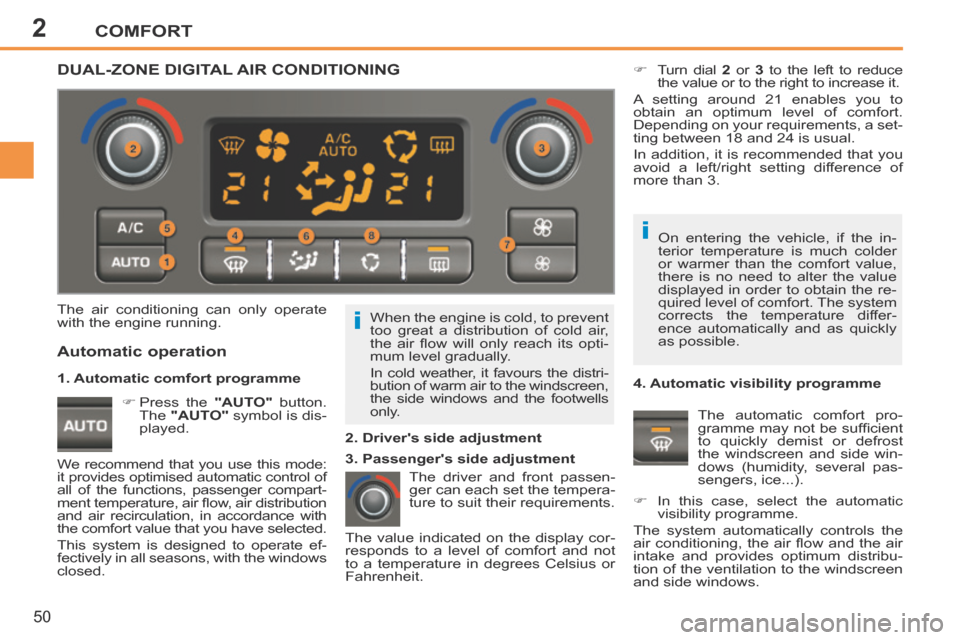
4. Automatic visibility programme The automatic comfort pro-
gramme may not be suffi cient
to quickly demist or defrost
the windscreen and side win-
dows (humidity, several pas-
sengers, ice...).
In this case, select the automatic visibility programme.
The system automatically controls the
air conditioning, the air fl ow and the air
intake and provides optimum distribu-
tion of the ventilation to the windscreen
and side windows.
Automatic operation
Press the "AUTO" button.
The "AUTO" symbol is dis-
played. 2. Driver's side adjustment
DUAL-ZONE DIGITAL AIR CONDITIONING
We recommend that you use this mode:
it provides optimised automatic control of
all of the functions, passenger compart-
ment temperature, air fl ow, air distribution
and air recirculation, in accordance with
the comfort value that you have selected.
This system is designed to operate ef-
fectively in all seasons, with the windows
closed. The value indicated on the display cor-
responds to a level of comfort and not
to a temperature in degrees Celsius or
Fahrenheit.
1. Automatic comfort programme
3. Passenger's side adjustment
Page 53 of 232
2
!
!
i
COMFORT
51
207CC_EN_CHAP02_CONFORT_ED01-2014
To exit this programme, press the "visibility"
button again or the "AUTO" button, the in-
dicator lamp on the button switches off and
"AUTO" is displayed.
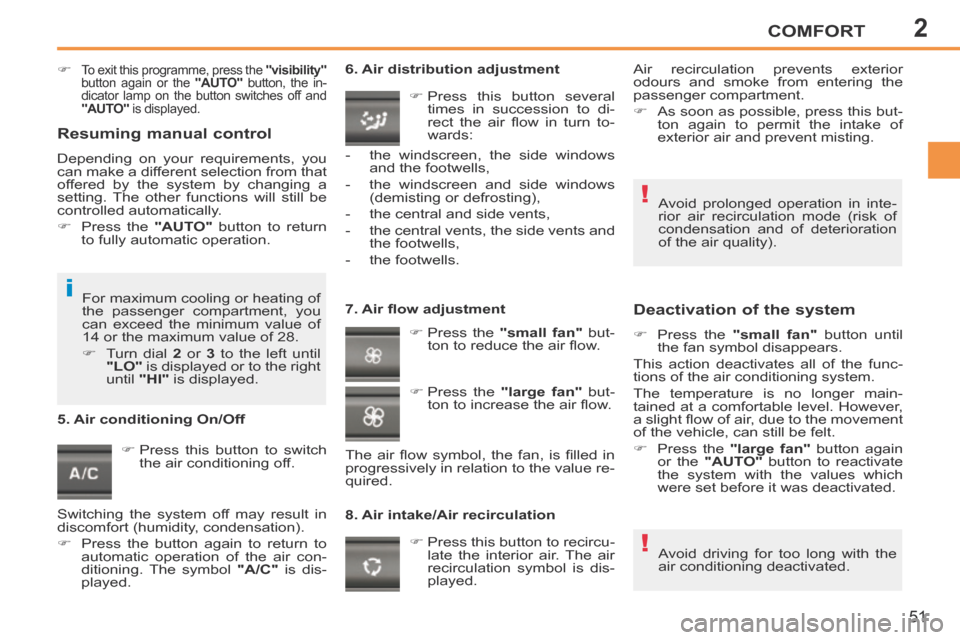
Press this button to switch the air conditioning off. 6. Air distribution adjustment
Press this button several times in succession to di-
rect the air fl ow in turn to-
wards:
7. Air fl ow adjustment Press the "small fan" but-
ton to reduce the air fl ow.
8. Air intake/Air recirculation
Deactivation of the system
Press the "small fan" button until
the fan symbol disappears.
This action deactivates all of the func-
tions of the air conditioning system.
The temperature is no longer main-
tained at a comfortable level. However,
a slight fl ow of air, due to the movement
of the vehicle, can still be felt.
Press the "large fan" button again
or the "AUTO" button to reactivate
the system with the values which
were set before it was deactivated.
Press this button to recircu- late the interior air. The air
recirculation symbol is dis-
played.
5. Air conditioning On/Off
Avoid driving for too long with the
air conditioning deactivated.
Avoid prolonged operation in inte-
rior air recirculation mode (risk of
condensation and of deterioration
of the air quality).
- the windscreen, the side windows
and the footwells,
- the windscreen and side windows (demisting or defrosting),
- the central and side vents,
- the central vents, the side vents and the footwells,
- the footwells.
Press the "large fan" but-
ton to increase the air fl ow.
The air fl ow symbol, the fan, is fi lled in
progressively in relation to the value re-
quired. Air recirculation prevents exterior
odours and smoke from entering the
passenger compartment.
As soon as possible, press this but-
ton again to permit the intake of
exterior air and prevent misting.
For maximum cooling or heating of
the passenger compartment, you
can exceed the minimum value of
14 or the maximum value of 28.
Turn dial 2 or 3 to the left until
"LO" is displayed or to the right
until "HI" is displayed.
Resuming manual control
Depending on your requirements, you
can make a different selection from that
offered by the system by changing a
setting. The other functions will still be
controlled automatically.
Press the "AUTO" button to return
to fully automatic operation.
Switching the system off may result in
discomfort (humidity, condensation).
Press the button again to return to automatic operation of the air con-
ditioning. The symbol "A/C" is dis-
played.
Page 61 of 232
2
i
COMFORT
59
207CC_EN_CHAP02_CONFORT_ED01-2014
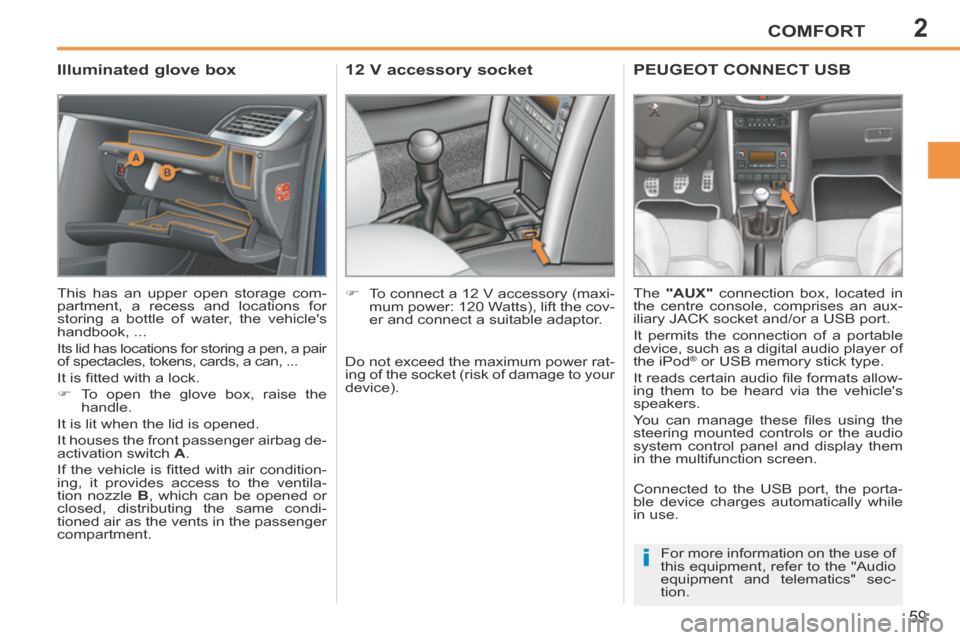
Illuminated glove box
This has an upper open storage com-
partment, a recess and locations for
storing a bottle of water, the vehicle's
handbook, ...
Its lid has locations for storing a pen, a pair
of spectacles, tokens, cards, a can, ...
It is fi tted with a lock.
To open the glove box, raise the handle.
It is lit when the lid is opened.
It houses the front passenger airbag de-
activation switch A .
If the vehicle is fi tted with air condition-
ing, it provides access to the ventila-
tion nozzle B , which can be opened or
closed, distributing the same condi-
tioned air as the vents in the passenger
compartment.
12 V accessory socket
To connect a 12 V accessory (maxi- mum power: 120 Watts), lift the cov-
er and connect a suitable adaptor.
PEUGEOT CONNECT USB
The "AUX" connection box, located in
the centre console, comprises an aux-
iliary JACK socket and/or a USB port.
It permits the connection of a portable
device, such as a digital audio player of
the iPod
® or USB memory stick type.
It reads certain audio fi le formats allow-
ing them to be heard via the vehicle's
speakers.
You can manage these fi les using the
steering mounted controls or the audio
system control panel and display them
in the multifunction screen.
Connected to the USB port, the porta-
ble device charges automatically while
in use.
For more information on the use of
this equipment, refer to the "Audio
equipment and telematics" sec-
tion.
Do not exceed the maximum power rat-
ing of the socket (risk of damage to your
device).
Page 82 of 232
4
80
VISIBILITY
207CC_EN_CHAP04_VISIBILITE_ED01-2014
LIGHTING CONTROL STALK
System for selection and control of the
various front and rear lamps providing
the vehicle's lighting.
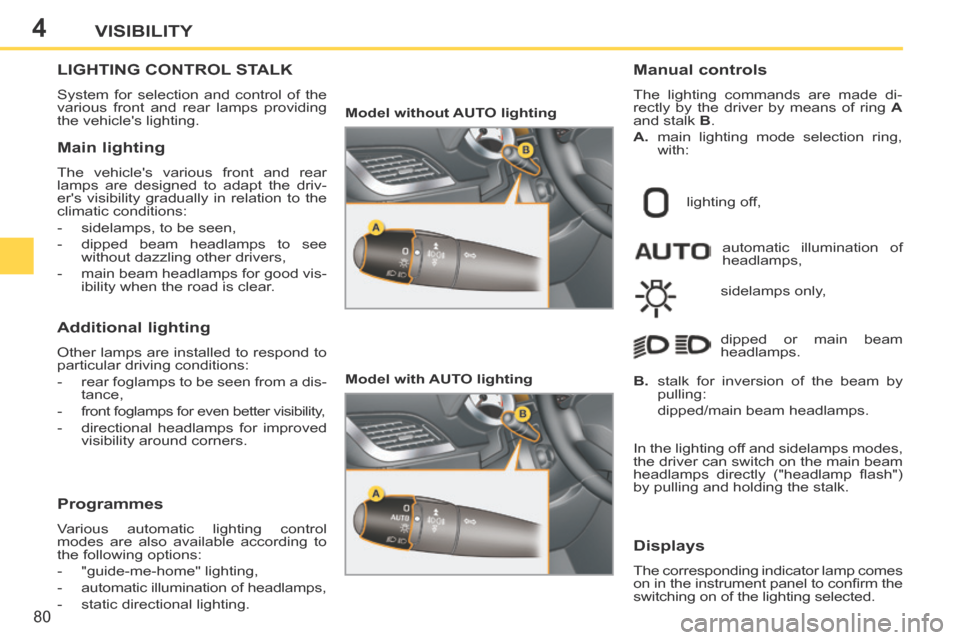
Manual controls
The lighting commands are made di-
rectly by the driver by means of ring A
and stalk B .
A. main lighting mode selection ring, with:
Model without AUTO lighting
Model with AUTO lighting lighting off,
automatic illumination of
headlamps,
sidelamps only,
B. stalk for inversion of the beam by pulling:
dipped/main beam headlamps. dipped or main beam
headlamps.
Displays
The corresponding indicator lamp comes
on in the instrument panel to confi rm the
switching on of the lighting selected.
Main lighting
The vehicle's various front and rear
lamps are designed to adapt the driv-
er's visibility gradually in relation to the
climatic conditions:
- sidelamps, to be seen,
- dipped beam headlamps to see
without dazzling other drivers,
- main beam headlamps for good vis- ibility when the road is clear.
Additional lighting
Other lamps are installed to respond to
particular driving conditions:
- rear foglamps to be seen from a dis-tance,
- front foglamps for even better visibility,
- directional headlamps for improved visibility around corners.
Programmes
Various automatic lighting control
modes are also available according to
the following options:
- "guide-me-home" lighting,
- automatic illumination of headlamps,
- static directional lighting. In the lighting off and sidelamps modes,
the driver can switch on the main beam
headlamps directly ("headlamp fl ash")
by pulling and holding the stalk.
Page 101 of 232
6
!
i
i
i
SAFETY
99
207CC_EN_CHAP06_SECURITE_ED01-2014
TYRE UNDER-INFLATION
DETECTION
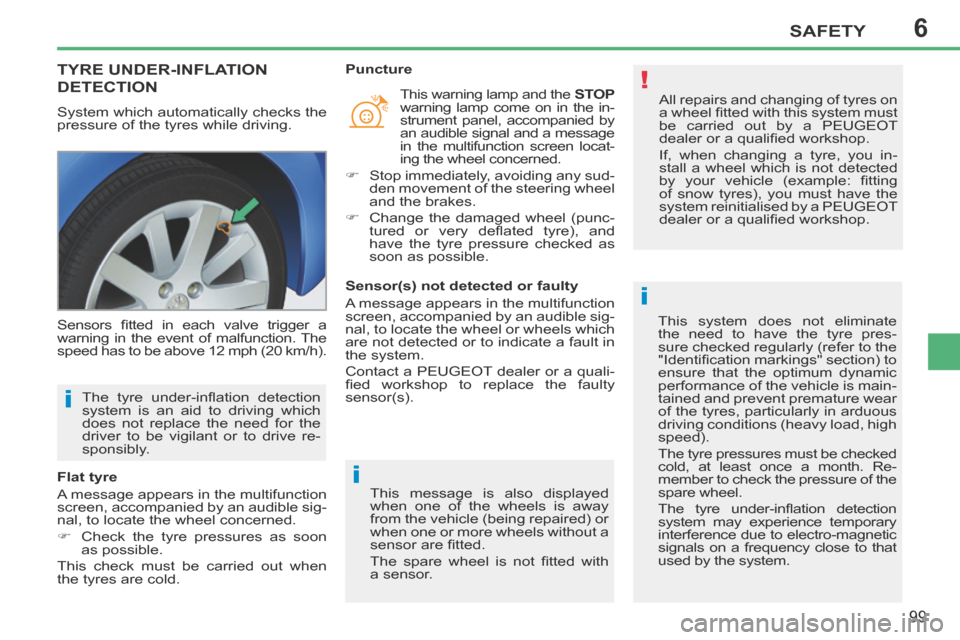
System which automatically checks the
pressure of the tyres while driving. All repairs and changing of tyres on
a wheel fi tted with this system must
be carried out by a PEUGEOT
dealer or a qualifi ed workshop.
If, when changing a tyre, you in-
stall a wheel which is not detected
by your vehicle (example: fi tting
of snow tyres), you must have the
system reinitialised by a PEUGEOT
dealer or a qualifi ed workshop.
This system does not eliminate
the need to have the tyre pres-
sure checked regularly (refer to the
"Identifi cation markings" section) to
ensure that the optimum dynamic
performance of the vehicle is main-
tained and prevent premature wear
of the tyres, particularly in arduous
driving conditions (heavy load, high
speed).
The tyre pressures must be checked
cold, at least once a month. Re-
member to check the pressure of the
spare wheel.
The tyre under-infl ation detection
system may experience temporary
interference due to electro-magnetic
signals on a frequency close to that
used by the system.
Sensors fi tted in each valve trigger a
warning in the event of malfunction. The
speed has to be above 12 mph (20 km/h).
Flat tyre
A message appears in the multifunction
screen, accompanied by an audible sig-
nal, to locate the wheel concerned.
Check the tyre pressures as soon
as possible.
This check must be carried out when
the tyres are cold. This warning lamp and the
STOP
warning lamp come on in the in-
strument panel, accompanied by
an audible signal and a message
in the multifunction screen locat-
ing the wheel concerned.
Stop immediately, avoiding any sud- den movement of the steering wheel
and the brakes.
Change the damaged wheel (punc- tured or very defl ated tyre), and
have the tyre pressure checked as
soon as possible.
Puncture
The tyre under-infl ation detection
system is an aid to driving which
does not replace the need for the
driver to be vigilant or to drive re-
sponsibly. Sensor(s) not detected or faulty
A message appears in the multifunction
screen, accompanied by an audible sig-
nal, to locate the wheel or wheels which
are not detected or to indicate a fault in
the system.
Contact a PEUGEOT dealer or a quali-
fi ed workshop to replace the faulty
sensor(s).
This message is also displayed
when one of the wheels is away
from the vehicle (being repaired) or
when one or more wheels without a
sensor are fi tted.
The spare wheel is not fi tted with
a sensor.
Page 113 of 232
7DRIVING
111
207CC_EN_CHAP07_CONDUITE_ED01-2014
AUTOMATIC GEARBOX
Four-speed automatic gearbox which
offers a choice between the comfort of
fully automatic operation, enhanced by
sport and snow programmes, or manual
gear changing.
There are therefore four driving modes:
- automatic operation for electronic management of the gears by the
gearbox,
- sport programme for a more dy- namic style of driving,
- snow programme to improve driv- ing when traction is poor,
- sequential operation for manual changing of the gears by the driver.
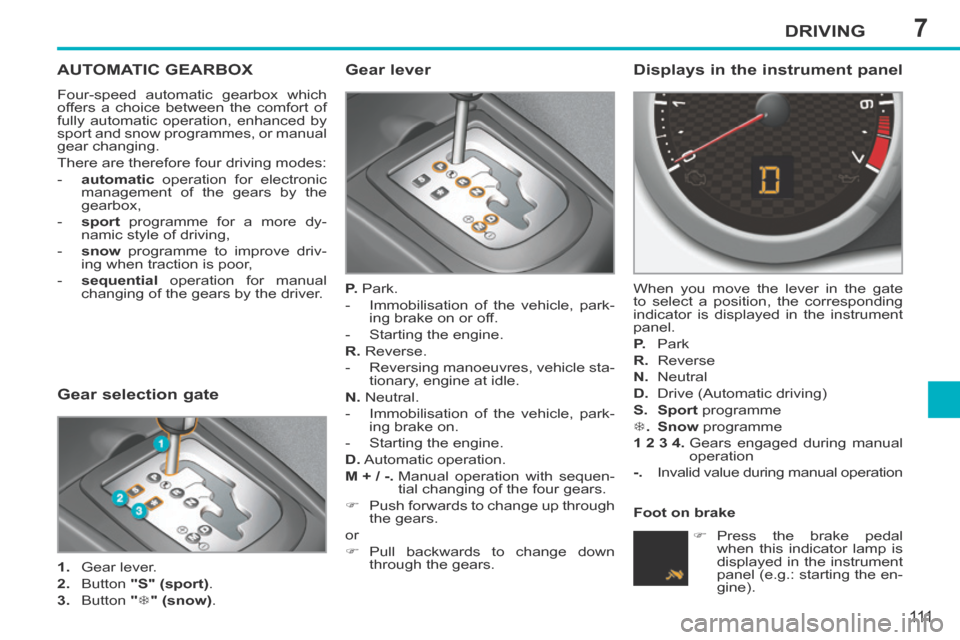
Gear lever
P. Park.
- Immobilisation of the vehicle, park- ing brake on or off.
- Starting the engine.
R. Reverse.
- Reversing manoeuvres, vehicle sta- tionary, engine at idle.
N. Neutral.
- Immobilisation of the vehicle, park- ing brake on.
- Starting the engine.
D. Automatic operation.
M + / - . Manual operation with sequen- tial changing of the four gears.
Push forwards to change up through the gears.
or
Pull backwards to change down through the gears.
Displays in the instrument panel
When you move the lever in the gate
to select a position, the corresponding
indicator is displayed in the instrument
panel.
P. Park
R. Reverse
N. Neutral
D. Drive (Automatic driving)
S. Sport programme
. Snow programme
1 2 3 4 . Gears engaged during manual
operation
-. Invalid value during manual operation
Press the brake pedal when this indicator lamp is
displayed in the instrument
panel (e.g.: starting the en-
gine).
Gear selection gate
1. Gear lever.
2. Button "S" (sport) .
3. Button " " (snow). Foot on brake
Page 114 of 232
7
!!
i
DRIVING
11 2
207CC_EN_CHAP07_CONDUITE_ED01-2014
Moving off
Apply the parking brake.
Select position P or N .
Start the engine.
If this procedure is not followed, there is
an audible signal, accompanied by the
display of an warning message.
With the engine running, press the brake pedal.
Release the parking brake.
Select position R , D or M .
Gradually release the brake pedal.
The vehicle moves off immediately.
If position N is selected inadver-
tently while driving, allow the en-
gine to return to idle then select
position D to accelerate.
If the ambient temperature is below
-23°C, the engine should be left at
idle for four minutes, to ensure the
correct operation and life of the en-
gine and gearbox. The gearbox then operates in auto-
adaptive mode, without any intervention
on the part of the driver. It continuously
selects the most suitable gear accord-
ing to the style of driving, the profi le of
the road and the load in the vehicle.
Automatic operation
Select position
D for automatic
changing of the four gears.
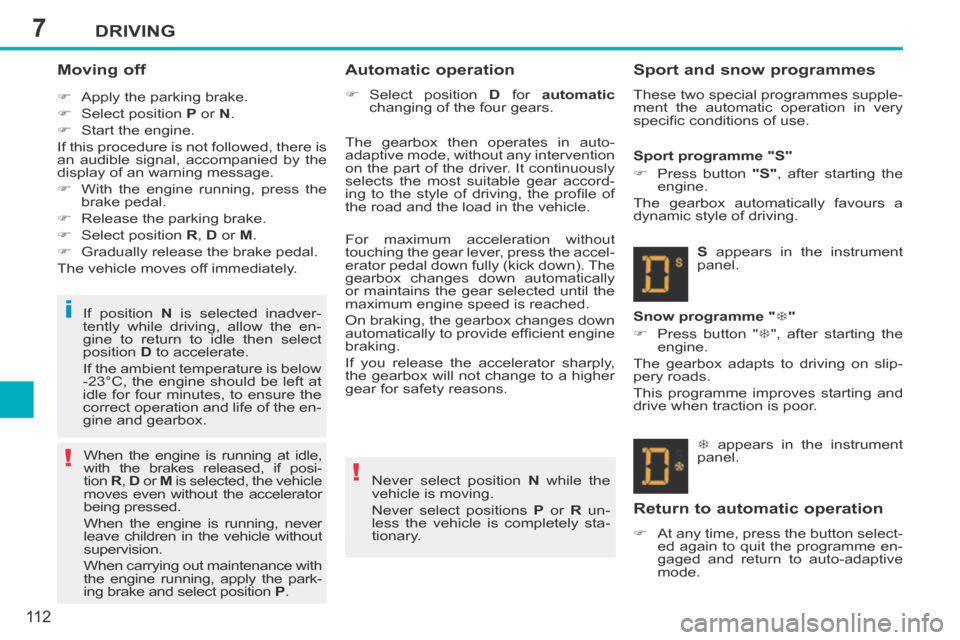
appears in the instrument
panel.
Snow programme " "
Press button "
", after starting the
engine.
The gearbox adapts to driving on slip-
pery roads.
This programme improves starting and
drive when traction is poor. S appears in the instrument
panel.
Sport programme "S"
Press button
"S" , after starting the
engine.
The gearbox automatically favours a
dynamic style of driving.
Never select position N while the
vehicle is moving.
Never select positions P or R un-
less the vehicle is completely sta-
tionary.
When the engine is running at idle,
with the brakes released, if posi-
tion
R , D or M is selected, the vehicle
moves even without the accelerator
being pressed.
When the engine is running, never
leave children in the vehicle without
supervision.
When carrying out maintenance with
the engine running, apply the park-
ing brake and select position P .
Sport and snow programmes
These two special programmes supple-
ment the automatic operation in very
specifi c conditions of use.
Return to automatic operation
At any time, press the button select-
ed again to quit the programme en-
gaged and return to auto-adaptive
mode.
For maximum acceleration without
touching the gear lever, press the accel-
erator pedal down fully (kick down). The
gearbox changes down automatically
or maintains the gear selected until the
maximum engine speed is reached.
On braking, the gearbox changes down
automatically to provide effi cient engine
braking.
If you release the accelerator sharply,
the gearbox will not change to a higher
gear for safety reasons.
Page 115 of 232
7
!i
i
DRIVING
11 3
207CC_EN_CHAP07_CONDUITE_ED01-2014
Stopping the vehicle
Before switching off the engine, you
can engage position P or N to place the
gearbox in neutral.
In both cases, apply the parking brake
to immobilise the vehicle.
Operating fault
There is a risk of damage to the
gearbox:
- if you press the accelerator and brake pedals at the same time,
- if you force the movement of the gear lever from the P posi-
tion to another position when
the battery is fl at.
To reduce fuel consumption when
at a prolonged standstill with the
engine running (traffi c jam...), put
the gear lever in the N position and
apply the parking brake.
Manual operation
Select position M for sequential
changing of the four gears.
Push the lever towards the + sign to
change up a gear.
Pull the lever towards the - sign to
change down a gear.
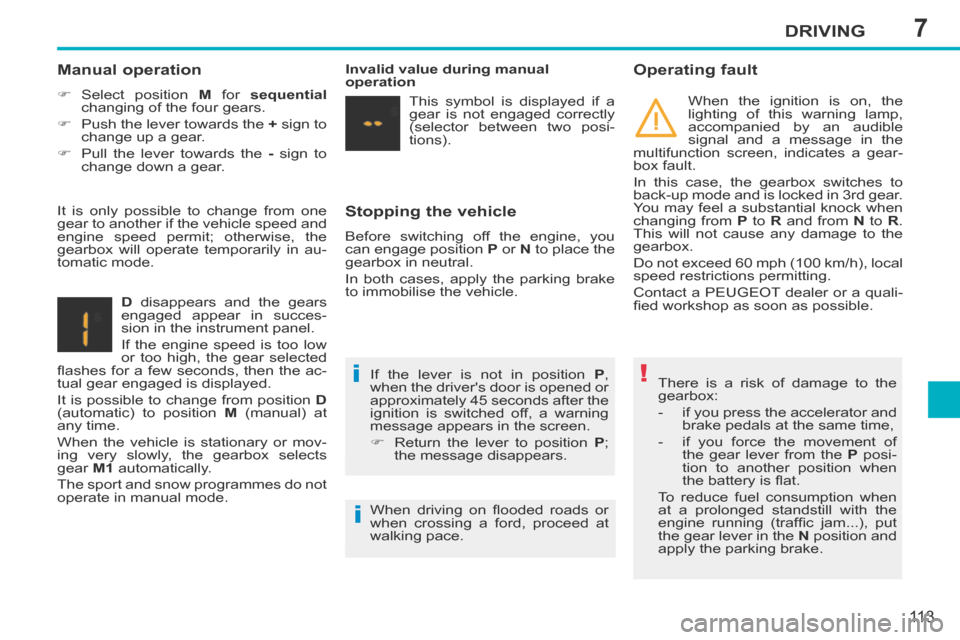
D disappears and the gears
engaged appear in succes-
sion in the instrument panel.
If the engine speed is too low
or too high, the gear selected
fl ashes for a few seconds, then the ac-
tual gear engaged is displayed.
It is possible to change from position D
(automatic) to position M (manual) at
any time.
When the vehicle is stationary or mov-
ing very slowly, the gearbox selects
gear M1 automatically.
The sport and snow programmes do not
operate in manual mode. If the lever is not in position
P ,
when the driver's door is opened or
approximately 45 seconds after the
ignition is switched off, a warning
message appears in the screen.
Return the lever to position P ;
the message disappears.
It is only possible to change from one
gear to another if the vehicle speed and
engine speed permit; otherwise, the
gearbox will operate temporarily in au-
tomatic mode.
Invalid value during manual
operation
This symbol is displayed if a
gear is not engaged correctly
(selector between two posi-
tions). When the ignition is on, the
lighting of this warning lamp,
accompanied by an audible
signal and a message in the
multifunction screen, indicates a gear-
box fault.
In this case, the gearbox switches to
back-up mode and is locked in 3rd gear.
You may feel a substantial knock when
changing from P to R and from N to R .
This will not cause any damage to the
gearbox.
Do not exceed 60 mph (100 km/h), local
speed restrictions permitting.
Contact a PEUGEOT dealer or a quali-
fi ed workshop as soon as possible.
When driving on fl ooded roads or
when crossing a ford, proceed at
walking pace.
Page 116 of 232
7
i
DRIVING
11 4
207CC_EN_CHAP07_CONDUITE_ED01-2014
SPEED LIMITER
System which prevents the vehicle from
exceeding the speed programmed by the
driver.
When the programmed speed limit is
reached, pressing the accelerator pedal
no longer has any effect.
The speed limiter is switched on manu-
ally: it requires a programmed speed of at
least 20 mph (30 km/h).
The speed limiter is switched off by
manual operation of the control.
The programmed speed can be exceed-
ed temporarily by pressing the accelera-
tor fi rmly.
To return to the programmed speed, sim-
ply slow down to a speed below the pro-
grammed speed.
The programmed speed remains in the
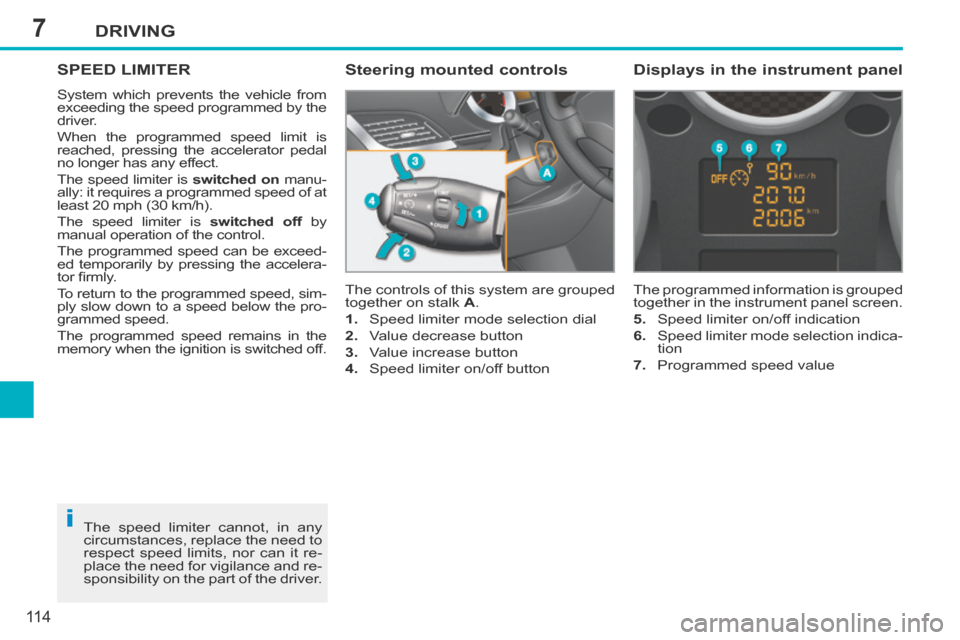
memory when the ignition is switched off. The controls of this system are grouped
together on stalk
A .
1. Speed limiter mode selection dial
2. Value decrease button
3. Value increase button
4. Speed limiter on/off button The programmed information is grouped
together in the instrument panel screen.
5. Speed limiter on/off indication
6. Speed limiter mode selection indica-
tion
7. Programmed speed value
Steering mounted controls Displays in the instrument panel
The speed limiter cannot, in any
circumstances, replace the need to
respect speed limits, nor can it re-
place the need for vigilance and re-
sponsibility on the part of the driver.
Page 117 of 232
7
!
DRIVING
11 5
207CC_EN_CHAP07_CONDUITE_ED01-2014
On a steep descent, the speed lim-
iter will not be able to prevent the
vehicle from exceeding the pro-
grammed speed.
To avoid any risk of jamming of the
pedals:
- ensure that the mat is secured correctly,
- do not fi t one mat on top of an- other.
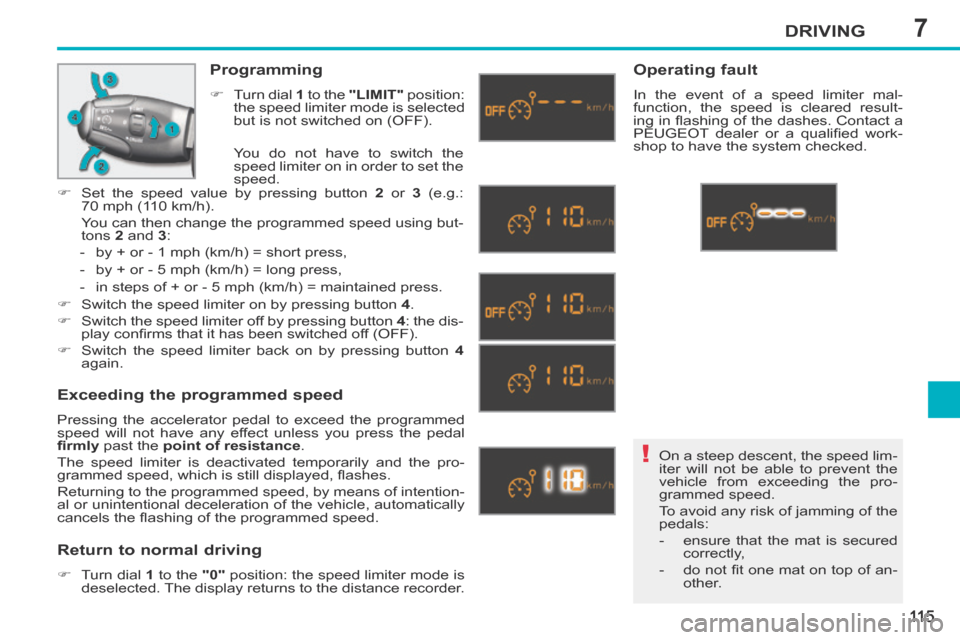
Programming
Turn dial 1 to the "LIMIT" position:
the speed limiter mode is selected
but is not switched on (OFF).
Exceeding the programmed speed
Pressing the accelerator pedal to exceed the programmed
speed will not have any effect unless you press the pedal
fi rmly past the point of resistance .
The speed limiter is deactivated temporarily and the pro-
grammed speed, which is still displayed, fl ashes.
Returning to the programmed speed, by means of intention-
al or unintentional deceleration of the vehicle, automatically
cancels the fl ashing of the programmed speed.
Return to normal driving
Turn dial 1 to the "0" position: the speed limiter mode is
deselected. The display returns to the distance recorder.
Operating fault
In the event of a speed limiter mal-
function, the speed is cleared result-
ing in fl ashing of the dashes. Contact a
PEUGEOT dealer or a qualifi ed work-
shop to have the system checked.
You do not have to switch the
speed limiter on in order to set the
speed.
Set the speed value by pressing button 2 or 3 (e.g.:
70 mph (110 km/h).
You can then change the programmed speed using but- tons 2 and 3 :
- by + or - 1 mph (km/h) = short press,
- by + or - 5 mph (km/h) = long press,
- in steps of + or - 5 mph (km/h) = maintained press.
Switch the speed limiter on by pressing button 4 .
Switch the speed limiter off by pressing button 4 : the dis-
play confi rms that it has been switched off (OFF).
Switch the speed limiter back on by pressing button 4
again.