Peugeot 207 Dag 2009 Service Manual
Manufacturer: PEUGEOT, Model Year: 2009, Model line: 207 Dag, Model: Peugeot 207 Dag 2009Pages: 267, PDF Size: 20.02 MB
Page 41 of 267
54
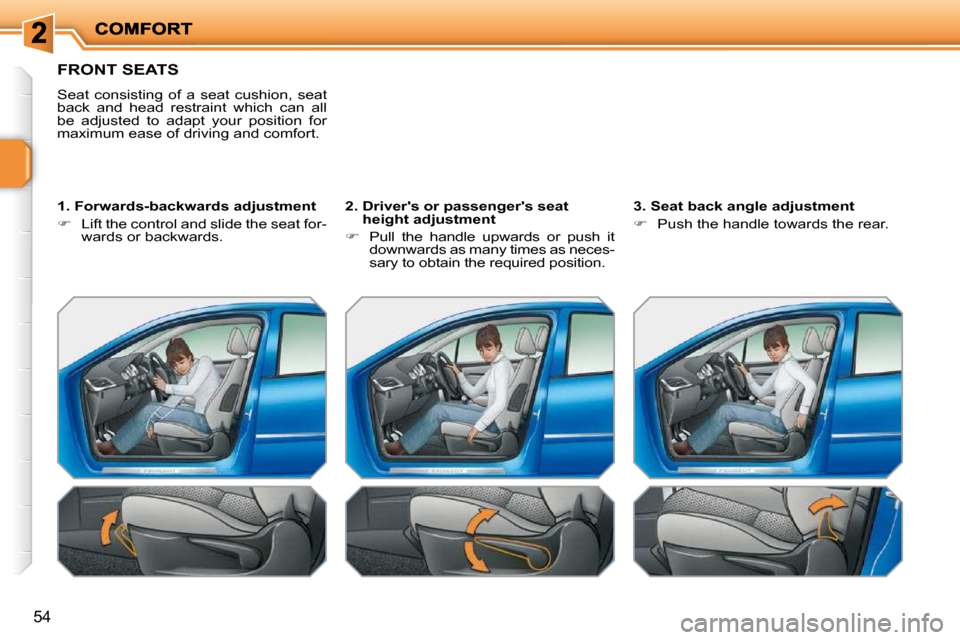
FRONT SEATS
Seat consisting of a seat cushion, seat
back and head restraint which can all
be adjusted to adapt your position for
maximum ease of driving and comfort.
� � �1�.� �F�o�r�w�a�r�d�s�-�b�a�c�k�w�a�r�d�s� �a�d�j�u�s�t�m�e�n�t�
� Lift the control and slide the seat for-
wards or backwards. 2. Driver's or passenger's seat
�h�e�i�g�h�t� �a�d�j�u�s�t�m�e�n�t�
� Pull the handle upwards or push it
downwards as many times as neces-
sary to obtain the required position. � � �3�.� �S�e�a�t� �b�a�c�k� �a�n�g�l�e� �a�d�j�u�s�t�m�e�n�t�
� Push the handle towards the rear.
Page 42 of 267
!
!
55
No person or object must prevent
the seat slide from returning to its
initial position; return to this posi-
tion is necessary for the seat to
lock in place.
Take care not to trap the seat belt
to avoid hindering the passage of
the rear passengers.
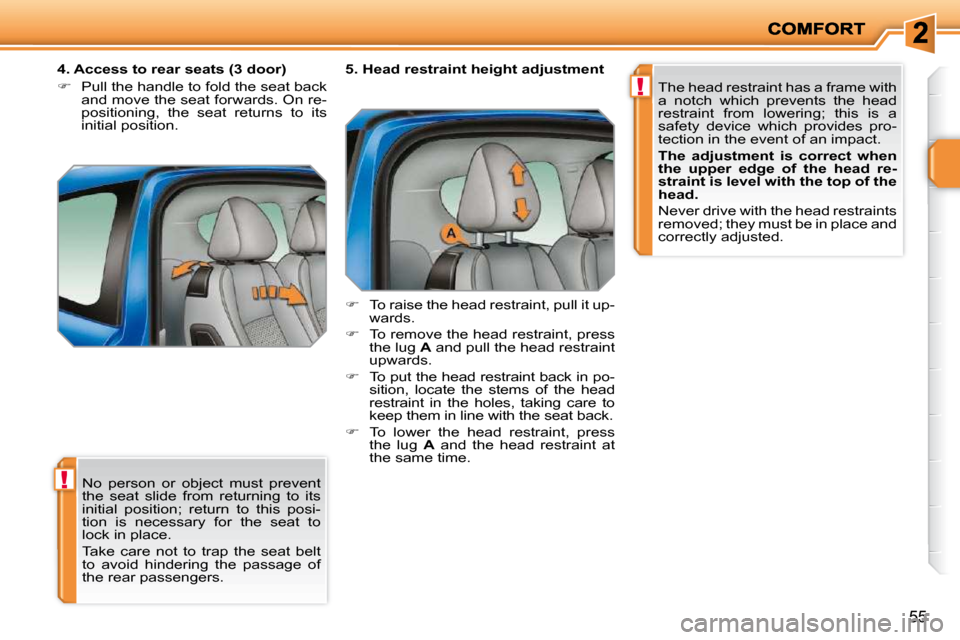
4. Access to rear seats (3 door)
� Pull the handle to fold the seat back
and move the seat forwards. On re-
positioning, the seat returns to its
initial position. � � �5�.� �H�e�a�d� �r�e�s�t�r�a�i�n�t� �h�e�i�g�h�t� �a�d�j�u�s�t�m�e�n�t�
� To raise the head restraint, pull it up-
wards.
� To remove the head restraint, press
the lug A and pull the head restraint
upwards.
� To put the head restraint back in po-
sition, locate the stems of the head
restraint in the holes, taking care to
keep them in line with the seat back.
� To lower the head restraint, press
the lug A and the head restraint at
the same time. The head restraint has a frame with
a notch which prevents the head
restraint from lowering; this is a
safety device which provides pro-
tection in the event of an impact.
�T�h�e� �a�d�j�u�s�t�m�e�n�t� �i�s� �c�o�r�r�e�c�t� �w�h�e�n�
the upper edge of the head re-
straint is level with the top of the
head.
Never drive with the head restraints
removed; they must be in place and
correctly adjusted.
Page 43 of 267
!
i
56
REAR SEATS
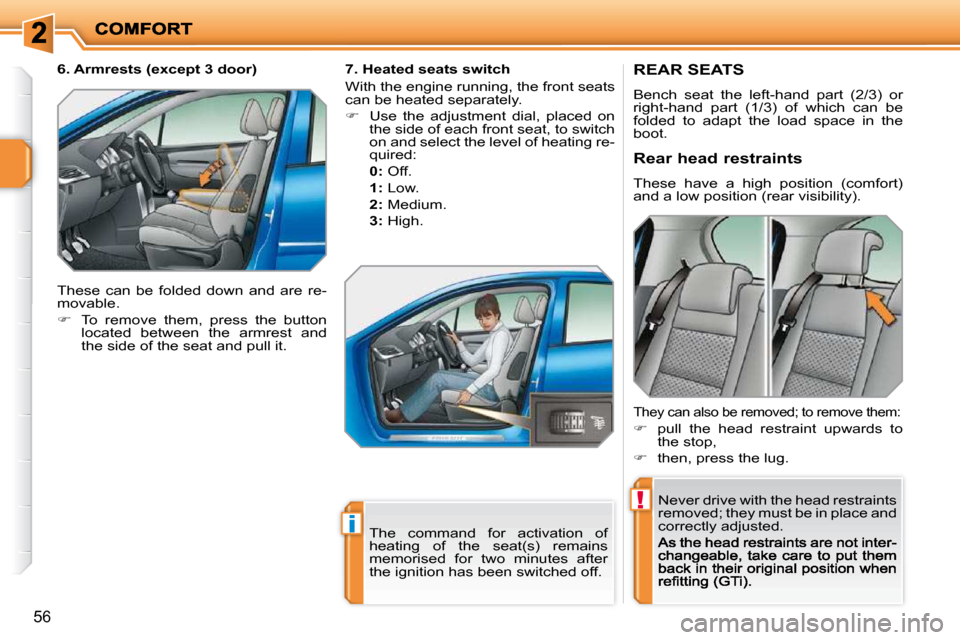
Bench seat the left-hand part (2/3) or right-hand part (1/3) of which can be folded to adapt the load space in the boot.
Never drive with the head restraints
removed; they must be in place and
correctly adjusted.
Rear head restraints
These have a high position (comfort)
and a low position (rear visibility).
The command for activation of
heating of the seat(s) remains
memorised for two minutes after
the ignition has been switched off.
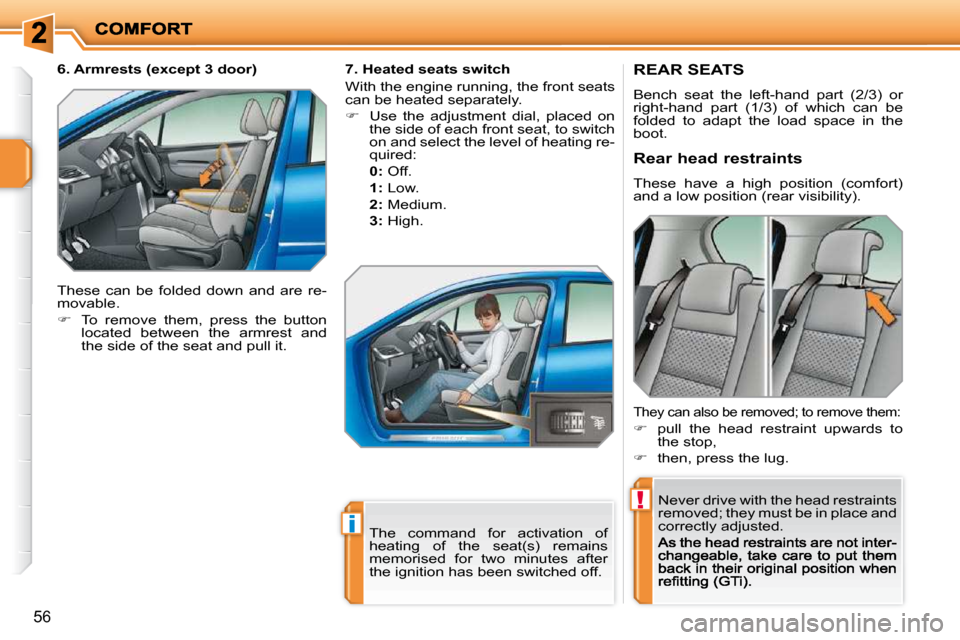
7. Heated seats switch
With the engine running, the front seats
can be heated separately.
� Use the adjustment dial, placed on
the side of each front seat, to switch
on and select the level of heating re-
quired:
0
: Off.
1
: Low.
2
: Medium.
3
: High.
They can also be removed; to remove them:
� pull the head restraint upwards to
the stop,
� then, press the lug.
6. Armrests (except 3 door)
These can be folded down and are re-
movable.
� To remove them, press the button
located between the armrest and
the side of the seat and pull it.
Page 44 of 267
!
i
56
REAR SEATS
Bench seat the left-hand part (2/3) or right-hand part (1/3) of which can be folded to adapt the load space in the boot.
Never drive with the head restraints
removed; they must be in place and
correctly adjusted.
Rear head restraints
These have a high position (comfort)
and a low position (rear visibility).
The command for activation of
heating of the seat(s) remains
memorised for two minutes after
the ignition has been switched off.
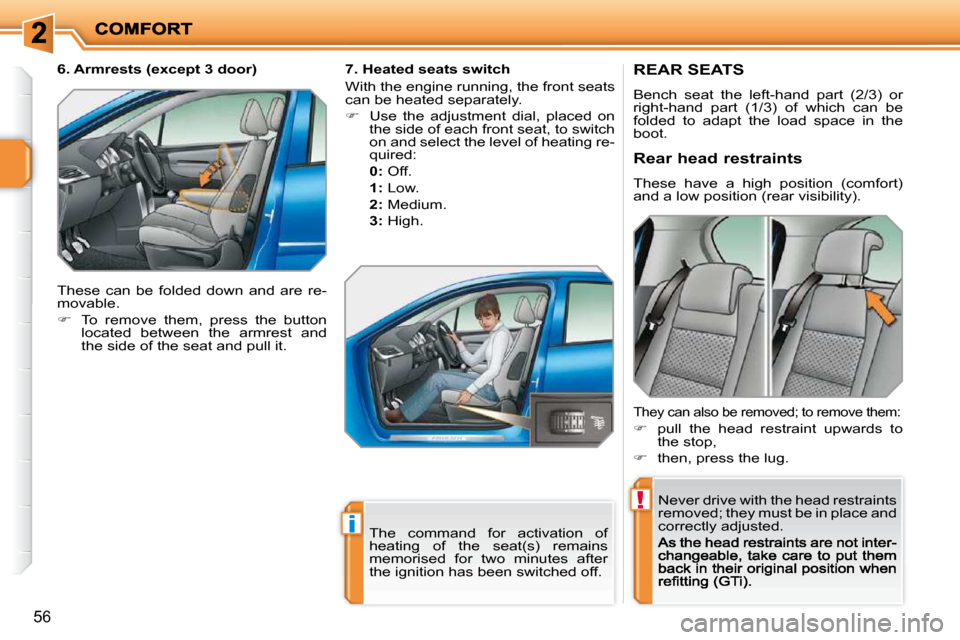
7. Heated seats switch
With the engine running, the front seats
can be heated separately.
� Use the adjustment dial, placed on
the side of each front seat, to switch
on and select the level of heating re-
quired:
0
: Off.
1
: Low.
2
: Medium.
3
: High.
They can also be removed; to remove them:
� pull the head restraint upwards to
the stop,
� then, press the lug.
6. Armrests (except 3 door)
These can be folded down and are re-
movable.
� To remove them, press the button
located between the armrest and
the side of the seat and pull it.
Page 45 of 267
!
i
57
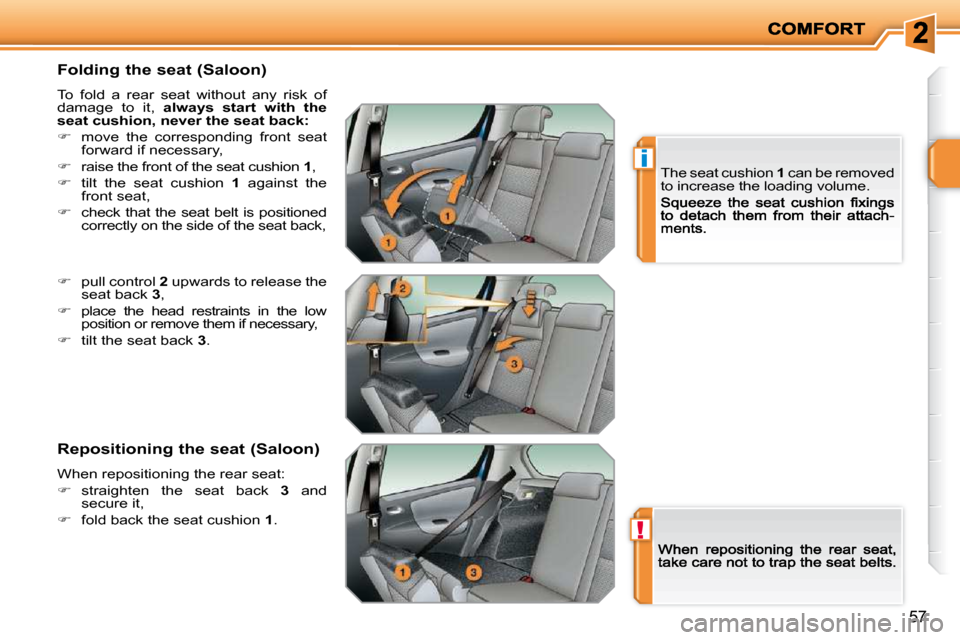
Folding the seat (Saloon)
To fold a rear seat without any risk of
damage to it, always start with the
seat cushion, never the seat back
:
� move the corresponding front seat
forward if necessary,
�raise the front of the seat cushion 1 ,
� tilt the seat cushion 1 against the front seat,
�check that the seat belt is positioned correctly on the side of the seat back,
Repositioning the seat (Saloon)
When repositioning the rear seat:
� straighten the seat back 3 and
secure it,
� fold back the seat cushion 1 .
� pull control 2 upwards to release the seat back 3 ,
�place the head restraints in the low position or remove them if necessary,
� tilt the seat back 3 .
The seat cushion 1 can be removed
to increase the loading volume.
Page 46 of 267
!
i
56
REAR SEATS
Bench seat the left-hand part (2/3) or right-hand part (1/3) of which can be folded to adapt the load space in the boot.
Never drive with the head restraints
removed; they must be in place and
correctly adjusted.
Rear head restraints
These have a high position (comfort)
and a low position (rear visibility).
The command for activation of
heating of the seat(s) remains
memorised for two minutes after
the ignition has been switched off.
7. Heated seats switch
With the engine running, the front seats
can be heated separately.
� Use the adjustment dial, placed on
the side of each front seat, to switch
on and select the level of heating re-
quired:
0
: Off.
1
: Low.
2
: Medium.
3
: High.
They can also be removed; to remove them:
� pull the head restraint upwards to
the stop,
� then, press the lug.
6. Armrests (except 3 door)
These can be folded down and are re-
movable.
� To remove them, press the button
located between the armrest and
the side of the seat and pull it.
Page 47 of 267
!
i
58
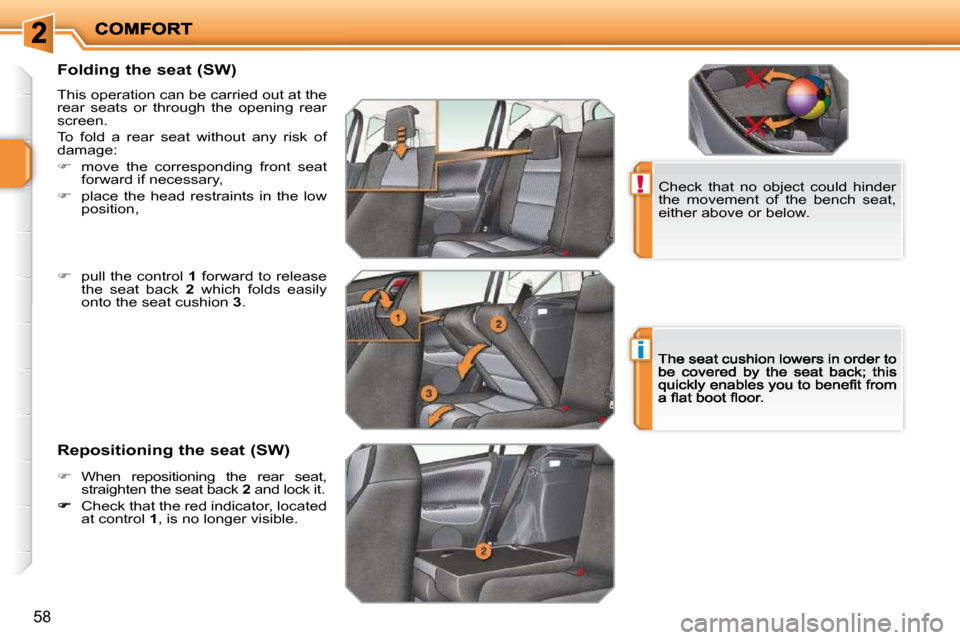
Folding the seat (SW)
This operation can be carried out at the rear seats or through the opening rear screen.
To fold a rear seat without any risk of
damage:
� move the corresponding front seat
forward if necessary,
� place the head restraints in the low
position, Check that no object could hinder
the movement of the bench seat,
either above or below.
Repositioning the seat (SW)
� pull the control 1 forward to release
the seat back 2 which folds easily
onto the seat cushion 3 .
� When repositioning the rear seat,
straighten the seat back 2 and lock it.
Check that the red indicator, located at control 1 , is no longer visible.
Page 48 of 267
i
!
59
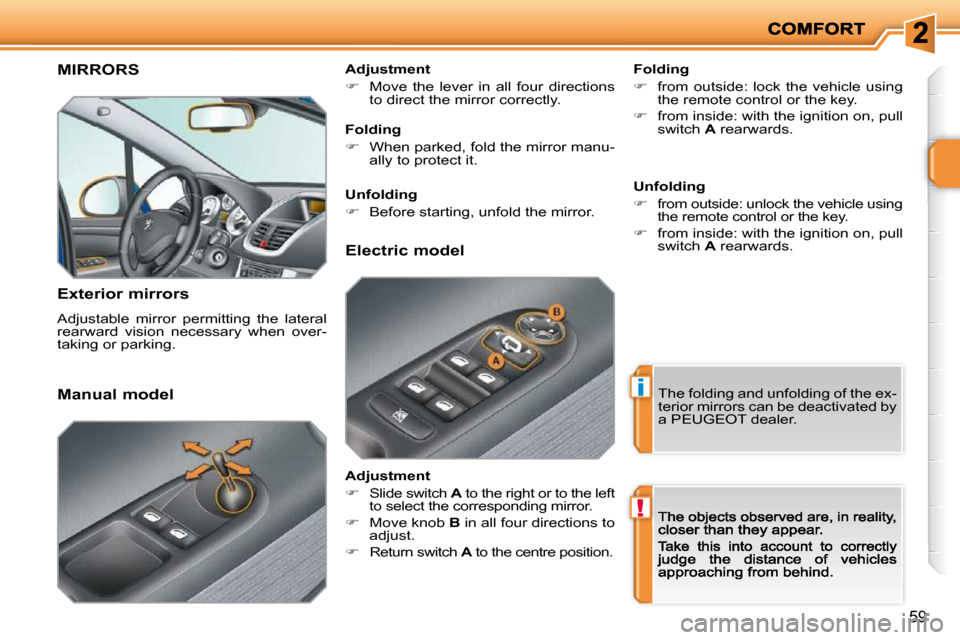
MIRRORS
Exterior mirrors
Adjustable mirror permitting the lateral
rearward vision necessary when over-
taking or parking. Folding
� from outside: lock the vehicle using
the remote control or the key.
� from inside: with the ignition on, pull
switch A rearwards.
Manual model � � �A�d�j�u�s�t�m�e�n�t�
� Move the lever in all four directions
to direct the mirror correctly.
The folding and unfolding of the ex-
terior mirrors can be deactivated by
a PEUGEOT dealer.
Folding
� When parked, fold the mirror manu-
ally to protect it.
Unfolding
� Before starting, unfold the mirror.
Electric model
� � �A�d�j�u�s�t�m�e�n�t�
� Slide switch A to the right or to the left
to select the corresponding mirror.
� Move knob B in all four directions to
adjust.
� Return switch A to the centre position. Unfolding
� from outside: unlock the vehicle using
the remote control or the key.
� from inside: with the ignition on, pull
switch A rearwards.
Page 49 of 267
!
i
60
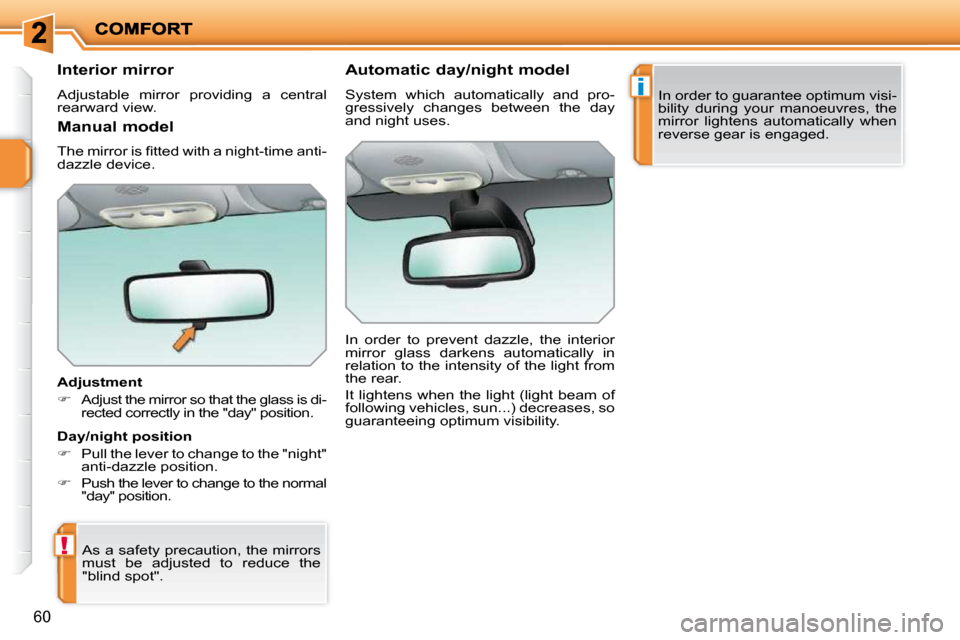
Interior mirror
Adjustable mirror providing a central
rearward view.
� � �A�d�j�u�s�t�m�e�n�t�
� Adjust the mirror so that the glass is di-
�r�e�c�t�e�d� �c�o�r�r�e�c�t�l�y� �i�n� �t�h�e� �"�d�a�y�"� �p�o�s�i�t�i�o�n�.� � �
As a safety precaution, the mirrors
must be adjusted to reduce the
�"�b�l�i�n�d� �s�p�o�t�"�.� � � Automatic day/night model
System which automatically and pro-
gressively changes between the day
and night uses.
In order to prevent dazzle, the interior
mirror glass darkens automatically in
relation to the intensity of the light from
the rear.
It lightens when the light (light beam of
following vehicles, sun...) decreases, so
guaranteeing optimum visibility.
Manual model
� �T�h�e� �m�i�r�r�o�r� �i�s� �fi� �t�t�e�d� �w�i�t�h� �a� �n�i�g�h�t�-�t�i�m�e� �a�n�t�i�-
dazzle device.
Day/night position
� � � �P�u�l�l� �t�h�e� �l�e�v�e�r� �t�o� �c�h�a�n�g�e� �t�o� �t�h�e� �"�n�i�g�h�t�"�
anti-dazzle position.
� Push the lever to change to the normal
�"�d�a�y�"� �p�o�s�i�t�i�o�n�.� � In order to guarantee optimum visi-
bility during your manoeuvres, the
mirror lightens automatically when
reverse gear is engaged.
Page 50 of 267
!
i
61
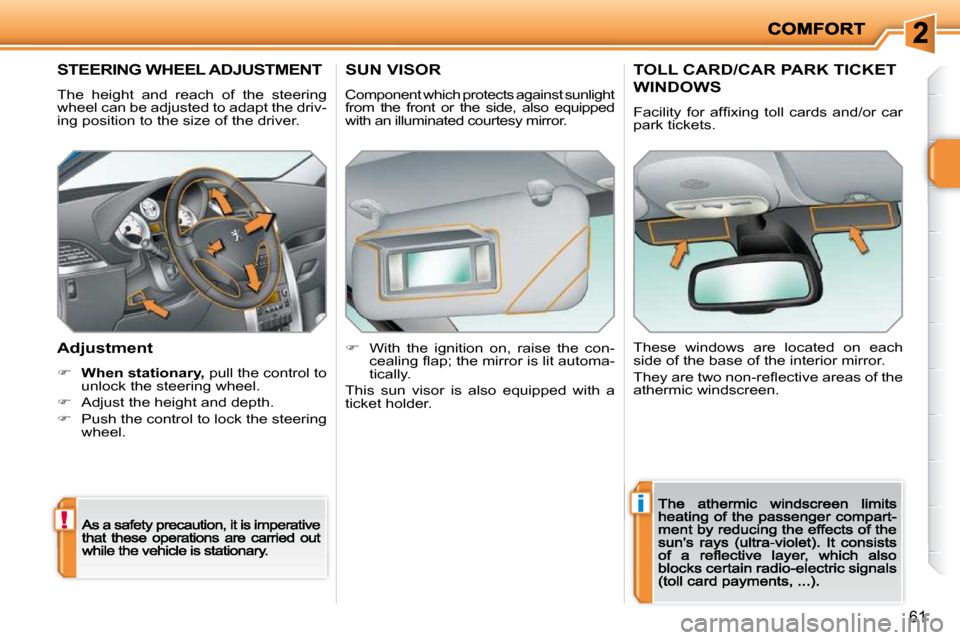
STEERING WHEEL ADJUSTMENT
The height and reach of the steering
wheel can be adjusted to adapt the driv-
ing position to the size of the driver.
� � �A�d�j�u�s�t�m�e�n�t�
� When stationary,stationarystationary pull the control to unlock the steering wheel.
� Adjust the height and depth.
� Push the control to lock the steering wheel.
SUN VISOR
Component which protects against sunlight
from the front or the side, also equipped
with an illuminated courtesy mirror.
� With the ignition on, raise the con-
�c�e�a�l�i�n�g� �fl� �a�p�;� �t�h�e� �m�i�r�r�o�r� �i�s� �l�i�t� �a�u�t�o�m�a�-
tically.
This sun visor is also equipped with a
ticket holder.
TOLL CARD/CAR PARK TICKET
WINDOWS
� �F�a�c�i�l�i�t�y� �f�o�r� �a�f�fi� �x�i�n�g� �t�o�l�l� �c�a�r�d�s� �a�n�d�/�o�r� �c�a�r�
park tickets.
These windows are located on each
side of the base of the interior mirror.
� �T�h�e�y� �a�r�e� �t�w�o� �n�o�n�-�r�e�fl� �e�c�t�i�v�e� �a�r�e�a�s� �o�f� �t�h�e�
athermic windscreen.