fog light bulb Peugeot 208 2015 Owner's Manual - RHD (UK, Australia)
[x] Cancel search | Manufacturer: PEUGEOT, Model Year: 2015, Model line: 208, Model: Peugeot 208 2015Pages: 341, PDF Size: 38.75 MB
Page 6 of 341
4
208_en_Chap01_vue-ensemble_ed01-2015
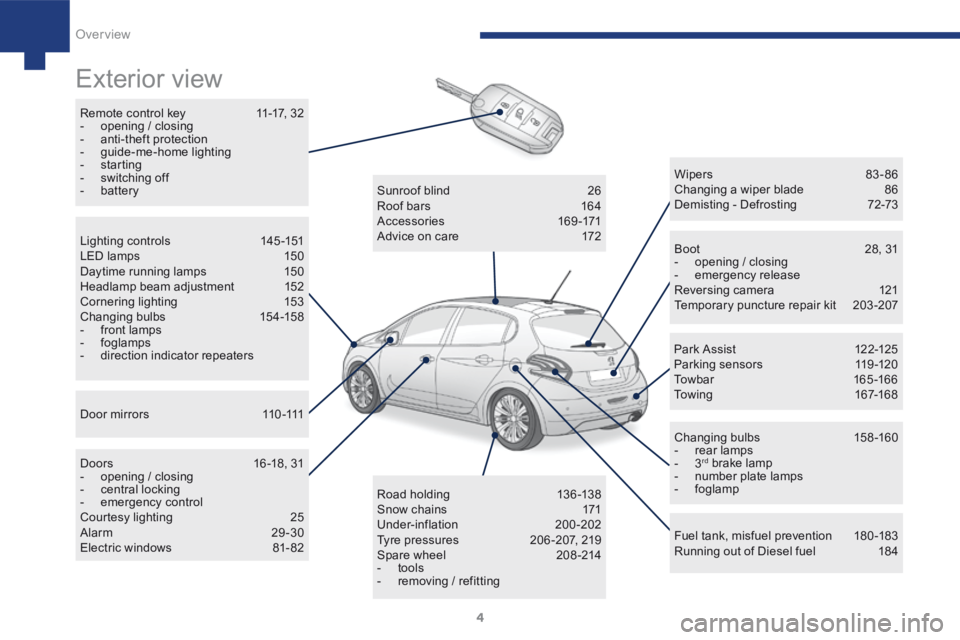
Exterior view
Remote control key 11-17, 32
- opening / closing
- anti-theft protection
- guide-me-home lighting
- starting
- switching off
- battery
Boot 28, 31
- opening / closing
- emergency release
Reversing camera 121
Temporary puncture repair kit 203-207
Wipers 83 - 86
Changing a wiper blade
86
Demisting - Defrosting 72-73
Changing bulbs 158-160
- rear lamps
- 3
rd brake lamp
- number plate lamps
- foglamp
Fuel tank, misfuel prevention 180-183
Running out of Diesel fuel 184
Sunroof blind
26
Roof bars 164
Accessories 169-171
Advice on care 172
Road holding 13 6 -13 8
Snow chains 171
Under-inflation 200-202
Tyre pressures 206 -207, 219
Spare wheel 208-214
- tools
- removing / refitting
Lighting controls
145-151
LED lamps 150
Daytime running lamps 150
Headlamp beam adjustment 152
Cornering lighting 153
Changing bulbs 154-158
- front lamps
- foglamps
- direction indicator repeaters
D o o r m i r r o r s 11 0 -111
Doors 16 -18, 31
- opening / closing
- central locking
- emergency control
Courtesy lighting 25
Alarm 29-30
Electric windows 81- 82 Par k A ssist
12 2-125
Parking sensors 119-120
Towbar 165 -166
Towing 167-168
Over view
Page 156 of 341
154
208_en_Chap06_Feux-Signalisations_ed01-2015
Changing a bulb
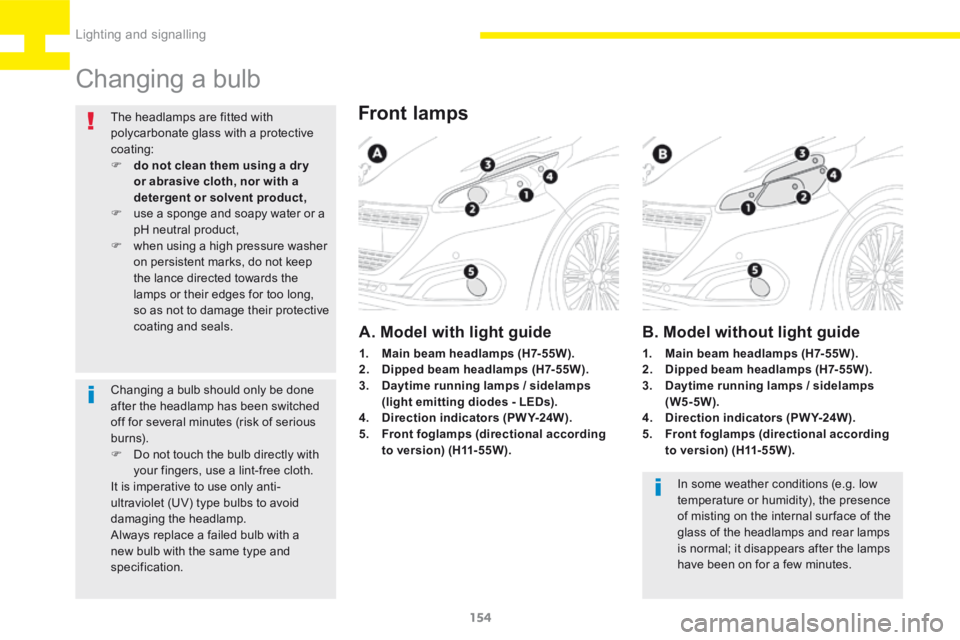
Front lamps
A. Model with light guide
In some weather conditions (e.g. low
temperature or humidity), the presence
of misting on the internal sur face of the
glass of the headlamps and rear lamps
is normal; it disappears after the lamps
have been on for a few minutes.
The headlamps are fitted with
polycarbonate glass with a protective
coating:
F
do not clean them using a dr y
or abrasive cloth, nor with a
detergent or solvent product,
F use a sponge and soapy water or a
pH neutral product,
F when using a high pressure washer
on persistent marks, do not keep
the lance directed towards the
lamps or their edges for too long,
so as not to damage their protective
coating and seals.
B. Model without light guide
1. Main beam headlamps (H7-55W).
2. Dipped beam headlamps (H7-55W).
3. Daytime running lamps / sidelamps
(light emitting diodes - LEDs).
4. Direction indicators (PWY-24W).
5. Front foglamps (directional according
to version) (H11-55W). 1.
Main beam headlamps (H7-55W).
2. Dipped beam headlamps (H7-55W).
3. Daytime running lamps / sidelamps
(W5-5W).
4. Direction indicators (PWY-24W).
5. Front foglamps (directional according
to version) (H11-55W).
Changing a bulb should only be done
after the headlamp has been switched
off for several minutes (risk of serious
burns).
F
Do not touch the bulb directly with
your fingers, use a lint-free cloth.
It is imperative to use only anti-
ultraviolet (UV) type bulbs to avoid
damaging the headlamp.
Always replace a failed bulb with a
new bulb with the same type and
specification.
Lighting and signalling
Page 157 of 341
155
208_en_Chap06_Feux-Signalisations_ed01-2015
Amber coloured bulbs, such as the
direction indicators, must be replaced
with bulbs of identical specifications
and colour.
When refitting, close the protective
cover carefully to preserve the sealing
of the headlamp.
Rapid flashing of the direction indicator
warning lamp (right or left) indicates the
failure of a bulb on that side.
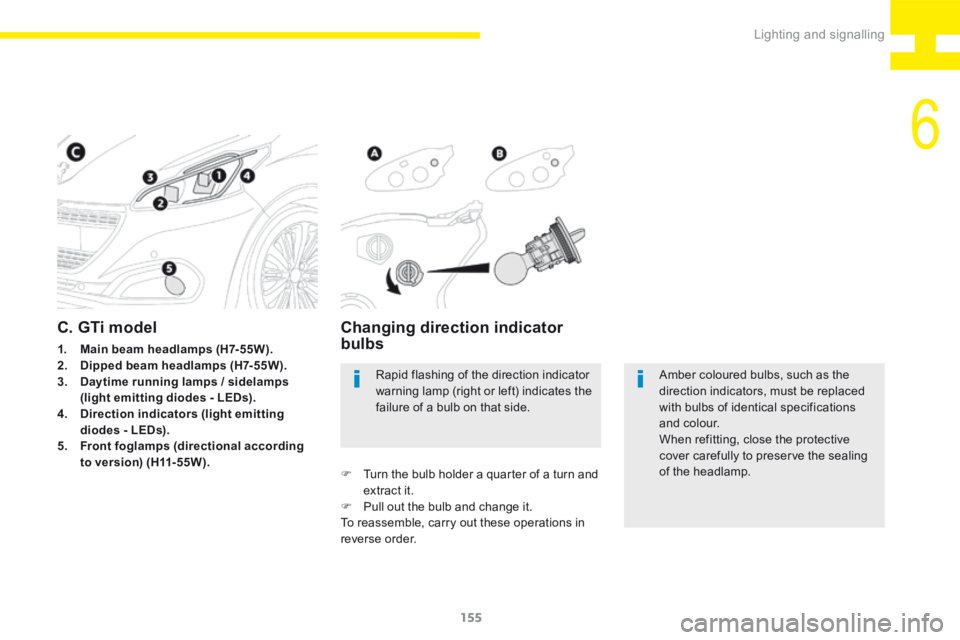
Changing direction indicator
bulbs
F
Turn the bulb holder a quarter of a turn and
extract it.
F Pull out the bulb and change it.
To reassemble, carry out these operations in
reverse order.
C. GTi model
1. Main beam headlamps (H7-55W).
2. Dipped beam headlamps (H7-55W).
3. Daytime running lamps / sidelamps
(light emitting diodes - LEDs).
4. Direction indicators (light emitting
diodes - LEDs).
5. Front foglamps (directional according
to version) (H11-55W).
6
Lighting and signalling
Page 159 of 341
157
208_en_Chap06_Feux-Signalisations_ed01-2015
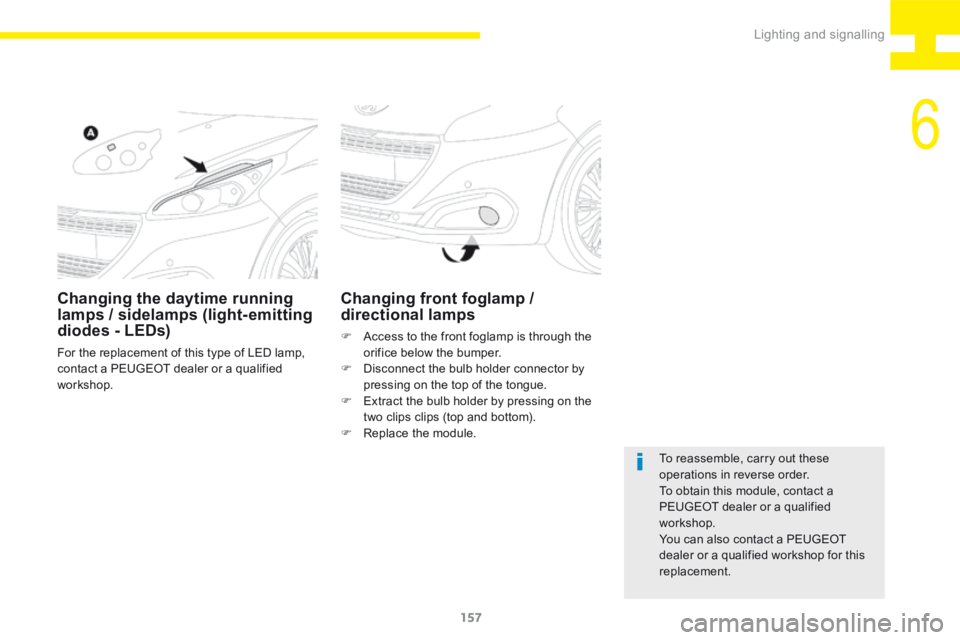
Changing the daytime running
lamps / sidelamps (light- emitting
diodes - LEDs)
For the replacement of this type of LED lamp,
contact a PEUGEOT dealer or a qualified
workshop.
Changing front foglamp /
directional lamps
F Access to the front foglamp is through the
orifice below the bumper.
F Disconnect the bulb holder connector by
pressing on the top of the tongue.
F Extract the bulb holder by pressing on the
two clips clips (top and bottom).
F Replace the module.
To reassemble, carry out these
operations in reverse order.
To obtain this module, contact a
PEUGEOT dealer or a qualified
workshop.
You can also contact a PEUGEOT
dealer or a qualified workshop for this
replacement.
6
Lighting and signalling
Page 160 of 341
158
208_en_Chap06_Feux-Signalisations_ed01-2015
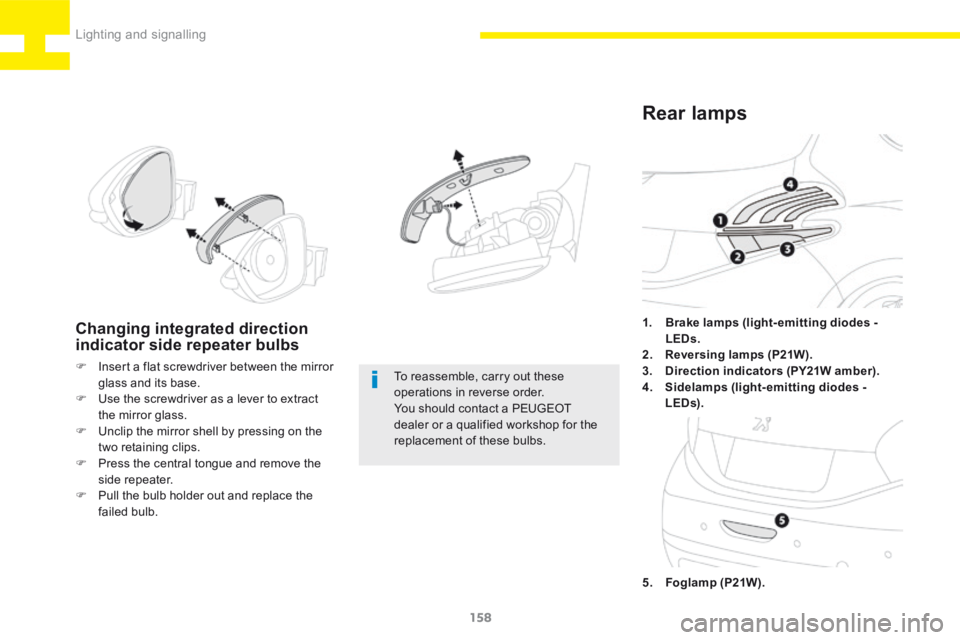
1. Brake lamps (light- emitting diodes -
LEDs.
2. Reversing lamps (P21W).
3. Direction indicators (PY21W amber).
4. Sidelamps (light-emitting diodes -
LEDs).
Rear lamps
5. Foglamp (P21W).
Changing integrated direction
indicator side repeater bulbs
F Insert a flat screwdriver between the mirror
glass and its base.
F Use the screwdriver as a lever to extract
the mirror glass.
F Unclip the mirror shell by pressing on the
two retaining clips.
F Press the central tongue and remove the
side repeater.
F Pull the bulb holder out and replace the
failed bulb. To reassemble, carry out these
operations in reverse order.
You should contact a PEUGEOT
dealer or a qualified workshop for the
replacement of these bulbs.
Lighting and signalling
Page 162 of 341
160
208_en_Chap06_Feux-Signalisations_ed01-2015
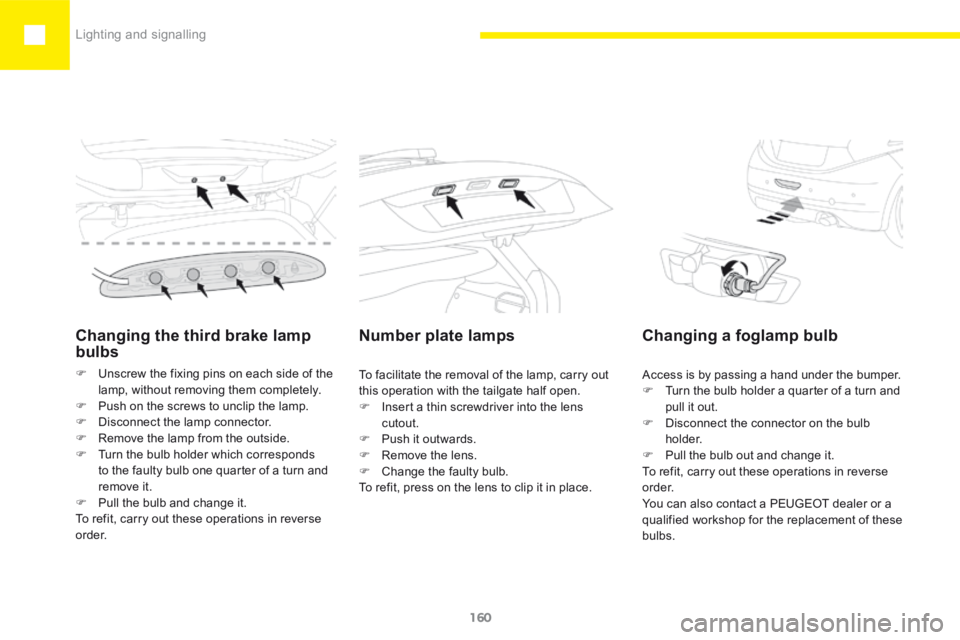
Changing the third brake lamp
bulbs
F Unscrew the fixing pins on each side of the
lamp, without removing them completely.
F Push on the screws to unclip the lamp.
F Disconnect the lamp connector.
F Remove the lamp from the outside.
F Turn the bulb holder which corresponds
to the faulty bulb one quarter of a turn and
remove it.
F Pull the bulb and change it.
To refit, carry out these operations in reverse
o r d e r.
Number plate lamps
To facilitate the removal of the lamp, carry out
this operation with the tailgate half open.
F Insert a thin screwdriver into the lens
cutout.
F Push it outwards.
F Remove the lens.
F Change the faulty bulb.
To refit, press on the lens to clip it in place. Access is by passing a hand under the bumper.
F
Turn the bulb holder a quarter of a turn and
pull it out.
F Disconnect the connector on the bulb
h o l d e r.
F Pull the bulb out and change it.
To refit, carry out these operations in reverse
o r d e r.
You can also contact a PEUGEOT dealer or a
qualified workshop for the replacement of these
bulbs.
Changing a foglamp bulb
Lighting and signalling