Peugeot 308 2014.5 - RHD (UK, Australia) Owners Manual
Manufacturer: PEUGEOT, Model Year: 2014.5,
Model line: 308,
Model: Peugeot 308 2014.5
Pages: 415, PDF Size: 11.57 MB
Peugeot 308 2014.5 - RHD (UK, Australia) Owners Manual
308 2014.5
Peugeot
Peugeot
https://www.carmanualsonline.info/img/29/28728/w960_28728-0.png
Peugeot 308 2014.5 - RHD (UK, Australia) Owners Manual
Trending: snow chains, wheel, engine oil capacity, USB port, relay, diagnostic menu, bluetooth
Page 91 of 415
89
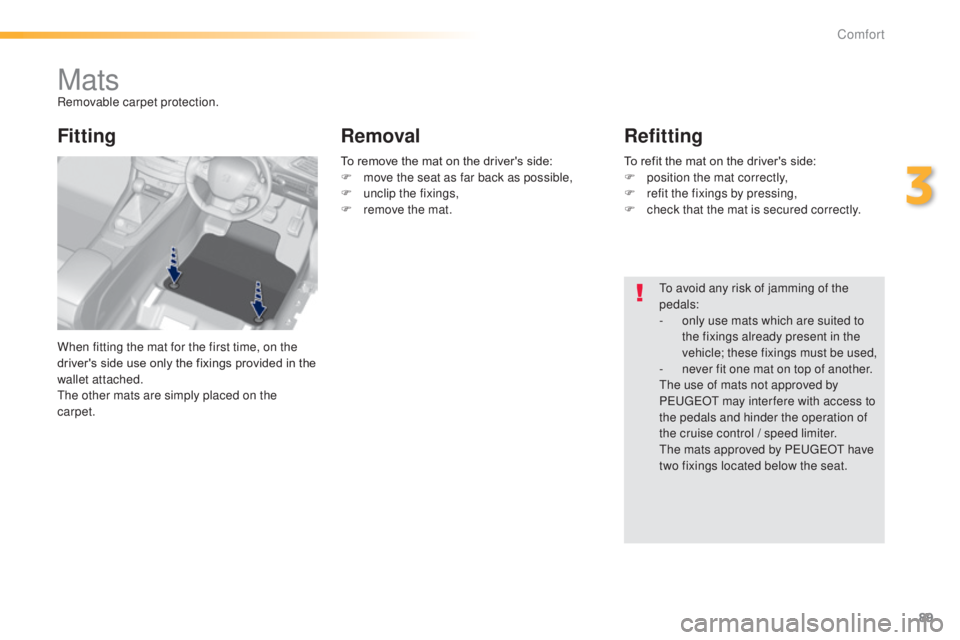
MatsRemovable carpet protection.
When fitting the mat for the first time, on the
driver's side use only the fixings provided in the
wallet attached.
th
e other mats are simply placed on the
carpet.
Fitting RemovalRefitting
to avoid any risk of jamming of the
pedals:
-
o
nly use mats which are suited to
the fixings already present in the
vehicle; these fixings must be used,
-
n
ever fit one mat on top of another.
th
e use of mats not approved by
P
e
uge
Ot
may inter fere with access to
the pedals and hinder the operation of
the cruise control / speed limiter.
th
e mats approved by P
e
uge
Ot
have
two fixings located below the seat.
To remove the mat on the driver's side:
F
m
ove the seat as far back as possible,
F
un
clip the fixings,
F
r
emove the mat.
To refit the mat on the driver's side:
F
p
osition the mat correctly,
F
r
efit the fixings by pressing,
F
c
heck that the mat is secured correctly.
3
Comfort
Page 92 of 415
90
Front armrest
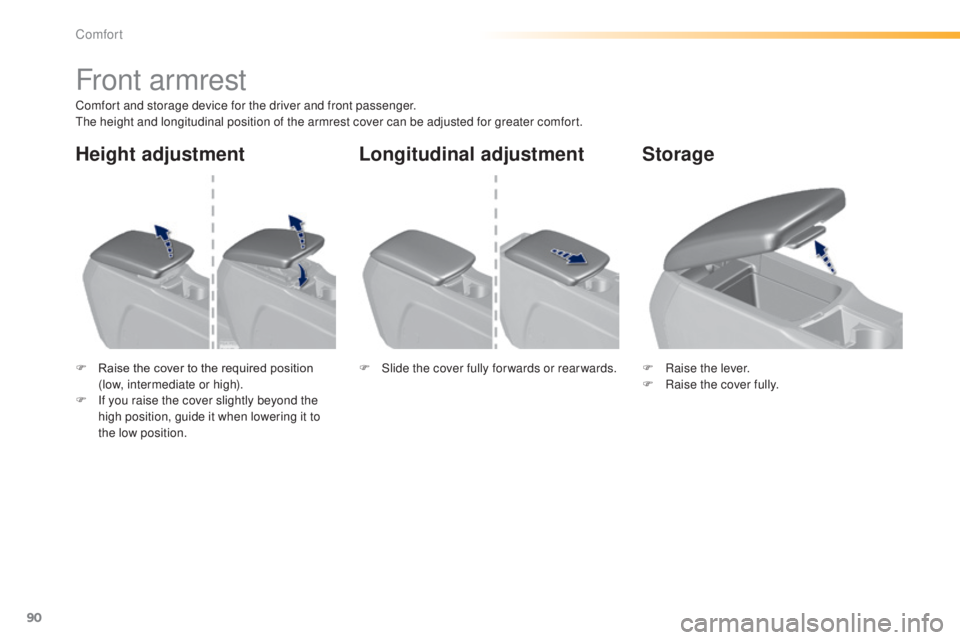
Comfort and storage device for the driver and front passenger.the height and longitudinal position of the armrest cover can be adjusted for greater comfort.
F
R
aise the cover to the required position
(low, intermediate or high).
F
I
f you raise the cover slightly beyond the
high position, guide it when lowering it to
the low position. F
Ra
ise the lever.
F
Ra
ise the cover fully.
F
S
lide the cover fully for wards or rear wards.
Storage
Longitudinal adjustment
Height adjustment
Comfort
Page 93 of 415
91
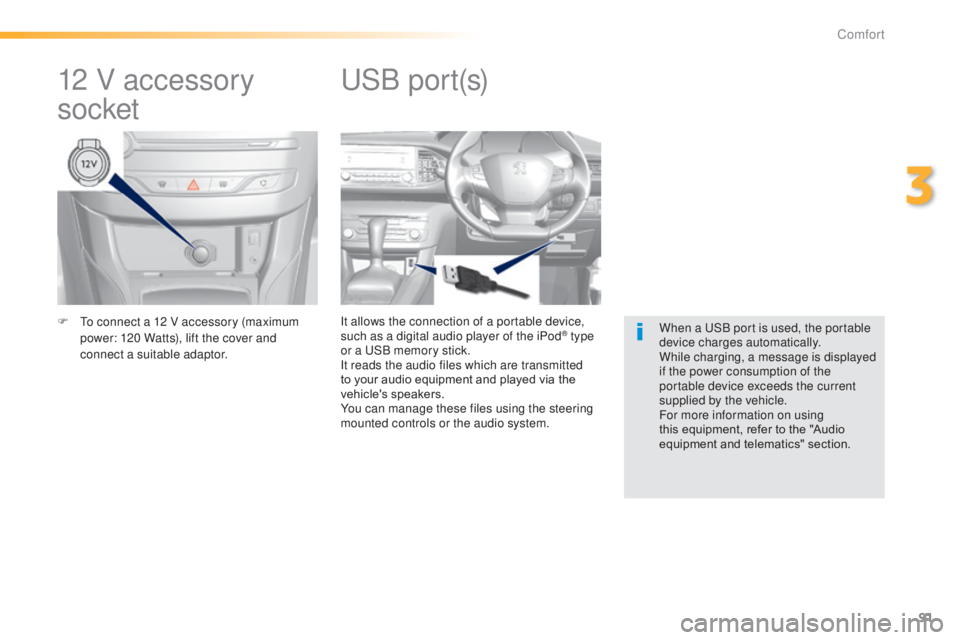
F to connect a 12 V accessory (maximum power: 120 Watts), lift the cover and
connect a suitable adaptor. It allows the connection of a portable device,
such as a digital audio player of the iPod® type
or a
uS
B memory stick.
It reads the audio files which are transmitted
to your audio equipment and played via the
vehicle's speakers.
You can manage these files using the steering
mounted controls or the audio system.
12 V accessory
socketuSB p ort(s)
When a uSB port is used, the portable
device charges automatically.
While charging, a message is displayed
if the power consumption of the
portable device exceeds the current
supplied by the vehicle.
For more information on using
this equipment, refer to the "Audio
equipment and telematics" section.
3
Comfort
Page 94 of 415
92
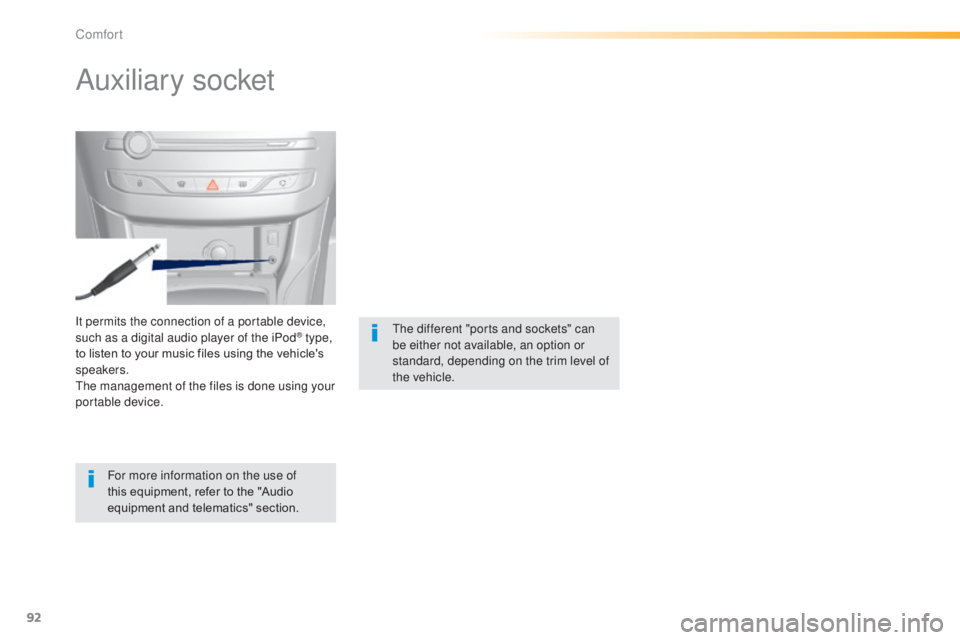
It permits the connection of a portable device,
such as a digital audio player of the iPod® type,
to listen to your music files using the vehicle's
speakers.
th
e management of the files is done using your
portable device.
Auxiliary socket
For more information on the use of
this equipment, refer to the "Audio
equipment and telematics" section.
th
e different "ports and sockets" can
be either not available, an option or
standard, depending on the trim level of
the vehicle.
Comfort
Page 95 of 415
93
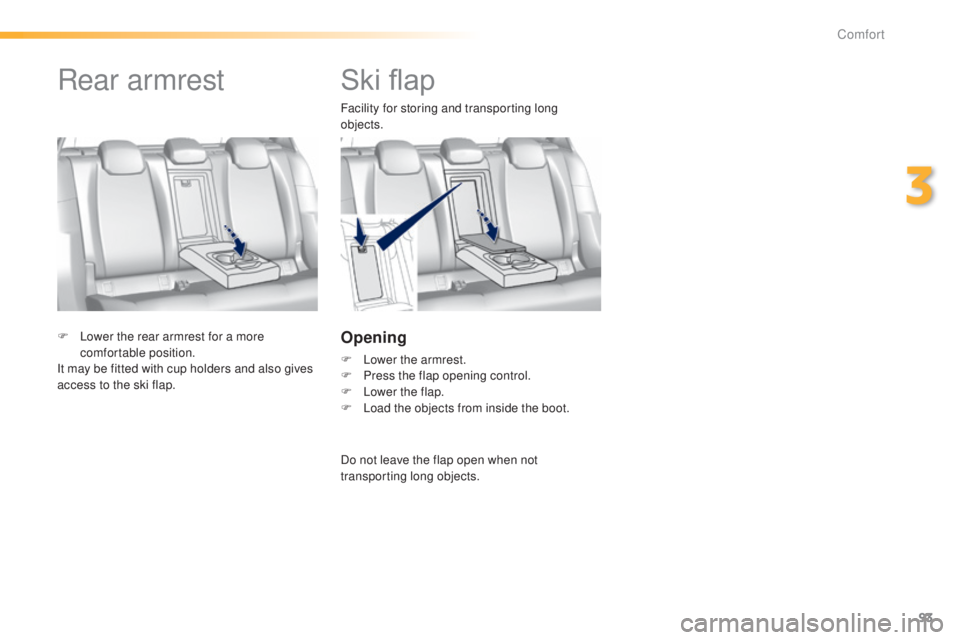
Ski flap
Facility for storing and transporting long
objects.
Opening
F Lower the armrest.
F P ress the flap opening control.
F
L
ower the flap.
F
L
oad the objects from inside the boot.
F
L
ower the rear armrest for a more
comfortable position.
It may be fitted with cup holders and also gives
access to the ski flap.
Rear armrest
Do not leave the flap open when not
transporting long objects.
3
Comfort
Page 96 of 415
94
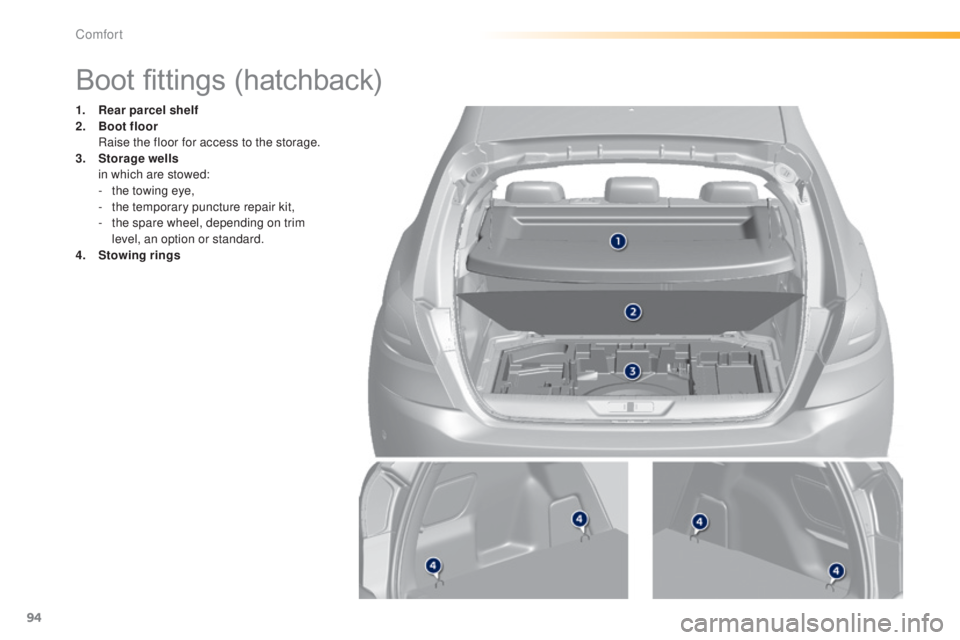
Boot fittings (hatchback)
1. Rear parcel shelf
2. Boot floor
R
aise the floor for access to the storage.
3.
S
torage wells
i
n which are stowed:
-
t
he towing eye,
-
t
he temporary puncture repair kit,
-
t
he spare wheel, depending on trim
level, an option or standard.
4.
S
towing rings
Comfort
Page 97 of 415
95
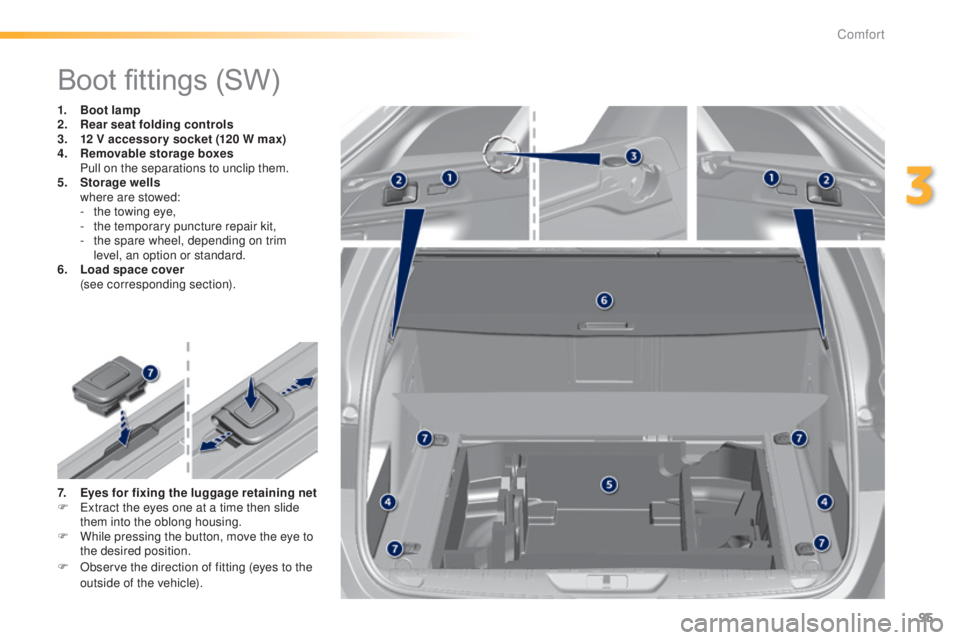
Boot fittings (SW)
1. Boot lamp
2. Rear seat folding controls
3.
1
2 V accessor y socket (120 W max)
4.
R
emovable storage boxes
P
ull on the separations to unclip them.
5.
S
torage wells
w
here are stowed:
-
t
he towing eye,
-
t
he temporary puncture repair kit,
-
t
he spare wheel, depending on trim
level, an option or standard.
6.
L
oad space cover
(
see corresponding section).
7.
E
yes for fixing the luggage retaining net
F
e
x
tract the eyes one at a time then slide
them into the oblong housing.
F
W
hile pressing the button, move the eye to
the desired position.
F
O
bserve the direction of fitting (eyes to the
outside of the vehicle).
3
Comfort
Page 98 of 415
96
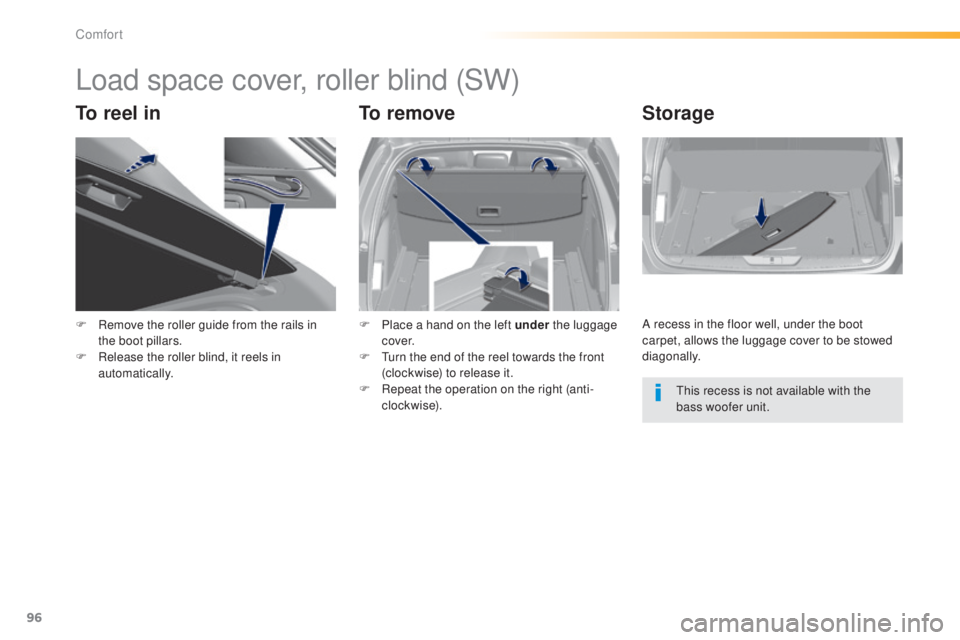
Load space cover, roller blind (SW)
To reel inTo removeStorage
F Remove the roller guide from the rails in
the boot pillars.
F
R
elease the roller blind, it reels in
automatically. F
P lace a hand on the left under
the luggage
c ove r.
F
t
u
rn the end of the reel towards the front
(clockwise) to release it.
F
R
epeat the operation on the right (anti-
clockwise). A recess in the floor well, under the boot
carpet, allows the luggage cover to be stowed
diagonally.
th
is recess is not available with the
bass woofer unit.
Comfort
Page 99 of 415
97
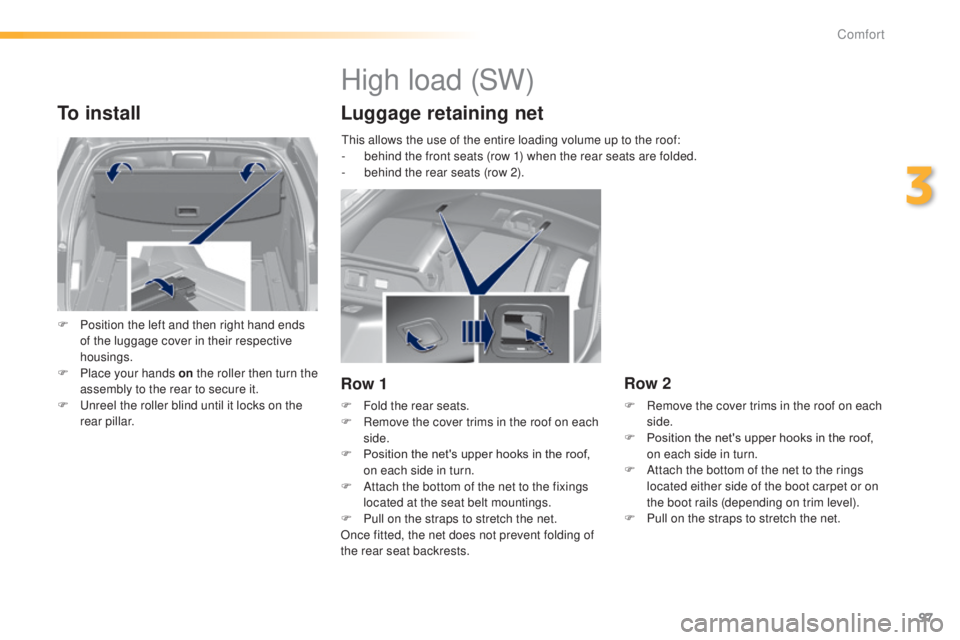
To install
F Position the left and then right hand ends of the luggage cover in their respective
housings.
F
P
lace your hands on the roller then turn the
assembly to the rear to secure it.
F
u
n
reel the roller blind until it locks on the
rear pillar.
High load (SW)
Luggage retaining net
Row 1
F Fold the rear seats.
F R emove the cover trims in the roof on each
side.
F
P
osition the net's upper hooks in the roof,
on each side in turn.
F
A
ttach the bottom of the net to the fixings
located at the seat belt mountings.
F
P
ull on the straps to stretch the net.
Once fitted, the net does not prevent folding of
the rear seat backrests.
Row 2
F Remove the cover trims in the roof on each side.
F
P
osition the net's upper hooks in the roof,
on each side in turn.
F
A
ttach the bottom of the net to the rings
located either side of the boot carpet or on
the boot rails (depending on trim level).
F
P
ull on the straps to stretch the net.
th
is allows the use of the entire loading volume up to the roof:
-
b
ehind the front seats (row 1) when the rear seats are folded.
-
b
ehind the rear seats (row 2).
3
Comfort
Page 100 of 415
98
Warning triangle (stowing)
Before getting out of your vehicle to
assemble the triangle and place it on
the road, put on your high visibility vest.
th
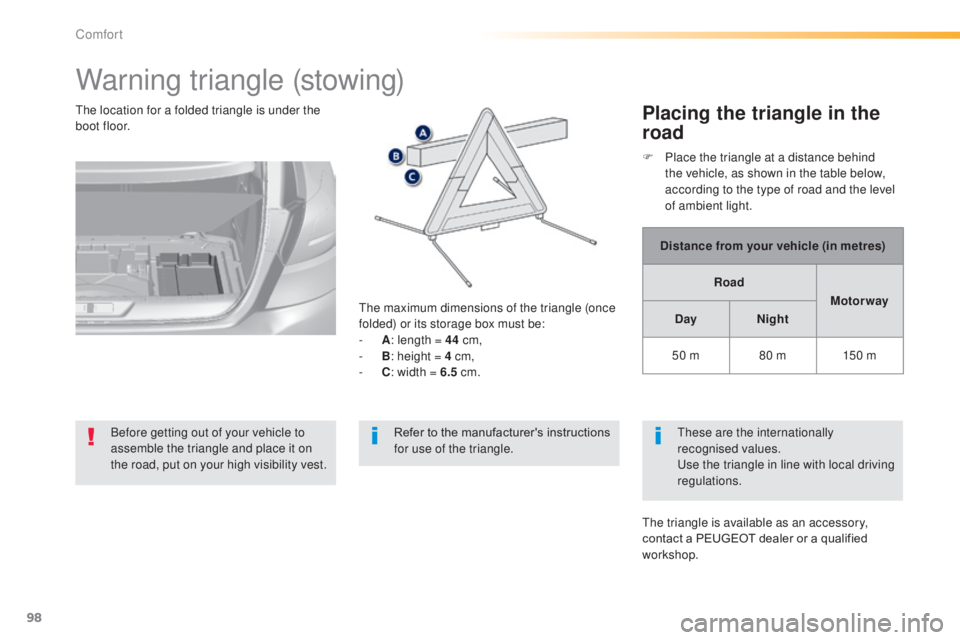
e maximum dimensions of the triangle (once
folded) or its storage box must be:
-
A
: l
ength = 44
cm,
-
B
: h
eight = 4 cm,
-
C
: w
idth = 6.5
cm.
th
e location for a folded triangle is under the
boot floor.
Placing the triangle in the
road
Distance from your vehicle (in metres)
Road Motor way
Day Night
50 m 80 m 150 m
th
ese are the internationally
recognised values.
us
e the triangle in line with local driving
regulations.
th
e triangle is available as an accessory,
contact a PEUGEOT dealer or a qualified
workshop. F
P
lace the triangle at a distance behind
the vehicle, as shown in the table below,
according to the type of road and the level
of ambient light.
Refer to the manufacturer's instructions
for use of the triangle.
Comfort
Trending: tyre pressure, light, battery replacement, roof rack, pairing phone, radio controls, check oil
