Peugeot 308 2014.5 - RHD (UK, Australia) Manual Online
Manufacturer: PEUGEOT, Model Year: 2014.5,
Model line: 308,
Model: Peugeot 308 2014.5
Pages: 415, PDF Size: 11.57 MB
Peugeot 308 2014.5 - RHD (UK, Australia) Manual Online
308 2014.5
Peugeot
Peugeot
https://www.carmanualsonline.info/img/29/28728/w960_28728-0.png
Peugeot 308 2014.5 - RHD (UK, Australia) Manual Online
Trending: bonnet, horn, lock, wheel size, deactivate passenger airbag, weight, adblue
Page 81 of 415
79
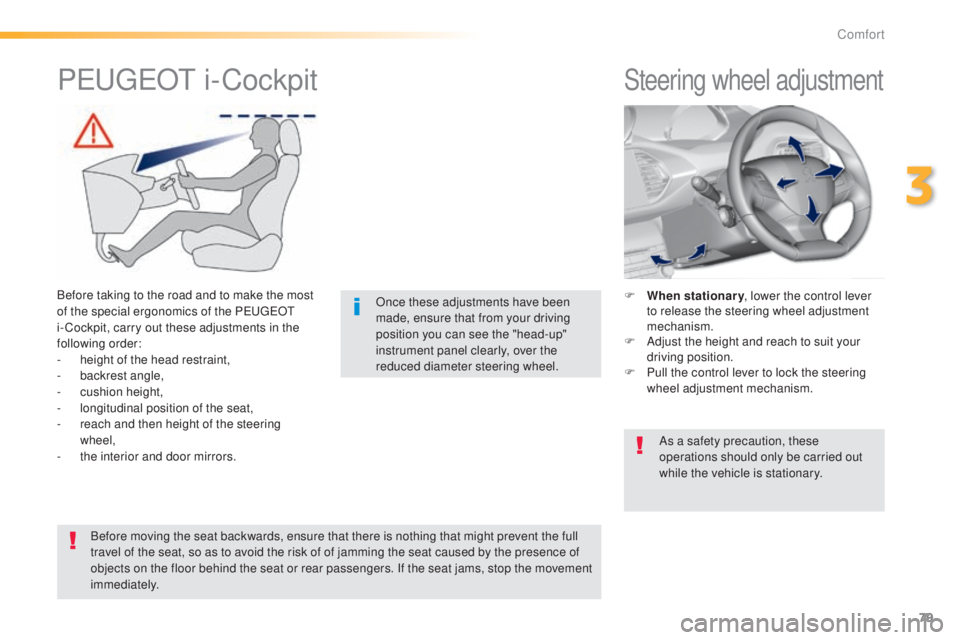
Steering wheel adjustment
F When stationary , lower the control lever
to release the steering wheel adjustment
mechanism.
F
A
djust the height and reach to suit your
driving position.
F
P
ull the control lever to lock the steering
wheel ad justment mechanism.
As a safety precaution, these
operations should only be carried out
while the vehicle is stationary.
PeugeOt i -Cockpit
Before taking to the road and to make the most
of the special ergonomics of the Pe
ugeOt
i- Cockpit, carry out these adjustments in the
following order:
-
h
eight of the head restraint,
-
b
ackrest angle,
-
c
ushion height,
-
l
ongitudinal position of the seat,
-
r
each and then height of the steering
wheel,
-
t
he interior and door mirrors. Once these adjustments have been
made, ensure that from your driving
position you can see the "head-up"
instrument panel clearly, over the
reduced diameter steering wheel.
Before moving the seat backwards, ensure that there is nothing that might prevent the full
travel of the seat, so as to avoid the risk of of jamming the seat caused by the presence of
objects on the floor behind the seat or rear passengers. If the seat jams, stop the movement
immediately.
3
Comfort
Page 82 of 415
80
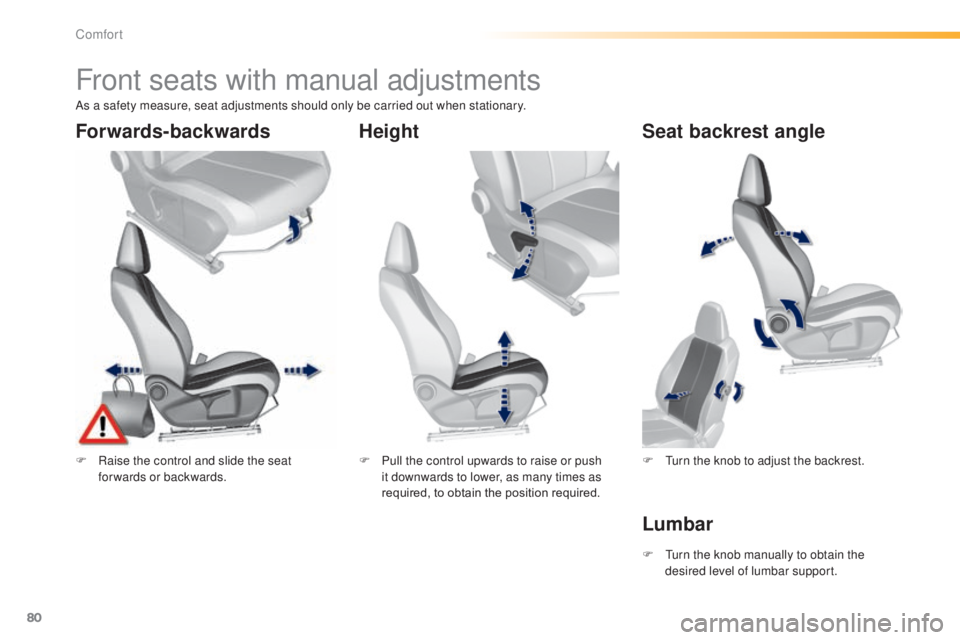
Front seats with manual adjustments
F Raise the control and slide the seat forwards or backwards. F
P ull the control upwards to raise or push
it downwards to lower, as many times as
required, to obtain the position required. F
tu rn the knob to adjust the backrest.
Forwards-backwards
HeightSeat backrest angle
As a safety measure, seat adjustments should only be carried out when stationary.
F t
u
rn the knob manually to obtain the
desired level of lumbar support.
Lumbar
Comfort
Page 83 of 415
Page 84 of 415
Page 85 of 415
83
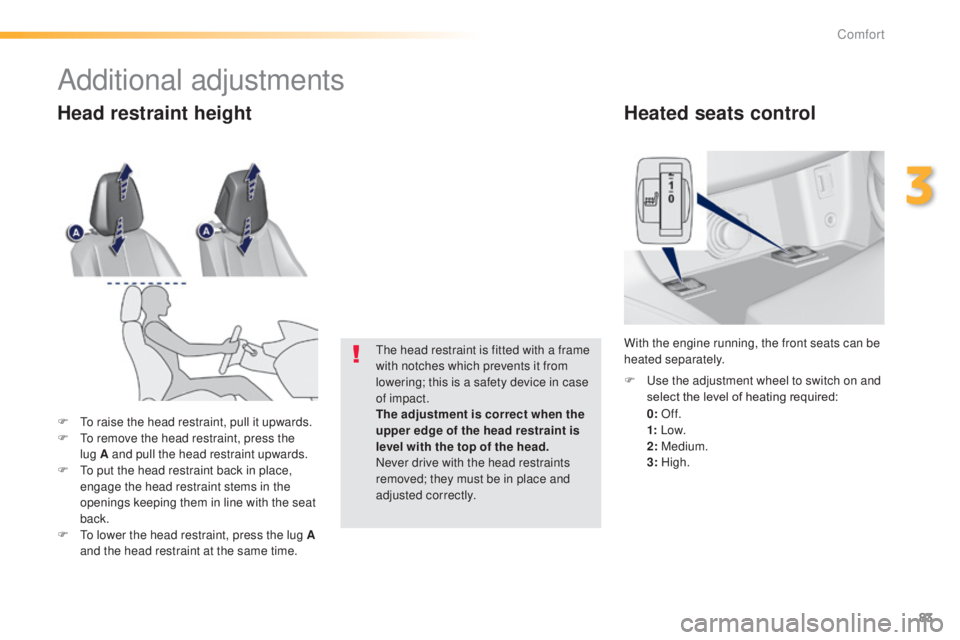
Heated seats control
0: Of f.
1: Low.
2: Medium.
3: High.
F
u
s
e the adjustment wheel to switch on and
select the level of heating required:
With the engine running, the front seats can be
heated separately.
F
to r
aise the head restraint, pull it upwards.
F
t
o r
emove the head restraint, press the
lug
A and pull the head restraint upwards.
F
t
o p
ut the head restraint back in place,
engage the head restraint stems in the
openings keeping them in line with the seat
back.
F
t
o l
ower the head restraint, press the lug A
and the head restraint at the same time.
th
e head restraint is fitted with a frame
with notches which prevents it from
lowering; this is a safety device in case
of impact.
The adjustment is correct when the
upper edge of the head restraint is
level with the top of the head.
Never drive with the head restraints
removed; they must be in place and
adjusted correctly.
Head restraint height
Additional adjustments
3
Comfort
Page 86 of 415
84
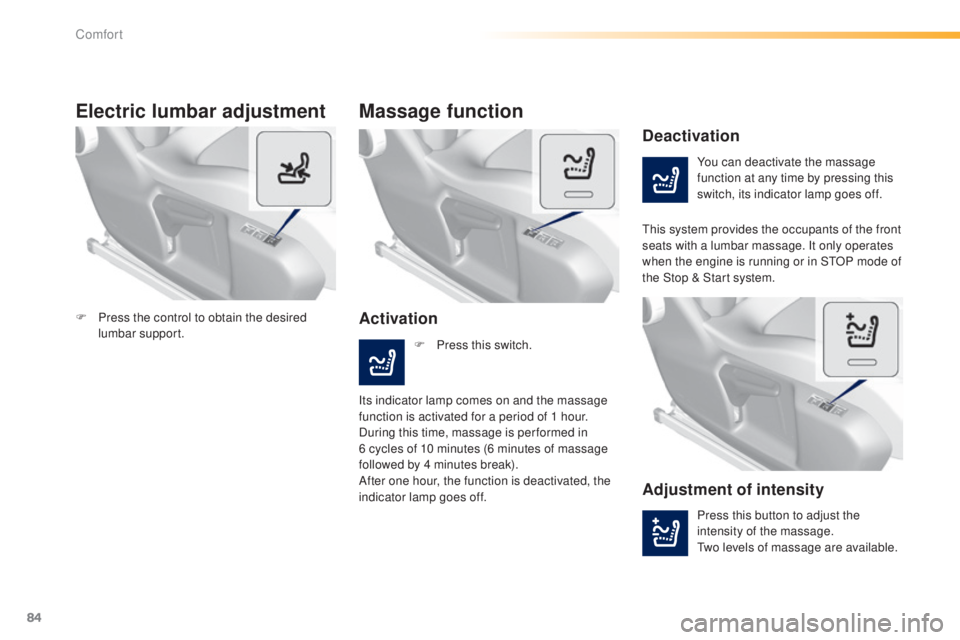
Electric lumbar adjustment
You can deactivate the massage
function at any time by pressing this
switch, its indicator lamp goes off.
Deactivation
Activation
Massage function
this system provides the occupants of the front
seats with a lumbar massage. It only operates
when the engine is running or in S
tO
P mode of
the Stop & Start system.
F
P
ress this switch.
Its indicator lamp comes on and the massage
function is activated for a period of 1 hour.
During this time, massage is per formed in
6 cycles of 10 minutes (6 minutes of massage
followed by 4 minutes break).
After one hour, the function is deactivated, the
indicator lamp goes off.
Adjustment of intensity
Press this button to adjust the
intensity of the massage.
tw
o levels of massage are available.
F
P
ress the control to obtain the desired
lumbar support.
Comfort
Page 87 of 415
85
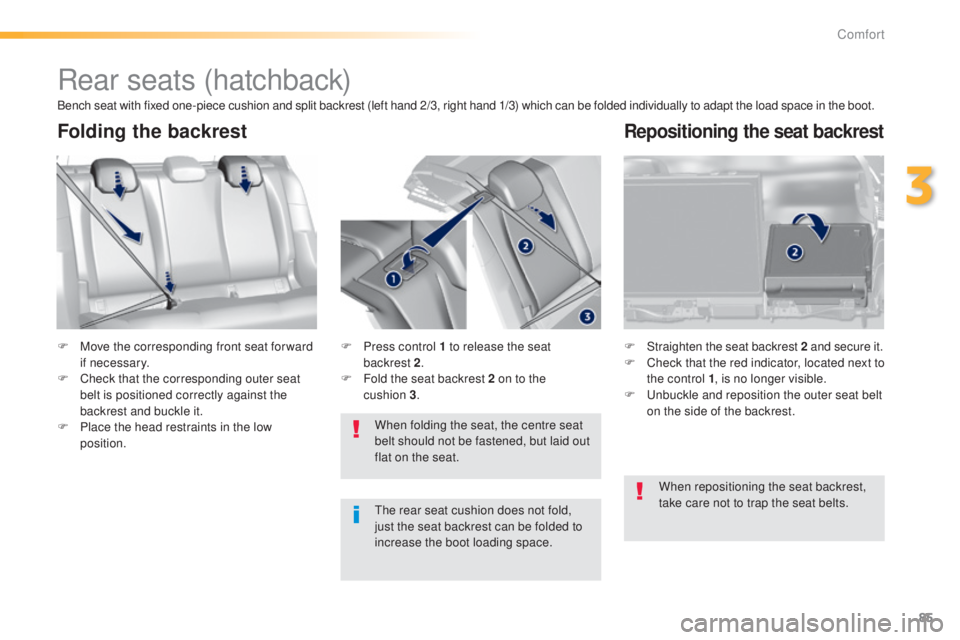
Rear seats (hatchback)
F Move the corresponding front seat for ward if necessary.
F
C
heck that the corresponding outer seat
belt is positioned correctly against the
backrest and buckle it.
F
P
lace the head restraints in the low
position. F
S traighten the seat backrest 2
and secure it.
F C heck that the red indicator, located next to
the control 1 , is no longer visible.
F
u
n
buckle and reposition the outer seat belt
on the side of the backrest.
When folding the seat, the centre seat
belt should not be fastened, but laid out
flat on the seat.
F
P ress control 1 to release the seat
backrest 2.
F
F
old the seat backrest 2 on to the
cushion
3.
Folding the backrestRepositioning the seat backrest
Bench seat with fixed one-piece cushion and split backrest (left hand 2/3, right hand 1/3) which can be folded individually to adapt the load space in the boot.
th
e rear seat cushion does not fold,
just the seat backrest can be folded to
increase the boot loading space. When repositioning the seat backrest,
take care not to trap the seat belts.
3
Comfort
Page 88 of 415
86
Rear seats (SW)
Bench seat, the left-hand (1/3) or right-hand (2/3) section of which can be folded to vary the boot load space.
ea
ch section of the bench seat (1/3 or 2/3) has its own control to release the seat back from inside
the boot.
Folding the seat from
the boot
F Check that nothing is preventing the seat
back from folding (seat belts, ...) and that
no object might inter fere with the seat
manoeuvre (above as well as below).
F
P
lace the head restraints in the low
position. F
P ull the control from inside the boot, the
seat backrest folds onto the cushion.
Folding the seat from
the rear
F Check that nothing is preventing the seat
backrest folding and that no object might
inter fere with the seat manoeuvre (above
as well as below).
F
M
ove the corresponding front seat
forwards if necessary.
F
C
heck that the seat belt is positioned
correctly on the side of the seat back.
F
P
lace the head restraints in the low
position.
Comfort
Page 89 of 415
87
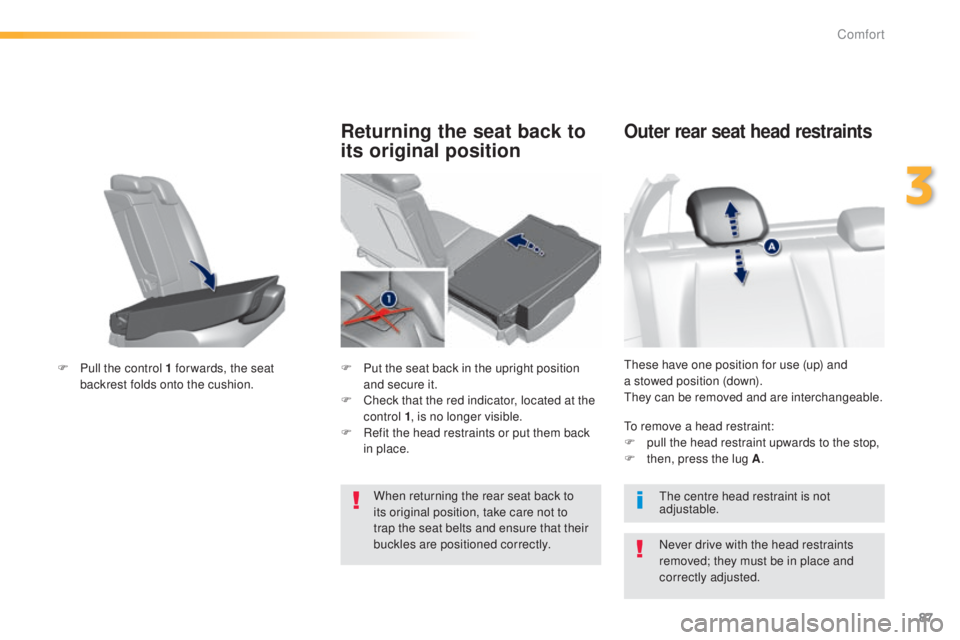
these have one position for use (up) and
a stowed position (down).
th
ey can be removed and are interchangeable.
Outer rear seat head restraints
Never drive with the head restraints
removed; they must be in place and
correctly adjusted.
to r
emove a head restraint:
F
p
ull the head restraint upwards to the stop,
F
t
hen, press the lug A
.
th
e centre head restraint is not
adjustable.
F
P
ull the control 1 for wards, the seat
backrest folds onto the cushion.
Returning the seat back to
its original position
F Put the seat back in the upright position and secure it.
F
C
heck that the red indicator, located at the
control 1 , is no longer visible.
F
R
efit the head restraints or put them back
in place.
When returning the rear seat back to
its original position, take care not to
trap the seat belts and ensure that their
buckles are positioned correctly.
3
Comfort
Page 90 of 415
88
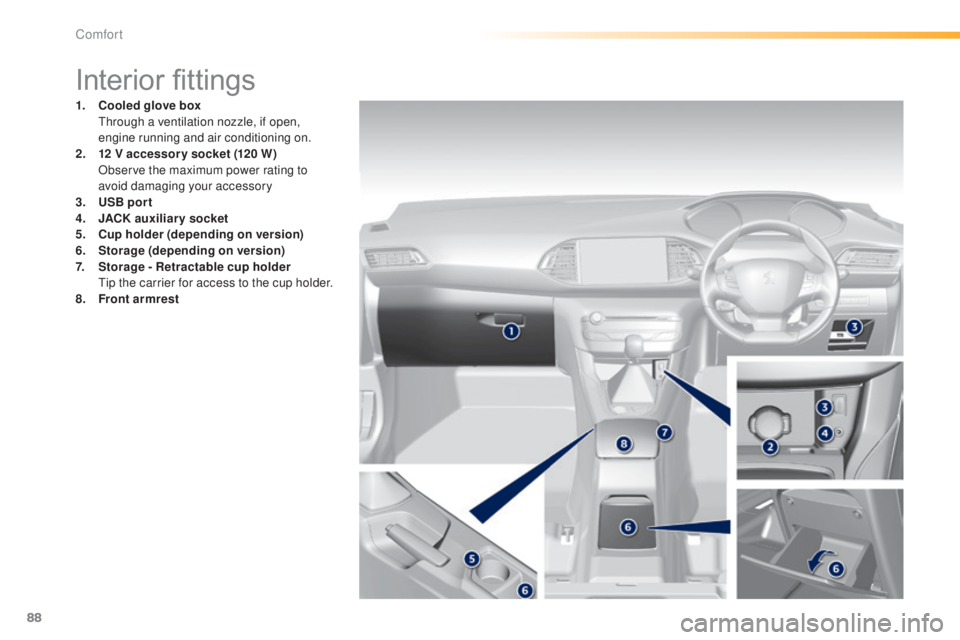
Interior fittings
1. Cooled glove box
th rough a ventilation nozzle, if open,
engine running and air conditioning on.
2.
1 2
V accessory socket (120 W )
O
bserve the maximum power rating to
avoid damaging your accessory
3.
U
SB por t
4.
J
ACK auxiliary socket
5.
C
up holder (depending on version)
6.
Sto
rage (depending on version)
7.
Sto
rage - Retractable cup holder
t
i
p the carrier for access to the cup holder.
8.
F
ront armrest
Comfort
Trending: roof rack, clock reset, oil additives, oil reset, brake, isofix, oil

