park assist Peugeot 308 CC 2013.5 Owner's Manual - RHD (UK, Australia)
[x] Cancel search | Manufacturer: PEUGEOT, Model Year: 2013.5, Model line: 308 CC, Model: Peugeot 308 CC 2013.5Pages: 268, PDF Size: 16.54 MB
Page 5 of 268
3
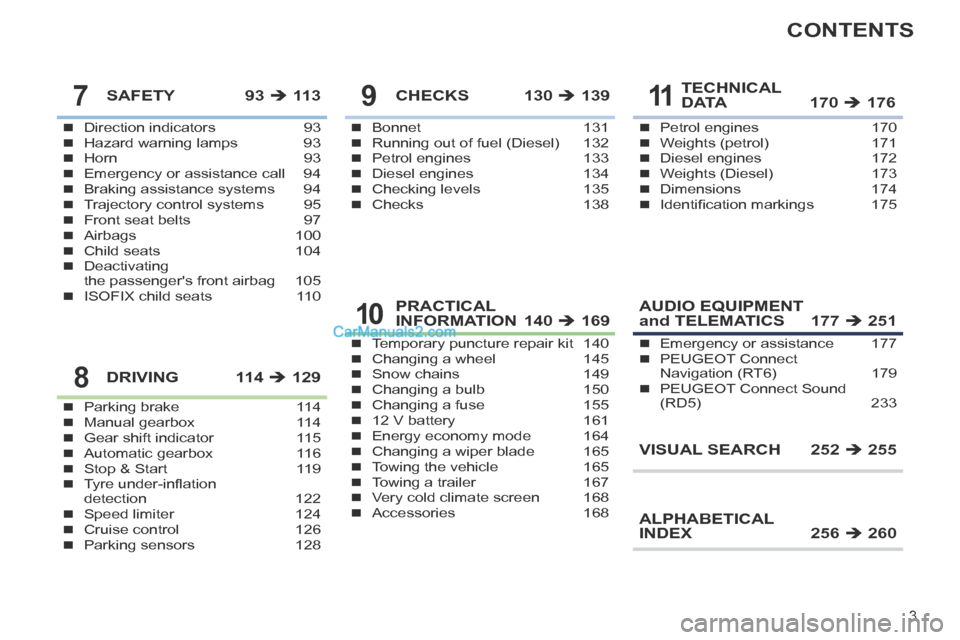
CONTENTS
Direction indicators 93Hazard warning lamps 93Horn 93Emergency or assistance call 94Braking assistance systems 94Trajectory control systems 95Front seat belts 97Airbags 100Child seats 104Deactivating the passenger's front airbag 105ISOFIX child seats 110
SAFETY 93 11 3
Parking brake 114Manual gearbox 114Gear shift indicator 115Automatic gearbox 116Stop & Start 119Tyre under-infl ation detection 122Speed limiter 124Cruise control 126Parking sensors 128
DRIVING 114 129
Bonnet 131Running out of fuel (Diesel) 132Petrol engines 133Diesel engines 134Checking levels 135Checks 138
CHECKS 130 139
Temporary puncture repair kit 140Changing a wheel 145Snow chains 149Changing a bulb 150Changing a fuse 15512 V battery 161Energy economy mode 164Changing a wiper blade 165Towing the vehicle 165Towing a trailer 167Very cold climate screen 168Accessories 168
PRACTICAL INFORMATION 140 169
Petrol engines 170Weights (petrol) 171Diesel engines 172Weights (Diesel) 173Dimensions 174Identifi cation markings 175
TECHNICAL D ATA 170 D ATA 170 D ATA 176
AUDIO EQUIPMENT and TELEMATICS 177 251
VISUAL SEARCH 252 255
ALPHABETICAL INDEX 256 260
Emergency or assistance 177PEUGEOT Connect Navigation (RT6) 179PEUGEOT Connect Sound (RD5) 233
7
8
9
10
11
Page 45 of 268
2
i
!
43
MULTIFUNCTION SCREENS
Display confi guration
This menu is used to select the colour
scheme for the screen, adjust its bright-
ness, set the date and time and select
the units for distance (km or miles),
fuel consumption (l/100 km, mpg or
km/l) and temperature (°Celsius or
°Fahrenheit).
Voice synthesiser
This menu is used to set the volume for
navigation instructions and to select the
type of voice (male or female).
Choice of language
This menu allows you to select the
language used by the screen: French,
English, Italian, Portuguese, Spanish,
German, Dutch, Turkish, Polish,
Russian). Vehicle settings *
This menu is used to activate or deacti-
vate certain driving and comfort equip-
ment, sorted by category:
- Access to the vehicle
● Plip action: "Driver's door" or "All doors".
- Parking assistance
- Rear wiper operation ● Operation of rear wiper in reverse (Rear wiper coupled to reverse;
see "Visibility"),
- Lighting confi guration (see "Visibility"):
●
Duration of guide-me-home lighting,
● Directional headlamps (Main / ad- ditional directional lighting),
● Mood lighting (Interior mood light- ing),
● Daytime running lamps ** .
Alert log
This summarises the active alerts by
displaying their associated messages
in turn.
* Depending on version.
** Depending on country of sale. When setting the time you can
select "Synchronise minutes with
GPS", so that the minutes are set
automatically by satellite reception.
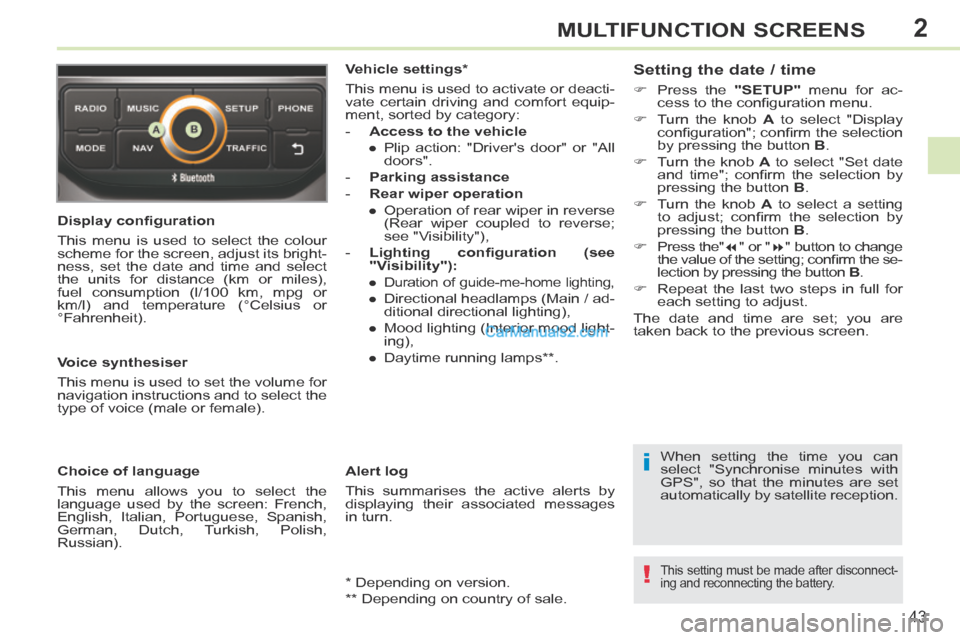
Setting the date / time
Press the
"SETUP" menu for ac-
cess to the confi guration menu.
Turn the knob A to select "Display
confi guration"; confi rm the selection
by pressing the button B .
Turn the knob A to select "Set date
and time"; confi rm the selection by
pressing the button B .
Turn the knob A to select a setting
to adjust; confi rm the selection by
pressing the button B .
Press the" " or " " button to change
the value of the setting; confi rm the se-
lection by pressing the button B .
Repeat the last two steps in full for each setting to adjust.
The date and time are set; you are
t aken back to the previous screen.
This setting must be made after disconnect-
ing and reconnecting the battery.
Page 65 of 268
4
!
i
63
ACCESS
Locating your vehicle
Press the closed padlock to locate your locked ve-
hicle in a car park.
Electronic engine immobiliser
The key contains an electronic chip
which has a special code. When the
ignition is switched on, this code must
be recognised in order for starting to be
possible.
This electronic engine immobiliser locks
the engine management system a few
minutes after the ignition is switched off
and prevents starting of the engine by
anyone who does not have the key.
Anti-theft protection
In the event of a fault, you are
informed by illumination of this
warning lamp, an audible signal
and a message in the screen.
In this case, your vehicle will not start;
contact a PEUGEOT dealer as soon as
possible.
This is indicated by lighting of the cour-
tesy lamps and side spotlamps and
fl ashing of the direction indicators for a
few seconds.
Starting the vehicle
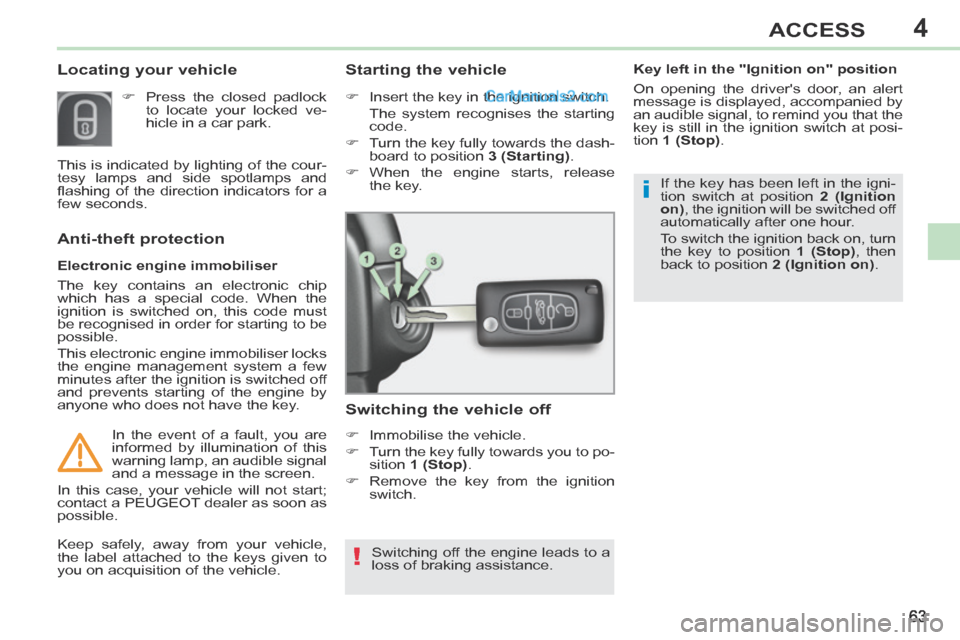
Insert the key in the ignition switch.
The system recognises the starting
code.
Turn the key fully towards the dash- board to position 3 (Starting) .
When the engine starts, release the key.
Switching the vehicle off
Immobilise the vehicle.
Turn the key fully towards you to po-sition 1 (Stop) .
Remove the key from the ignition switch.
Switching off the engine leads to a
loss of braking assistance.
Keep safely, away from your vehicle,
the label attached to the keys given to
you on acquisition of the vehicle. If the key has been left in the igni-
tion switch at position
2 (Ignition
on) , the ignition will be switched off
automatically after one hour.
To switch the ignition back on, turn
the key to position 1 (Stop) , then
back to position 2 (Ignition on) .
Key left in the "Ignition on" position
On opening the driver's door, an alert
message is displayed, accompanied by
an audible signal, to remind you that the
key is still in the ignition switch at posi-
tion
1 (Stop) .
Page 121 of 268

8
!
i
i
11 9
DRIVING
STOP & START
The Stop & Start system puts the en-
gine temporarily into standby - STOP
mode - during stops in the traffi c (red
lights, traffi c jams, etc...). The engine
restarts automatically - START mode -
as soon as you want to move off. The
restart takes place instantly, quickly and
silently.
Perfect for urban use, the Stop & Start
system reduces fuel consumption, ex-
haust emissions and the noise level
when stationary.
Operation
Going into engine STOP mode The "ECO" warning lamp comes
on in the instrument panel and the
engine goes into standby:
- with a manual gearbox , at speeds below 12 mph (20 km/h), when you
put the gear lever into neutral, and
you release the clutch pedal.
If your vehicle is fi tted with it, a time counter calculates the
sum of the periods in STOP
mode during a journey. It
rests itself to zero every time
the ignition is switched on with the key. For your comfort when parking,
STOP mode is not available for a
few seconds after coming out of
reverse gear.
STOP mode does not affect the
functionality of the vehicle, such
as braking, power steering, for ex-
ample.
Never refuel with the engine in
STOP mode; you must switch off
the ignition with the key. Special cases: STOP mode
unavailable
STOP mode is not invoked when:
- the driver's door is open,
- the driver's seat belt is not fastened,
- the vehicle has not exceeded 6 mph
(10 km/h) since the last engine start
using the key,
- the engine is needed to maintain a comfortable temperature in the pas-
senger compartment,
- demisting is active,
- some special conditions (battery charge, engine temperature, brak-
ing assistance, ambient tempera-
ture...) where the engine is needed
to assure control of a system.
The "ECO" warning lamp fl ash-
es for a few seconds, then goes
off.
This operation is perfectly normal.
In STOP mode of Stop & Start, the
"AIRWAVE" system stops working.
Page 130 of 268

8
!
128
DRIVING
PARKING SENSORS
This system indicates the proximity of an
obstacle (person, vehicle, tree, gate,
etc.) which comes within the fi eld of de-
tection of sensors located in the bumper.
Certain types of obstacle (stake, road-
works cone, etc.) detected initially will
no longer be detected at the end of the
manoeuvre due to the presence of blind
spots. This function cannot, in any cir-
cumstances, take the place of the
vigilance and responsibility of the
driver.
Rear parking sensors
Audible assistance
The proximity information is given by an
intermittent audible signal, the frequen-
cy of which increases as the vehicle ap-
proaches the obstacle.
The sound emitted by the speaker (right
or left) indicates the side on which the
obstacle is located.
When the distance between the vehicle
and the obstacle becomes less than ap-
proximately thirty centimetres, the audi-
ble signal becomes continuous. The system is switched on by engaging
reverse gear. This is accompanied by
an audible signal.
The system is switched off when you
come out of reverse gear. This supplements the audible signal
by displaying bars in the multifunction
screen which move progressively near-
er to the vehicle. When the obstacle is
near, the "Danger" symbol is displayed
in the screen. Visual assistance
Page 167 of 268
10
i
165
PRACTICAL INFORMATION
CHANGING A WIPER BLADE
Removing
Raise the corresponding wiper arm.
Unclip the wiper blade and remove it.
Fitting
Put the corresponding new wiper blade in place and clip it.
Fold down the wiper arm carefully.
Before removing a front wiper
blade
Within one minute after switching off the ignition, operate the wiper stalk
to position the wiper blades verti-
cally on the windscreen.
After fitting a front wiper blade
Switch on the ignition.
Operate the wiper stalk again to park the wiper blades.
TOWING THE VEHICLE
Procedure for having your vehicle
towed or for towing another vehicle us-
ing a removable towing eye.
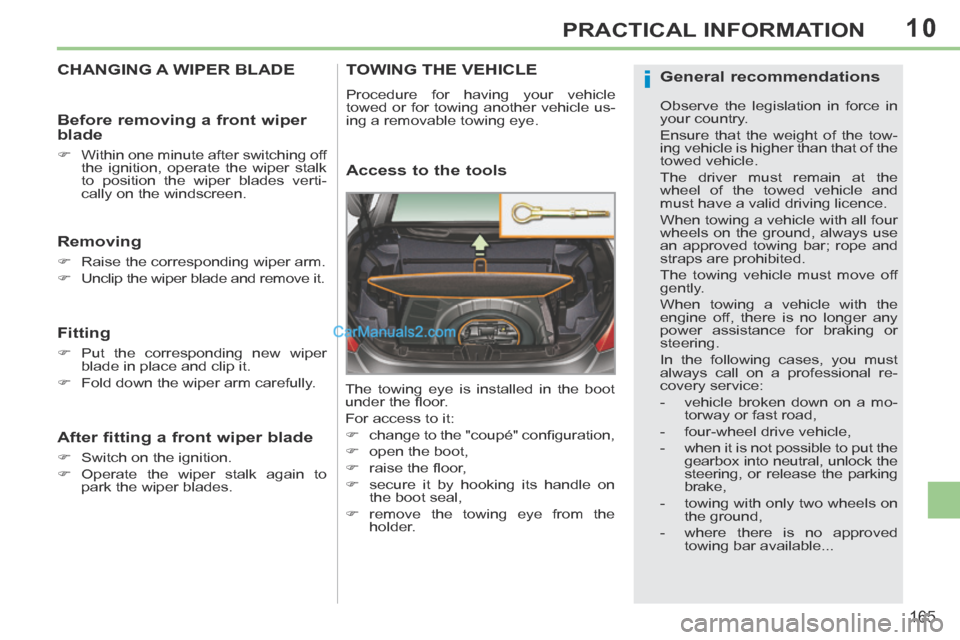
Access to the tools
The towing eye is installed in the boot
under the fl oor.
For access to it:
change to the "coupé" confi guration,
open the boot,
raise the fl oor,
secure it by hooking its handle on the boot seal,
remove the towing eye from the holder.
General recommendations
Observe the legislation in force in
your country.
Ensure that the weight of the tow-
ing vehicle is higher than that of the
towed vehicle.
The driver must remain at the
wheel of the towed vehicle and
must have a valid driving licence.
When towing a vehicle with all four
wheels on the ground, always use
an approved towing bar; rope and
straps are prohibited.
The towing vehicle must move off
gently.
When towing a vehicle with the
engine off, there is no longer any
power assistance for braking or
steering.
In the following cases, you must
a lways call on a professional re-
covery service:
- vehicle broken down on a mo-torway or fast road,
- four-wheel drive vehicle,
- when it is not possible to put the gearbox into neutral, unlock the
steering, or release the parking
brake,
- towing with only two wheels on the ground,
- where there is no approved towing bar available...
Page 168 of 268
10
i
166
PRACTICAL INFORMATION
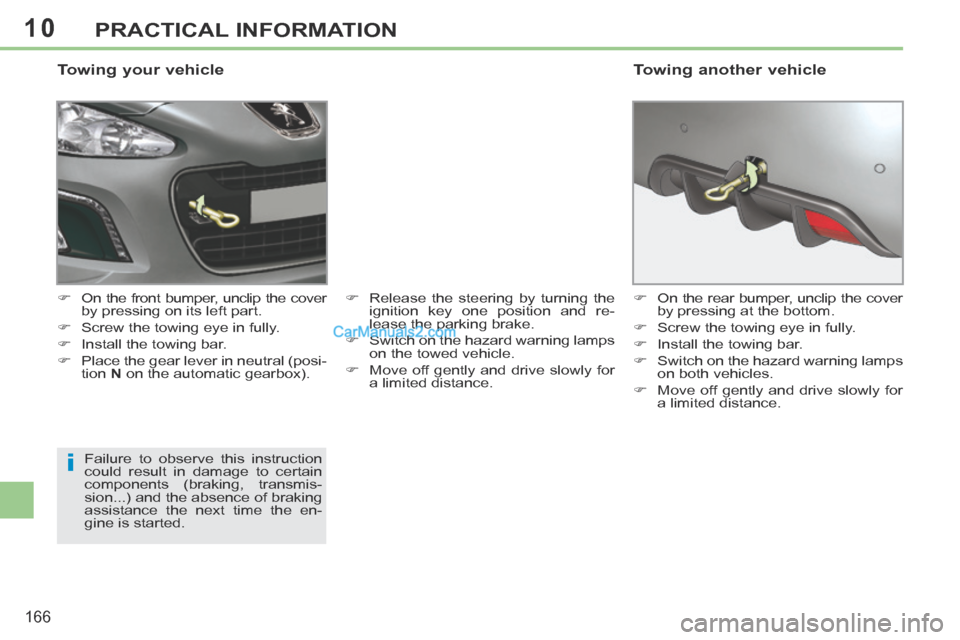
Towing your vehicle
On the front bumper, unclip the cover by pressing on its left part.
Screw the towing eye in fully.
Install the towing bar.
Place the gear lever in neutral (posi- tion N on the automatic gearbox). Release the steering by turning the
ignition key one position and re-
lease the parking brake.
Switch on the hazard warning lamps on the towed vehicle.
Move off gently and drive slowly for a limited distance.
Failure to observe this instruction
could result in damage to certain
components (braking, transmis-
sion...) and the absence of braking
assistance the next time the en-
gine is started. On the rear bumper, unclip the cover
by pressing at the bottom.
Screw the towing eye in fully.
Install the towing bar.
Switch on the hazard warning lamps on both vehicles.
Move off gently and drive slowly for a limited distance.
Towing another vehicle
Page 227 of 268
11
225
2
3
3
1
4
2
2
1
4
4
2
2
Night mode
Auto Day/Night
Adjust luminosity
Set date and time
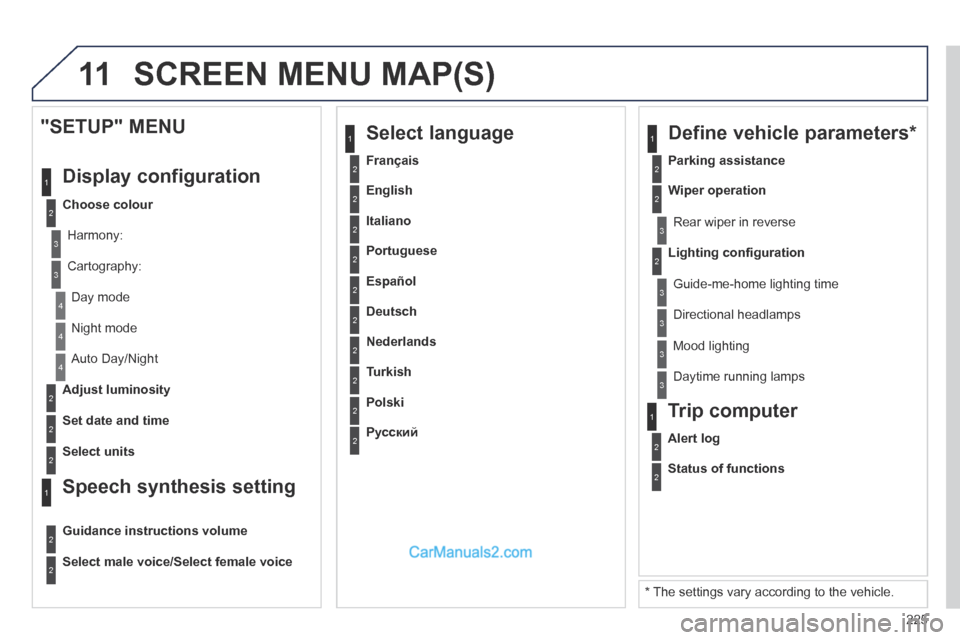
"SETUP" MENU
Display configuration
Choose colour
Harmony:
Cartography:
Day mode
Speech synthesis setting
Guidance instructions volume
Select male voice/Select female voice
2Select units
2
3
3
2Lighting confi guration
Parking assistance
Rear wiper in reverse
Guide-me-home lighting time
1 Define vehicle parameters *
2Wiper operation
3 Directional headlamps
3 Mood lighting
3 Daytime running lamps
* The settings vary according to the vehicle.
2Alert log
1 Trip computer
2Status of functions
2Français
1 Select language
2English
2Italiano
2Portuguese
2Español
2Deutsch
2Nederlands
2Turkish
2Polski
2Русский
SCREEN MENU MAP(S)
Page 254 of 268
252
VISUAL SEARCH
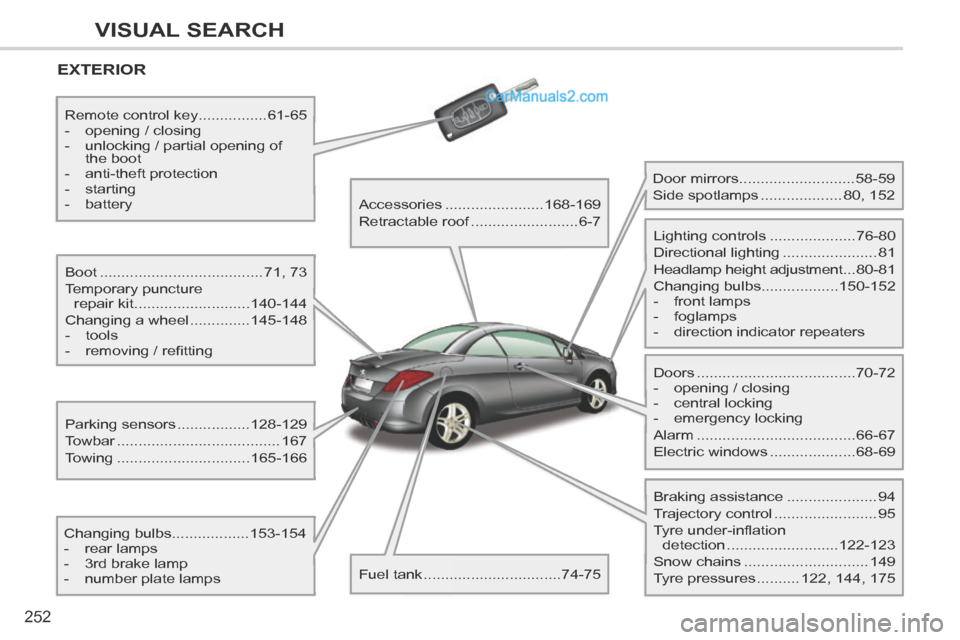
EXTERIOR
Boot ......................................71, 73
Temporary puncture repair kit ........................... 140-144
Changing a wheel .............. 145-148
- tools
- removing / refi tting
Changing bulbs ..................153-154
- rear lamps
- 3rd brake lamp
- number plate lamps Parking sensors .................
128-129
Towbar ...................................... 167
Towing ............................... 165-166
Remote control key
................61-65
- opening / closing
- unlocking / partial opening of the boot
- anti-theft protection
- starting
- battery Accessories .......................168-169
Retractable roof ......................... 6-7
Fuel tank ................................ 74-75 Door mirrors ...........................
58-59
Side spotlamps ................... 80, 152
Doors ..................................... 70-72
- opening / closing
- central locking
- emergency locking
Alarm ..................................... 66-67
Electric windows .................... 68-69
Lighting controls ....................
76-80
Directional lighting ...................... 81
Headlamp height adjustment ... 80-81
Changing bulbs ..................150-152
- front lamps
- foglamps
- direction indicator repeaters
Braking assistance ..................... 94
Trajectory control ........................ 95
Tyre under-inflation detection .......................... 122-123
Snow chains ............................. 149
Tyre pressures .......... 122, 144, 175
Page 256 of 268
254
VISUAL SEARCH
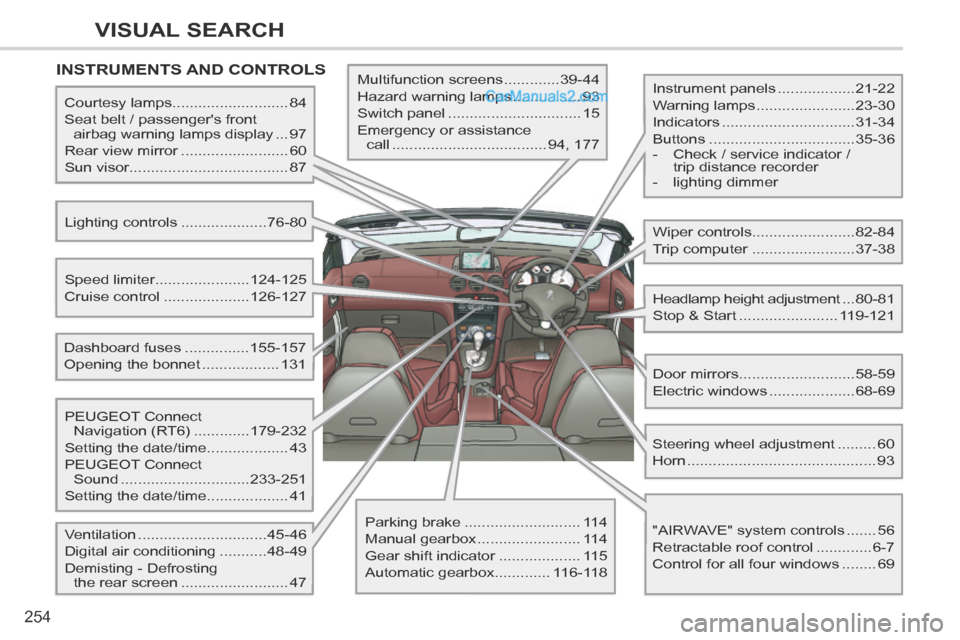
INSTRUMENTS AND CONTROLS
Instrument panels ..................21-22
Warning lamps ....................... 23-30
Indicators ............................... 31-34
Buttons .................................. 35-36
- Check / service indicator / trip distance recorder
- lighting dimmer
Courtesy lamps
........................... 84
Seat belt / passenger's front airbag warning lamps display ... 97
Rear view mirror ......................... 60
Sun visor ..................................... 87
Lighting controls .................... 76-80
Ventilation .............................. 45-46
Digital air conditioning ........... 48-49
Demisting - Defrosting the rear screen ......................... 47
PEUGEOT
Connect
Navigation (RT6) ............. 179-232
Setting the date/time ...................43
PEUGEOT Connect
Sound .............................. 233-251
Setting the date/time ...................41
Dashboard fuses ...............
155-157
Opening the bonnet .................. 131
Speed limiter
...................... 124-125
Cruise control .................... 126-127 Multifunction screens .............
39-44
Hazard warning lamps ................ 93
Switch panel ............................... 15
Emergency or assistance call .................................... 94, 177
Wiper controls........................ 82-84
Trip computer ........................ 37-38
Headlamp height adjustment ... 80-81
Stop & Start ....................... 119-121
Door mirrors ........................... 58-59
Electric windows .................... 68-69
"AIRWAVE" system controls ....... 56
Retractable roof control ............. 6-7
Control for all four windows ........ 69
Parking brake ...........................
114
Manual gearbox ........................ 114
Gear shift indicator ................... 115
Automatic gearbox .............116-118 Steering wheel adjustment .........
60
Horn ............................................ 93