tow Peugeot 308 CC 2013.5 Owner's Manual - RHD (UK, Australia)
[x] Cancel search | Manufacturer: PEUGEOT, Model Year: 2013.5, Model line: 308 CC, Model: Peugeot 308 CC 2013.5Pages: 268, PDF Size: 16.54 MB
Page 5 of 268
3
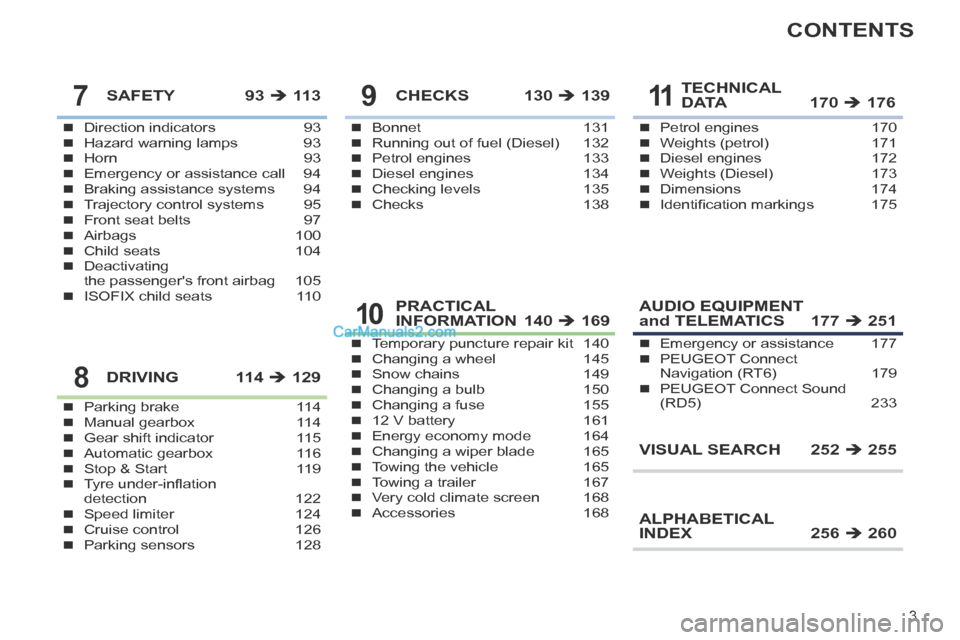
CONTENTS
Direction indicators 93Hazard warning lamps 93Horn 93Emergency or assistance call 94Braking assistance systems 94Trajectory control systems 95Front seat belts 97Airbags 100Child seats 104Deactivating the passenger's front airbag 105ISOFIX child seats 110
SAFETY 93 11 3
Parking brake 114Manual gearbox 114Gear shift indicator 115Automatic gearbox 116Stop & Start 119Tyre under-infl ation detection 122Speed limiter 124Cruise control 126Parking sensors 128
DRIVING 114 129
Bonnet 131Running out of fuel (Diesel) 132Petrol engines 133Diesel engines 134Checking levels 135Checks 138
CHECKS 130 139
Temporary puncture repair kit 140Changing a wheel 145Snow chains 149Changing a bulb 150Changing a fuse 15512 V battery 161Energy economy mode 164Changing a wiper blade 165Towing the vehicle 165Towing a trailer 167Very cold climate screen 168Accessories 168
PRACTICAL INFORMATION 140 169
Petrol engines 170Weights (petrol) 171Diesel engines 172Weights (Diesel) 173Dimensions 174Identifi cation markings 175
TECHNICAL D ATA 170 D ATA 170 D ATA 176
AUDIO EQUIPMENT and TELEMATICS 177 251
VISUAL SEARCH 252 255
ALPHABETICAL INDEX 256 260
Emergency or assistance 177PEUGEOT Connect Navigation (RT6) 179PEUGEOT Connect Sound (RD5) 233
7
8
9
10
11
Page 21 of 268
19
ECO-DRIVING
Eco-driving is a range of everyday practices that allow the motorist to \
optimise their fuel consumption and CO2 emissions.
Optimise the use of your gearbox
With a manual gearbox, move off gently and change up
without waiting. During acceleration change up early.
With an automatic or electronic gearbox, give preference to
automatic mode and avoid pressing the accelerator pedal
heavily or suddenly.
The gear shift indicator invites you engage the most suitable
gear: as soon as the indication is displayed in the instru-
ment panel, follow it straight away.
For vehicles fi tted with an electronic or automatic gearbox,
this indicator appears only in manual mode.
Drive smoothly
Maintain a safe distance between vehicles, use engine
braking rather than the brake pedal, and press the accel-
erator progressively. These practices contribute towards a
reduction in fuel consumption and CO
2 emissions and also
helps reduce the background traffi c noise.
If your vehicle has cruise control, make use of the system at
speeds above 25 mph (40 km/h) when the traffi c is fl owing
well.
Control the use of your electrical equipment
Before moving off, if the passenger compartment is too
warm, ventilate it by opening the windows and air vents
b efore using the air conditioning.
Above 30 mph (50 km/h), close the windows and leave the
air vents open.
Remember to make use of equipment that can help keep the
temperature in the passenger compartment down (s unroof
and window blinds...).
Switch off the air conditioning, unless it has automatic regu-
lation, as soon as the desired temperature is attained.
Switch off the demisting and defrosting controls, if not
a utomatic.
Switch off the heated seat as soon as possible.
Switch off the headlamps and front foglamps when the level
of light does not require their use.
Avoid running the engine before moving off, particularly in
winter; your vehicle will warm up much faster while driving.
As a passenger, if you avoid connecting your multimedia
devices (fi lm, music, video game...), you will contribute
t owards limiting the consumption of electrical energy, and
so of fuel.
Disconnect your portable devices before leaving the vehicle.
Page 28 of 268
1
26
MONITORING
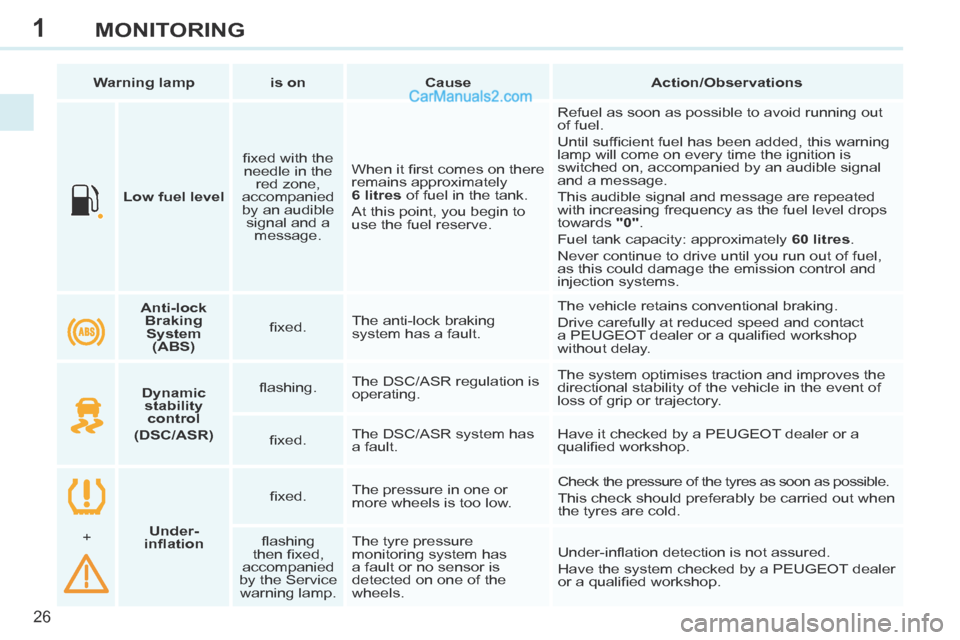
Low fuel level fi xed with the
needle in the red zone,
accompanied
by an audible signal and a message. When it fi rst comes on there
remains approximately
6 litres of fuel in the tank.
At this point, you begin to
use the fuel reserve. Refuel as soon as possible to avoid running out
of fuel.
Until suffi cient fuel has been added, this warning
lamp will come on every time the ignition is
switched on, accompanied by an audible signal
and a message.
This audible signal and message are repeated
with increasing frequency as the fuel level drops
towards
"0" .
Fuel tank capacity: approximately 60 litres .
Never continue to drive until you run out of fuel,
as this could damage the emission control and
injection systems.
Warning lamp
is on Cause Action/Observations
Anti-lock
Braking System (ABS) fi xed.
The anti-lock braking
system has a fault. The vehicle retains conventional braking.
Drive carefully at reduced speed and contact
a PEUGEOT dealer or a qualifi ed workshop
without delay.
Dynamic
stability control
(DSC/ASR) fl ashing.
The DSC/ASR regulation is
operating. The system optimises traction and improves the
directional stability of the vehicle in the event of
loss of grip or trajectory.
fi xed. The DSC/ASR system has
a fault. Have it checked by a PEUGEOT dealer or a
qualifi ed workshop.
Under-
infl ation fi xed.
The pressure in one or
more wheels is too low. Check the pressure of the tyres as soon as possible.
This check should preferably be carried out when
the tyres are cold.
+ fl ashing
then fi xed,
accompanied
by the Service warning lamp. The tyre pressure
monitoring system has
a fault or no sensor is
detected on one of the
wheels.
Under-infl ation detection is not assured.
Have the system checked by a PEUGEOT dealer
or a qualifi ed workshop.
Page 30 of 268
1
28
MONITORING
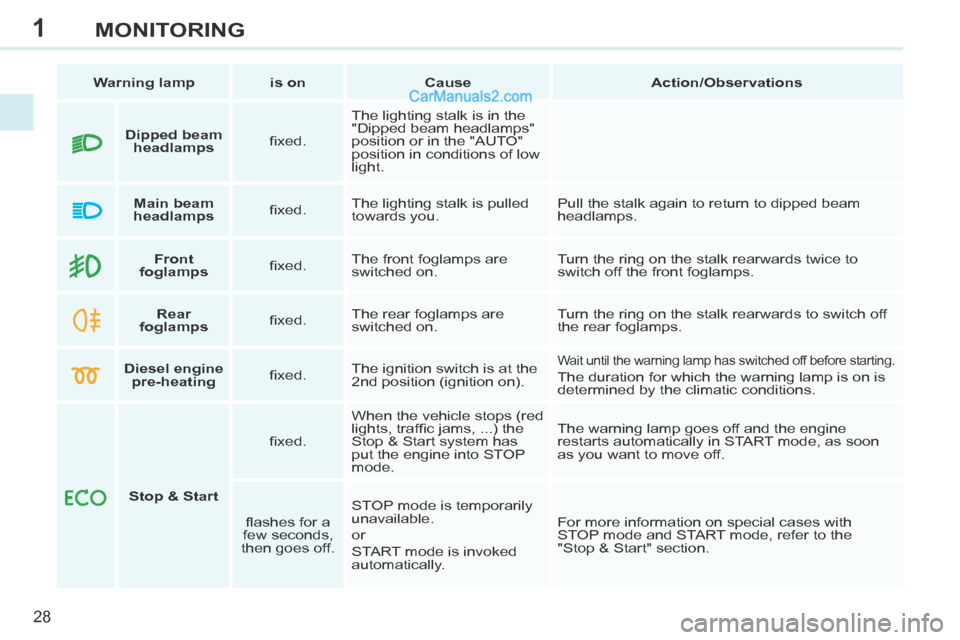
Warning lamp is on Cause Action/Observations
Front
foglamps fi xed. The front foglamps are
switched on. Turn the ring on the stalk rearwards twice to
switch off the front foglamps.
Rear
foglamps fi xed. The rear foglamps are
switched on. Turn the ring on the stalk rearwards to switch off
the rear foglamps.
Diesel engine
pre-heating fi xed. The ignition switch is at the
2nd position (ignition on).
Wait until the warning lamp has switched off before starting.
The duration for which the warning lamp is on is
determined by the climatic conditions.
Stop & Start fi xed.
When the vehicle stops (red
lights, traffi c jams, ...) the
Stop & Start system has
put the engine into STOP
mode. The warning lamp goes off and the engine
restarts automatically in START mode, as soon
as you want to move off.
fl ashes for a
few seconds,
then goes off. STOP mode is temporarily
unavailable.
or
START mode is invoked
automatically. For more information on special cases with
STOP mode and START mode, refer to the
"Stop & Start" section.
Dipped beam
headlamps fi xed. The lighting stalk is in the
"Dipped beam headlamps"
position or in the "AUTO"
position in conditions of low
light.
Main beam
headlamps fi xed. The lighting stalk is pulled
towards you. Pull the stalk again to return to dipped beam
headlamps.
Page 48 of 268
3
i
i
46
COMFORT
The condensation created by the
air conditioning results in a dis-
charge of water under the vehicle
which is perfectly normal.
RECOMMENDATIONS FOR VENTILATION AND AIR CONDITIONING
In order for these systems to be fully effective, follow the guidelines on opera-
tion and maintenance below:
To obtain an even air distribution, take care not to obstruct the exterio\
r air intake grilles located at the base of the windscreen, the nozzles, the v\
ents
and the air outlets, as well as the air extractor located in the boot.
Do not cover the sunshine sensor, located on the dashboard; this is used for regulation of the air conditioning system.
Operate the air conditioning system for at least 5 minutes, once or twic\
e a month to keep it in perfect working order.
Ensure that the passenger compartment fi lter is in good condition and have the fi lter elements replaced regularly (refer to the "Checks" section).
We recommend the use of a combined passenger compartment fi lter. Thanks to its second special active fi lter, it contributes to the purifi cation
of the air breathed by the occupants and the cleanness of the passenger \
compartment (reduction of allergic symptoms, bad odours and greasy de-
posits).
To ensure correct operation of the air conditioning system, you are also \
advised to have it checked regularly, as recommended in the warranty and
maintenance record.
If the system does not produce cold air, switch it off and contact a PEUGEOT dealer or a qualifi ed workshop.
In the "cabriolet" confi guration, installing the windstop and using the
"AIRWAVE" systems improves comfort.
When towing the maximum load on a steep gradient in high temperatures,
switching off the air conditioning permits the recovery of engine power and
therefore improvement of the towing capacity. If the interior temperature remains
very high after the vehicle has been
parked in the sun for a considerable
time, fi rst ventilate the passenger
compartment for a few minutes.
Place the air fl ow control at a suf-
fi cient level to provide an adequate
renewal of air in the passenger com-
partment.
The air conditioning system does not
contain chlorine and does not pres-
ent any danger to the ozone layer.
Stop & Start
The heating and air conditioning systems only work when the engine is ru\
n-
ning. To maintain a comfortable temperature in the passenger compartment,
you can temporarily deactivate the Stop & Start system (see the corresp\
ond-
ing section).
Page 51 of 268
3
!
i
49
COMFORT
Manual operation
If you wish, you can make a different
choice from that offered by the system
by changing a setting. The other func-
tions will still be controlled automati-
cally.
Pressing the "AUTO" button returns
the system to completely automatic
operation.
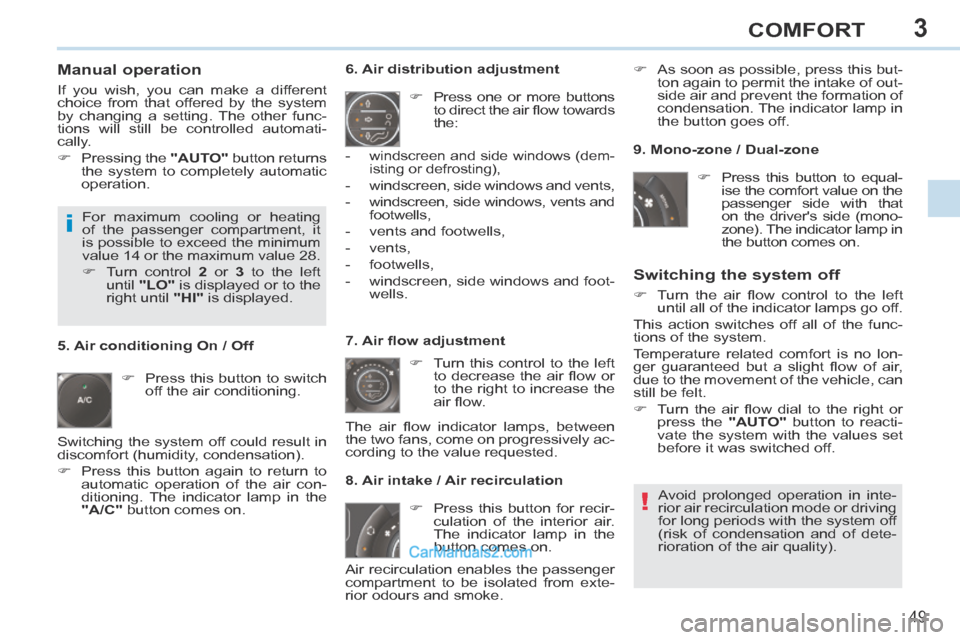
Press this button to switch off the air conditioning. 6. Air distribution adjustment
Press one or more buttons to direct the air fl ow towards
the:
7. Air fl ow adjustment Turn this control to the left to decrease the air fl ow or
to the right to increase the
air fl ow.
8. Air intake / Air recirculation
Switching the system off
Turn the air fl ow control to the left until all of the indicator lamps go off.
This action switches off all of the func-
tions of the system.
Temperature related comfort is no lon-
ger guaranteed but a slight fl ow of air,
due to the movement of the vehicle, can
still be felt.
Turn the air fl ow dial to the right or press the "AUTO" button to reacti-
vate the system with the values set
before it was switched off.
Press this button for recir- culation of the interior air.
The indicator lamp in the
button comes on.
5. Air conditioning On / Off
Avoid prolonged operation in inte-
rior air recirculation mode or driving
for long periods with the system off
(risk of condensation and of dete-
rioration of the air quality).
-
windscreen and side windows (dem-
isting or defrosting),
- windscreen, side windows and vents,
- windscreen, side windows, vents and
footwells,
- vents and footwells,
- vents,
- footwells,
- windscreen, side windows and foot- wells.
The air fl ow indicator lamps, between
the two fans, come on progressively ac-
cording to the value requested. As soon as possible, press this but-
ton again to permit the intake of out-
side air and prevent the formation of
condensation. The indicator lamp in
the button goes off.
For maximum cooling or heating
of the passenger compartment, it
is possible to exceed the minimum
value 14 or the maximum value 28.
Turn control 2 or 3 to the left
until "LO" is displayed or to the
right until "HI" is displayed. 9. Mono-zone / Dual-zone
Press this button to equal-ise the comfort value on the
passenger side with that
on the driver's side (mono-
zone). The indicator lamp in
the button comes on.
Air recirculation enables the passenger
compartment to be isolated from exte-
rior odours and smoke.
Switching the system off could result in
discomfort (humidity, condensation).
Press this button again to return to
automatic operation of the air con-
ditioning. The indicator lamp in the
"A/C" button comes on.
Page 54 of 268
3
52
COMFORT
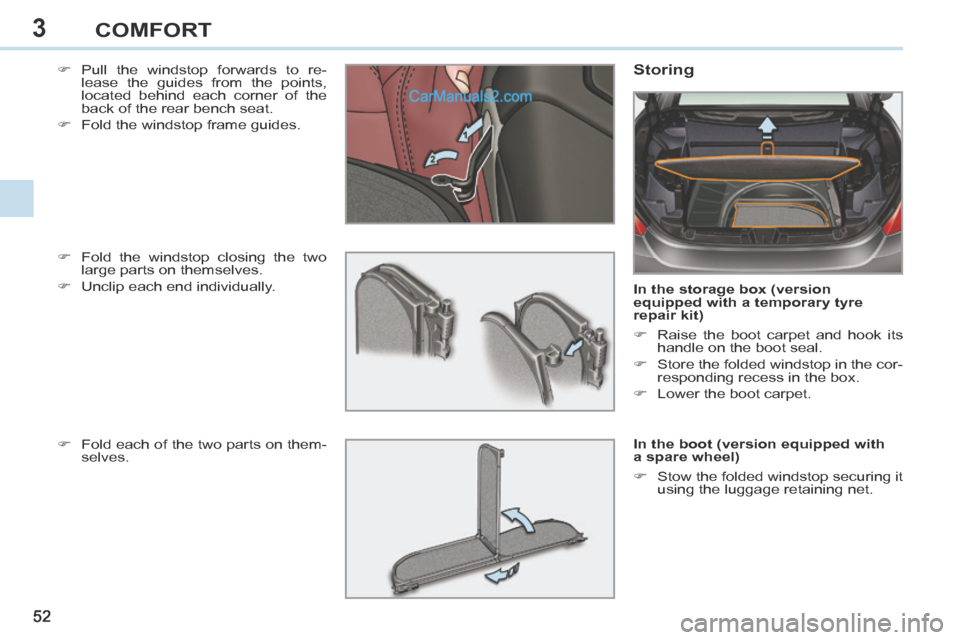
Pull the windstop forwards to re-lease the guides from the points,
located behind each corner of the
back of the rear bench seat.
Fold the windstop frame guides. Storing
In the storage box (version
equipped with a temporary tyre
repair kit)
Raise the boot carpet and hook its handle on the boot seal.
Store the folded windstop in the cor- responding recess in the box.
Lower the boot carpet.
In the boot (version equipped with
a spare wheel)
Stow the folded windstop securing it using the luggage retaining net.
Fold the windstop closing the two
large parts on themselves.
Unclip each end individually.
Fold each of the two parts on them- selves.
Page 58 of 268
3
i!
i
56
COMFORT
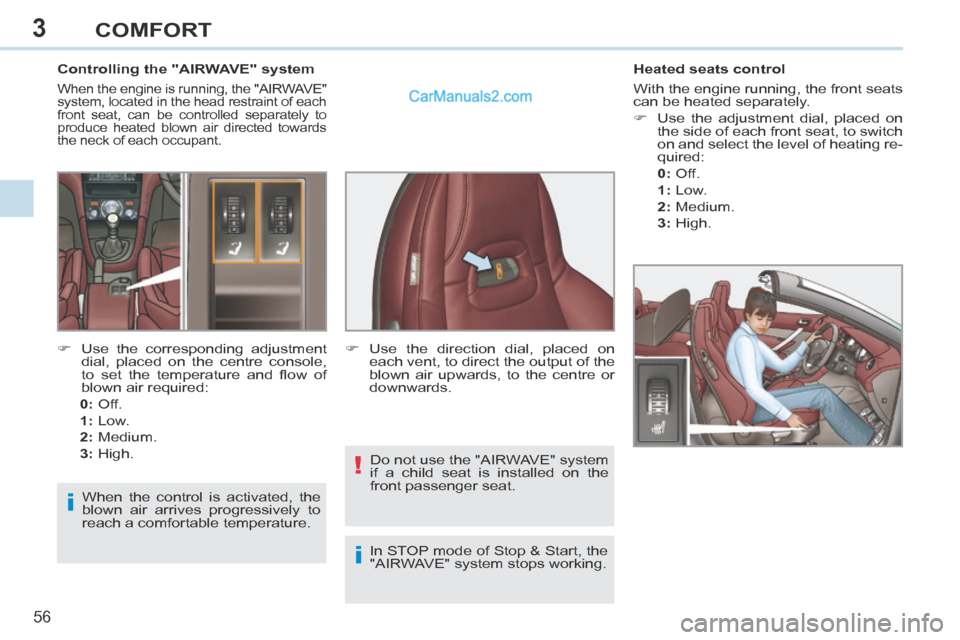
Controlling the "AIRWAVE" system
When the engine is running, the "AIRWAVE"
system, located in the head restraint of each
front seat, can be controlled separately to
produce heated blown air directed towards
the neck of each occupant.
Heated seats control
With the engine running, the front seats
can be heated separately.
Use the adjustment dial, placed on
the side of each front seat, to switch
on and select the level of heating re-
quired:
0 : Off.
1 : Low.
2 : Medium.
3 : High.
Use the corresponding adjustment dial, placed on the centre console,
to set the temperature and fl ow of
blown air required:
0: Off.
1: Low.
2: Medium.
3: High. Use the direction dial, placed on
each vent, to direct the output of the
blown air upwards, to the centre or
downwards.
When the control is activated, the
blown air arrives progressively to
reach a comfortable temperature. Do not use the "AIRWAVE" system
if a child seat is installed on the
front passenger seat.
In STOP mode of Stop & Start, the
"AIRWAVE" system stops working.
Page 65 of 268
4
!
i
63
ACCESS
Locating your vehicle
Press the closed padlock to locate your locked ve-
hicle in a car park.
Electronic engine immobiliser
The key contains an electronic chip
which has a special code. When the
ignition is switched on, this code must
be recognised in order for starting to be
possible.
This electronic engine immobiliser locks
the engine management system a few
minutes after the ignition is switched off
and prevents starting of the engine by
anyone who does not have the key.
Anti-theft protection
In the event of a fault, you are
informed by illumination of this
warning lamp, an audible signal
and a message in the screen.
In this case, your vehicle will not start;
contact a PEUGEOT dealer as soon as
possible.
This is indicated by lighting of the cour-
tesy lamps and side spotlamps and
fl ashing of the direction indicators for a
few seconds.
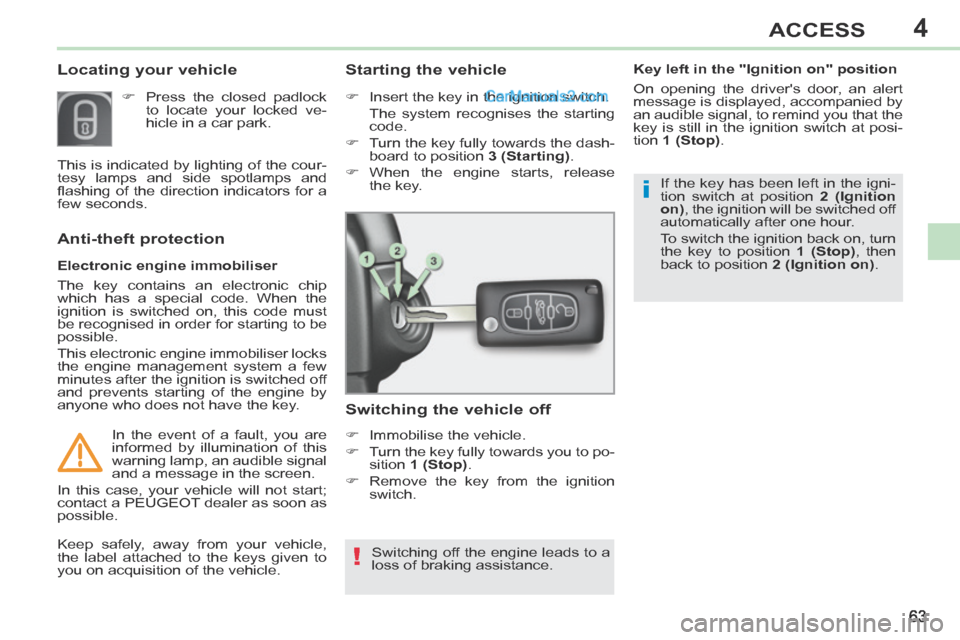
Starting the vehicle
Insert the key in the ignition switch.
The system recognises the starting
code.
Turn the key fully towards the dash- board to position 3 (Starting) .
When the engine starts, release the key.
Switching the vehicle off
Immobilise the vehicle.
Turn the key fully towards you to po-sition 1 (Stop) .
Remove the key from the ignition switch.
Switching off the engine leads to a
loss of braking assistance.
Keep safely, away from your vehicle,
the label attached to the keys given to
you on acquisition of the vehicle. If the key has been left in the igni-
tion switch at position
2 (Ignition
on) , the ignition will be switched off
automatically after one hour.
To switch the ignition back on, turn
the key to position 1 (Stop) , then
back to position 2 (Ignition on) .
Key left in the "Ignition on" position
On opening the driver's door, an alert
message is displayed, accompanied by
an audible signal, to remind you that the
key is still in the ignition switch at posi-
tion
1 (Stop) .
Page 74 of 268
4
!
72
ACCESS
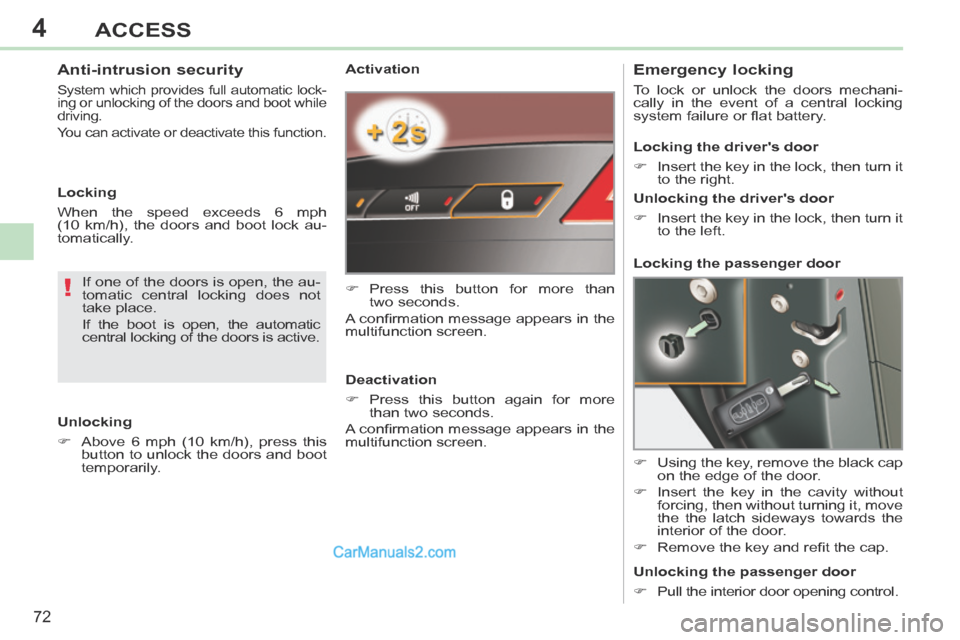
Activation
Press this button for more than two seconds.
A confi rmation message appears in the
multifunction screen.
Deactivation
Press this button again for more than two seconds.
A confi rmation message appears in the
multifunction screen. Emergency locking
To lock or unlock the doors mechani-
cally in the event of a central locking
system failure or fl at battery.
Using the key, remove the black cap on the edge of the door.
Insert the key in the cavity without forcing, then without turning it, move
the the latch sideways towards the
interior of the door.
Remove the key and refi t the cap. Locking the driver's door
Insert the key in the lock, then turn it to the right.
Unlocking the driver's door
Insert the key in the lock, then turn it to the left.
Locking the passenger door
Unlocking the passenger door
Pull the interior door opening control.
If one of the doors is open, the au-
tomatic central locking does not
take place.
If the boot is open, the automatic
central locking of the doors is active.
Anti-intrusion security
System which provides full automatic lock-
ing or unlocking of the doors and boot while
driving.
You can activate or deactivate this function.
Unlocking
Above 6 mph (10 km/h), press this
button to unlock the doors and boot
temporarily.
Locking
When the speed exceeds 6 mph
(10 km/h), the doors and boot lock au-
tomatically.