PEUGEOT 5008 2013 User Guide
Manufacturer: PEUGEOT, Model Year: 2013, Model line: 5008, Model: PEUGEOT 5008 2013Pages: 364, PDF Size: 16.24 MB
Page 11 of 364
FA
M
9
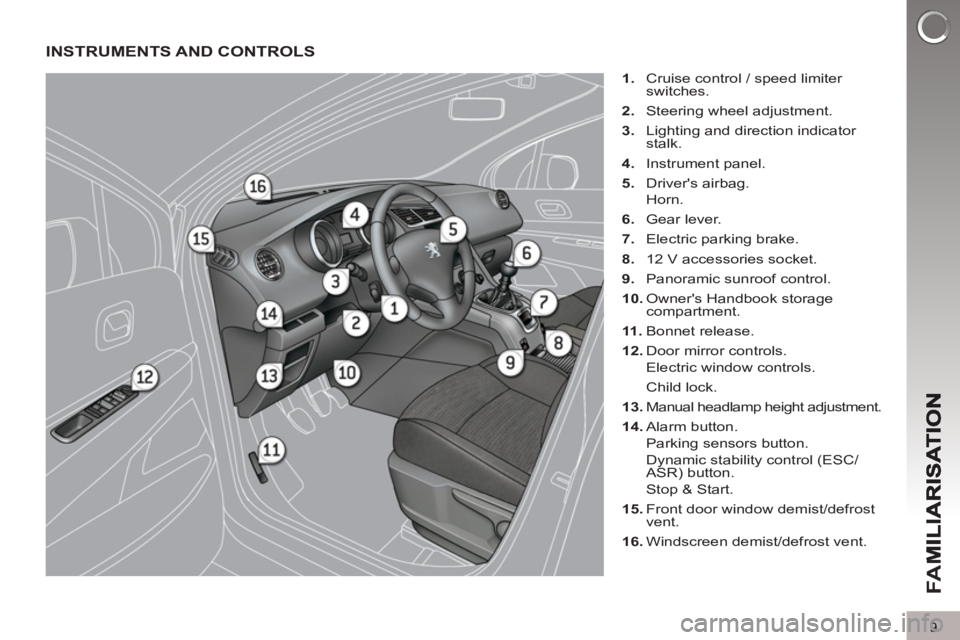
INSTRUMENTS AND CONTROLS
1.
Cruise control / speed limiter
switches.
2.
Steering wheel adjustment.
3.
Lighting and direction indicator
stalk.
4.
Instrument panel.
5.
Driver's airbag.
Horn.
6.
Gear lever.
7.
Electric parking brake.
8.
12 V accessories socket.
9.
Panoramic sunroof control.
10.
Owner's Handbook storage
compartment.
11 .
Bonnet release.
12.
Door mirror controls.
Electric window controls.
Child lock.
13.
Manual headlamp height adjustment.
14.
Alarm button.
Parking sensors button.
Dynamic stability control (ESC/
ASR) button.
Stop & Start.
15.
Front door window demist/defrost
vent.
16.
Windscreen demist/defrost vent.
Page 12 of 364
FA
M
10
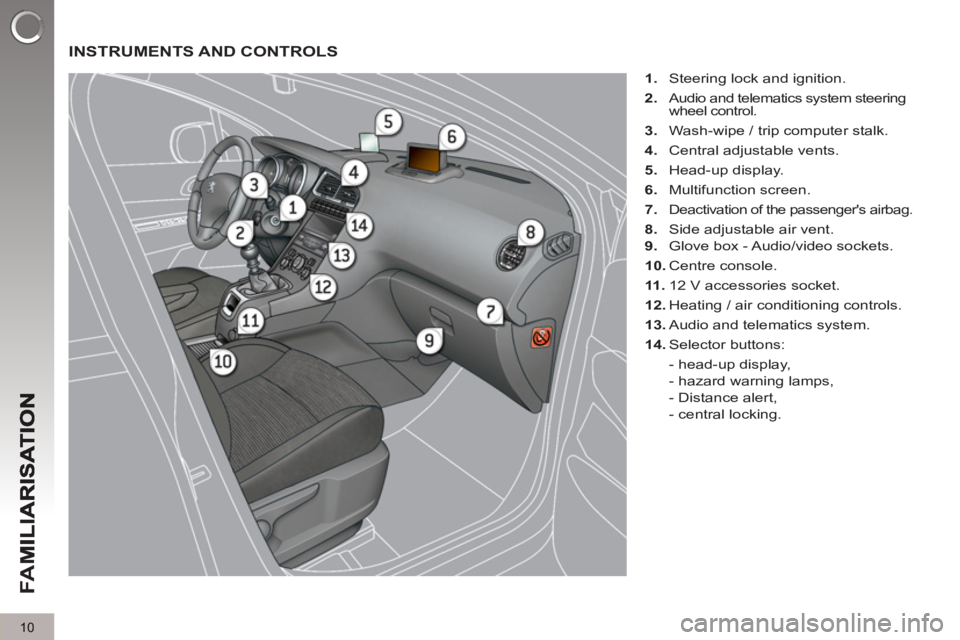
INSTRUMENTS AND CONTROLS
1.
Steering lock and ignition.
2.
Audio and telematics system steering
wheel control.
3.
Wash-wipe / trip computer stalk.
4.
Central adjustable vents.
5.
Head-up display.
6.
Multifunction screen.
7.
Deactivation of the passenger's airbag.
8.
Side adjustable air vent.
9.
Glove box - Audio/video sockets.
10.
Centre console.
11 .
12 V accessories socket.
12.
Heating / air conditioning controls.
13.
Audio and telematics system.
14.
Selector buttons:
- head-up display,
- hazard warning lamps,
- Distance alert,
- central locking.
Page 13 of 364
FA
M
11
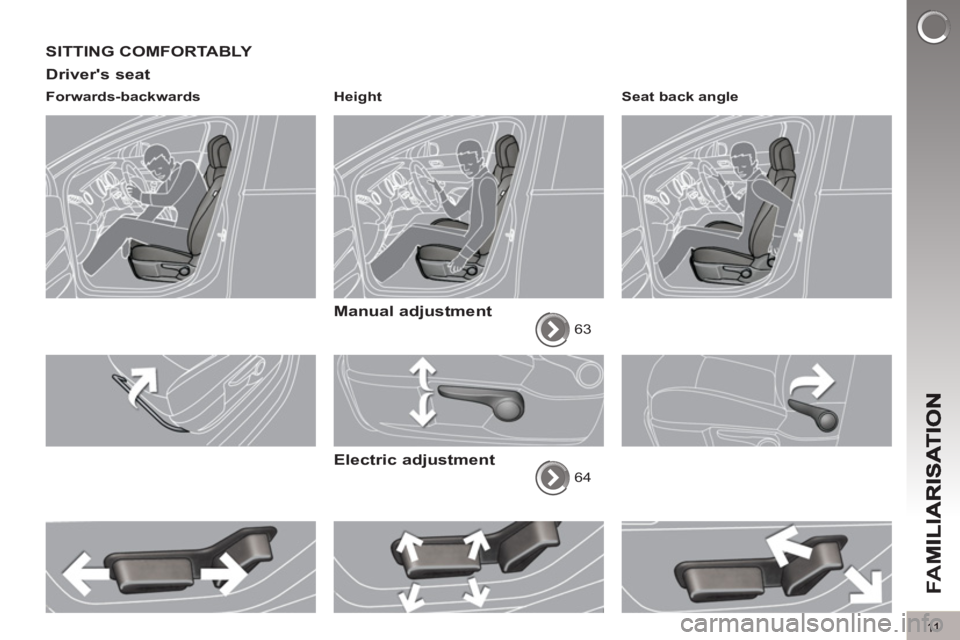
SITTING COMFORTABLY
Driver's seat
Forwards-backwards
Height
Manual adjustment
63
Electric adjustment
64
Seat back angle
Page 14 of 364
FA
M
12
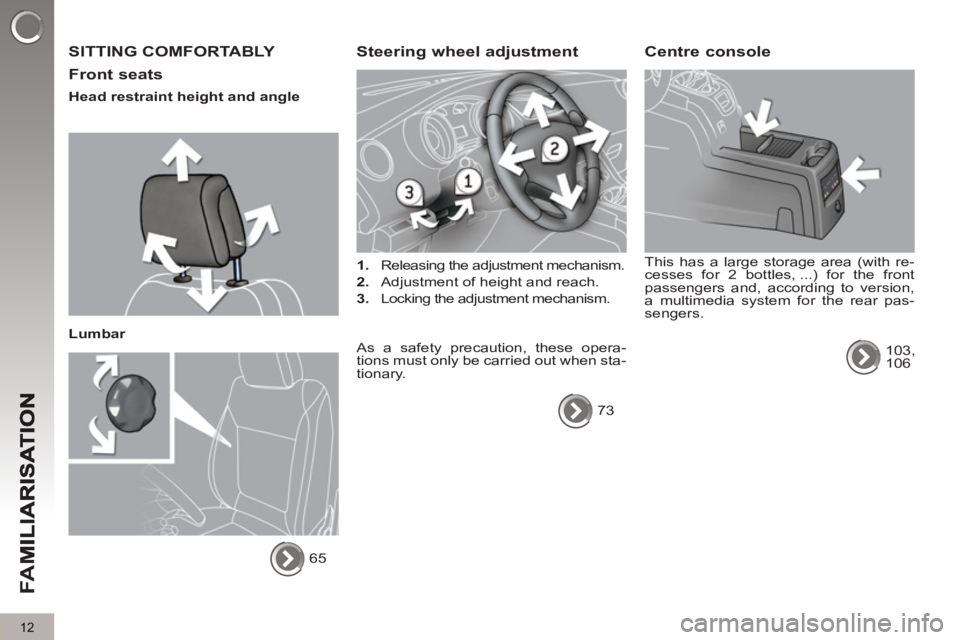
SITTING COMFORTABLY
Front seats
Head restraint height and angle
Lumbar
65
Steering wheel adjustment
1.
Releasing the adjustment mechanism.
2.
Adjustment of height and reach.
3.
Locking the adjustment mechanism.
As a safety precaution, these opera-
tions must only be carried out when sta-
tionary.
73
Centre console
This has a large storage area (with re-
cesses for 2 bottles, ...) for the front
passengers and, according to version,
a multimedia system for the rear pas-
sengers.
103,
106
Page 15 of 364
13
SITTING COMFORTABLY
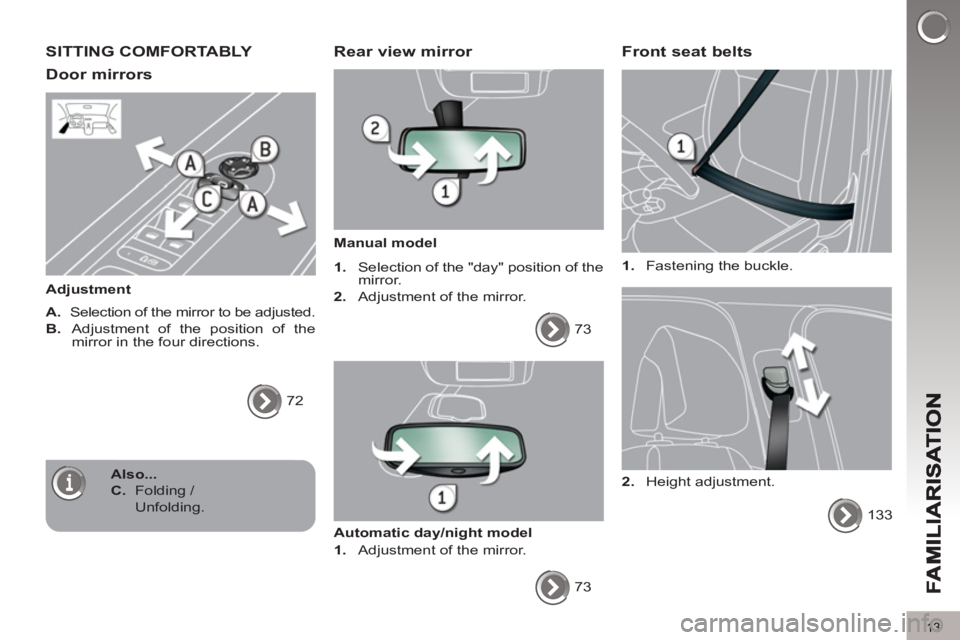
Door mirrors
Adjustment
A.
Selection of the mirror to be adjusted.
B.
Adjustment of the position of the
mirror in the four directions.
72
Rear view mirror
Manual model
1.
Selection of the "day" position of the
mirror.
2.
Adjustment of the mirror.
73
Automatic day/night model
1.
Adjustment of the mirror.
73
Front seat belts
1.
Fastening the buckle.
133
2.
Height adjustment.
Also...
C.
Folding /
Unfolding.
Page 16 of 364
FA
M
14
SEEING CLEARLY
Li
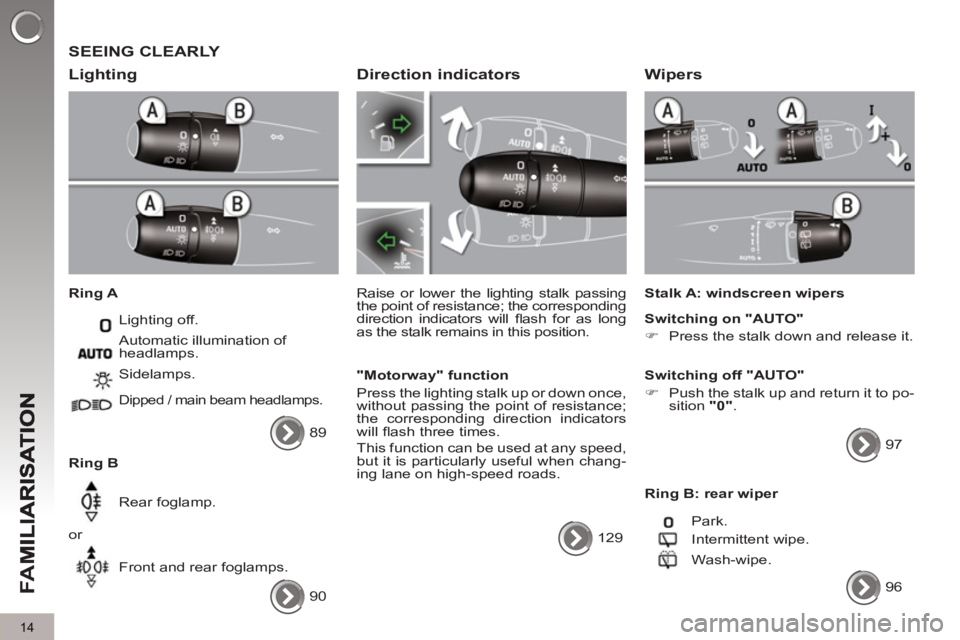
ghting
Ring A
Lighting off.
Ring B Sidelamps.
Dipped / main beam headlamps.
Rear foglamp.
or
Front and rear foglamps. Automatic illumination of
headlamps.
90
Direction indicators
Raise or lower the lighting stalk passing
the point of resistance; the corresponding
direction indicators will fl ash for as long
as the stalk remains in this position.
"Motorway" function
Press the lighting stalk up or down once,
without passing the point of resistance;
the corresponding direction indicators
will fl ash three times.
This function can be used at any speed,
but it is particularly useful when chang-
ing lane on high-speed roads.
129
Wipers
Stalk A: windscreen wipers
Switching on "AUTO"
�)
Press the stalk down and release it.
Switching off "AUTO"
�)
Push the stalk up and return it to po-
sition "0"
.
97
Ring B: rear wiper
Park.
Intermittent wipe.
Wash-wipe.
96
89
Page 17 of 364
FA
M
15
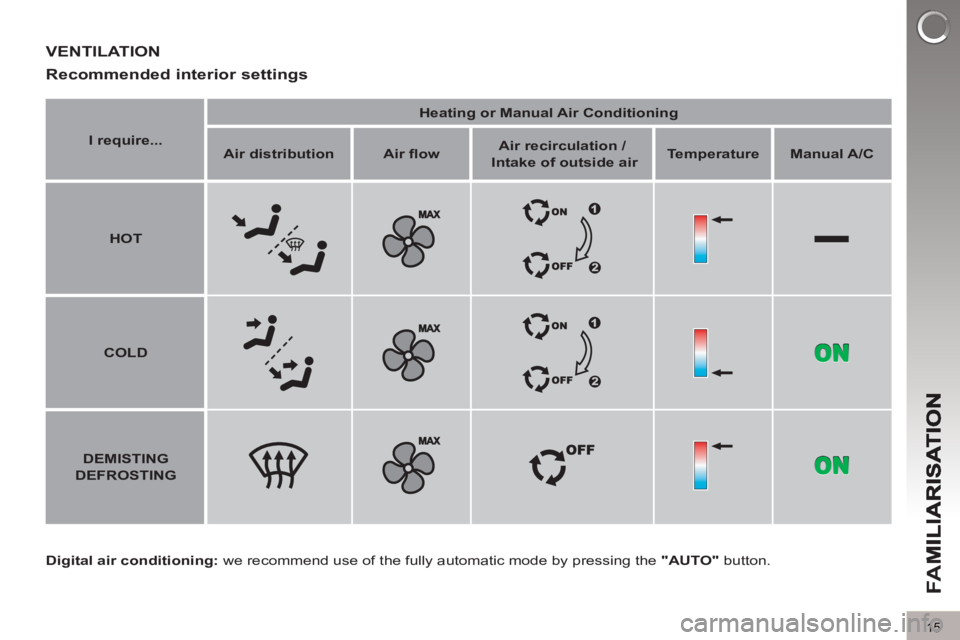
Digital air conditioning:
we recommend use of the fully automatic mode by pressing the "AUTO"
button.
VENTILATION
Recommended interior settin
gs
I require...
Heating or Manual Air Conditioning
Air distribution
Air fl ow
Air recirculation /
Intake of outside air
Temperature
Manual A/C
HOT
COLD
DEMISTING
DEFROSTING
Page 18 of 364
FA
M
16
MONITORING
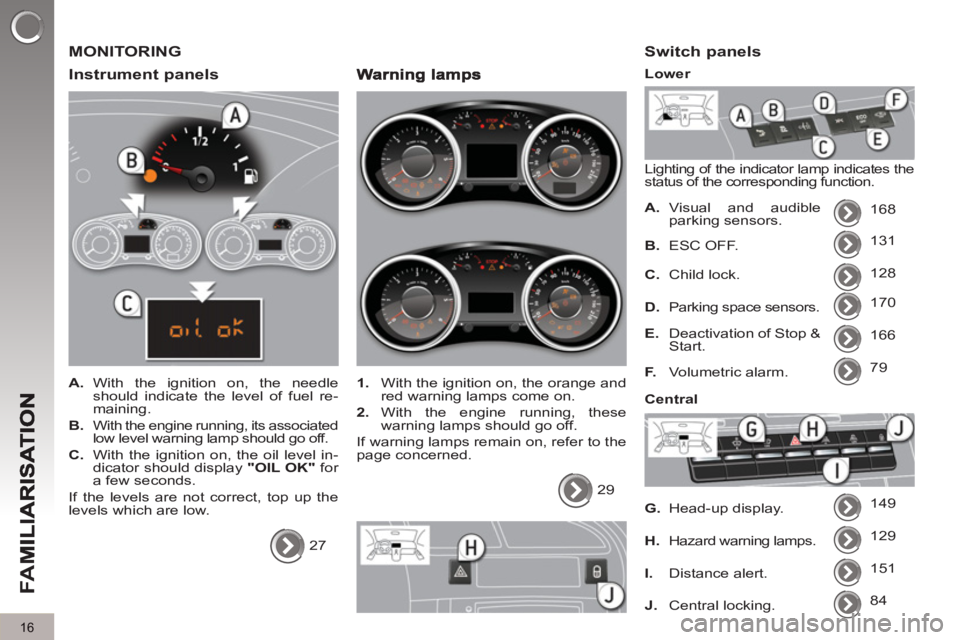
Instrument
panels
A.
With the ignition on, the needle
should indicate the level of fuel re-
maining.
B.
With the engine running, its associated
low level warning lamp should go off.
C.
With the ignition on, the oil level in-
dicator should display "OIL OK"
for
a few seconds.
If the levels are not correct, top up the
levels which are low.
27
1.
With the ignition on, the orange and
red warning lamps come on.
2.
With the engine running, these
warning lamps should go off.
If warning lamps remain on, refer to the
page concerned.
29
Switch panels
Lighting of the indicator lamp indicates the
status of the corresponding function.
A.
Visual and audible
parking sensors. 168
131
128
170
166
79
149
129
B.
ESC OFF.
C.
Child lock.
D.
Parking space sensors.
E.
Deactivation of Stop &
Start.
F.
Volumetric alarm.
G.
Head-up display.
H.
Hazard warning lamps.
Lower
Central
151
I.
Distance alert.
84
J.
Central locking.
Page 19 of 364
FA
M
17
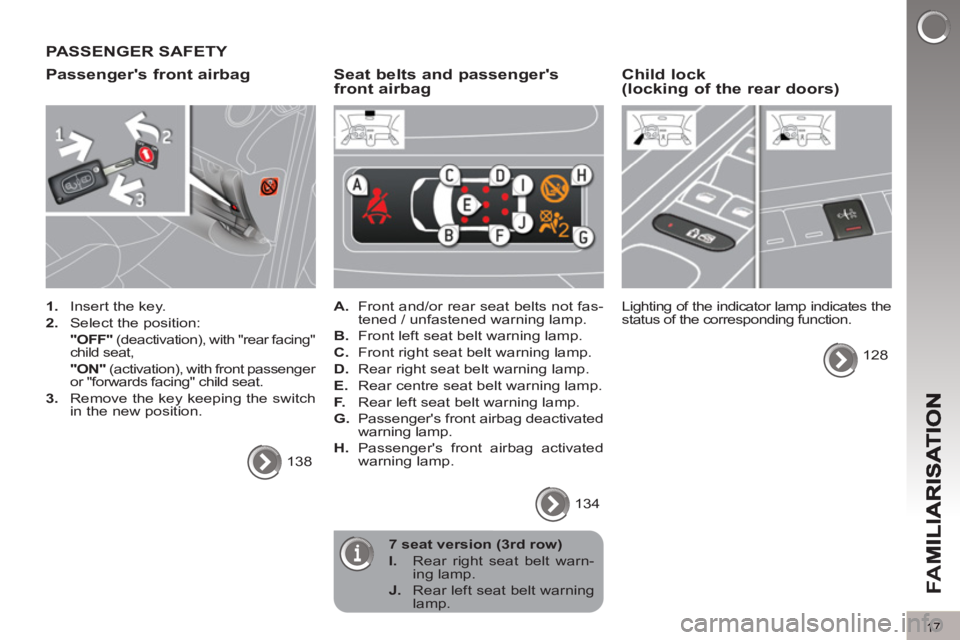
PASSENGER SAFETY
Passen
ger's front airbag
1.
Insert the key.
2.
Select the position:
"OFF"
(deactivation), with "rear facing"
child seat,
"ON"
(activation), with front passenger
or "forwards facing" child seat.
3.
Remove the key keeping the switch
in the new position.
138
Seat belts and passenger's front airbag
A.
Front and/or rear seat belts not fas-
tened / unfastened warning lamp.
B.
Front left seat belt warning lamp.
C.
Front right seat belt warning lamp.
D.
Rear right seat belt warning lamp.
E.
Rear centre seat belt warning lamp.
F.
Rear left seat belt warning lamp.
G.
Passenger's front airbag deactivated
warning lamp.
H.
Passenger's front airbag activated
warning lamp.
134
Child lock (locking of the rear doors)
Lighting of the indicator lamp indicates the
status of the corresponding function.
128
7 seat version (3rd row)
I.
Rear right seat belt warn-
ing lamp.
J.
Rear left seat belt warning
lamp.
Page 20 of 364
FA
M
18
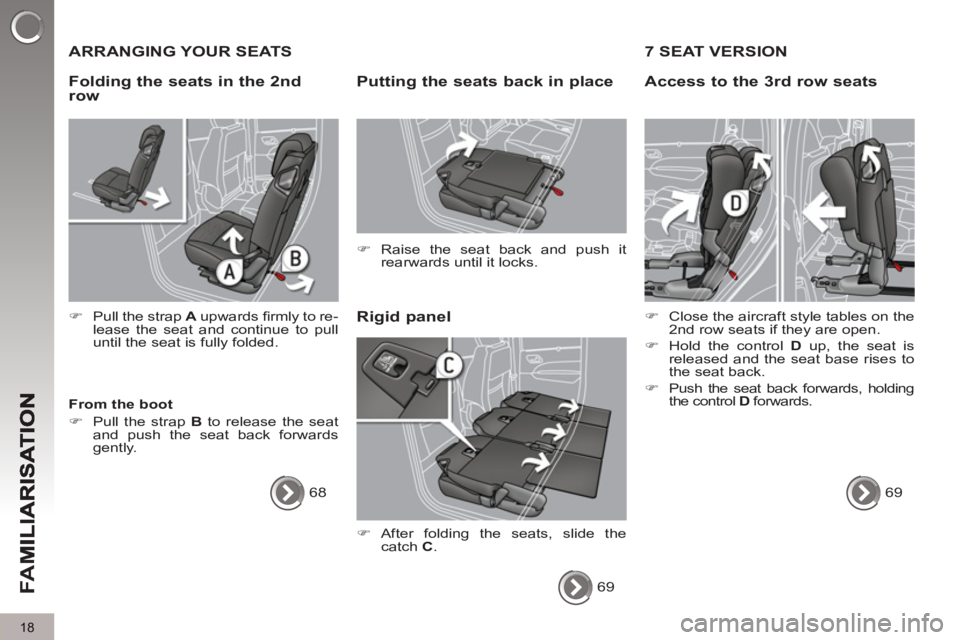
ARRANGING YOUR SEATS
Ri
gid panel
Putting the seats back in place
�)
Raise the seat back and push it
rearwards until it locks.
From the boot
�)
Pull the strap B
to release the seat
and push the seat back forwards
gently.
Folding the seats in the 2nd row
�)
Pull the strap A
upwards fi rmly to re-
lease the seat and continue to pull
until the seat is fully folded.
Access to the 3rd row seats
�)
Close the aircraft style tables on the
2 nd row seats if they are open.
�)
Hold the control D
up, the seat is
released and the seat base rises to
the seat back.
�)
Push the seat back forwards, holding
the control D
forwards.
69
68
69
7 SEAT VERSION
�)
After folding the seats, slide the
catch C
.