PEUGEOT 5008 2017 Owners Manual
Manufacturer: PEUGEOT, Model Year: 2017, Model line: 5008, Model: PEUGEOT 5008 2017Pages: 404, PDF Size: 15.31 MB
Page 251 of 404
249
Trailers with LED lamps are not
compatible with the wiring harness of this
device.
To know the technical features, and in
particular the towable weights for your
vehicle, refer to the corresponding section.
For advice on driving safely when To w i n g
a trailer , refer to the corresponding
section.
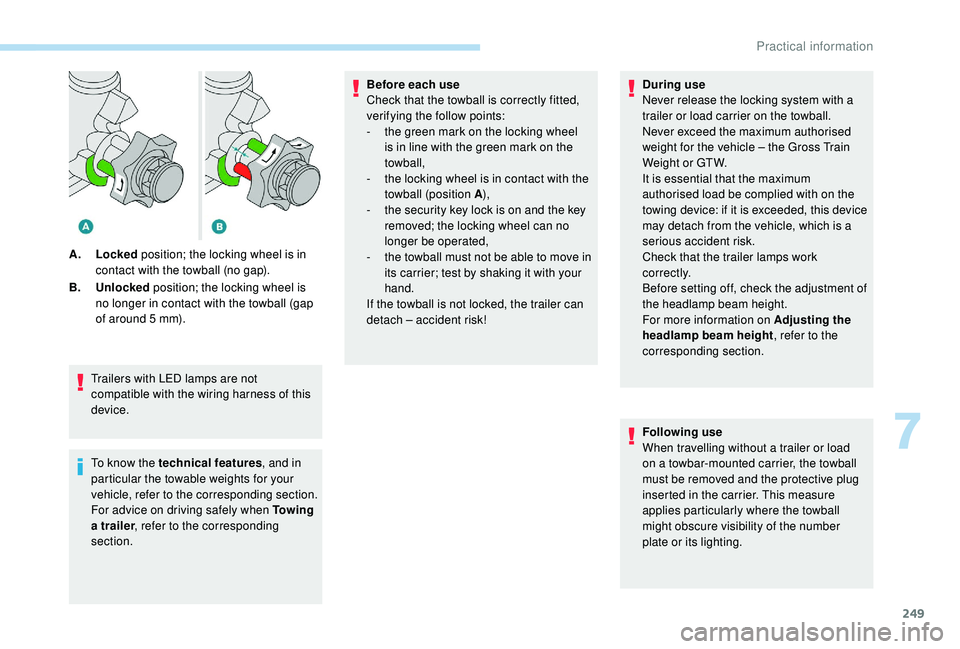
A.
Locked position; the locking wheel is in
contact with the towball (no gap).
B. Unlocked position; the locking wheel is
no longer in contact with the towball (gap
of around 5 mm). Before each use
Check that the towball is correctly fitted,
verifying the follow points:
-
t
he green mark on the locking wheel
is in line with the green mark on the
towball,
-
t
he locking wheel is in contact with the
towball (position A ),
-
t
he security key lock is on and the key
removed; the locking wheel can no
longer be operated,
-
t
he towball must not be able to move in
its carrier; test by shaking it with your
hand.
If the towball is not locked, the trailer can
detach – accident risk! During use
Never release the locking system with a
trailer or load carrier on the towball.
Never exceed the maximum authorised
weight for the vehicle – the Gross Train
Weight or GTW.
It is essential that the maximum
authorised load be complied with on the
towing device: if it is exceeded, this device
may detach from the vehicle, which is a
serious accident risk.
Check that the trailer lamps work
c o r r e c t l y.
Before setting off, check the adjustment of
the headlamp beam height.
For more information on Adjusting the
headlamp beam height
, refer to the
corresponding section.
Following use
When travelling without a trailer or load
on a towbar-mounted carrier, the towball
must be removed and the protective plug
inserted in the carrier. This measure
applies particularly where the towball
might obscure visibility of the number
plate or its lighting.
7
Practical information
Page 252 of 404
250
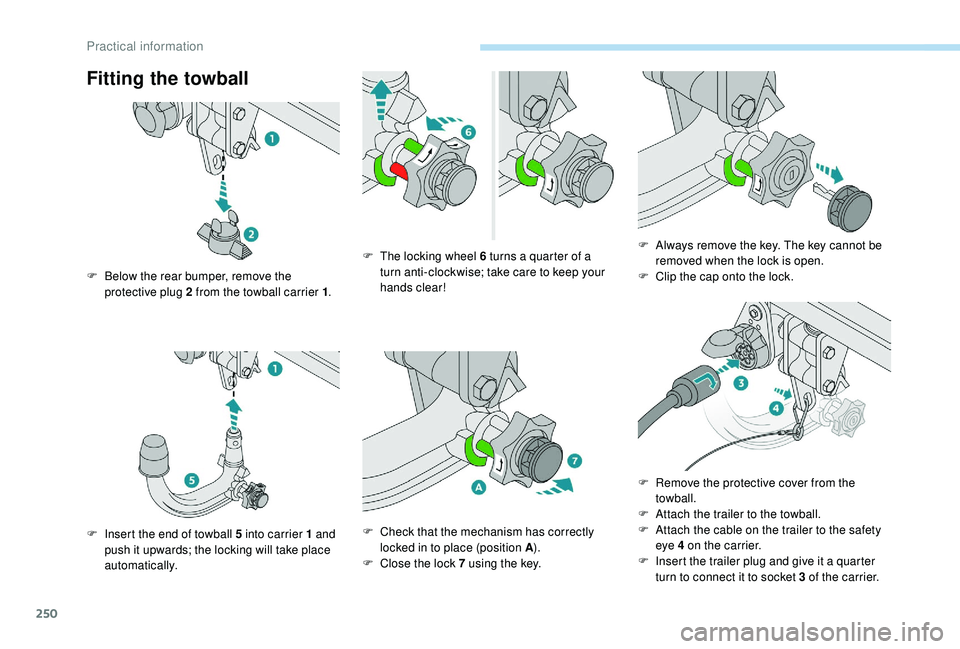
Fitting the towball
F Below the rear bumper, remove the protective plug 2 from the towball carrier 1 .
F
I
nsert the end of towball 5 into carrier 1 and
push it upwards; the locking will take place
automatically. F
T
he locking wheel 6 turns a quarter of a
turn anti-clockwise; take care to keep your
hands clear!
F
C
heck that the mechanism has correctly
locked in to place (position A ).
F
C
lose the lock 7 using the key.F
A
lways remove the key. The key cannot be
removed when the lock is open.
F C lip the cap onto the lock.
F
R
emove the protective cover from the
towball.
F
A
ttach the trailer to the towball.
F
A
ttach the cable on the trailer to the safety
eye 4
on the carrier.
F
I
nsert the trailer plug and give it a quarter
turn to connect it to socket 3
of the carrier.
Practical information
Page 253 of 404
251
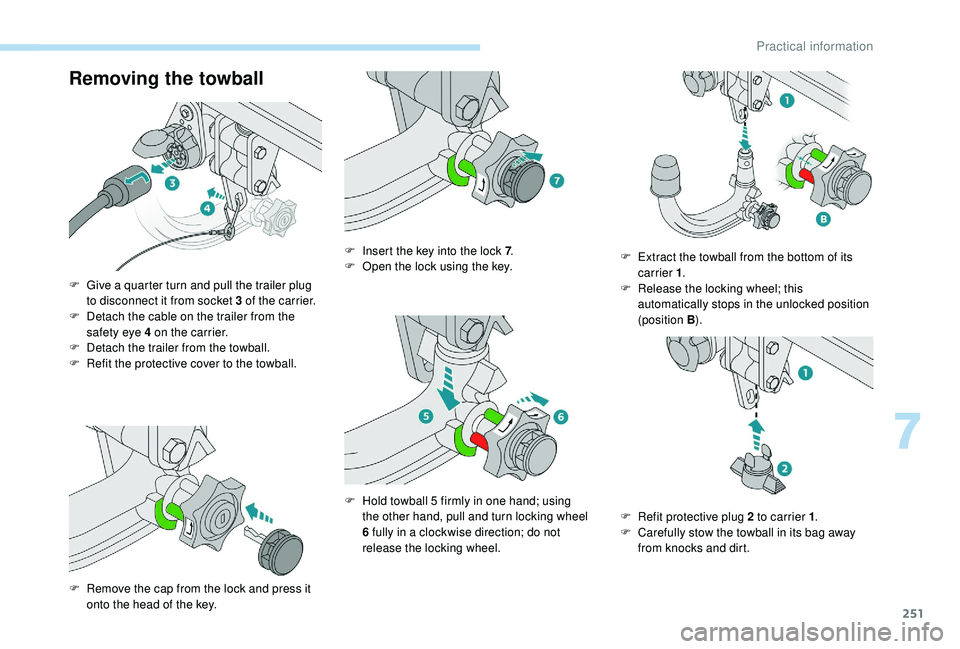
Removing the towball
F Give a quarter turn and pull the trailer plug to disconnect it from socket 3 of the carrier.
F
D
etach the cable on the trailer from the
safety eye 4
on the carrier.
F
D
etach the trailer from the towball.
F
R
efit the protective cover to the towball.
F
R
emove the cap from the lock and press it
onto the head of the key. F
I
nsert the key into the lock 7
.
F
O
pen the lock using the key.
F
H
old towball 5 firmly in one hand; using
the other hand, pull and turn locking wheel
6
fully in a clockwise direction; do not
release the locking wheel. F
E
xtract the towball from the bottom of its
carrier 1 .
F R elease the locking wheel; this
automatically stops in the unlocked position
(position B ).
F
R
efit protective plug 2 to carrier 1.
F
C
arefully stow the towball in its bag away
from knocks and dirt.
7
Practical information
Page 254 of 404
252
Apply the label provided to a clearly visible
area, close to the carrier or in the boot.
Go to a PEUGEOT dealer or a qualified
workshop for any work on the towbar
system.
Load reduction mode
System which manages the use of certain
functions according to the level of charge
remaining in the battery.
When the vehicle is being driven, the load
reduction function temporarily deactivates
certain functions, such as air conditioning,
heated rear screen, etc.
The deactivated functions are reactivated
automatically as soon as conditions permit.
Maintenance
Correct operation is only possible if the towball
and its carrier are kept clean.
Before cleaning the vehicle with a high-
pressure jet wash, the towball must be removed
and the protective plug fitted to the carrier.
Energy economy mode
System which manages the duration of use of
certain functions to conser ve a sufficient level
of charge in the battery.
After the engine has stopped, you can still use
functions such as the audio and telematics
system, windscreen wipers, dipped beam
headlamps, courtesy lamps, etc. for a
maximum combined duration of about forty
minutes.
Switching to this mode
A message appears in the instrument panel
screen indicating that the vehicle has switched
to economy mode and the active functions are
put on standby.If a telephone call is being made at this
time, it will be maintained for around
10
minutes with the Bluetooth hands-free
system of your audio system.
Exiting the mode
These functions will be automatically restored
the next time the vehicle is used.
In order to restore the use of these functions
immediately, start the engine and let it run:
-
f
or less than ten minutes, to use the
equipment for approximately five minutes,
-
f
or more than ten minutes, to use the
equipment for up to approximately thirty
minutes.
Let the engine run for the duration specified to
ensure that the battery charge is sufficient.
Do not repeatedly and continuously restart the
engine in order to charge the battery.
A flat battery prevents the engine from
starting.
For more information on the 12
V batter y,
refer to the corresponding section.
Practical information
Page 255 of 404
253
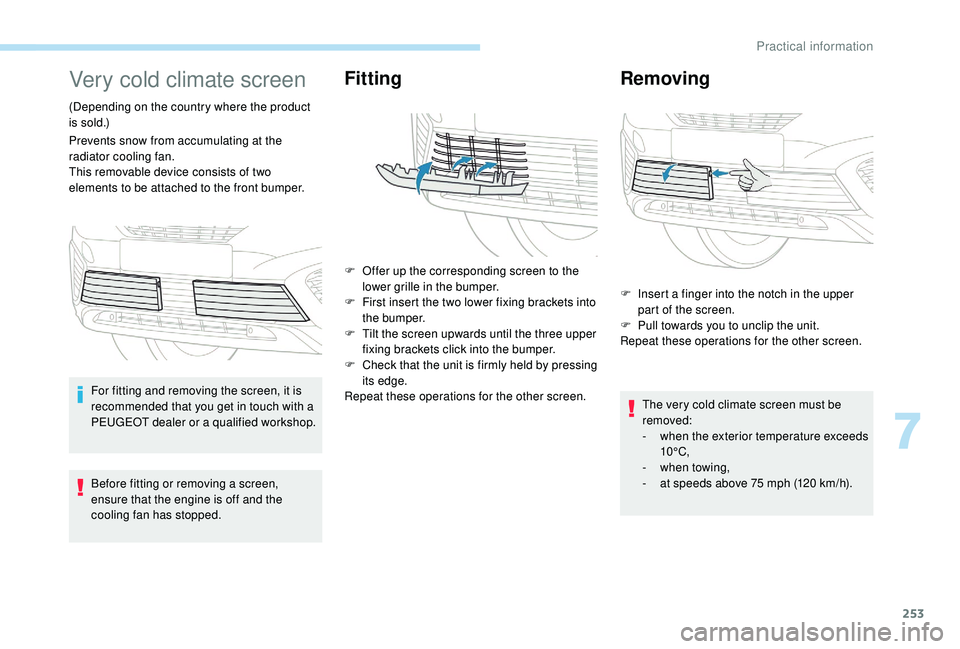
Very cold climate screen
(Depending on the country where the product
is sold.)
Prevents snow from accumulating at the
radiator cooling fan.
This removable device consists of two
elements to be attached to the front bumper.For fitting and removing the screen, it is
recommended that you get in touch with a
PEUGEOT dealer or a qualified workshop.
Before fitting or removing a screen,
ensure that the engine is off and the
cooling fan has stopped.
Fitting
F Offer up the corresponding screen to the lower grille in the bumper.
F
F
irst insert the two lower fixing brackets into
the bumper.
F
T
ilt the screen upwards until the three upper
fixing brackets click into the bumper.
F
C
heck that the unit is firmly held by pressing
its edge.
Repeat these operations for the other screen.
Removing
F Insert a finger into the notch in the upper part of the screen.
F
P
ull towards you to unclip the unit.
Repeat these operations for the other screen.
The very cold climate screen must be
removed:
-
w
hen the exterior temperature exceeds
10°C,
-
w
hen towing,
-
a
t speeds above 75 mph (120 km/h).
7
Practical information
Page 256 of 404
254
Snow chains
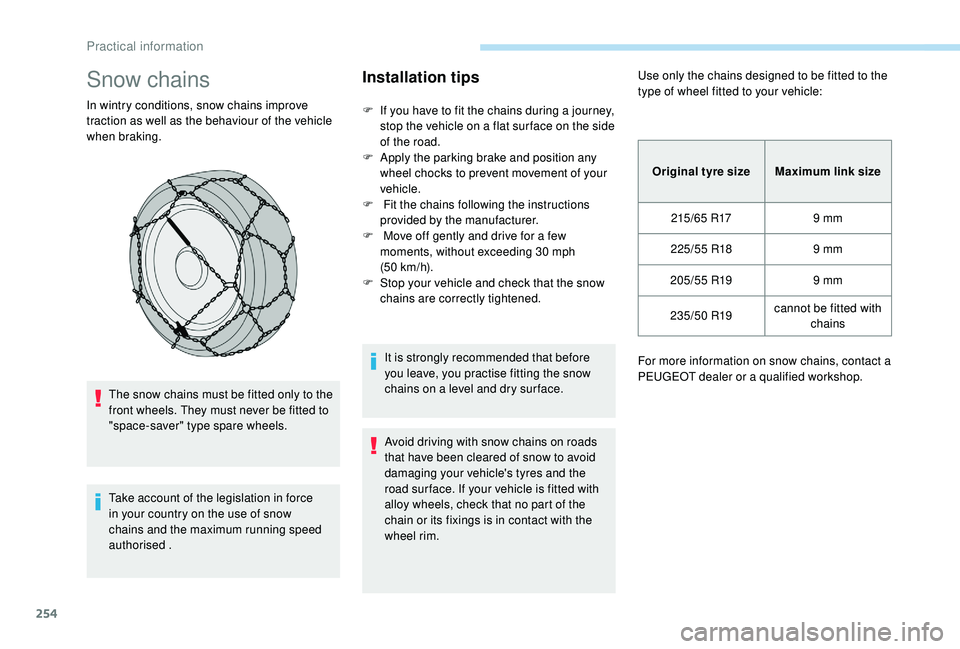
In wintry conditions, snow chains improve
traction as well as the behaviour of the vehicle
when braking.The snow chains must be fitted only to the
front wheels. They must never be fitted to
"space-saver" type spare wheels.
Take account of the legislation in force
in your country on the use of snow
chains and the maximum running speed
authorised .
Installation tips
F If you have to fit the chains during a journey, stop the vehicle on a flat sur face on the side
of the road.
F
A
pply the parking brake and position any
wheel chocks to prevent movement of your
vehicle.
F
F
it the chains following the instructions
provided by the manufacturer.
F
M
ove off gently and drive for a few
moments, without exceeding 30
mph
(50
km/h).
F
S
top your vehicle and check that the snow
chains are correctly tightened.
It is strongly recommended that before
you leave, you practise fitting the snow
chains on a level and dry sur face.
Avoid driving with snow chains on roads
that have been cleared of snow to avoid
damaging your vehicle's tyres and the
road sur face. If your vehicle is fitted with
alloy wheels, check that no part of the
chain or its fixings is in contact with the
wheel rim. Use only the chains designed to be fitted to the
type of wheel fitted to your vehicle:
Original tyre size Maximum link size
215/65
R179
mm
225/55
R189
mm
205/55
R199
mm
235/50
R19cannot be fitted with
chains
For more information on snow chains, contact a
PEUGEOT dealer or a qualified workshop.
Practical information
Page 257 of 404
255
Fitting roof bars
As a safety measure and to avoid
damaging the roof, it is essential to use
the transverse bars approved for your
vehicle.
Obser ve the instructions on fitting and use
contained in the guide supplied with the
roof bars.
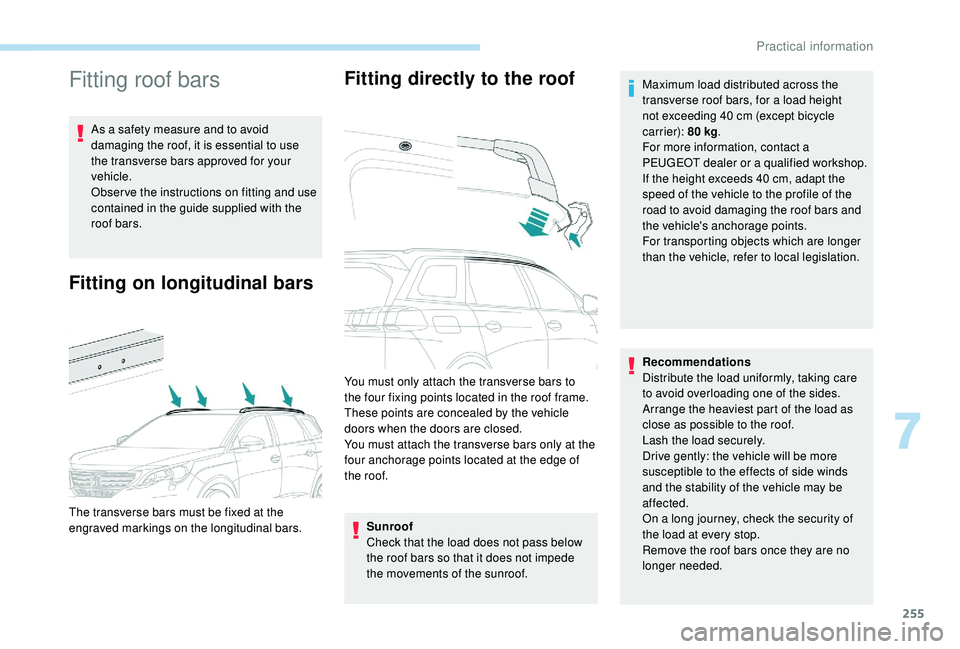
Fitting on longitudinal barsFitting directly to the roof
Sunroof
Check that the load does not pass below
the roof bars so that it does not impede
the movements of the sunroof.
The transverse bars must be fixed at the
engraved markings on the longitudinal bars. You must only attach the transverse bars to
the four fixing points located in the roof frame.
These points are concealed by the vehicle
doors when the doors are closed.
You must attach the transverse bars only at the
four anchorage points located at the edge of
the roof.
Recommendations
Distribute the load uniformly, taking care
to avoid overloading one of the sides.
Arrange the heaviest part of the load as
close as possible to the roof.
Lash the load securely.
Drive gently: the vehicle will be more
susceptible to the effects of side winds
and the stability of the vehicle may be
affected.
On a long journey, check the security of
the load at every stop.
Remove the roof bars once they are no
longer needed. Maximum load distributed across the
transverse roof bars, for a load height
not exceeding 40 cm (except bicycle
carrier): 80 kg
.
For more information, contact a
PEUGEOT dealer or a qualified workshop.
If the height exceeds 40 cm, adapt the
speed of the vehicle to the profile of the
road to avoid damaging the roof bars and
the vehicle's anchorage points.
For transporting objects which are longer
than the vehicle, refer to local legislation.
7
Practical information
Page 258 of 404
256
Bonnet
Before doing anything under the bonnet,
deactivate the Stop & Start system to
avoid any risk of injury resulting from an
automatic change to START mode.
The location of the interior bonnet release
lever prevents opening of the bonnet when
the left-hand front door is shut.
When the engine is hot, handle the
exterior safety catch and the stay with
care (risk of burns), using the protected
area.
When the bonnet is open, take care not to
damage the safety catch.
Do not open the bonnet under very windy
conditions.
The cooling fan may star t after
switching off the engine: take care
with articles and clothing that might be
caught by the fan blades.
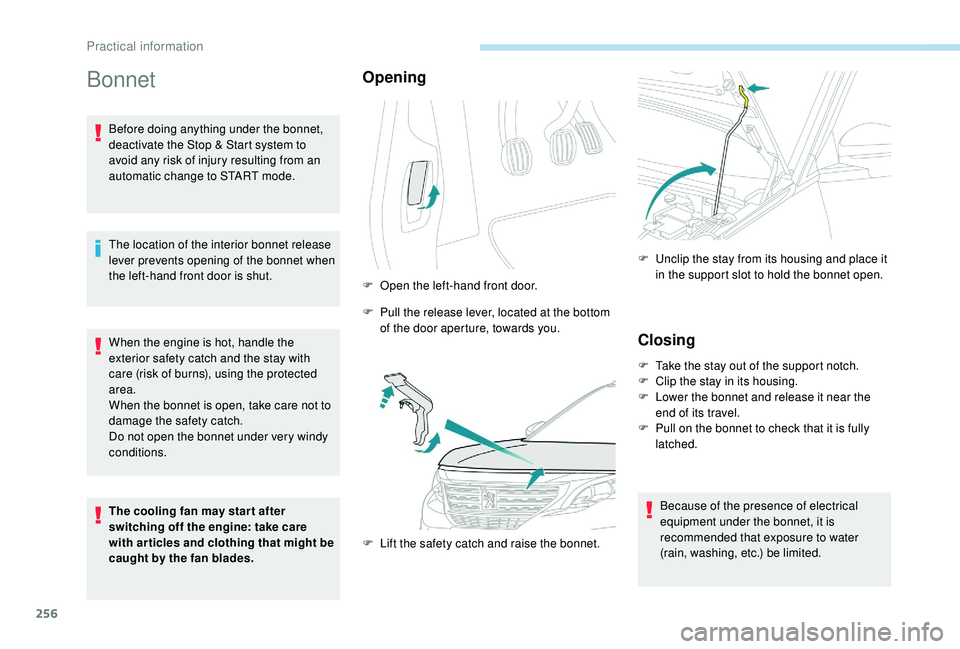
Opening
F Open the left-hand front door.
F
P
ull the release lever, located at the bottom
of the door aperture, towards you.
F
L
ift the safety catch and raise the bonnet. F
U
nclip the stay from its housing and place it
in the support slot to hold the bonnet open.
Closing
F Take the stay out of the support notch.
F C lip the stay in its housing.
F
L
ower the bonnet and release it near the
end of its travel.
F
P
ull on the bonnet to check that it is fully
latched.
Because of the presence of electrical
equipment under the bonnet, it is
recommended that exposure to water
(rain, washing, etc.) be limited.
Practical information
Page 259 of 404
257
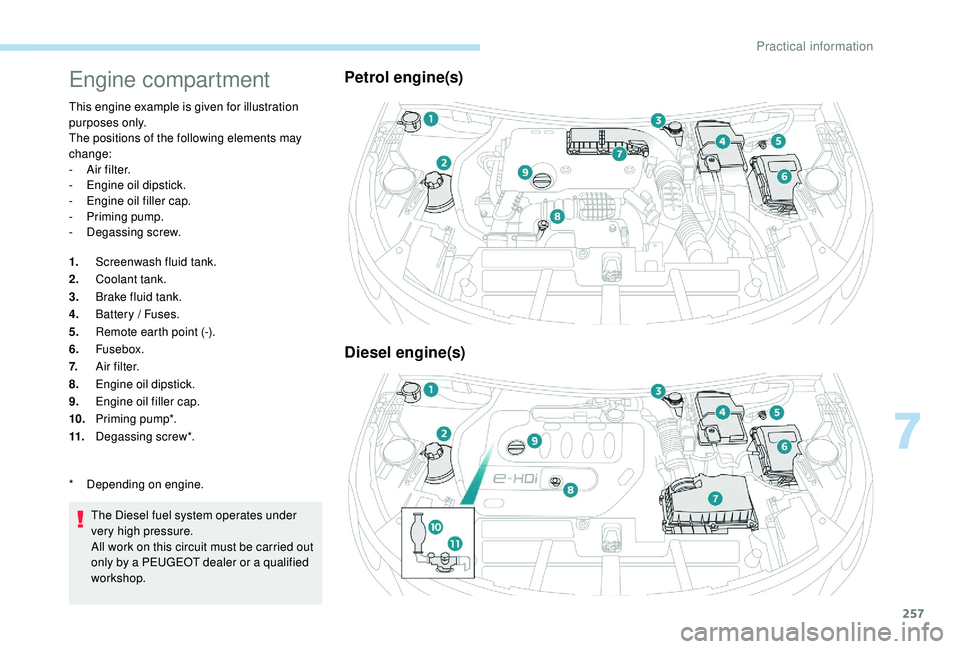
Engine compartment
This engine example is given for illustration
purposes only.
The positions of the following elements may
change:
-
A
ir filter.
-
E
ngine oil dipstick.
-
E
ngine oil filler cap.
-
P
riming pump.
-
D
egassing screw.
1. Screenwash fluid tank.
2. Coolant tank.
3. Brake fluid tank.
4. Battery / Fuses.
5. Remote earth point (-).
6. Fusebox.
7. A i r f i l t e r.
8. Engine oil dipstick.
9. Engine oil filler cap.
10. Priming pump*.
11. Degassing screw*.
The Diesel fuel system operates under
very high pressure.
All work on this circuit must be carried out
only by a PEUGEOT dealer or a qualified
workshop.
Petrol engine(s)
Diesel engine(s)
* Depending on engine.
7
Practical information
Page 260 of 404
258
Checking levels
Check all of these levels regularly, in line with
the manufacturer's service schedule. Top them
up if necessary, unless other wise indicated.
If a level drops significantly, have the
corresponding system checked by a PEUGEOT
dealer or a qualified workshop.Take care when working under the bonnet,
as certain areas of the engine may be
extremely hot (risk of burns) and the
cooling fan could start at any time (even
with the ignition off).
Used products
Avoid prolonged contact of used oil or
fluids with the skin.
Most of these fluids are harmful to health
or indeed very corrosive.Do not discard used oil or fluids into
sewers or onto the ground.
Take used oil to a PEUGEOT dealer
or a qualified workshop and dispose
of it in the containers reser ved for this
purpose.
Engine oil level
The check is carried out either when
the ignition is switched on using the
oil level indicator in the instrument
panel for vehicles equipped with an
electric gauge, or using the dipstick.
To ensure that the reading is correct, your
vehicle must be parked on a level sur face
with the engine stopped for more than
30
minutes.
It is normal to top up the oil level between
two ser vices (or oil changes). PEUGEOT
recommends that you check the level, and top
up if necessary, every 3,000
miles (5,000 km).
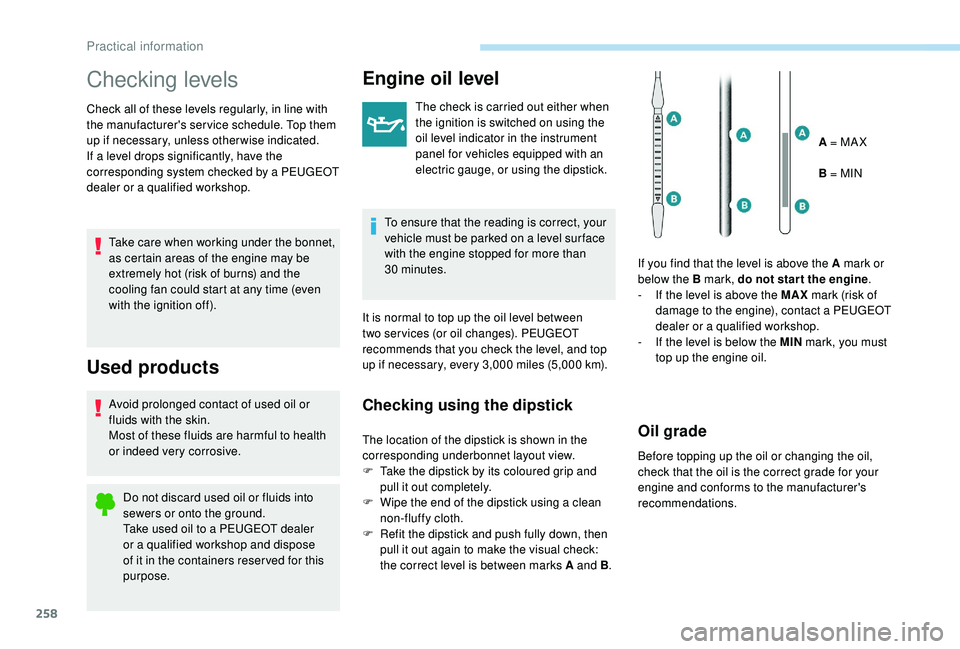
Checking using the dipstick
The location of the dipstick is shown in the
corresponding underbonnet layout view.
F
T
ake the dipstick by its coloured grip and
pull it out completely.
F
W
ipe the end of the dipstick using a clean
non-fluffy cloth.
F
R
efit the dipstick and push fully down, then
pull it out again to make the visual check:
the correct level is between marks A and B .A = MA X
B = MIN
If you find that the level is above the A mark or
below the B mark, do not star t the engine .
-
I
f the level is above the MAX
mark (risk of
damage to the engine), contact a PEUGEOT
dealer or a qualified workshop.
-
I
f the level is below the MIN
mark, you must
top up the engine oil.Oil grade
Before topping up the oil or changing the oil,
check that the oil is the correct grade for your
engine and conforms to the manufacturer's
recommendations.
Practical information