seats Peugeot 508 2014 Owner's Manual - RHD (UK, Australia)
[x] Cancel search | Manufacturer: PEUGEOT, Model Year: 2014, Model line: 508, Model: Peugeot 508 2014Pages: 352, PDF Size: 13.51 MB
Page 4 of 352
.
Contents
Instrument panel 22
Indicator and warning lamps 23
Gauges and indicators 33
Trip computer 38
Setting the date and time 41
Monitoring
Familiarisation
Remote control key
43
Alarm 53
Electric windows 55
Boot 57
Motorised tailgate (SW) 58
Sunroof 61
Panoramic sunroof (SW) 63
Fuel tank 64
Diesel misfuel prevention 65
Access
Front seats 67
Rear seats 72
M i r r o r s 74
Steering wheel adjustment 76
Interior fi ttings 77
Boot fi ttings (Saloon) 80
Boot fi ttings (SW) 81
Heating and Ventilation 86
Manual air conditioning 88
Dual-zone digital air conditioning 90
Quad-zone digital air conditioning 93
Rear screen demist - defrost 98
Programmable Heating / Ventilation 99
Comfort
Starting-switching off the engine 101
Electric parking brake 103
Manual parking brake 110
Manual gearbox 111
Gear shift indicator 112
Automatic gearbox 113
6-speed electronic gear control gearbox 117
Stop & Start 121
Hill start assist 124
Head-up display 125
Speed limiter 128
Cruise control 130
Parking sensors 132
Parking space sensors 134
Driving
Lighting controls 136
Automatic illumination of headlamps 141
Headlamp adjustment 144
Directional lighting 145
Wiper controls 147
Automatic rain sensitive wipers 149
Courtesy lamps 151
Interior mood lighting 152
Visibility
Eco-driving 20
Page 5 of 352
.
.
Contents
Child seats 153
ISOFIX child seats 160
Child lock 164
Child safety
Direction indicators 165
Emergency or assistance call 166
Horn 166
Tyre under-infl ation detection 167
ESC system 169
Seat belts 172
Airbags 175
Safety
Temporary puncture repair kit 179
Changing a wheel 185
Changing a bulb 192
Changing a fuse 201
12 V battery 205
Energy economy mode 208
Changing a wiper blade 209
Towing the vehicle 210
Towing a trailer 212
Fitting roof bars 214
Accessories 215
Practical information
Opening the bonnet 218
Running out of fuel (Diesel) 219
Petrol engines 221
Diesel engines 222
Blue HDi Diesel engines 224
Checking levels 225
Checks 228
AdBlue® additive for ® additive for ®
HDi Blue Diesel engines 230
Checks
Petrol engines 235
Petrol weights 236
Diesel engines 238
Diesel weights 242
Dimensions 246
Identifi cation markings 247
Technical data
Emergency or assistance 249
JBL equipment 251
PEUGEOT Connect Navigation (RT6) 253
Audio system 307
Audio equipment and telematics
Alphabetical indexVisual search
Page 11 of 352
.
9
Familiarisation
Sitting comfortably
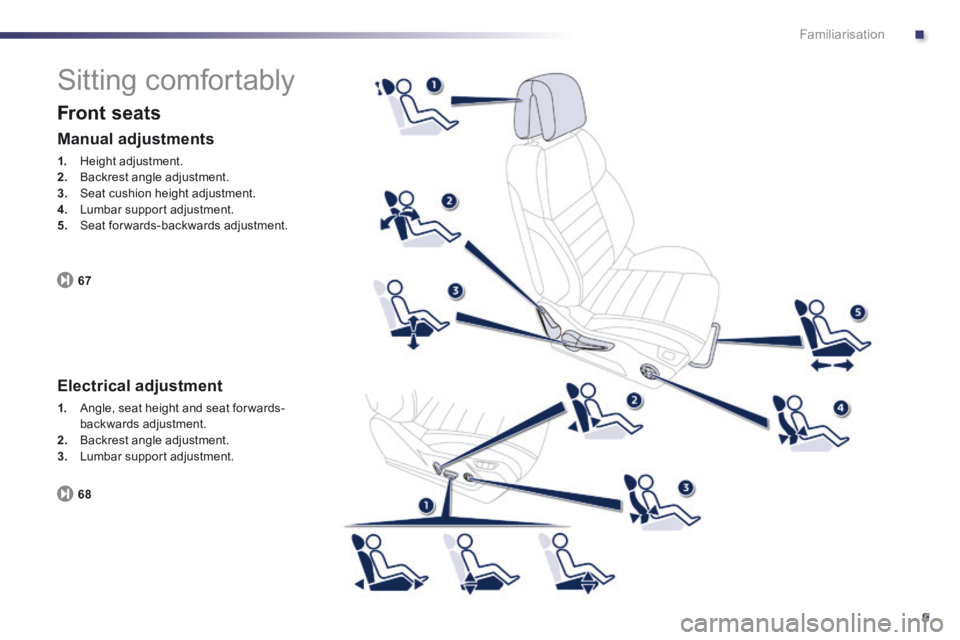
Front seats
67
Manual adjustments
1. Height adjustment. 2. Backrest angle adjustment. 3. Seat cushion height adjustment. 4. Lumbar support adjustment. 5. Seat forwards-backwards adjustment.
Electrical adjustment
1. Angle, seat height and seat forwards-backwards adjustment. 2. Backrest angle adjustment. 3. Lumbar support adjustment.
68
Page 14 of 352
12
Familiarisation
Sitting comfortably
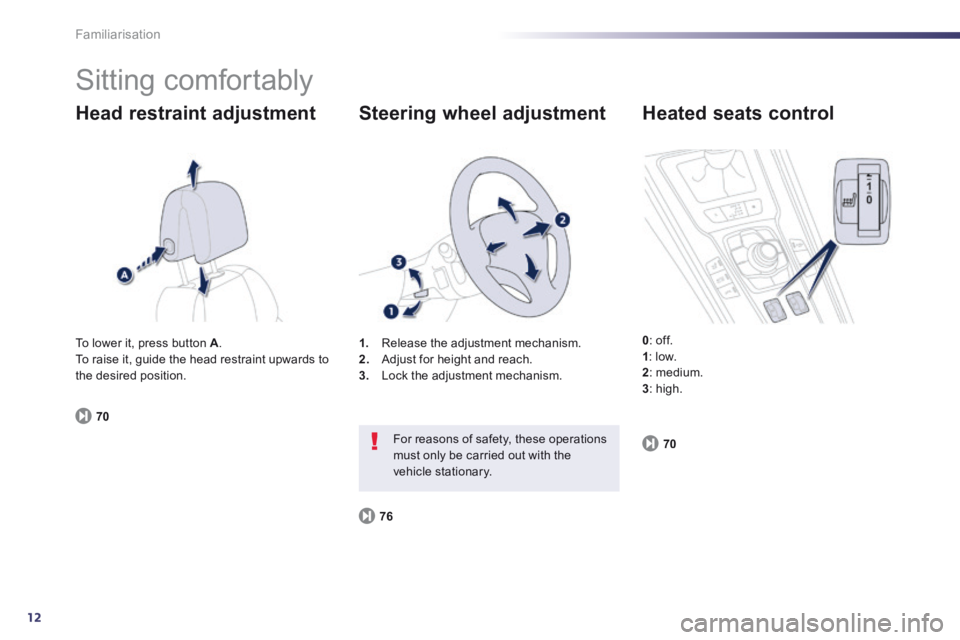
Head restraint adjustment
70
1. Release the adjustment mechanism. 2. Adjust for height and reach. 3. Lock the adjustment mechanism.
Steering wheel adjustment
76
For reasons of safety, these operations must only be carried out with the vehicle stationary.
Heated seats control
0 : off. 1 : low. 2 : medium. 3 : high.
To lower it, press button A . To raise it, guide the head restraint upwards to the desired position.
70
Page 23 of 352
.
21
Limit the causes of excess
consumption
Spread loads throughout the vehicle; place the heaviest items in the bottom of the boot, as close as possible to the rear seats. Limit the loads carried in the vehicle and reduce wind resistance (roof bars, roof rack, bicycle carrier, trailer...). Use a roof box in preference. Remove roof bars and roof racks after use.
At the end of winter, remove snow tyres and refit your summer tyres.
Observe the recommendations
on maintenance
Check the tyre pressures regularly, when cold, referring to the label in the door aperture, driver's side.
Carry out this check in particular: - before a long journey, - at each change of season, - after a long period out of use. Don't forget the spare wheel and the tyres on any trailer or caravan.
Have your vehicle serviced regularly (engine oil, oil filter, air filter...) and observe the schedule of operations recommended by the manufacturer.
When refuelling, do not continue after the third cut-off of the nozzle to avoid any over flow.
At the wheel of your new vehicle, it is only after the first 1 800 miles (3 000 kilometres) that you will see the fuel consumption settle down to a consistent average.
Page 62 of 352
60
Access
Emergency release (Saloon
and SW)
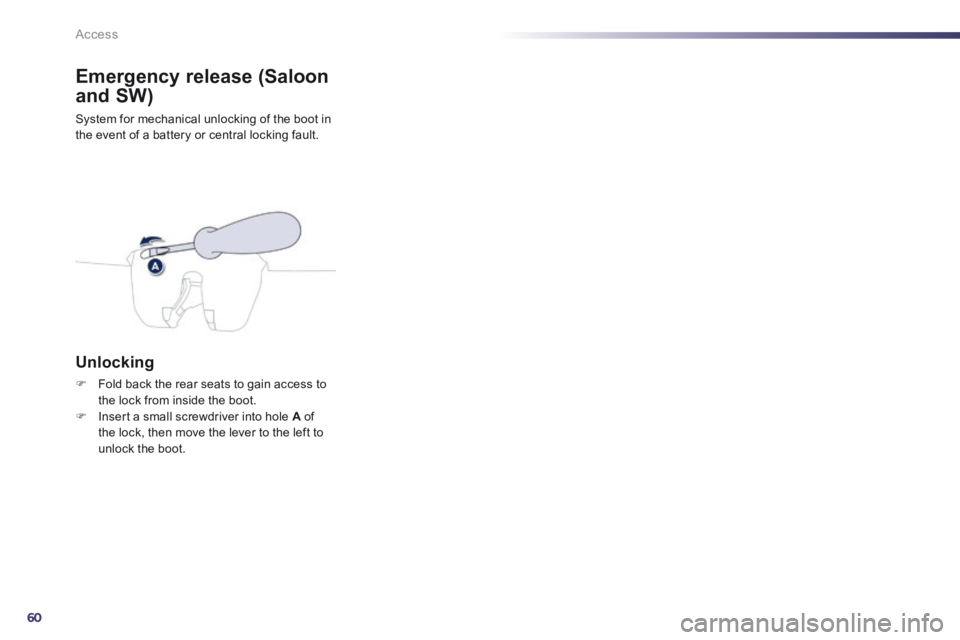
System for mechanical unlocking of the boot in the event of a battery or central locking fault.
Unlocking
Fold back the rear seats to gain access to the lock from inside the boot. Insert a small screwdriver into hole A of
the lock, then move the lever to the left to unlock the boot.
Page 69 of 352
3
67
Comfort
Front seats
Manual adjustments
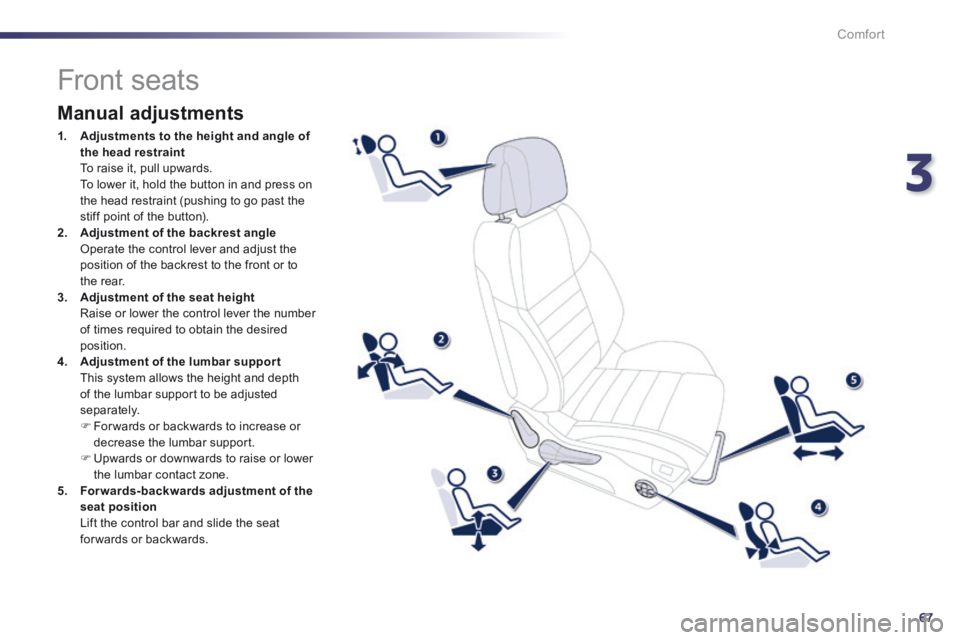
1. Adjustments to the height and angle of the head restraint To raise it, pull upwards. To lower it, hold the button in and press on the head restraint (pushing to go past the stiff point of the button). 2. Adjustment of the backrest angle Operate the control lever and adjust the position of the backrest to the front or to the rear. 3. Adjustment of the seat height Raise or lower the control lever the number of times required to obtain the desired position. 4. Adjustment of the lumbar suppor t This system allows the height and depth of the lumbar support to be adjusted separately. For wards or backwards to increase or
decrease the lumbar support. Upwards or downwards to raise or lower the lumbar contact zone. 5. Forwards-backwards adjustment of the seat position Lift the control bar and slide the seat for wards or backwards.
Page 72 of 352
70
Comfort
Head restraint height and angle adjustment
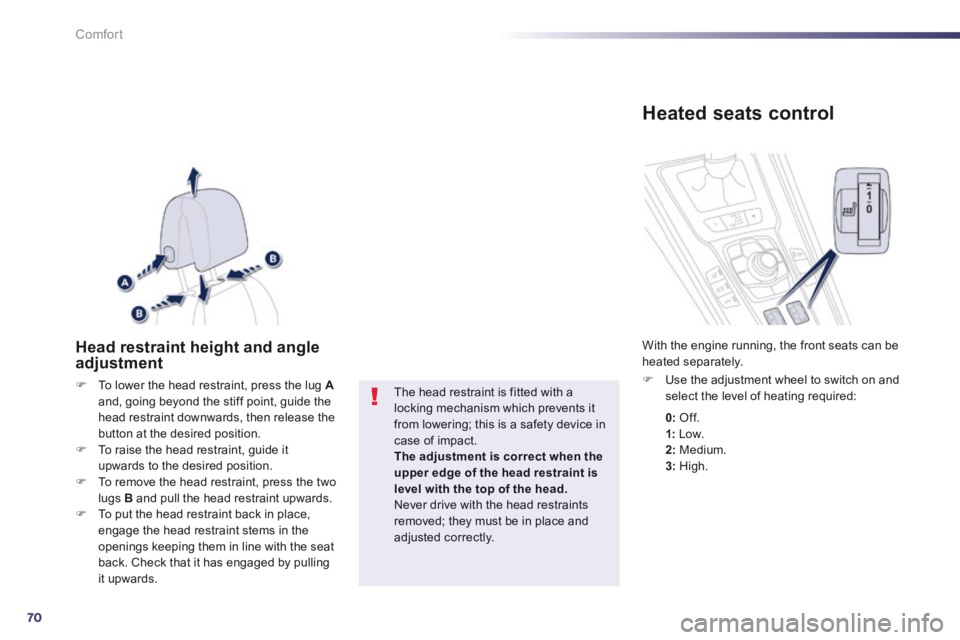
To lower the head restraint, press the lug Aand, going beyond the stiff point, guide the head restraint downwards, then release the button at the desired position. To raise the head restraint, guide it upwards to the desired position. To remove the head restraint, press the two lugs B and pull the head restraint upwards. To put the head restraint back in place, engage the head restraint stems in the openings keeping them in line with the seat back. Check that it has engaged by pulling it upwards.
The head restraint is fitted with a locking mechanism which prevents it from lowering; this is a safety device in
case of impact. The adjustment is correct when the upper edge of the head restraint is level with the top of the head. Never drive with the head restraints removed; they must be in place and adjusted correctly.
Heated seats control
Use the adjustment wheel to switch on and select the level of heating required:
With the engine running, the front seats can be heated separately.
0: Of f.
1: Low. 2: Medium. 3: High.
Page 74 of 352
72
Comfort
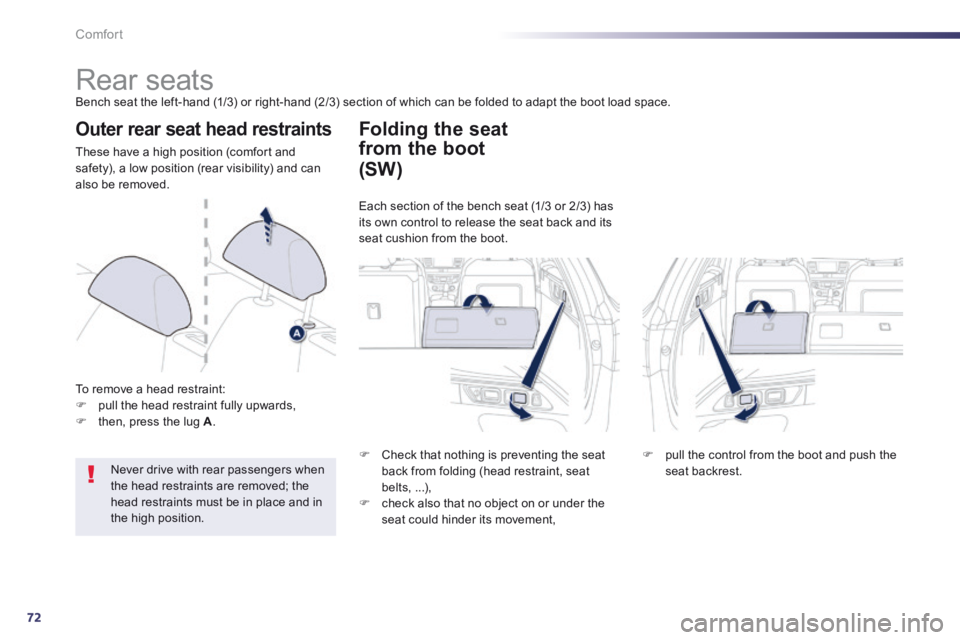
Rear seats Bench seat the left-hand (1/3) or right-hand (2/3) section of which can be folded to adapt the boot load space.
Outer rear seat head restraints
These have a high position (comfort and safety), a low position (rear visibility) and can also be removed.
To remove a head restraint: pull the head restraint fully upwards, then, press the lug A .
Never drive with rear passengers when the head restraints are removed; the head restraints must be in place and in the high position.
Folding the seat
from the boot
Check that nothing is preventing the seat back from folding (head restraint, seat belts, ...), check also that no object on or under the seat could hinder its movement,
pull the control from the boot and push the seat backrest.
(SW)
Each section of the bench seat (1/3 or 2/3) has its own control to release the seat back and its seat cushion from the boot.
Page 83 of 352
3
81
Comfort
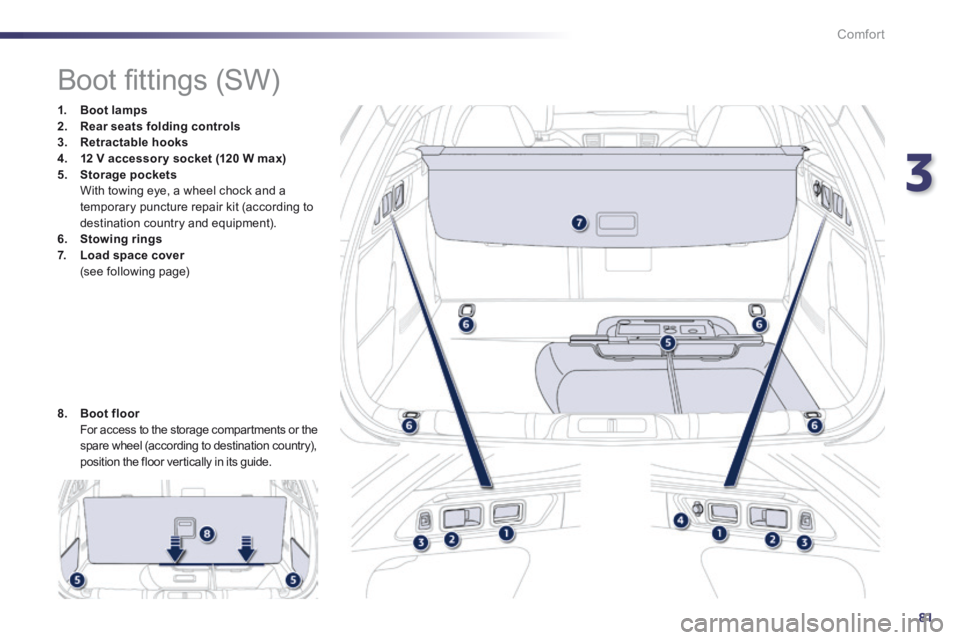
Boot fi ttings (SW)
1. Boot lamps2. Rear seats folding controls3. Retractable hooks4. 12 V accessor y socket (120 W max)5. Storage pockets With towing eye, a wheel chock and a temporary puncture repair kit (according to destination country and equipment). 6. Stowing rings7. Load space cover Load space cover Load space cover (see following page)
8. Boot floor For access to the storage compartments or the spare wheel (according to destination country), position the floor vertically in its guide.