Peugeot 508 2018 Owner's Manual
Manufacturer: PEUGEOT, Model Year: 2018, Model line: 508, Model: Peugeot 508 2018Pages: 320, PDF Size: 10.09 MB
Page 181 of 320
179
Operating fault
If a fault occurs when shifting
to reverse, this warning lamp
comes on in the instrument panel,
accompanied by a message and an
audible signal (short beep).
Contact a PEUGEOT dealer or a qualified
workshop to have the system checked.
Visiopark 1 – Visiopark 2
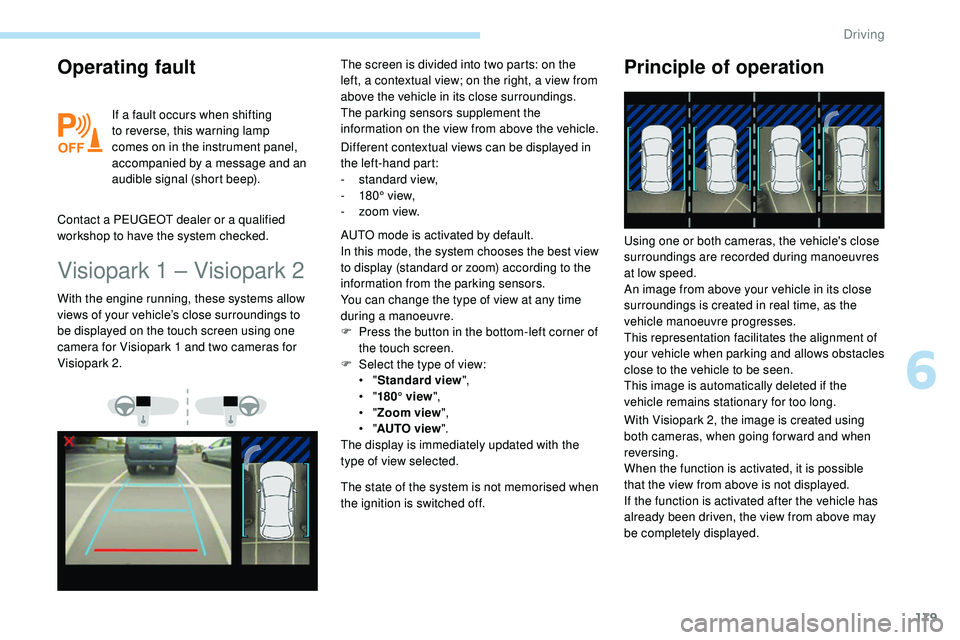
Different contextual views can be displayed in
the left-hand part:
-
s
tandard view,
-
1
80° view,
-
z
oom view.
With the engine running, these systems allow
views of your vehicle’s close surroundings to
be displayed on the touch screen using one
camera for Visiopark 1 and two cameras for
Visiopark 2. The screen is divided into two parts: on the
left, a contextual view; on the right, a view from
above the vehicle in its close surroundings.
The parking sensors supplement the
information on the view from above the vehicle.
AUTO mode is activated by default.
In this mode, the system chooses the best view
to display (standard or zoom) according to the
information from the parking sensors.
You can change the type of view at any time
during a manoeuvre.
F
P
ress the button in the bottom-left corner of
the touch screen.
F
Sel
ect the type of view:
•
"Standard view ",
•
"180° view ",
•
"Zoom view ",
•
"AUTO view ".
The display is immediately updated with the
type of view selected.
The state of the system is not memorised when
the ignition is switched off.
Principle of operation
With Visiopark 2, the image is created using
both cameras, when going for ward and when
reversing.
When the function is activated, it is possible
that the view from above is not displayed.
If
the function is activated after the vehicle has
already been driven, the view from above may
be completely displayed. Using one or both cameras, the vehicle's close
surroundings are recorded during manoeuvres
at low speed.
An image from above your vehicle in its close
surroundings is created in real time, as the
vehicle manoeuvre progresses.
This representation facilitates the alignment of
your vehicle when parking and allows obstacles
close to the vehicle to be seen.
This image is automatically deleted if the
vehicle remains stationary for too long.
6
Driving
Page 182 of 320
180
This system is a visual aid that cannot in
any circumstances replace the need for
vigilance on the part of the driver.
The images provided by the camera(s)
may be distorted by the relief.
In the presence of areas in shade, or in
conditions of bright sunlight or inadequate
lighting, the image may be darkened and
with lower contrast.
Recommendations on care
In bad or wintry weather, ensure that the
sensors and camera lenses are not covered
with mud, ice or snow.
Check the cleanliness of the camera lenses
regularly.
If necessary, clean the cameras with a soft,
dry cloth.
When washing your vehicle at high pressure,
direct the lance at least 30 cm away from the
cameras and parking aid sensors.
Visiopark 1
Rear vision
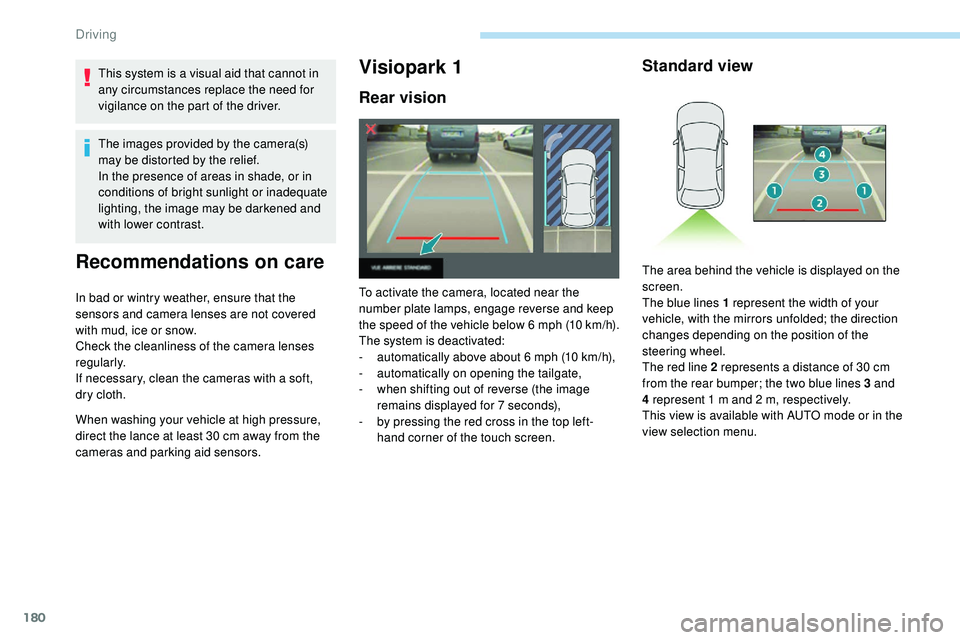
To activate the camera, located near the
number plate lamps, engage reverse and keep
the speed of the vehicle below 6 mph (10
k
m/h).
The system is deactivated:
-
a
utomatically above about 6 mph (10 km/h),
-
a
utomatically on opening the tailgate,
-
w
hen shifting out of reverse (the image
remains displayed for 7 seconds),
-
b
y pressing the red cross in the top left-
hand corner of the touch screen.
Standard view
The area behind the vehicle is displayed on the
screen.
The blue lines 1 represent the width of your
vehicle, with the mirrors unfolded; the direction
changes depending on the position of the
steering wheel.
The red line 2 represents a distance of 30 cm
from the rear bumper; the two blue lines 3 and
4 represent 1 m and 2 m, respectively.
This view is available with AUTO mode or in the
view selection menu.
Driving
Page 183 of 320
181
Zoom view
Obstacles may appear further away than
they actually are in reality.
It is important to check the sides of the
vehicle during the manoeuvre, using the
mirrors.
The rear parking sensors also provide
information on the vehicle's surroundings.
AUTO mode
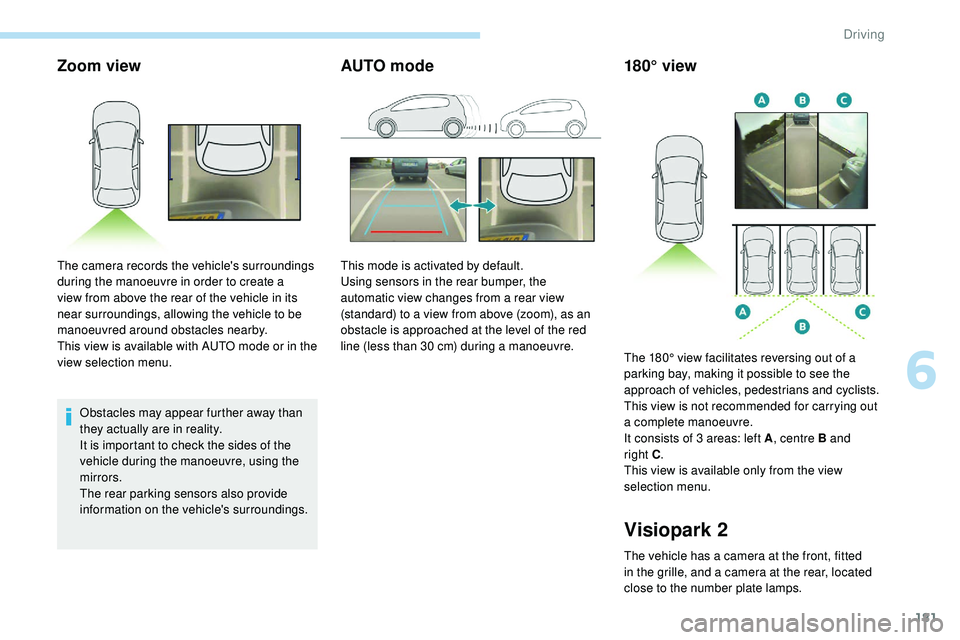
The camera records the vehicle's surroundings
during the manoeuvre in order to create a
view from above the rear of the vehicle in its
near surroundings, allowing the vehicle to be
manoeuvred around obstacles nearby.
This view is available with AUTO mode or in the
view selection menu.This mode is activated by default.
Using sensors in the rear bumper, the
automatic view changes from a rear view
(standard) to a view from above (zoom), as an
obstacle is approached at the level of the red
line (less than 30 cm) during a manoeuvre.
180° view
Visiopark 2
The vehicle has a camera at the front, fitted
in the grille, and a camera at the rear, located
close to the number plate lamps.The 180° view facilitates reversing out of a
parking bay, making it possible to see the
approach of vehicles, pedestrians and cyclists.
This view is not recommended for carrying out
a complete manoeuvre.
It consists of 3 areas: left A
, centre B and
right C
.
This view is available only from the view
selection menu.
6
Driving
Page 184 of 320
182
Rear vision
If a trailer or a bicycle carrier is fitted to
the towball, the zone behind the vehicle on
the view from above goes dark.
The surroundings are reconstructed by the
front camera only.
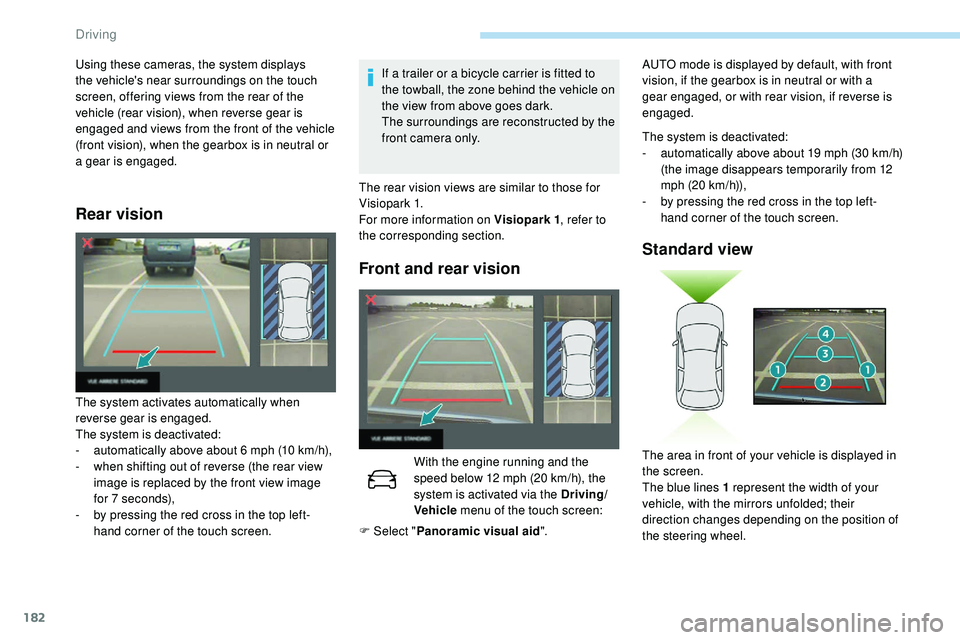
The system activates automatically when
reverse gear is engaged.
The system is deactivated:
-
a
utomatically above about 6 mph (10 km/h),
-
w
hen shifting out of reverse (the rear view
image is replaced by the front view image
for 7 seconds),
-
b
y pressing the red cross in the top left-
hand corner of the touch screen. The rear vision views are similar to those for
Visiopark 1.
For more information on Visiopark 1
, refer to
the corresponding section.
Front and rear vision
With the engine running and the
speed below 12 mph (20 km/h), the
system is activated via the Driving/
Vehicle menu of the touch screen:
Using these cameras, the system displays
the vehicle's near surroundings on the touch
screen, offering views from the rear of the
vehicle (rear vision), when reverse gear is
engaged and views from the front of the vehicle
(front vision), when the gearbox is in neutral or
a gear is engaged.
F Select "Panoramic visual aid ".The system is deactivated:
-
a
utomatically above about 19 mph (30 km/h)
(the image disappears temporarily from 12
mph (20 km/h)),
-
b
y pressing the red cross in the top left-
hand corner of the touch screen.
Standard view
The area in front of your vehicle is displayed in
the screen.
The blue lines 1 represent the width of your
vehicle, with the mirrors unfolded; their
direction changes depending on the position of
the steering wheel.
AUTO mode is displayed by default, with front
vision, if the gearbox is in neutral or with a
gear engaged, or with rear vision, if reverse is
engaged.
Driving
Page 185 of 320
183
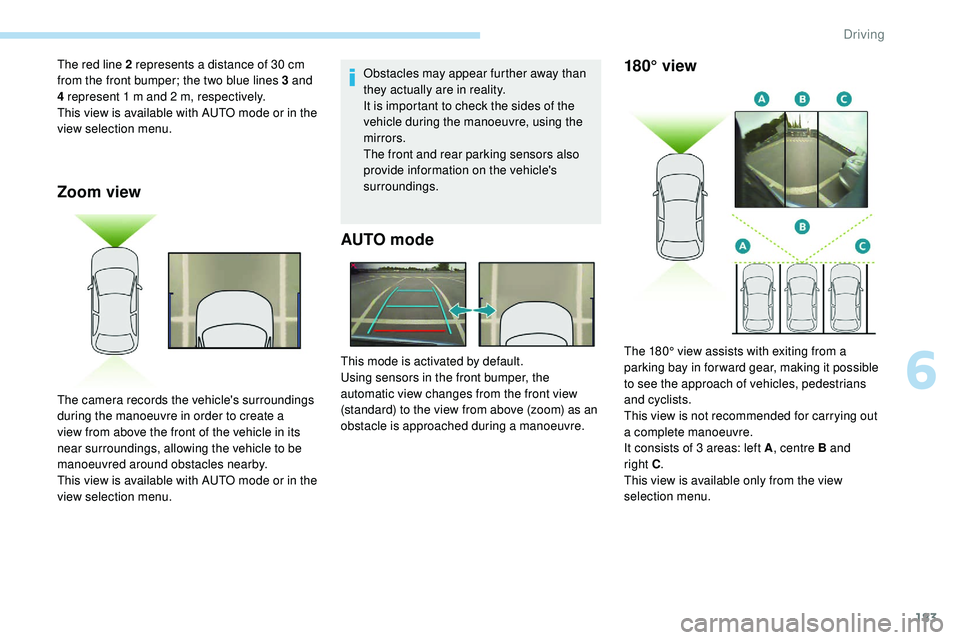
Zoom view
Obstacles may appear further away than
they actually are in reality.
It is important to check the sides of the
vehicle during the manoeuvre, using the
mirrors.
The front and rear parking sensors also
provide information on the vehicle's
surroundings.
AUTO mode
The red line 2 represents a distance of 30 cm
from the front bumper; the two blue lines 3 and
4 represent 1 m and 2 m, respectively.
This view is available with AUTO mode or in the
view selection menu.
The camera records the vehicle's surroundings
during the manoeuvre in order to create a
view from above the front of the vehicle in its
near surroundings, allowing the vehicle to be
manoeuvred around obstacles nearby.
This view is available with AUTO mode or in the
view selection menu.This mode is activated by default.
Using sensors in the front bumper, the
automatic view changes from the front view
(standard) to the view from above (zoom) as an
obstacle is approached during a manoeuvre.180° view
The 180° view assists with exiting from a
parking bay in forward gear, making it possible
to see the approach of vehicles, pedestrians
and cyclists.
This view is not recommended for carrying out
a complete manoeuvre.
It consists of 3 areas: left A
, centre B and
right
C.
This view is available only from the view
selection menu.
6
Driving
Page 186 of 320
184
Park Assist
This system provides active parking
assistance: it detects a parking space and then
steers in the appropriate direction to park in
this space while the driver controls the driving
direction, engagement of gears, acceleration
and braking.
To assist the driver in monitoring the
correct manoeuvring operation, the system
automatically triggers the display of Visiopark 1
or Visiopark 2 and the activation of the parking
sensors.This system is a manoeuvring aid that
cannot under any circumstances replace
the vigilance of the driver.
The driver must remain in control of their
vehicle. He or she must always check
the surroundings of the vehicle before
undertaking a manoeuvre and ensure that
the space remains clear during the entire
manoeuvre.
The system per forms the measurements of
available parking spaces and calculations of
distances to obstacles using ultrasonic sensors
built in the front and rear bumpers of the
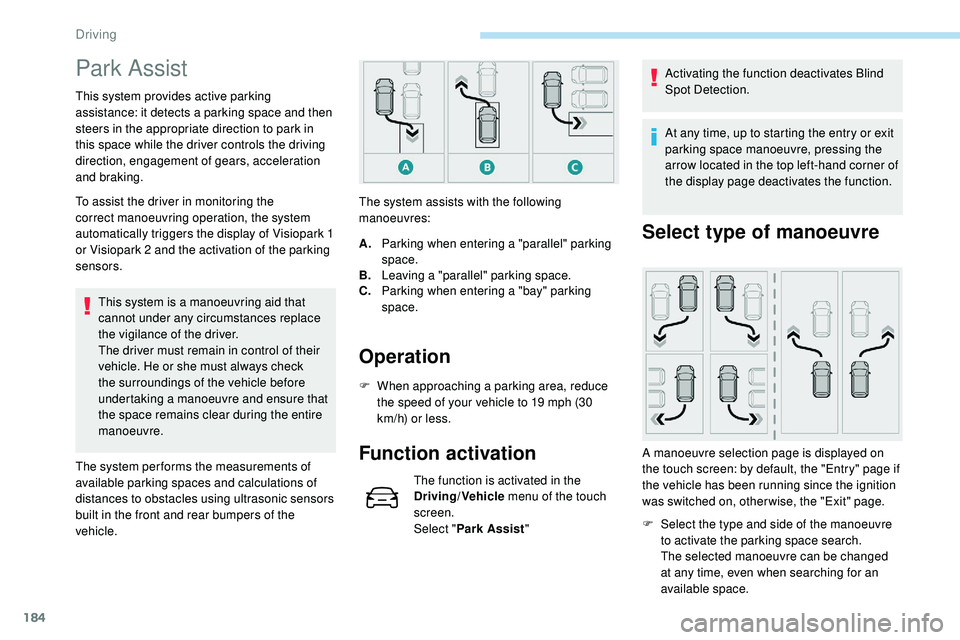
vehicle. The system assists with the following
manoeuvres:
Operation
A.
Parking when entering a "parallel" parking
space.
B. Leaving a "parallel" parking space.
C. Parking when entering a "bay" parking
space.
F
W
hen approaching a parking area, reduce
the speed of your vehicle to 19 mph (30
km/h) or less.
Function activation
The function is activated in the
Driving/Vehicle menu of the touch
screen.
Select " Park Assist " Activating the function deactivates Blind
Spot Detection.
At any time, up to starting the entry or exit
parking space manoeuvre, pressing the
arrow located in the top left-hand corner of
the display page deactivates the function.
Select type of manoeuvre
A manoeuvre selection page is displayed on
the touch screen: by default, the "Entry" page if
the vehicle has been running since the ignition
was switched on, other wise, the "Exit" page.F
S
elect the type and side of the manoeuvre
to activate the parking space search.
The selected manoeuvre can be changed
at any time, even when searching for an
available space.
Driving
Page 187 of 320
185
The selection is accompanied by
this indicator lamp coming on.
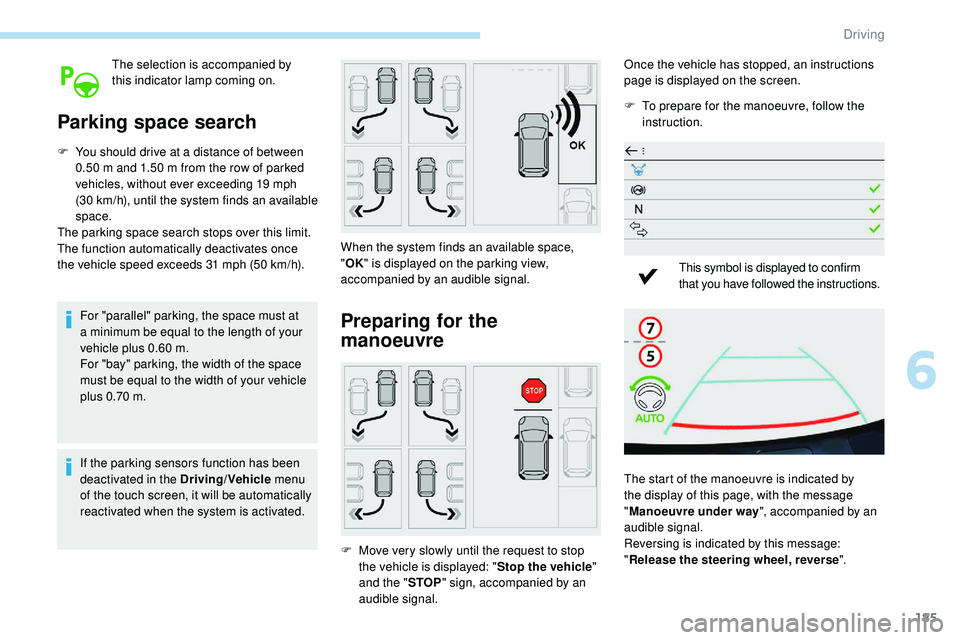
Parking space search
F You should drive at a distance of between 0.50 m and 1.50 m from the row of parked
vehicles, without ever exceeding 19 mph
(30
km/h), until the system finds an available
space.
The parking space search stops over this limit.
The function automatically deactivates once
the vehicle speed exceeds 31 mph (50 km/h).
For "parallel" parking, the space must at
a minimum be equal to the length of your
vehicle plus 0.60 m.
For "bay" parking, the width of the space
must be equal to the width of your vehicle
plus 0.70 m.
If the parking sensors function has been
deactivated in the Driving/Vehicle menu
of the touch screen, it will be automatically
reactivated when the system is activated. When the system finds an available space,
"
OK " is displayed on the parking view,
accompanied by an audible signal.
Preparing for the
manoeuvre
F Move very slowly until the request to stop the vehicle is displayed: " Stop the vehicle"
and the " STOP" sign, accompanied by an
audible signal. Once the vehicle has stopped, an instructions
page is displayed on the screen.
F
T
o prepare for the manoeuvre, follow the
instruction.
This symbol is displayed to confirm
that you have followed the instructions.
The start of the manoeuvre is indicated by
the display of this page, with the message
" Manoeuvre under way ", accompanied by an
audible signal.
Reversing is indicated by this message:
" Release the steering wheel, reverse ".
6
Driving
Page 188 of 320
186
7
5
Visiopark 1 or Visiopark 2 and the parking
sensors are automatically activated to help
you monitor the close surrounding area of your
vehicle during the manoeuvre.
During the manoeuvre
The system takes over the vehicle's steering. It
gives instructions on the manoeuvring direction
when starting the entry and exit parallel parking
manoeuvres and for all entry manoeuvres for
bay parking.
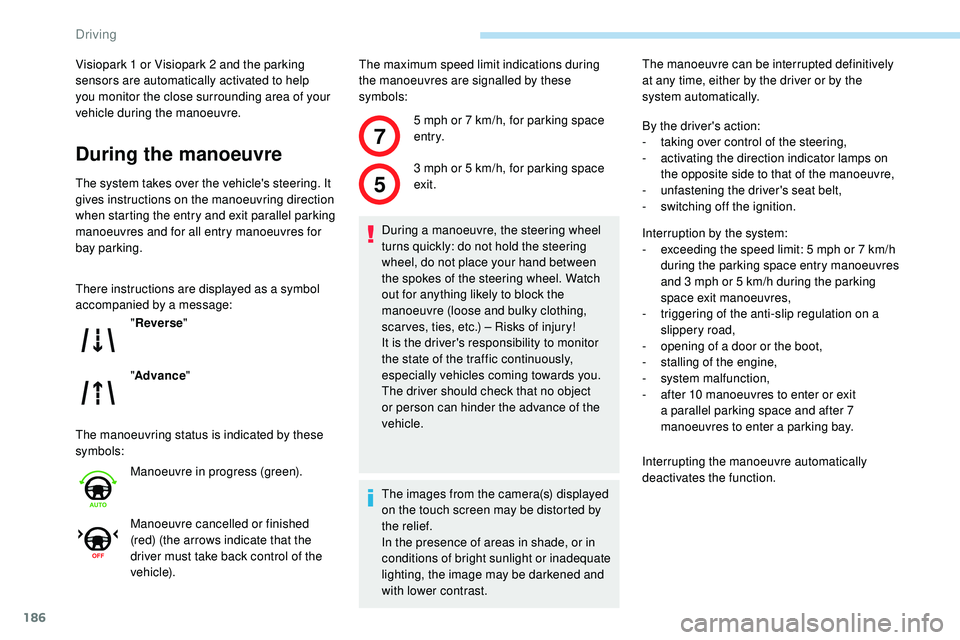
There instructions are displayed as a symbol
accompanied by a message:
The manoeuvring status is indicated by these
symbols:The maximum speed limit indications during
the manoeuvres are signalled by these
symbols:
" Reverse "
" Advance "
Manoeuvre in progress (green).
Manoeuvre cancelled or finished
(red) (the arrows indicate that the
driver must take back control of the
vehicle). 5 mph or 7
km/h, for parking space
e nt r y.
3 mph or 5 km/h, for parking space
exit.
During a manoeuvre, the steering wheel
turns quickly: do not hold the steering
wheel, do not place your hand between
the spokes of the steering wheel. Watch
out for anything likely to block the
manoeuvre (loose and bulky clothing,
scar ves, ties, etc.) – Risks of injury!
It is the driver's responsibility to monitor
the state of the traffic continuously,
especially vehicles coming towards you.
The driver should check that no object
or person can hinder the advance of the
vehicle.
The images from the camera(s) displayed
on the touch screen may be distorted by
the relief.
In the presence of areas in shade, or in
conditions of bright sunlight or inadequate
lighting, the image may be darkened and
with lower contrast. The manoeuvre can be interrupted definitively
at any time, either by the driver or by the
system automatically.
By the driver's action:
-
t
aking over control of the steering,
-
a
ctivating the direction indicator lamps on
the opposite side to that of the manoeuvre,
- u nfastening the driver's seat belt,
-
s
witching off the ignition.
Interruption by the system:
-
e
xceeding the speed limit: 5 mph or 7 km/h
during the parking space entry manoeuvres
and 3 mph or 5 km/h during the parking
space exit manoeuvres,
-
t
riggering of the anti-slip regulation on a
slippery road,
-
o
pening of a door or the boot,
-
s
talling of the engine,
-
s
ystem malfunction,
-
a
fter 10 manoeuvres to enter or exit
a parallel parking space and after 7
manoeuvres to enter a parking bay.
Interrupting the manoeuvre automatically
deactivates the function.
Driving
Page 189 of 320
187
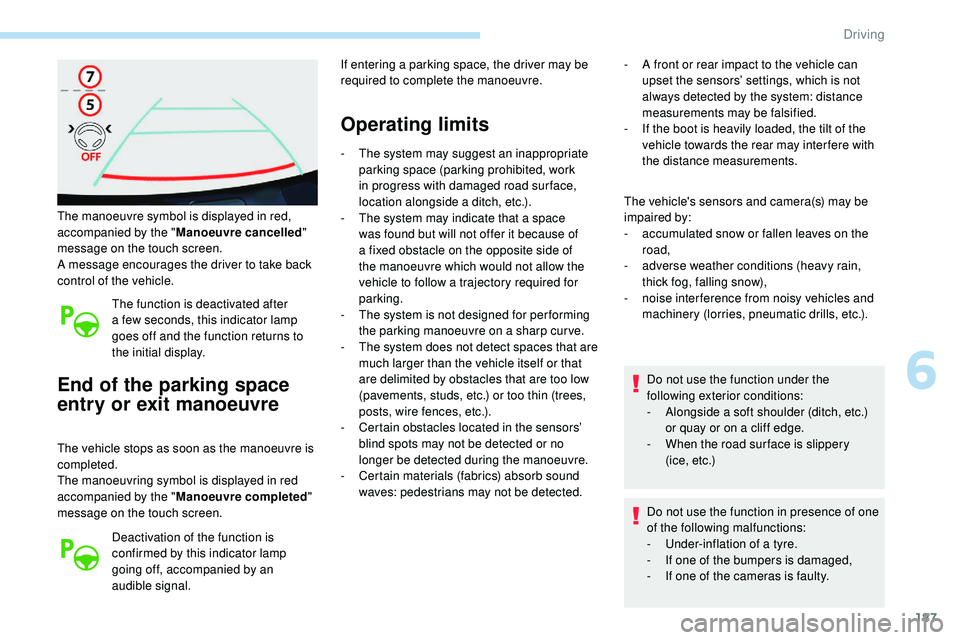
The manoeuvre symbol is displayed in red,
accompanied by the "Manoeuvre cancelled "
message on the touch screen.
A message encourages the driver to take back
control of the vehicle.
The function is deactivated after
a few seconds, this indicator lamp
goes off and the function returns to
the initial display.
End of the parking space
entry or exit manoeuvre
The vehicle stops as soon as the manoeuvre is
completed.
The manoeuvring symbol is displayed in red
accompanied by the " Manoeuvre completed "
message on the touch screen.
Deactivation of the function is
confirmed by this indicator lamp
going off, accompanied by an
audible signal. If entering a parking space, the driver may be
required to complete the manoeuvre.
Operating limits
- The system may suggest an inappropriate
parking space (parking prohibited, work
in progress with damaged road sur face,
location alongside a ditch, etc.).
-
T
he system may indicate that a space
was found but will not offer it because of
a fixed obstacle on the opposite side of
the manoeuvre which would not allow the
vehicle to follow a trajectory required for
parking.
-
T
he system is not designed for per forming
the parking manoeuvre on a sharp curve.
-
T
he system does not detect spaces that are
much larger than the vehicle itself or that
are delimited by obstacles that are too low
(pavements, studs, etc.) or too thin (trees,
posts, wire fences, etc.).
-
C
ertain obstacles located in the sensors’
blind spots may not be detected or no
longer be detected during the manoeuvre.
-
C
ertain materials (fabrics) absorb sound
waves: pedestrians may not be detected. -
A f
ront or rear impact to the vehicle can
upset the sensors’ settings, which is not
always detected by the system: distance
measurements may be falsified.
-
I
f the boot is heavily loaded, the tilt of the
vehicle towards the rear may inter fere with
the distance measurements.
The vehicle's sensors and camera(s) may be
impaired by:
-
a
ccumulated snow or fallen leaves on the
road,
-
a
dverse weather conditions (heavy rain,
thick fog, falling snow),
-
nois
e interference from noisy vehicles and
machinery (lorries, pneumatic drills, etc.).
Do not use the function under the
following exterior conditions:
-
A
longside a soft shoulder (ditch, etc.)
or quay or on a cliff edge.
-
W
hen the road sur face is slippery
( i c e ,
e t c .)
Do not use the function in presence of one
of the following malfunctions:
-
U
nder-inflation of a tyre.
-
I
f one of the bumpers is damaged,
-
I
f one of the cameras is faulty.
6
Driving
Page 190 of 320
188
Do not use the function in presence of one
of the following modifications:
-
W
hen carrying an object extending
beyond the vehicle size (ladder on
the roof bars, bicycle carrier on the
tailgate, etc.).
-
W
ith a non-approved towball in place.
-
W
ith snow chains fitted.
-
W
hen driving on a small-diameter or
"space-saver" type spare wheel.
-
W
hen the wheels fitted are a different
size from the original ones.
-
A
fter modifying one or both bumpers
(added protection, etc.).
-
I
f the sensors have been repainted
outside the PEUGEOT dealer network.
-
W
ith sensors not approved for your
vehicle.
Maintenance
recommendations Operating faults
When the function is not activated,
this indicator lamp temporarily
flashing and an audible signal
indicate a system fault.
If the fault occurs during the use of the system,
the indicator lamp goes off. If the fault in the parking sensors,
indicated by this warning lamp
coming on, occurs during use, it
causes the function to deactivate.
In the event of a fault, have the system checked
by a PEUGEOT dealer or a qualified workshop.
In the event of a fault with the
power steering, this warning lamp
flashes in the instrument panel,
accompanied by a message.
You must stop as soon as it is safe to do so.
Contact a PEUGEOT dealer or a qualified
workshop.
-
R
egularly check that the sensors and
cameras are clean.
If necessary, clean the camera lenses with
a soft, dry cloth.
-
I
f using a high-pressure washer, do not
direct the spray less than 30 cm from the
sensors and cameras.
-
I
n bad weather, or during the winter, ensure
that the sensors and cameras are not
covered with mud, ice or snow.
Full Park Assist
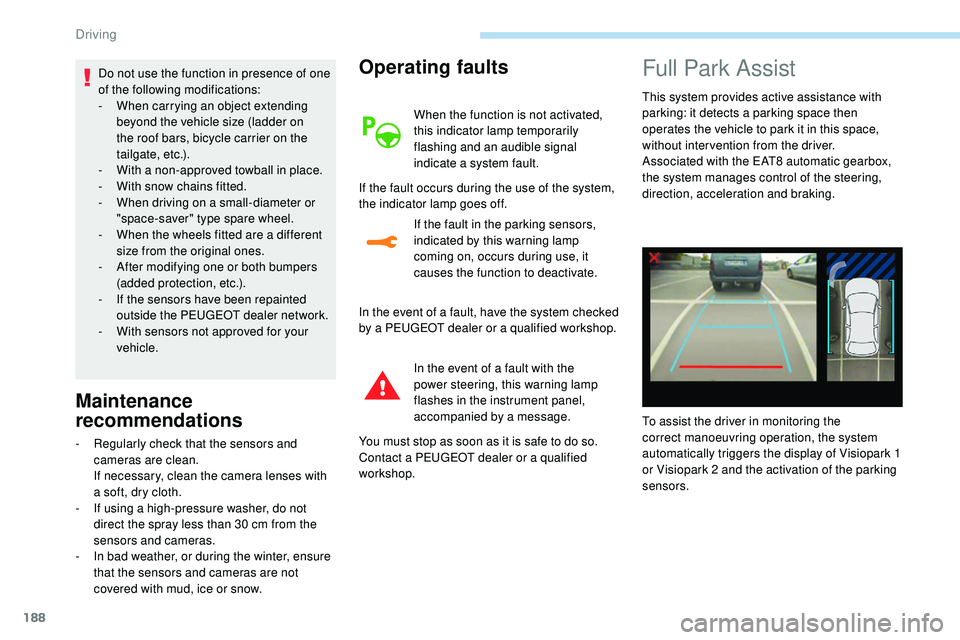
This system provides active assistance with
parking: it detects a parking space then
operates the vehicle to park it in this space,
without intervention from the driver.
Associated with the EAT8 automatic gearbox,
the system manages control of the steering,
direction, acceleration and braking.
To assist the driver in monitoring the
correct manoeuvring operation, the system
automatically triggers the display of Visiopark 1
or Visiopark 2 and the activation of the parking
sensors.
Driving