Peugeot 508 Hybrid 2014 Owner's Manual
Manufacturer: PEUGEOT, Model Year: 2014, Model line: 508 Hybrid, Model: Peugeot 508 Hybrid 2014Pages: 380, PDF Size: 10.94 MB
Page 131 of 380
129
Memorising speeds
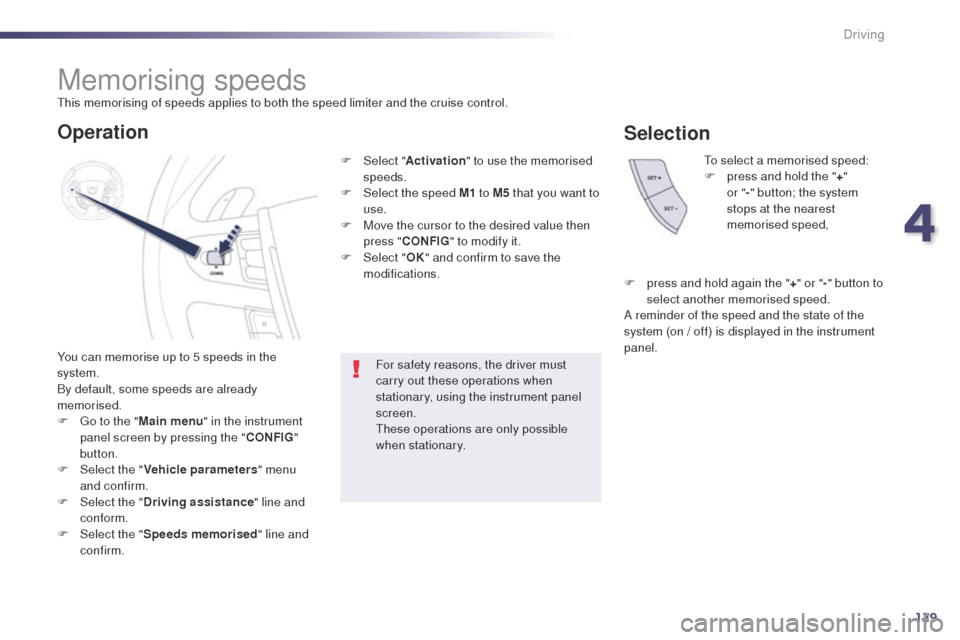
You can memorise up to 5 speeds in the
system.
By default, some speeds are already
memorised.
F g
o t
o the "Main menu " in the instrument
panel screen by pressing the " CONFIG"
button.
F
Sel
ect the " Vehicle parameters " menu
and confirm.
F
Sel
ect the " Driving assistance " line and
conform.
F
Sel
ect the " Speeds memorised " line and
confirm.
to
select a memorised speed:
F
p
ress and hold the "
+"
or "
- " button; the system
stops at the nearest
memorised speed,
For safety reasons, the driver must
carry out these operations when
stationary, using the instrument panel
screen.
th
ese operations are only possible
when stationary.
Operation
F Select " Activation" to use the memorised
speeds.
F
Sel
ect the speed M1 to M5 that you want to
use.
F
M
ove the cursor to the desired value then
press " CONFIG " to modify it.
F
Sel
ect "OK" and confirm to save the
modifications.
Selection
F press and hold again the " +" or " -" button to
select another memorised speed.
A reminder of the speed and the state of the
system (on / off) is displayed in the instrument
panel.
th
is memorising of speeds applies to both the speed limiter and the cruise control.
4
Driving
Page 132 of 380
130
Speed limiter
System which prevents the vehicle from
exceeding the speed programmed by the
driver.
When the programmed speed limit is reached,
pressing the accelerator pedal no longer
has any effect unless it is pressed firmly,
which allows you to temporarily exceed the
programmed speed.
to r
eturn to the programmed speed, simply
slow down to a speed below the programmed
speed by releasing the accelerator.
th
e speed limiter is switched on manually:
it requires a programmed speed of at least
20
mph (30 km/h).
th
e speed limiter is switched off by manual
operation of the control.
th
e programmed speed remains in the memory
when the ignition is switched off.
th
e speed limiter cannot, in any
circumstances, replace the need to
observe speed limits, nor can it replace
the need for vigilance and responsibility
on the part of the driver.
th
is information also appears in the
head-up display.
For more information, refer to the
"Head-up display" section.
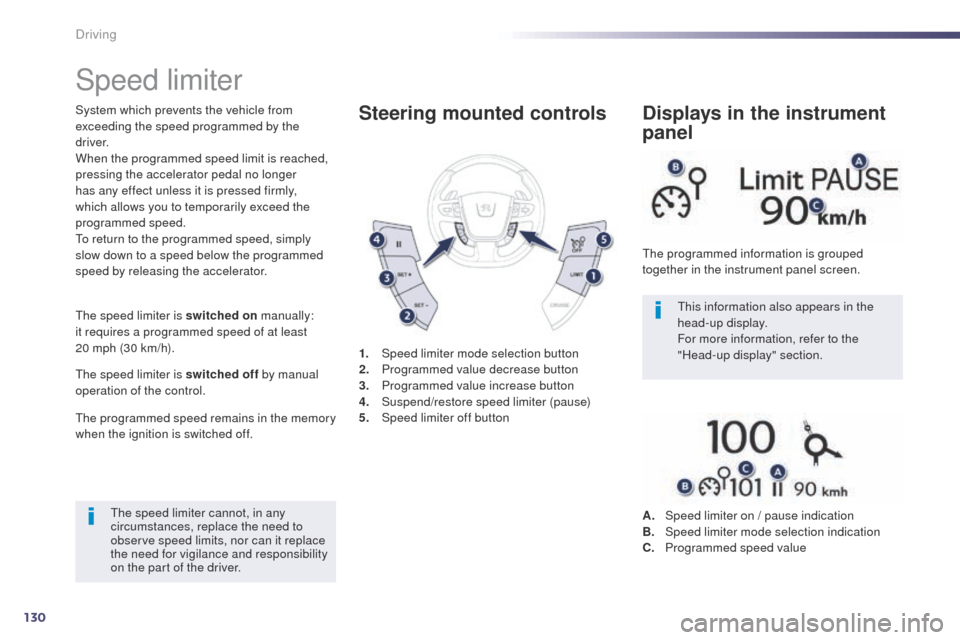
1.
Spe
ed limiter mode selection button
2.
P
rogrammed value decrease button
3.
P
rogrammed value increase button
4.
S
uspend/restore speed limiter (pause)
5.
Spe
ed limiter off buttonSteering mounted controls
the programmed information is grouped
together in the instrument panel screen.
Displays in the instrument
panel
A. Speed limiter on / pause indication
B. Speed limiter mode selection indication
C.
P
rogrammed speed value
Driving
Page 133 of 380
131
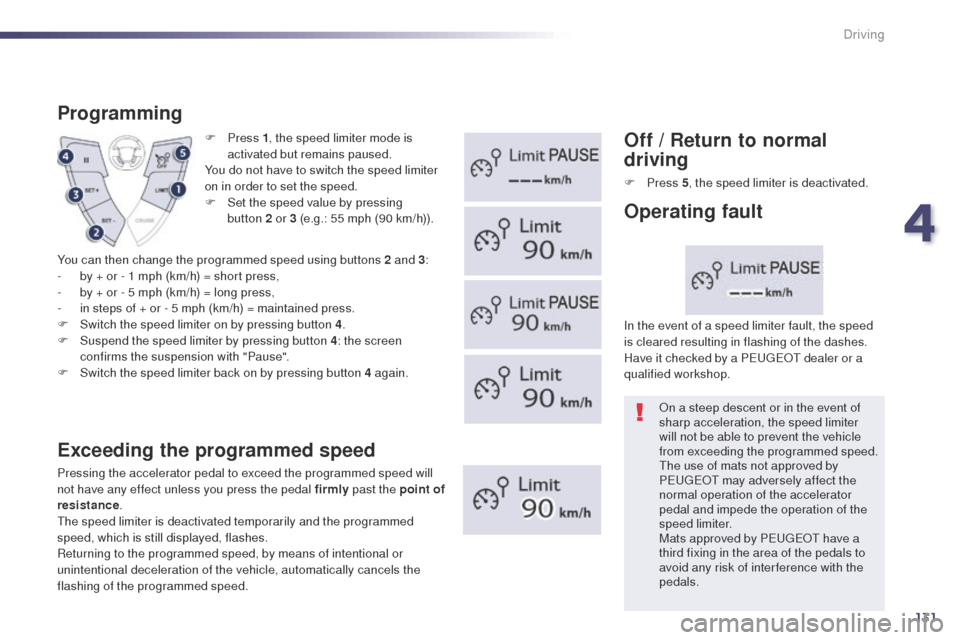
F Press 1, t he speed limiter mode is
activated but remains paused.
You do not have to switch the speed limiter
on in order to set the speed.
F
S
et the speed value by pressing
button
2 or 3 (e.g.: 55 mph (90 km/h)).
Programming
Exceeding the programmed speed
Pressing the accelerator pedal to exceed the programmed speed will
not have any effect unless you press the pedal firmly past the point of
resistance .
th
e speed limiter is deactivated temporarily and the programmed
speed, which is still displayed, flashes.
Returning to the programmed speed, by means of intentional or
unintentional deceleration of the vehicle, automatically cancels the
flashing of the programmed speed.
Off / Return to normal
driving
F Press 5, t he speed limiter is deactivated.
On a steep descent or in the event of
sharp acceleration, the speed limiter
will not be able to prevent the vehicle
from exceeding the programmed speed.
th
e use of mats not approved by
P
e
uge
Ot
may adversely affect the
normal operation of the accelerator
pedal and impede the operation of the
speed limiter.
Mats approved by P
e
uge
Ot
have a
third fixing in the area of the pedals to
avoid any risk of inter ference with the
pedals.
In the event of a speed limiter fault, the speed
is cleared resulting in flashing of the dashes.
Have it checked by a P
e
uge
Ot
dealer or a
qualified workshop.
Operating fault
You can then change the programmed speed using buttons 2 and 3 :
- b y + or - 1 mph (km/h) = short press,
-
b
y + or - 5 mph (km/h) = long press,
-
i
n steps of + or - 5 mph (km/h) = maintained press.
F
S
witch the speed limiter on by pressing button 4 .
F
S
uspend the speed limiter by pressing button 4 : the screen
confirms the suspension with "Pause".
F
S
witch the speed limiter back on by pressing button 4 again.
4
Driving
Page 134 of 380
132
Cruise control
System which automatically maintains the
speed of the vehicle at the value programmed
by the driver, without any action on the
accelerator pedal.
th
e cruise control is switched on manually: it
requires a minimum vehicle speed of 25 mph
(40 km/h) and the engaging:
-
4
th gear or higher with a manual gearbox,
-
2
nd gear or higher with an electronic or
automatic gearbox,
-
position A with an electronic gearbox or D
with an automatic gearbox.
th
e cruise control is switched off manually
or by pressing the brake or clutch pedal or
on triggering of the
e SC system for safety
reasons.
It is possible to exceed the programmed speed
temporarily by pressing the accelerator pedal.
to r
eturn to the programmed speed, simply
release the accelerator pedal.
Switching off the ignition cancels any
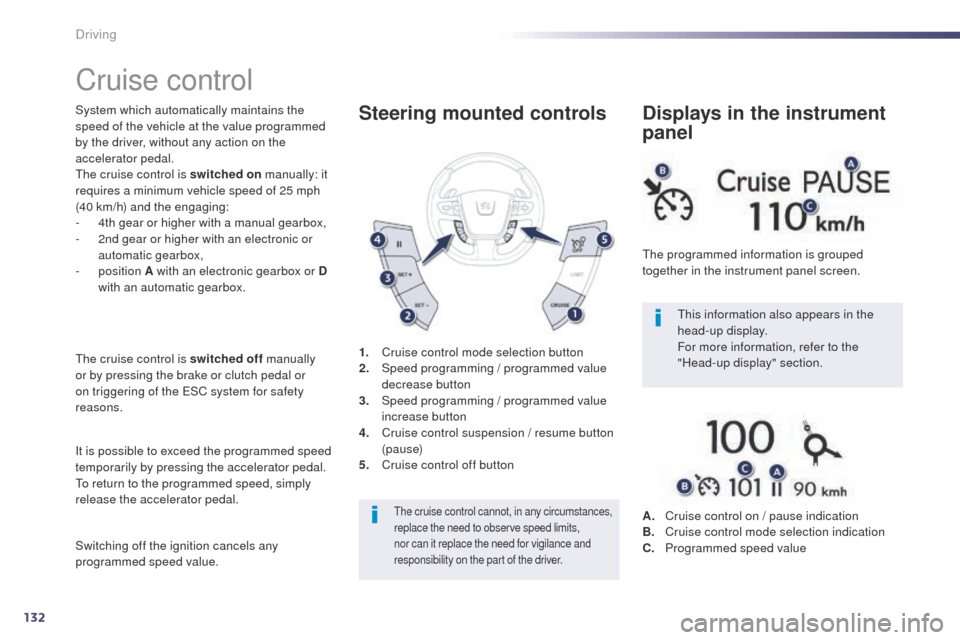
programmed speed value. 1.
C
ruise control mode selection button
2.
S
peed programming / programmed value
decrease button
3.
S
peed programming / programmed value
increase button
4.
C
ruise control suspension / resume button
(pause)
5.
C
ruise control off buttonSteering mounted controls
the cruise control cannot, in any circumstances,
replace the need to observe speed limits,
nor can it replace the need for vigilance and
responsibility on the part of the driver.
this information also appears in the
head-up display.
For more information, refer to the
"Head-up display" section.
th
e programmed information is grouped
together in the instrument panel screen.
Displays in the instrument
panel
A. Cruise control on / pause indication
B. C ruise control mode selection indication
C.
P
rogrammed speed value
Driving
Page 135 of 380
133
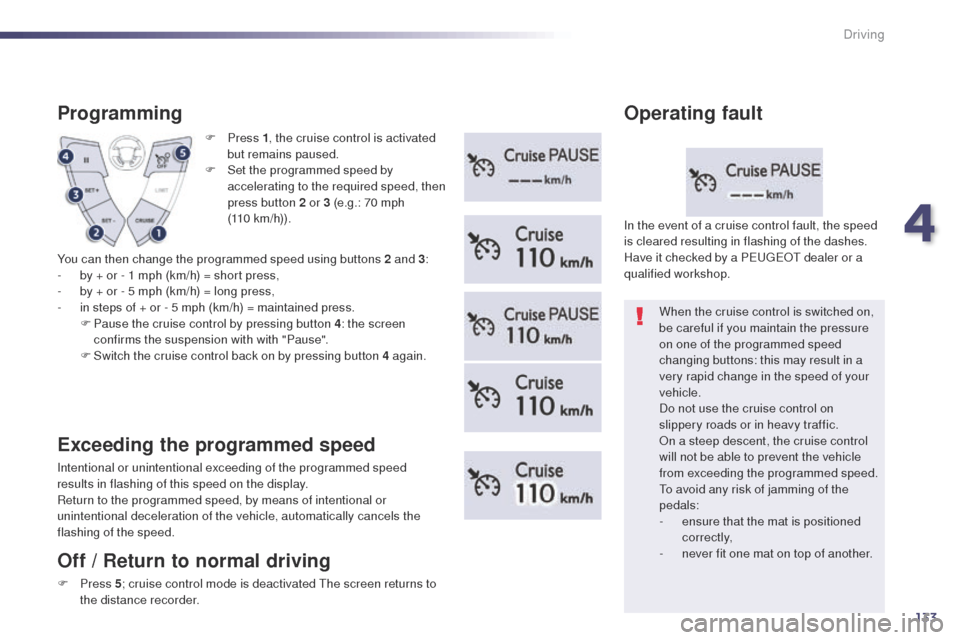
F Press 1, t he cruise control is activated
but remains paused.
F
S
et the programmed speed by
accelerating to the required speed, then
press button 2 or 3 (e.g.: 70 mph
(110 km/h)).
Programming
You can then change the programmed speed using buttons 2 and 3 :
- b y + or - 1 mph (km/h) = short press,
-
b
y + or - 5 mph (km/h) = long press,
-
i
n steps of + or - 5 mph (km/h) = maintained press.
F
P
ause the cruise control by pressing button 4 : the screen
confirms the suspension with with "Pause".
F
S
witch the cruise control back on by pressing button 4 again.
Exceeding the programmed speed
Intentional or unintentional exceeding of the programmed speed
results in flashing of this speed on the display.
Return to the programmed speed, by means of intentional or
unintentional deceleration of the vehicle, automatically cancels the
flashing of the speed. When the cruise control is switched on,
be careful if you maintain the pressure
on one of the programmed speed
changing buttons: this may result in a
very rapid change in the speed of your
vehicle.
Do not use the cruise control on
slippery roads or in heavy traffic.
On a steep descent, the cruise control
will not be able to prevent the vehicle
from exceeding the programmed speed.
to a
void any risk of jamming of the
pedals:
-
e
nsure that the mat is positioned
c o r r e c t l y,
-
n
ever fit one mat on top of another.
In the event of a cruise control fault, the speed
is cleared resulting in flashing of the dashes.
Have it checked by a P
e
uge
Ot
dealer or a
qualified workshop.
Operating fault
Off / Return to normal driving
F Press 5; c ruise control mode is deactivated th e screen returns to
the distance recorder.
4
Driving
Page 136 of 380
134
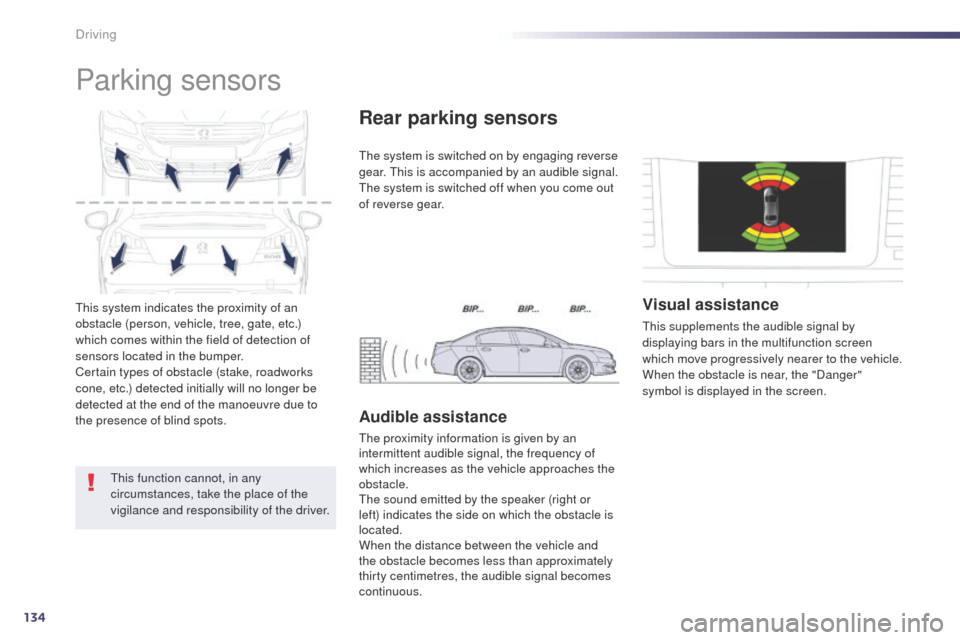
this system indicates the proximity of an
obstacle (person, vehicle, tree, gate, etc.)
which comes within the field of detection of
sensors located in the bumper.
Certain types of obstacle (stake, roadworks
cone, etc.) detected initially will no longer be
detected at the end of the manoeuvre due to
the presence of blind spots.
Parking sensors
this function cannot, in any
circumstances, take the place of the
vigilance and responsibility of the driver.
the
system is switched on by engaging reverse
gear. t
h
is is accompanied by an audible signal.
th
e system is switched off when you come out
of reverse gear.
Rear parking sensors
Audible assistance
the proximity information is given by an
intermittent audible signal, the frequency of
which increases as the vehicle approaches the
obstacle.
th
e sound emitted by the speaker (right or
left) indicates the side on which the obstacle is
located.
When the distance between the vehicle and
the obstacle becomes less than approximately
thirty centimetres, the audible signal becomes
continuous.
Visual assistance
this supplements the audible signal by
displaying bars in the multifunction screen
which move progressively nearer to the vehicle.
When the obstacle is near, the "Danger"
symbol is displayed in the screen.
Driving
Page 137 of 380
135
In addition to the rear parking sensors, the
front parking sensors are triggered when an
obstacle is detected in front and the speed of
the vehicle is still below 6 mph (10 km/h).
th
e front parking sensors are interrupted if
the vehicle stops for more than three seconds
in for ward gear, if no further obstacles are
detected or when the speed of the vehicle
exceeds 6 mph (10 km/h).
Front parking sensors
the function will be deactivated
automatically if a trailer is being towed
or a bicycle carrier is fitted (vehicle
fitted with a towbar or bicycle carrier
recommended by P
e
uge
Ot)
.
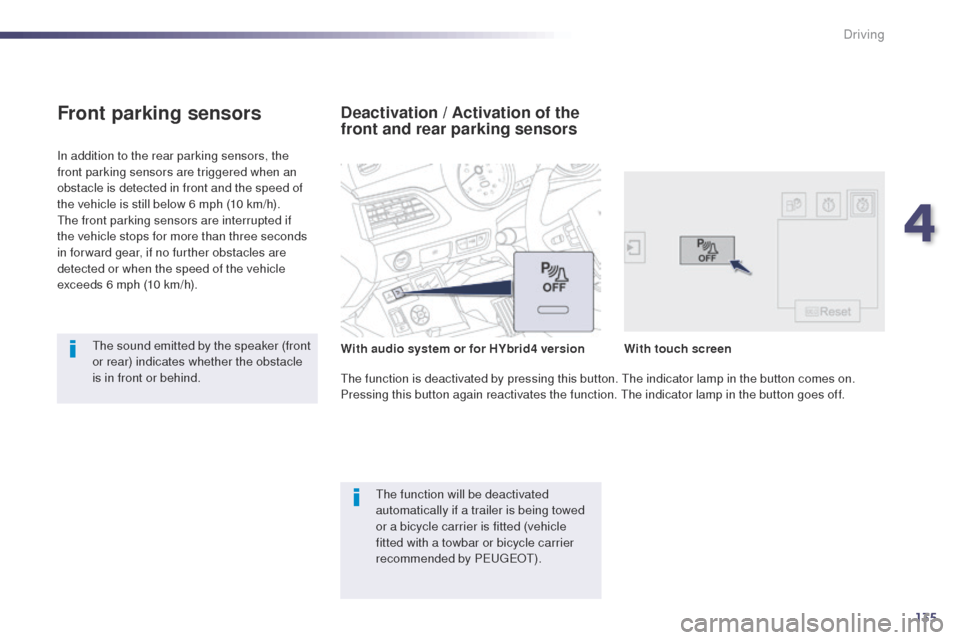
Deactivation / Activation of the
front and rear parking sensors
the function is deactivated by pressing this button. th e indicator lamp in the button comes on.
Pressing this button again reactivates the function. th e indicator lamp in the button goes off.
th
e sound emitted by the speaker (front
or rear) indicates whether the obstacle
is in front or behind. With
audio system or for HYbrid4 version With
touch screen
4
Driving
Page 138 of 380
136
In bad weather or in winter, ensure
that the sensors are not covered with
mud, ice or snow. When reverse gear is
engaged, an audible signal (long beep)
indicates that the sensors may be dirty.
Certain sound sources (motorcycle,
lorry, pneumatic drill, etc.) may trigger
the audible signals of the parking
sensor system.In the event of a malfunction
of the system, when reverse
gear is engaged this warning
lamp is displayed in the instrument panel
and/or a message appears in the screen,
accompanied by an audible signal (short beep).
Contact a P
e
uge
Ot
dealer or a qualified
workshop.
Operating fault
Driving
Page 139 of 380
137
Reversing camera
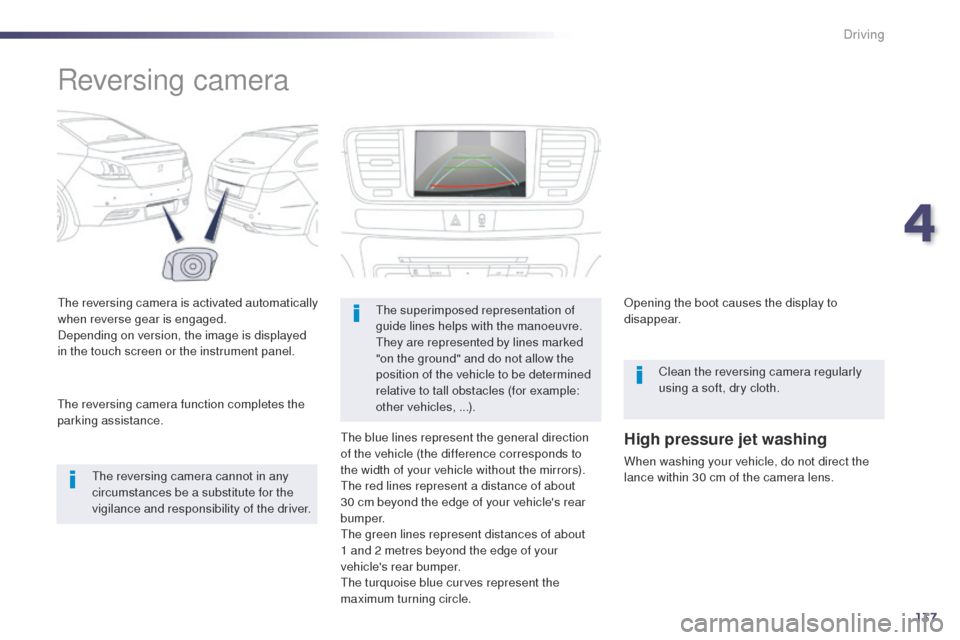
the reversing camera is activated automatically
when reverse gear is engaged.
Depending on version, the image is displayed
in the touch screen or the instrument panel.
th
e reversing camera cannot in any
circumstances be a substitute for the
vigilance and responsibility of the driver.
th
e reversing camera function completes the
parking assistance.the superimposed representation of
guide lines helps with the manoeuvre.
th
ey are represented by lines marked
"on the ground" and do not allow the
position of the vehicle to be determined
relative to tall obstacles (for example:
other vehicles, ...).
th
e blue lines represent the general direction
of the vehicle (the difference corresponds to
the width of your vehicle without the mirrors).
th
e red lines represent a distance of about
30 cm beyond the edge of your vehicle's rear
b u m p e r.
th
e green lines represent distances of about
1 and 2 metres beyond the edge of your
vehicle's rear bumper.
the
turquoise blue curves represent the
maximum turning circle. Opening the boot causes the display to
disappear.
Clean the reversing camera regularly
using a soft, dry cloth.
High pressure jet washing
When washing your vehicle, do not direct the
lance within 30 cm of the camera lens.
4
Driving
Page 140 of 380
138
508_en_Chap05_visibilite_ed02-2014
Visibility
Lighting controlsControls for selection and operation of the various front and rear lamps providing the vehicle's lighting and signalling.
Main lighting
there are various lamps on the vehicle:
- s idelamps, to be seen,
-
d
ipped beam headlamps to see without
dazzling other drivers,
-
m
ain beam headlamps to see clearly when
the road is clear,
-
d
irectional headlamps for improved
visibility when cornering.
Additional lighting
Other lamps are installed to fulfil the
requirements of particular driving conditions:
-
r
ear foglamps to better signal the presence
of the vehicle in foggy conditions,
-
f
ront foglamps for better visibility in foggy
conditions and to improve lighting at
intersections and when parking,
-
d
aytime running lamps to be seen during
t h e d ay.
Automatic lighting
functions
Various automatic lighting functions are also
available depending on options:
-
gu
ide-me-home lighting,
-
m
ain additional lighting,
-
s
econdary additional lighting,
-
w
elcome lighting,
-
d
aytime running lamps,
-
a
utomatic illumination of headlamps,
-
a
daptive lighting.