check oil Peugeot 508 Hybrid 2014 Owner's Manual
[x] Cancel search | Manufacturer: PEUGEOT, Model Year: 2014, Model line: 508 Hybrid, Model: Peugeot 508 Hybrid 2014Pages: 380, PDF Size: 10.94 MB
Page 13 of 380
11
Limit the causes of excess consumption
Spread loads throughout the vehicle; place the heaviest items in the
bottom of the boot, as close as possible to the rear seats.
Limit the loads carried in the vehicle and reduce wind resistance (roof
bars, roof rack, bicycle carrier, trailer...). u
s
e a roof box in preference.
Remove roof bars and roof racks after use.
At the end of winter, remove snow tyres and refit your summer tyres.
Observe the recommendations on
maintenance
Check the tyre pressures regularly, when cold, referring to the label in
the door aperture, driver's side.
Carry out this check in particular:
-
b
efore a long journey,
-
a
t each change of season,
-
a
fter a long period out of use.
Don't forget the spare wheel and the tyres on any trailer or caravan.
Have your vehicle serviced regularly (engine oil, oil filter, air filter,
passenger compartment filter...) and observe the schedule of
operations recommended in the warranty and maintenance record.
When refuelling, do not continue after the third cut-off of the nozzle to
avoid any over flow.
At the wheel of your new vehicle, it is only after the first 1 800 miles
(3 000 kilometres) that you will see the fuel consumption settle down to
a consistent average.
.
Eco-driving
Page 30 of 380
28
Service indicator
More than 1 800 miles (3 000 km)
remain before the next service is due
When the ignition is switched on, no service
information appears in the screen.
th
is is a check against the planned servicing
intervals in the manufacturer's servicing
schedule.
It is calculated from the last service indicator
reset according to the number of miles travelled
and the time elapsed since the last service.
For BlueHDi Diesel versions only (depending
on country of sale), the level of deterioration of
the engine oil is also taken into account.
Between 600 miles (1 000 km) and
1 800 miles (3 000 km) remain before
the next service is due
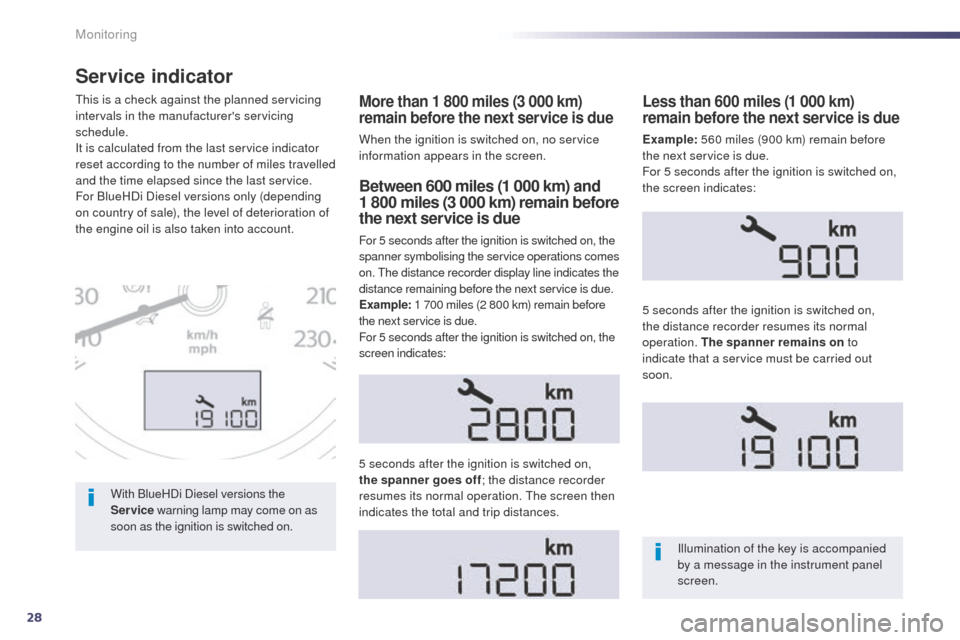
For 5 seconds after the ignition is switched on, the
spanner symbolising the service operations comes
on.
t
h
e distance recorder display line indicates the
distance remaining before the next service is due.
Example: 1 700 miles (2 800 km) remain before
the next service is due.
For 5 seconds after the ignition is switched on, the
screen indicates:
5 seconds after the ignition is switched on,
the spanner goes off ; the distance recorder
resumes its normal operation.
t
h
e screen then
indicates the total and trip distances.
Less than 600 miles (1 000 km)
remain before the next service is due
Example: 560 miles (900 km) remain before
the next service is due.
For 5 seconds after the ignition is switched on,
the screen indicates:
5 seconds after the ignition is switched on,
the distance recorder resumes its normal
operation. The spanner remains on to
indicate that a service must be carried out
soon.
Illumination of the key is accompanied
by a message in the instrument panel
screen.
With BlueHDi Diesel versions the
Service
warning lamp may come on as
soon as the ignition is switched on.
Monitoring
Page 32 of 380
30
Engine oil level indicator*
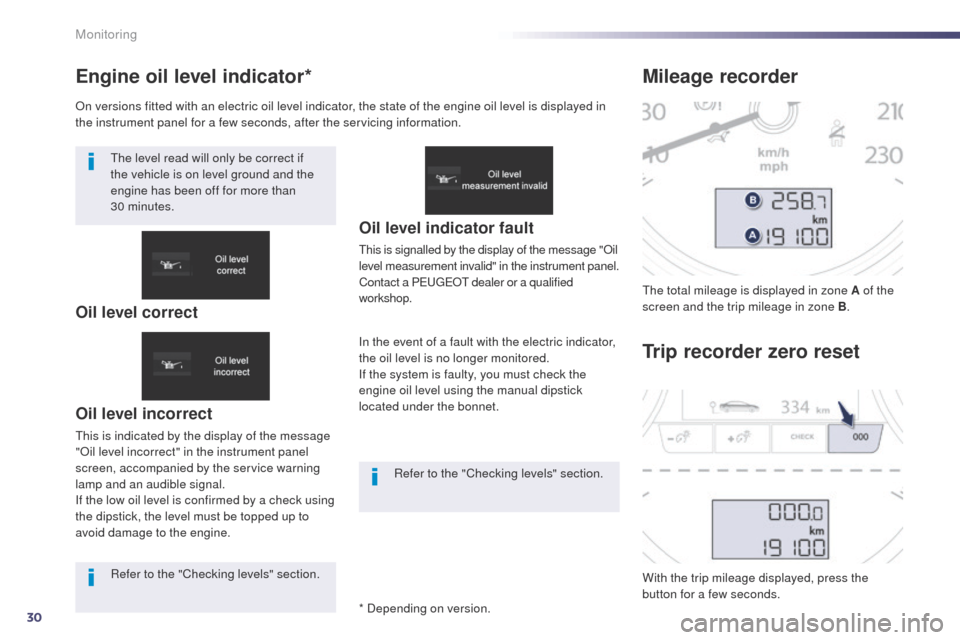
Oil level incorrect
this is indicated by the display of the message
"Oil level incorrect" in the instrument panel
screen, accompanied by the service warning
lamp and an audible signal.
If the low oil level is confirmed by a check using
the dipstick, the level must be topped up to
avoid damage to the engine.
Oil level indicator fault
this is signalled by the display of the message "Oil
level measurement invalid" in the instrument panel.
Contact a P
e
uge
Ot
dealer or a qualified
workshop.
In the event of a fault with the electric indicator,
the oil level is no longer monitored.
If the system is faulty, you must check the
engine oil level using the manual dipstick
located under the bonnet.
th
e total mileage is displayed in zone A of the
screen and the trip mileage in zone B .
With the trip mileage displayed, press the
button for a few seconds.
Mileage recorder
Trip recorder zero reset
On versions fitted with an electric oil level indicator, the state of the engine oil level is displayed in
the instrument panel for a few seconds, after the servicing information.
th
e level read will only be correct if
the vehicle is on level ground and the
engine has been off for more than
30
minutes.
Oil level correct
* Depending on version.Refer to the "Checking levels" section.
Refer to the "Checking levels" section.
Monitoring
Page 193 of 380
191
508_en_Chap08_info-pratiques_ed02-2014
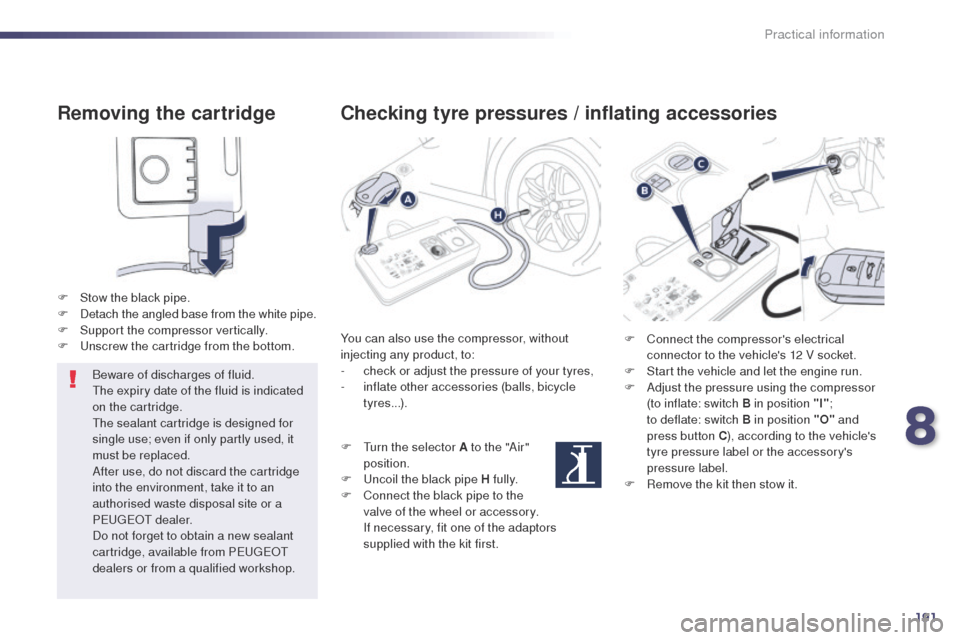
Removing the cartridge
F Stow the black pipe.
F D etach the angled base from the white pipe.
F
S
upport the compressor vertically.
F
u
n
screw the cartridge from the bottom.
Beware of discharges of fluid.
th
e expiry date of the fluid is indicated
on the cartridge.
th
e sealant cartridge is designed for
single use; even if only partly used, it
must be replaced.
After use, do not discard the cartridge
into the environment, take it to an
authorised waste disposal site or a
P
e
uge
Ot d
ealer.
Do not forget to obtain a new sealant
cartridge, available from P
e
uge
Ot
dealers or from a qualified workshop.
Checking tyre pressures / inflating accessories
You can also use the compressor, without
injecting any product, to:
-
c
heck or adjust the pressure of your tyres,
-
i
nflate other accessories (balls, bicycle
tyres...).
F
t
u
rn the selector A to the "Air"
position.
F
u
n
coil the black pipe H fully.
F
C
onnect the black pipe to the
valve of the wheel or accessory.
I
f necessary, fit one of the adaptors
supplied with the kit first. F
C onnect the compressor's electrical
connector to the vehicle's 12 V socket.
F
S
tart the vehicle and let the engine run.
F
A
djust the pressure using the compressor
(to inflate: switch B in position "I" ;
to
deflate: switch B in position "O" and
press button C ), according to the vehicle's
tyre pressure label or the accessory's
pressure label.
F
R
emove the kit then stow it.
8
Practical information
Page 234 of 380
232
508_en_Chap09_verifications_ed02-2014
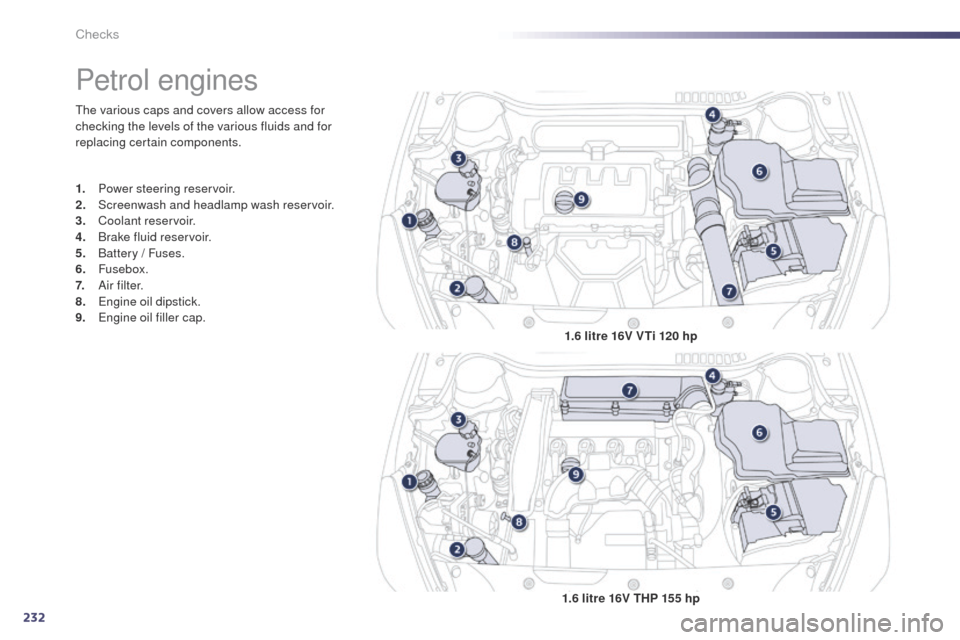
the various caps and covers allow access for
checking the levels of the various fluids and for
replacing certain components.
Petrol engines
1. Power steering reservoir.
2. Screenwash and headlamp wash reservoir.
3.
C
oolant reservoir.
4.
B
rake fluid reservoir.
5.
B
attery / Fuses.
6.
Fusebox.
7.
A
i r f i l t e r.
8.
e
n
gine oil dipstick.
9.
e
n
gine oil filler cap. 1.6 litre 16V VTi 120 hp
1.6 litre 16V THP 155 hp
Checks
Page 235 of 380
233
508_en_Chap09_verifications_ed02-2014
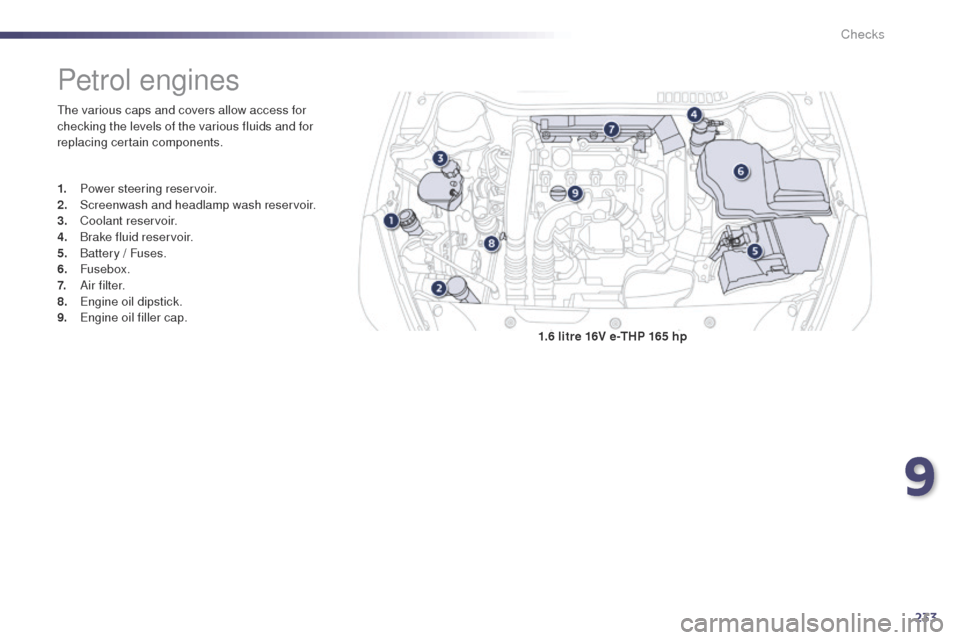
1.6 litre 16V e-THP 165 hp
Petrol engines
the various caps and covers allow access for
checking the levels of the various fluids and for
replacing certain components.
1.
P
ower steering reservoir.
2.
S
creenwash and headlamp wash reservoir.
3.
C
oolant reservoir.
4.
B
rake fluid reservoir.
5.
B
attery / Fuses.
6.
Fusebox.
7.
A
i r f i l t e r.
8.
e
n
gine oil dipstick.
9.
e
n
gine oil filler cap.
9
Checks
Page 236 of 380
234
508_en_Chap09_verifications_ed02-2014
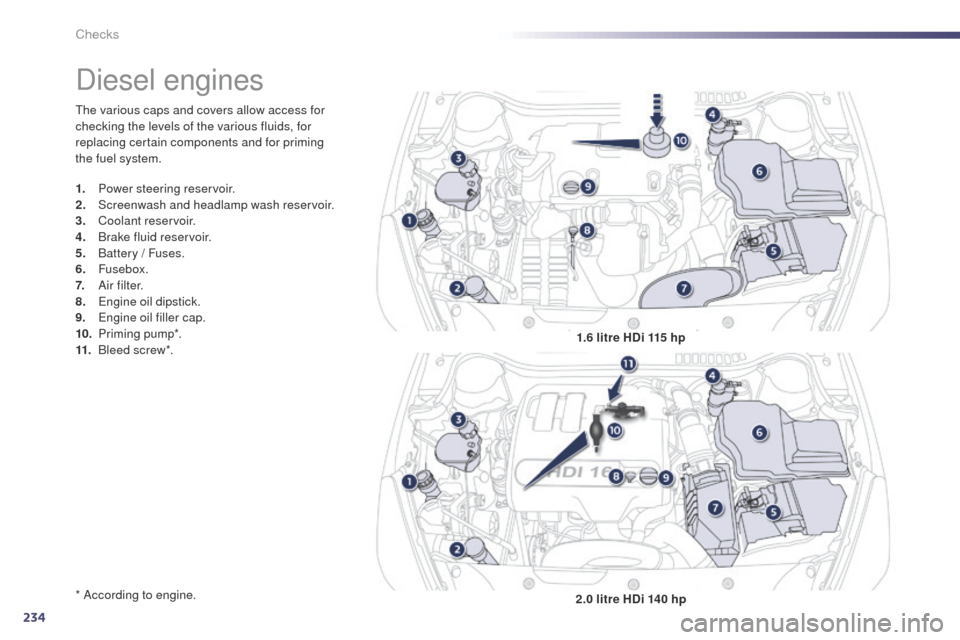
the various caps and covers allow access for
checking the levels of the various fluids, for
replacing certain components and for priming
the fuel system.
* According to engine.
Diesel engines
1. Power steering reservoir.
2. Screenwash and headlamp wash reservoir.
3.
C
oolant reservoir.
4.
B
rake fluid reservoir.
5.
B
attery / Fuses.
6.
Fusebox.
7.
A
i r f i l t e r.
8.
e
n
gine oil dipstick.
9.
e
n
gine oil filler cap.
10.
P
riming pump*.
11.
B
leed screw*. 1.6 litre HDi 115 hp
2.0 litre HDi 140 hp
Checks
Page 237 of 380
235
508_en_Chap09_verifications_ed02-2014
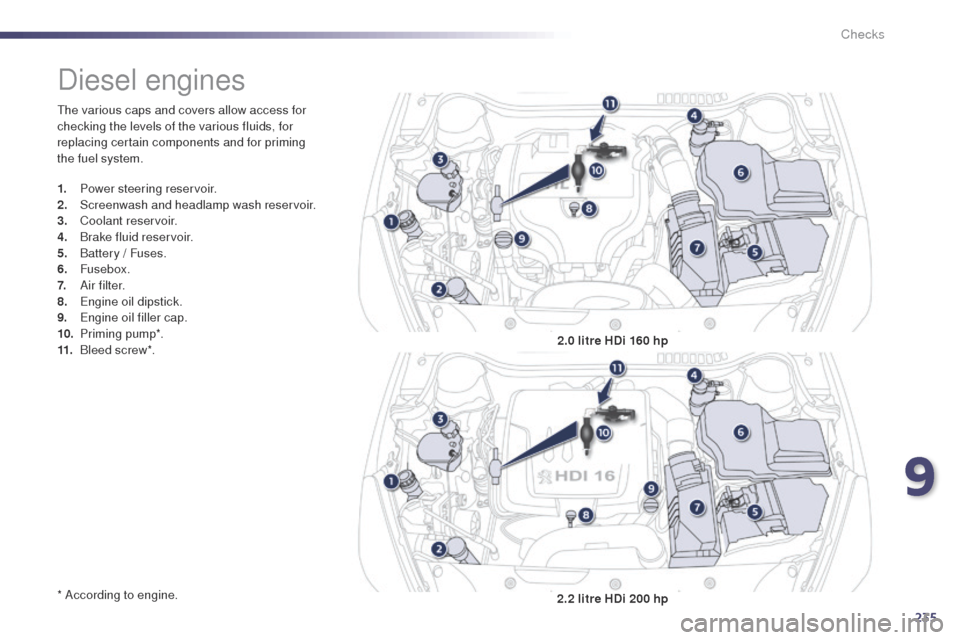
the various caps and covers allow access for
checking the levels of the various fluids, for
replacing certain components and for priming
the fuel system.
* According to engine.
Diesel engines
1. Power steering reservoir.
2. Screenwash and headlamp wash reservoir.
3.
C
oolant reservoir.
4.
B
rake fluid reservoir.
5.
B
attery / Fuses.
6.
Fusebox.
7.
A
i r f i l t e r.
8.
e
n
gine oil dipstick.
9.
e
n
gine oil filler cap.
10.
P
riming pump*.
11.
B
leed screw*. 2.0 litre HDi 160 hp
2.2 litre HDi 200 hp
9
Checks
Page 238 of 380
236
508_en_Chap09_verifications_ed02-2014
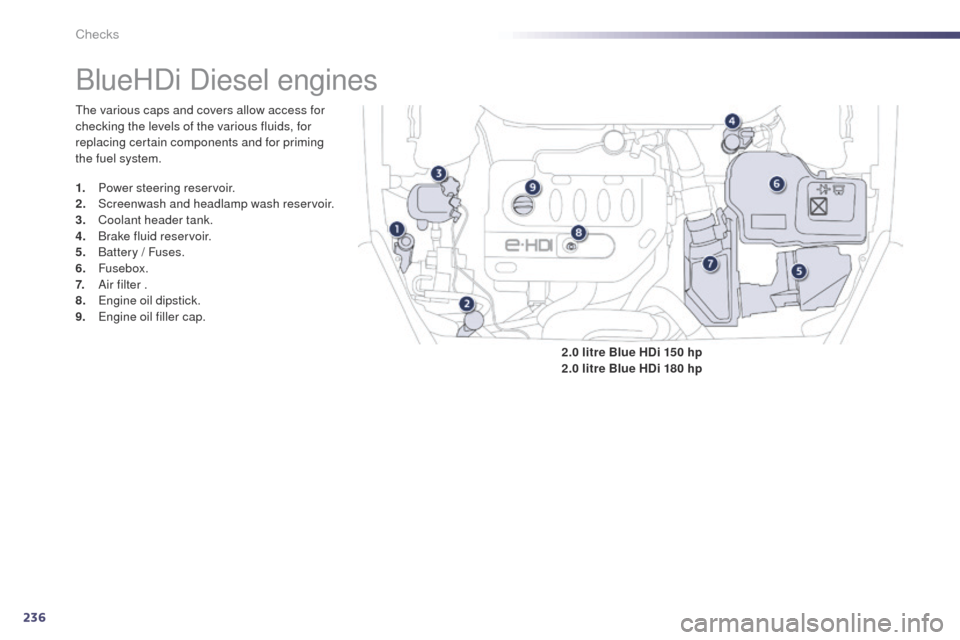
BlueHDi Diesel engines
the various caps and covers allow access for
checking the levels of the various fluids, for
replacing certain components and for priming
the fuel system.
1.
P
ower steering reservoir.
2.
S
creenwash and headlamp wash reservoir.
3.
C
oolant header tank.
4.
B
rake fluid reservoir.
5.
B
attery / Fuses.
6.
Fusebox.
7.
A
ir filter .
8.
e
n
gine oil dipstick.
9.
e
n
gine oil filler cap. 2.0 litre Blue HDi 150 hp
2.0 litre Blue HDi 180 hp
Checks
Page 239 of 380
237
508_en_Chap09_verifications_ed02-2014
Checking levels
take care when working under the
bonnet, as certain areas of the engine
may be extremely hot (risk of burns) and
the cooling fan could start at any time
(even with the ignition off).
Engine oil level
the check is carried out either when
the ignition is switched on using the
oil level indicator in the instrument
panel for vehicles with and electric oil
level gauge, or using the dipstick.
to e
nsure that the reading is correct,
your vehicle must be parked on a level
sur face and the engine having been off
for more than 30 minutes.
It is normal to top up the oil level between
two services (or oil changes). P
e
uge
Ot
recommends that you check the level, and top
up if necessary, every 3 000 miles (5 000 kms). Check all of these levels regularly, in line with the warranty and maintenance record. t
o
p them up if necessary, unless other wise indicated.
If a level drops significantly, have the corresponding system checked by a P
e
uge
Ot
dealer or a qualified workshop.
Checking using the dipstick
Refer to the "Petrol engine" or "Diesel engine"
section for the location of the dipstick in the
engine compartment of your vehicle.
F
t
a
ke the dipstick by its coloured grip and
remove it completely.
F
W
ipe the end of the dipstick using a clean
non-fluffy cloth.
F
R
efit the dipstick and push fully down, then
pull it out again to make the visual check:
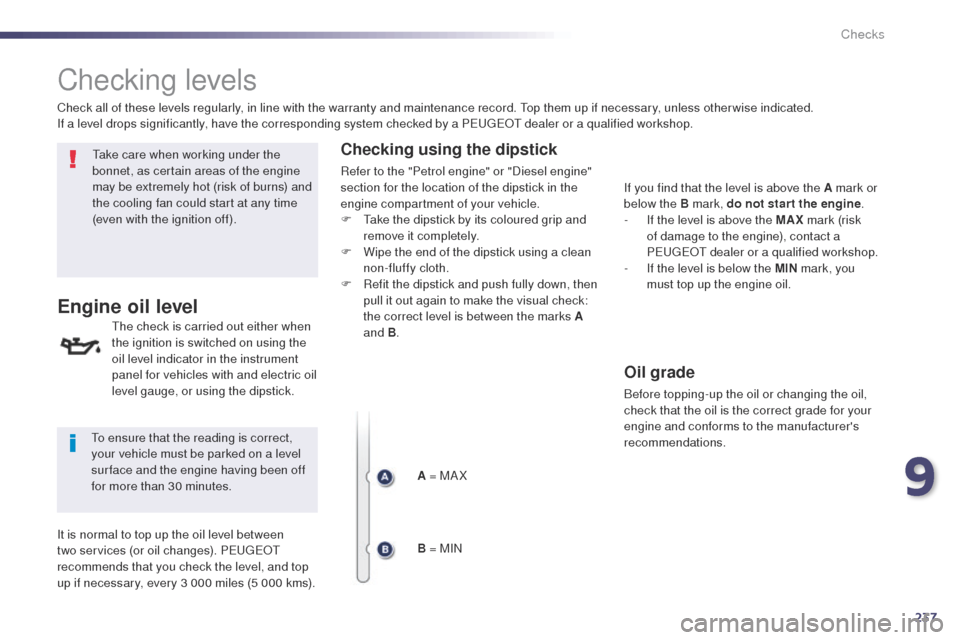
the correct level is between the marks A
and B .
A = MA X
B = MIN If you find that the level is above the A mark or
below the B mark, do not star t the engine
.
-
I
f the level is above the MAX mark (risk
of damage to the engine), contact a
P
e
uge
Ot
dealer or a qualified workshop.
-
I
f the level is below the MIN mark, you
must top up the engine oil.
Oil grade
Before topping-up the oil or changing the oil,
check that the oil is the correct grade for your
engine and conforms to the manufacturer's
recommendations.
9
Checks