Peugeot 508 Hybrid 2016 Owner's Manual
Manufacturer: PEUGEOT, Model Year: 2016, Model line: 508 Hybrid, Model: Peugeot 508 Hybrid 2016Pages: 424, PDF Size: 13.29 MB
Page 111 of 424
109
508_en_Chap03_ergonomie-et-confort_ed01-2016
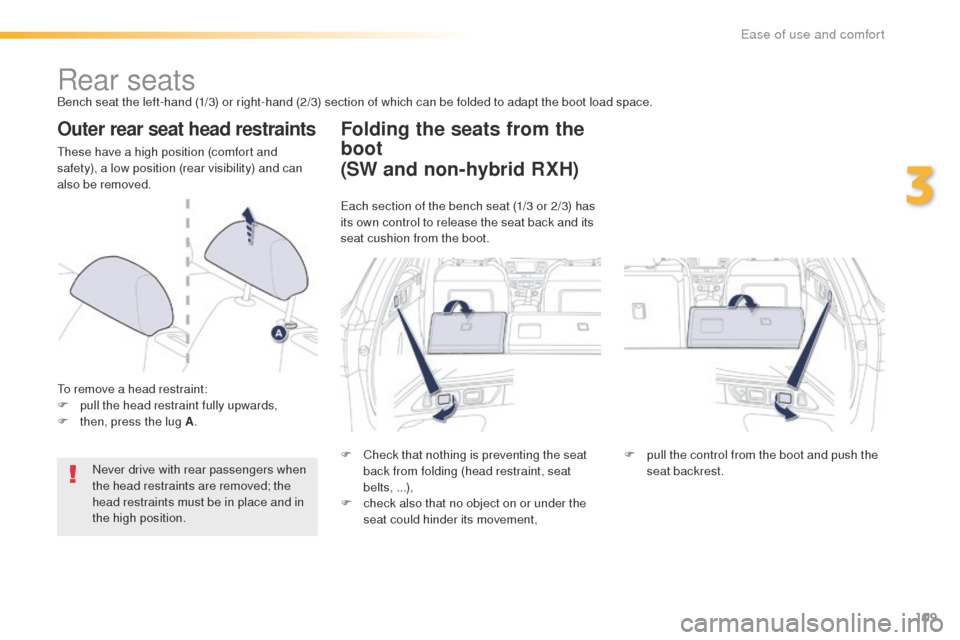
Rear seatsBench seat the left-hand (1/3) or right-hand (2/3) section of which can be folded to adapt the boot load space.
Outer rear seat head restraints
these have a high position (comfort and
safety), a low position (rear visibility) and can
also be removed.
to r
emove a head restraint:
F
p
ull the head restraint fully upwards,
F
t
hen, press the lug A .
Never drive with rear passengers when
the head restraints are removed; the
head restraints must be in place and in
the high position.
Folding the seats from the
boot
F Check that nothing is preventing the seat back from folding (head restraint, seat
belts, ...),
F
c
heck also that no object on or under the
seat could hinder its movement, F
p ull the control from the boot and push the
seat backrest.
(SW and non-hybrid RXH)
each section of the bench seat (1/3 or 2/3) has
its own control to release the seat back and its
seat cushion from the boot.
3
ease of use and comfort
Page 112 of 424
110
508_en_Chap03_ergonomie-et-confort_ed01-2016
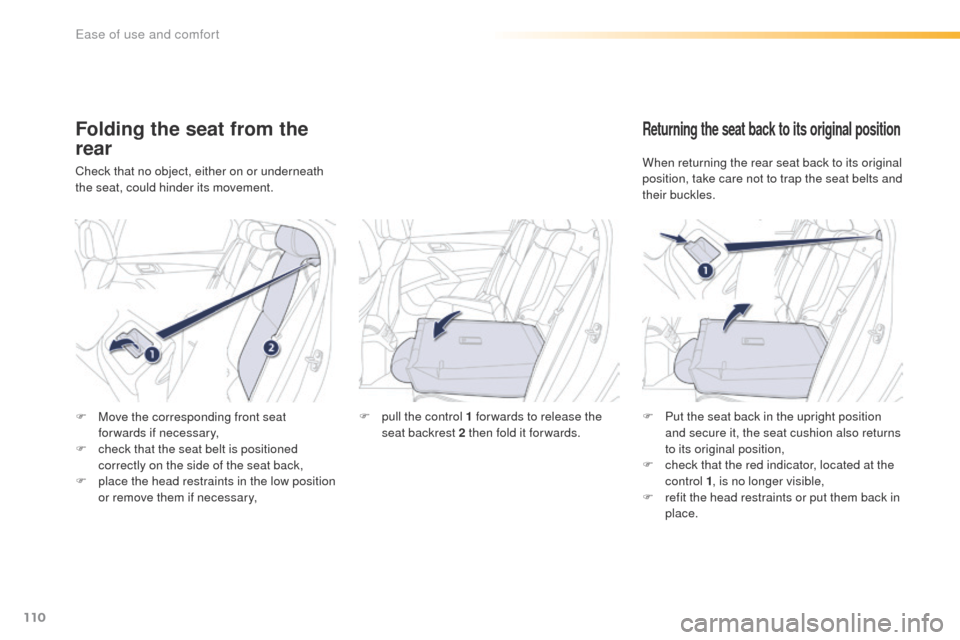
Folding the seat from the
rear
Check that no object, either on or underneath
the seat, could hinder its movement.
Returning the seat back to its original position
When returning the rear seat back to its original
position, take care not to trap the seat belts and
their buckles.
F
M
ove the corresponding front seat
forwards if necessary,
F
c
heck that the seat belt is positioned
correctly on the side of the seat back,
F
p
lace the head restraints in the low position
or remove them if necessary, F
p
ull the control 1 for wards to release the
seat backrest 2 then fold it forwards. F
P
ut the seat back in the upright position
and secure it, the seat cushion also returns
to its original position,
F
c
heck that the red indicator, located at the
control 1 , is no longer visible,
F
r
efit the head restraints or put them back in
place.
ease of use and comfort
Page 113 of 424
111
508_en_Chap03_ergonomie-et-confort_ed01-2016
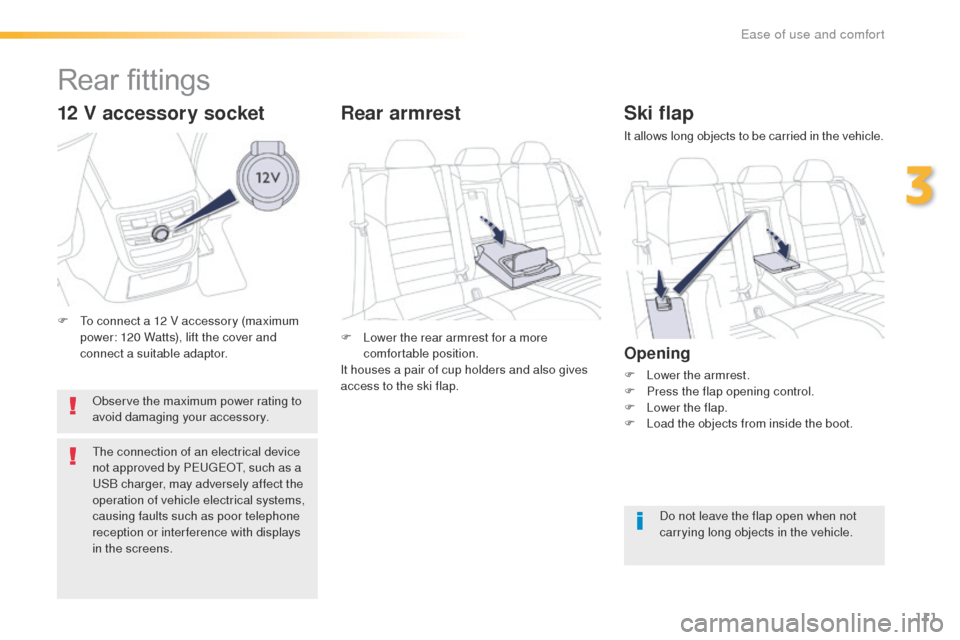
Ski flap
It allows long objects to be carried in the vehicle.
Opening
F Lower the armrest.
F P ress the flap opening control.
F
L
ower the flap.
F
L
oad the objects from inside the boot.
Do not leave the flap open when not
carrying long objects in the vehicle.
F
L
ower the rear armrest for a more
comfortable position.
It houses a pair of cup holders and also gives
access to the ski flap.
Rear armrest
12 V accessory socket
Observe the maximum power rating to
avoid damaging your accessory.
th
e connection of an electrical device
not approved by P
e
uge
Ot, s
uch as a
uS
B charger, may adversely affect the
operation of vehicle electrical systems,
causing faults such as poor telephone
reception or inter ference with displays
in the screens.
Rear fittings
F to connect a 12 V accessory (maximum power: 120 Watts), lift the cover and
connect a suitable adaptor.
3
ease of use and comfort
Page 114 of 424
112
508_en_Chap03_ergonomie-et-confort_ed01-2016
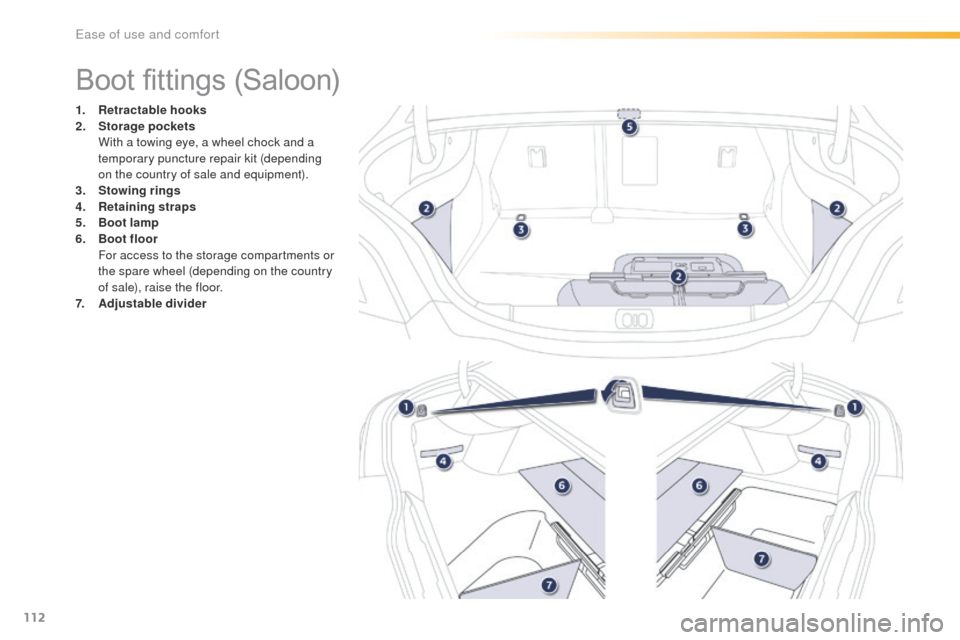
Boot fittings (Saloon)
1. Retractable hooks
2. Storage pockets
W
ith a towing eye, a wheel chock and a
temporary puncture repair kit (depending
on the country of sale and equipment).
3.
S
towing rings
4.
R
etaining straps
5.
B
oot lamp
6.
B
oot floor
F
or access to the storage compartments or
the spare wheel (depending on the country
of sale), raise the floor.
7.
A
djustable divider
ease of use and comfort
Page 115 of 424
113
508_en_Chap03_ergonomie-et-confort_ed01-2016
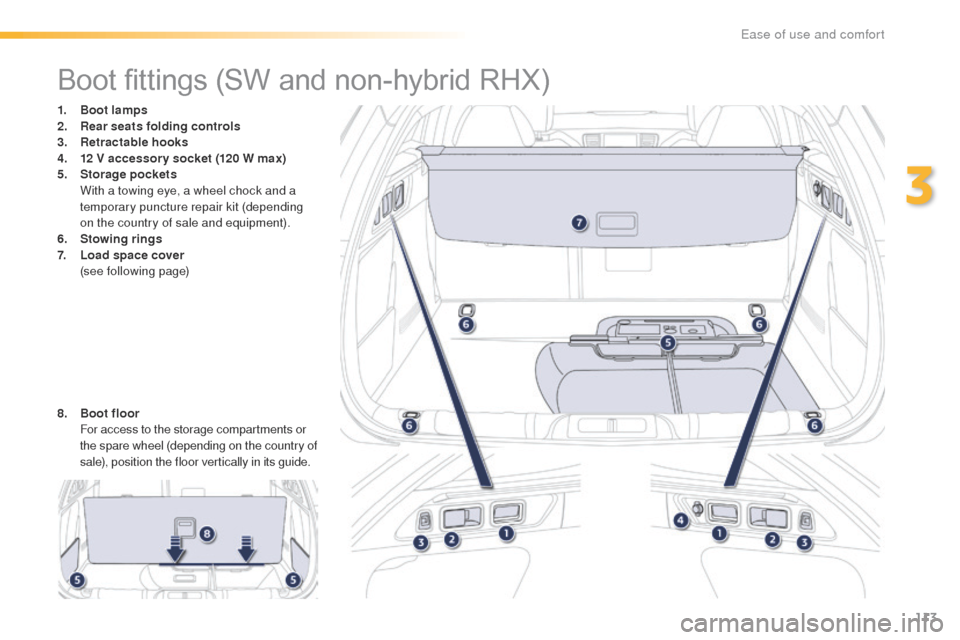
Boot fittings (SW and non-hybrid RHX)
1. Boot lamps
2. Rear seats folding controls
3.
R
etractable hooks
4.
1
2 V accessor y socket (120 W max)
5.
Sto
rage pockets
W
ith a towing eye, a wheel chock and a
temporary puncture repair kit (depending
on the country of sale and equipment).
6.
S
towing rings
7.
L
oad space cover
(
see following page)
8.
B
oot floor
F
or access to the storage compartments or
the spare wheel (depending on the country of
sale), position the floor vertically in its guide.
3
ease of use and comfort
Page 116 of 424
114
508_en_Chap03_ergonomie-et-confort_ed01-2016
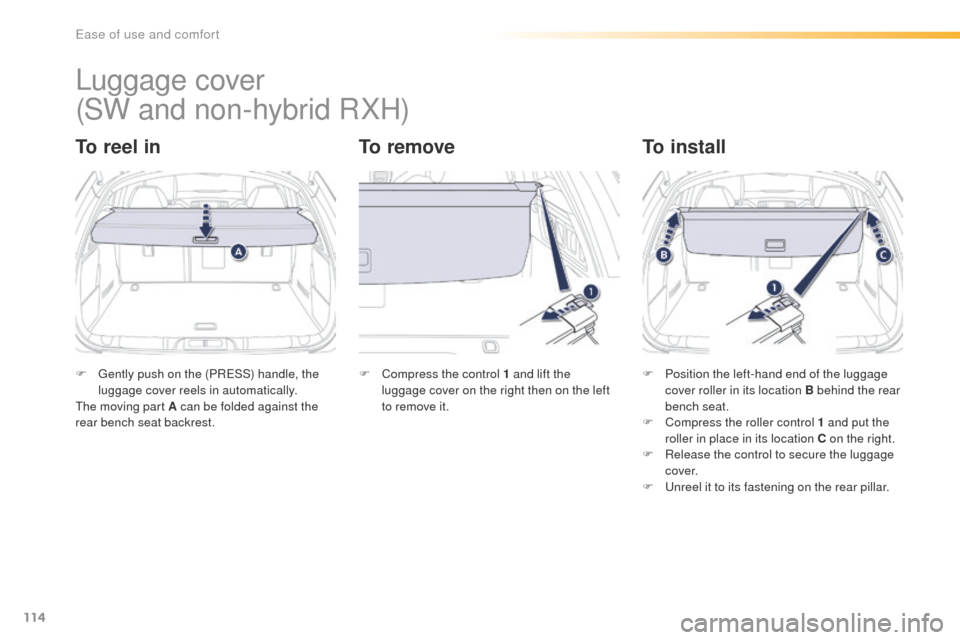
Luggage cover
To reel inTo removeTo install
F gently push on the (PReSS) handle, the
luggage cover reels in automatically.
th
e moving part A can be folded against the
rear bench seat backrest. F
C ompress the control 1 and lift the
luggage cover on the right then on the left
to
remove it.F
P osition the left-hand end of the luggage
cover roller in its location B behind the rear
bench seat.
F
C
ompress the roller control 1 and put the
roller in place in its location C on the right.
F
R
elease the control to secure the luggage
c ove r.
F
u
n
reel it to its fastening on the rear pillar.
(SW and non-hybrid RXH)
ease of use and comfort
Page 117 of 424
115
508_en_Chap03_ergonomie-et-confort_ed01-2016
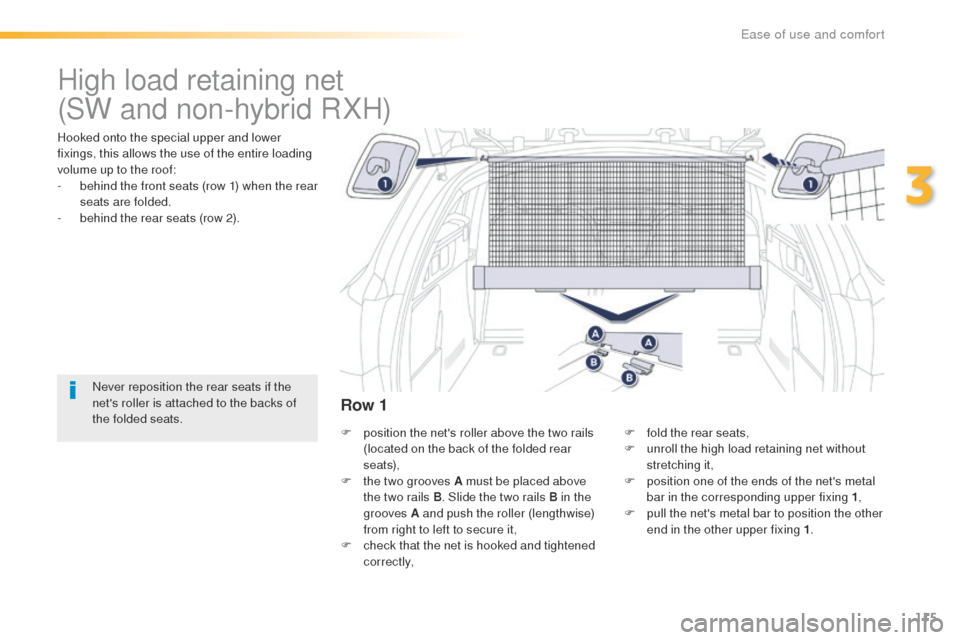
High load retaining net
Hooked onto the special upper and lower
fixings, this allows the use of the entire loading
volume up to the roof:
-
b
ehind the front seats (row 1) when the rear
seats are folded.
-
b
ehind the rear seats (row 2).
Never reposition the rear seats if the
net's roller is attached to the backs of
the folded seats. F
p
osition the net's roller above the two rails
(located on the back of the folded rear
seats),
F
t
he two grooves A must be placed above
the two rails B . Slide the two rails B in the
grooves A and push the roller (lengthwise)
from right to left to secure it,
F
c
heck that the net is hooked and tightened
c o r r e c t l y, F
f
old the rear seats,
F
u
nroll the high load retaining net without
stretching it,
F
p
osition one of the ends of the net's metal
bar in the corresponding upper fixing 1 ,
F
p
ull the net's metal bar to position the other
end in the other upper fixing 1 .
Row 1
(SW and non-hybrid RXH)
3
ease of use and comfort
Page 118 of 424
116
508_en_Chap03_ergonomie-et-confort_ed01-2016
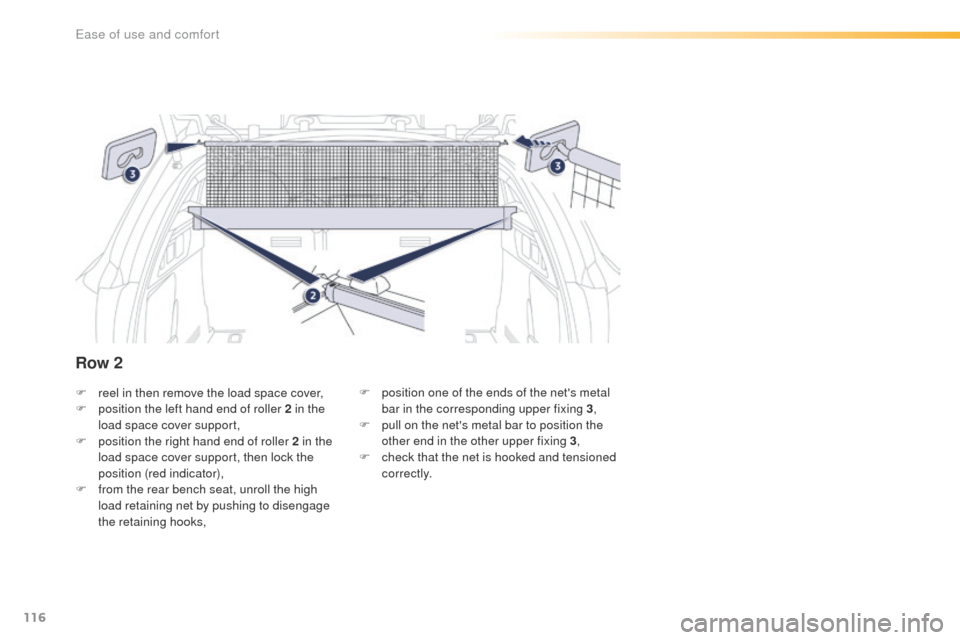
F reel in then remove the load space cover,
F p osition the left hand end of roller 2 in the
load space cover support,
F
p
osition the right hand end of roller 2 in the
load space cover support, then lock the
position (red indicator),
F
f
rom the rear bench seat, unroll the high
load retaining net by pushing to disengage
the retaining hooks, F
p osition one of the ends of the net's metal
bar in the corresponding upper fixing 3 ,
F
p
ull on the net's metal bar to position the
other end in the other upper fixing 3 ,
F
c
heck that the net is hooked and tensioned
c o r r e c t l y.
Row 2
ease of use and comfort
Page 119 of 424
117
508_en_Chap04_eclairage-et-visibilite_ed01-2016
Lighting controlsSelection and operation of the various front and rear lamps providing the vehicle's lighting and signalling.
Main lighting
there are various lamps on the vehicle:
- s idelamps, to be seen,
-
d
ipped beam headlamps to see without
dazzling other drivers,
-
m
ain beam headlamps to see clearly when
the road is clear,
-
d
irectional headlamps for improved
visibility when cornering.
Additional lighting
Other lamps are installed to fulfil the
requirements of particular driving conditions:
-
r
ear foglamps to better signal the presence
of the vehicle in foggy conditions,
-
f
ront foglamps for better visibility in foggy
conditions and to improve lighting at
intersections and when parking,
-
d
aytime running lamps at the front for
better visibility of the vehicle by day.
-
a
dditional headlamps for better lighting of
the inside of corners.
Lighting function settings
You can activate or deactivate the following
lighting functions:
-
gu
ide-me-home lighting,
-
m
ain additional lighting,
-
s
econdary additional lighting,
-
w
elcome lighting,
-
a
utomatic illumination of headlamps,
-
a
daptive lighting.
In some weather conditions (e.g. low
temperature or humidity), the presence
of misting on the internal sur face of the
glass of the headlamps and rear lamps
is normal; it disappears after the lamps
have been on for a few minutes.
4
Lighting and visibility
Page 120 of 424
118
508_en_Chap04_eclairage-et-visibilite_ed01-2016
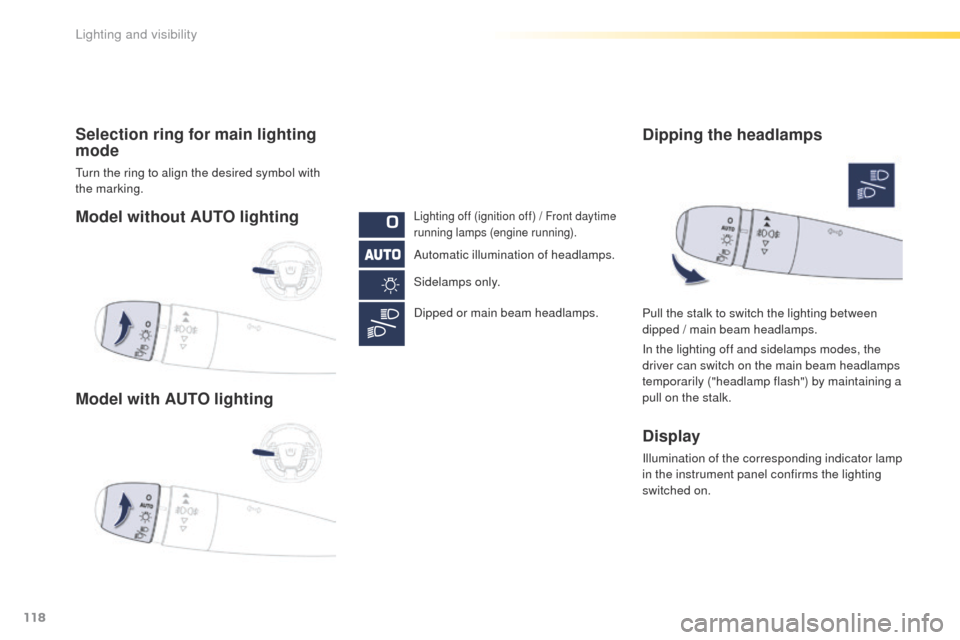
Model without AUTO lighting
Model with AUTO lighting Selection ring for main lighting
mode
turn the ring to align the desired symbol with
the marking.
Lighting off (ignition off) / Front daytime
running lamps (engine running).
Automatic illumination of headlamps.
Sidelamps only.
Dipped or main beam headlamps.Pull the stalk to switch the lighting between
dipped / main beam headlamps.
In the lighting off and sidelamps modes, the
driver can switch on the main beam headlamps
temporarily ("headlamp flash") by maintaining a
pull on the stalk.
Display
Illumination of the corresponding indicator lamp
in the instrument panel confirms the lighting
switched on.
Dipping the headlamps
Lighting and visibility