Peugeot Boxer 2020 User Guide
Manufacturer: PEUGEOT, Model Year: 2020, Model line: Boxer, Model: Peugeot Boxer 2020Pages: 196, PDF Size: 5.1 MB
Page 11 of 196
9
Instruments
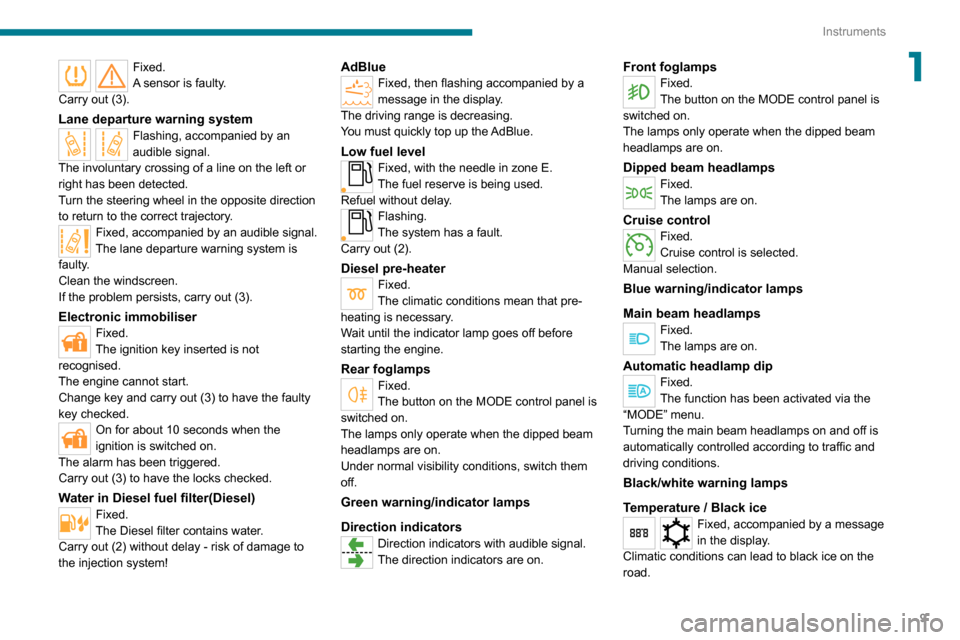
1Fixed.
A sensor is faulty.
Carry out (3).
Lane departure warning systemFlashing, accompanied by an
audible signal.
The involuntary crossing of a line on the left or
right has been detected.
Turn the steering wheel in the opposite direction
to return to the correct trajectory.
Fixed, accompanied by an audible signal.
The lane departure warning system is
faulty.
Clean the windscreen.
If the problem persists, carry out (3).
Electronic immobiliserFixed.
The ignition key inserted is not
recognised.
The engine cannot start.
Change key and carry out (3) to have the faulty
key checked.
On for about 10 seconds when the
ignition is switched on.
The alarm has been triggered.
Carry out (3) to have the locks checked.
Water in Diesel fuel filter(Diesel)Fixed.
The Diesel filter contains water.
Carry out (2) without delay - risk of damage to
the injection system!
AdBlueFixed, then flashing accompanied by a
message in the display.
The driving range is decreasing.
You must quickly top up the AdBlue.
Low fuel levelFixed, with the needle in zone E.The fuel reserve is being used.Refuel without delay.Flashing.
The system has a fault.
Carry out (2).
Diesel pre-heaterFixed.
The climatic conditions mean that pre-
heating is necessary.
Wait until the indicator lamp goes off before
starting the engine.
Rear foglampsFixed.
The button on the MODE control panel is
switched on.
The lamps only operate when the dipped beam
headlamps are on.
Under normal visibility conditions, switch them
off.
Green warning/indicator lamps
Direction indicators
Direction indicators with audible signal.
The direction indicators are on.
Front foglampsFixed.
The button on the MODE control panel is
switched on.
The lamps only operate when the dipped beam
headlamps are on.
Dipped beam headlampsFixed.
The lamps are on.
Cruise controlFixed.
Cruise control is selected.
Manual selection.
Blue warning/indicator lamps
Main beam headlamps
Fixed.
The lamps are on.
Automatic headlamp dipFixed.
The function has been activated via the
“MODE” menu.
Turning the main beam headlamps on and off is
automatically controlled according to traffic and
driving conditions.
Black/white warning lamps
Temperature / Black ice
Fixed, accompanied by a message
in the display.
Climatic conditions can lead to black ice on the
road.
Page 12 of 196
10
Instruments
Be extra vigilant and avoid sudden braking.
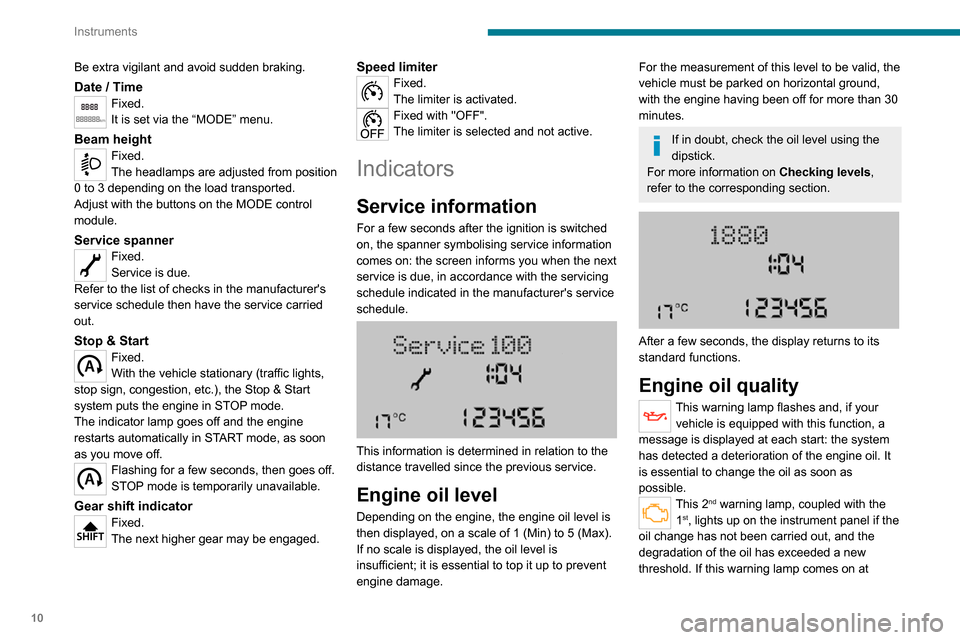
Date / TimeFixed.
It is set via the “MODE” menu.
Beam heightFixed.
The headlamps are adjusted from position
0 to 3 depending on the load transported.
Adjust with the buttons on the MODE control
module.
Service spannerFixed.
Service is due.
Refer to the list of checks in the manufacturer's
service schedule then have the service carried
out.
Stop & StartFixed.
With the vehicle stationary (traffic lights,
stop sign, congestion, etc.), the Stop & Start
system puts the engine in STOP mode.
The indicator lamp goes off and the engine
restarts automatically in START mode, as soon
as you move off.
Flashing for a few seconds, then goes off.
STOP mode is temporarily unavailable.
Gear shift indicatorFixed.
The next higher gear may be engaged.
Speed limiterFixed.
The limiter is activated.
Fixed with "OFF".
The limiter is selected and not active.
Indicators
Service information
For a few seconds after the ignition is switched
on, the spanner symbolising service information
comes on: the screen informs you when the next
service is due, in accordance with the servicing
schedule indicated in the manufacturer's service
schedule.
This information is determined in relation to the
distance travelled since the previous service.
Engine oil level
Depending on the engine, the engine oil level is
then displayed, on a scale of 1 (Min) to 5 (Max).
If no scale is displayed, the oil level is
insufficient; it is essential to top it up to prevent
engine damage.
For the measurement of this level to be valid, the
vehicle must be parked on horizontal ground,
with the engine having been off for more than 30
minutes.
If in doubt, check the oil level using the
dipstick.
For more information on Checking levels,
refer to the corresponding section.
After a few seconds, the display returns to its
standard functions.
Engine oil quality
This warning lamp flashes and, if your vehicle is equipped with this function, a
message is displayed at each start: the system
has detected a deterioration of the engine oil. It
is essential to change the oil as soon as
possible.
This 2nd warning lamp, coupled with the
1st, lights up on the instrument panel if the
oil change has not been carried out, and the
degradation of the oil has exceeded a new
threshold. If this warning lamp comes on at
Page 13 of 196
11
Instruments
1regular intervals, the oil has to be changed as
soon as possible.
For 3.0 L HDi engines, the engine speed
is then limited to 3,000 rpm, then 1,500
rpm until the oil is changed. Change the
engine oil to prevent damage.
Resetting the service
indicator
A qualified workshop, equipped with the
diagnostic tool, will stop the permanent flashing
of the warning lamp after each service.
If you have serviced the vehicle yourself, reset
the service indicator as follows:
► Insert the key into the ignition switch.► Turn it to the MAR - ON position.► Simultaneously depress the brake and accelerator pedals for more than 15 seconds.
Refer to the checklist in the
manufacturer's service schedule
provided on delivery of the vehicle.
Reminder of the servicing
information
To access the service indications at any time, briefly press the MODE button.
Use the up/down arrows to view service intervals
and engine oil quality.
Pressing the MODE button again allows you to return to the various display menus.
A long press allows you to return to the home
screen.
Menu... Select... Allows you
to...
Service Service
(miles/
km before
service) Display the
remaining
miles/
kilometres to
be travelled
before the
next service.
Oil change
(miles/km
before oil
change) Display the
remaining
miles/
kilometres to
be travelled
before the
next oil
change.
For more information on
Vehicle
configuration (MODE) , refer to the
corresponding section.
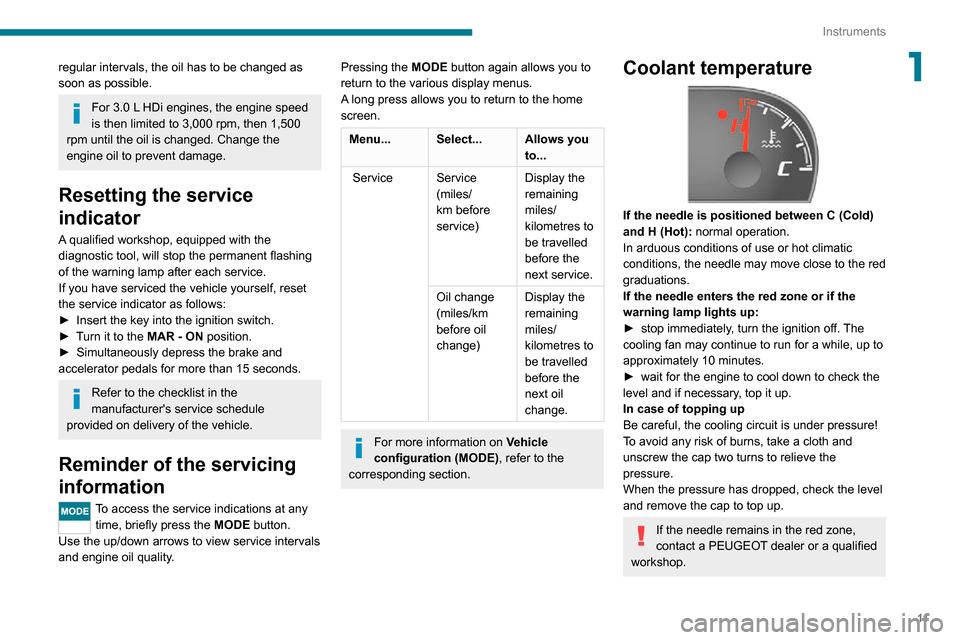
Coolant temperature
If the needle is positioned between C (Cold)
and H (Hot): normal operation.In arduous conditions of use or hot climatic
conditions, the needle may move close to the red
graduations.
If the needle enters the red zone or if the
warning lamp lights up:
► stop immediately , turn the ignition off. The cooling fan may continue to run for a while, up to
approximately 10 minutes.
► wait for the engine to cool down to check the level and if necessary, top it up.
In case of topping up
Be careful, the cooling circuit is under pressure!
To avoid any risk of burns, take a cloth and
unscrew the cap two turns to relieve the
pressure.
When the pressure has dropped, check the level
and remove the cap to top up.
If the needle remains in the red zone,
contact a PEUGEOT dealer or a qualified
workshop.
Page 14 of 196
12
Instruments
Check the engine coolant level regularly.
For more information on Checking
levels, refer to the corresponding section.
AdBlue® fluid ange
indicators
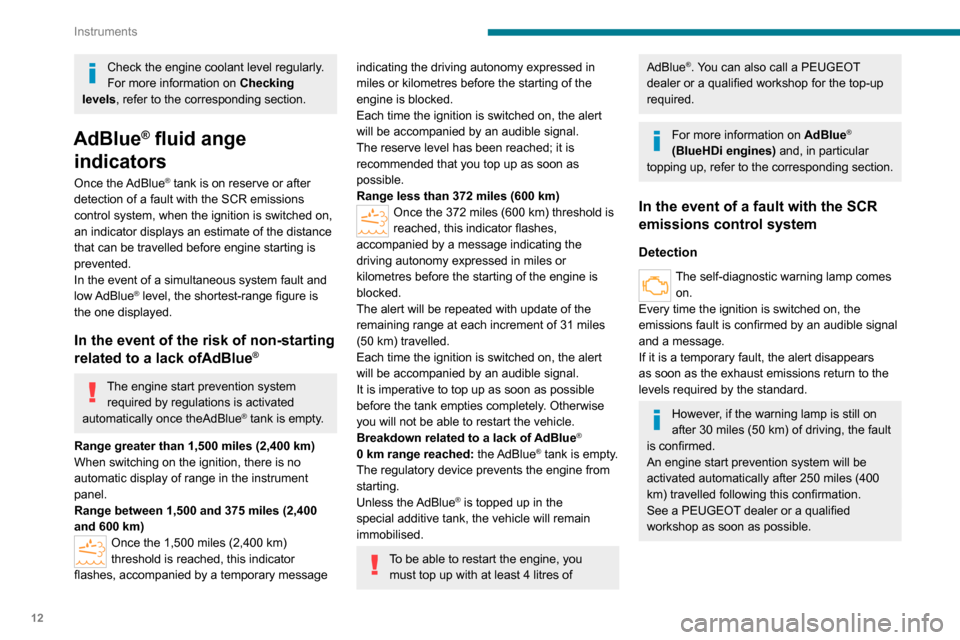
Once the AdBlue® tank is on reserve or after
detection of a fault with the SCR emissions
control system, when the ignition is switched on,
an indicator displays an estimate of the distance
that can be travelled before engine starting is
prevented.
In the event of a simultaneous system fault and
low AdBlue
® level, the shortest-range figure is
the one displayed.
In the event of the risk of non-starting
related to a lack ofAdBlue®
The engine start prevention system
required by regulations is activated
automatically once theAdBlue
® tank is empty.
Range greater than 1,500 miles (2,400 km)
When switching on the ignition, there is no
automatic display of range in the instrument
panel.
Range between 1,500 and 375 miles (2,400
and 600 km)
Once the 1,500 miles (2,400 km)
threshold is reached, this indicator
flashes, accompanied by a temporary message
indicating the driving autonomy expressed in
miles or kilometres before the starting of the
engine is blocked.
Each time the ignition is switched on, the alert
will be accompanied by an audible signal.
The reserve level has been reached; it is
recommended that you top up as soon as
possible.
Range less than 372 miles (600 km)
Once the 372 miles (600 km) threshold is
reached, this indicator flashes,
accompanied by a message indicating the
driving autonomy expressed in miles or
kilometres before the starting of the engine is
blocked.
The alert will be repeated with update of the
remaining range at each increment of 31 miles
(50 km) travelled.
Each time the ignition is switched on, the alert
will be accompanied by an audible signal.
It is imperative to top up as soon as possible
before the tank empties completely. Otherwise
you will not be able to restart the vehicle.
Breakdown related to a lack of AdBlue
®
0 km range reached: the AdBlue® tank is empty.
The regulatory device prevents the engine from
starting.
Unless the AdBlue
® is topped up in the
special additive tank, the vehicle will remain
immobilised.
To be able to restart the engine, you must top up with at least 4 litres of
AdBlue®. You can also call a PEUGEOT
dealer or a qualified workshop for the top-up
required.
For more information on AdBlue®
(BlueHDi engines) and, in particular
topping up, refer to the corresponding section.
In the event of a fault with the SCR
emissions control system
Detection
The self-diagnostic warning lamp comes on.
Every time the ignition is switched on, the
emissions fault is confirmed by an audible signal
and a message.
If it is a temporary fault, the alert disappears
as soon as the exhaust emissions return to the
levels required by the standard.
However, if the warning lamp is still on
after 30 miles (50 km) of driving, the fault
is confirmed.
An engine start prevention system will be
activated automatically after 250 miles (400
km) travelled following this confirmation.
See a PEUGEOT dealer or a qualified
workshop as soon as possible.
Page 15 of 196
13
Instruments
1Fault confirmed
In addition to the previous signals, the remaining
range allowed will be displayed in miles or
kilometres in the instrument panel.
The alert will be repeated every 30 seconds with
an update of the driving range.
See a PEUGEOT dealer or a qualified workshop
as soon as possible.
You risk not being able to start the engine.
Starting will be prevented after 250 miles
(400 km)
At each starting attempt, the alert is activated and the starting prevention
message is displayed.
To be able to start the engine, you must call on a
PEUGEOT dealer or a qualified workshop.
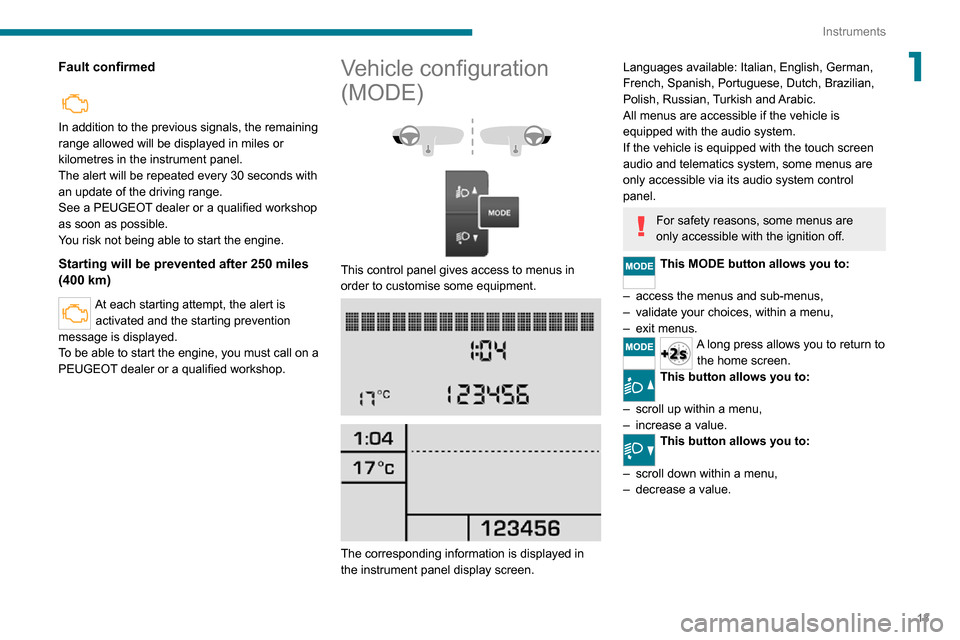
Vehicle configuration
(MODE)
This control panel gives access to menus in
order to customise some equipment.
The corresponding information is displayed in
the instrument panel display screen.
Languages available: Italian, English, German,
French, Spanish, Portuguese, Dutch, Brazilian,
Polish, Russian, Turkish and Arabic.
All menus are accessible if the vehicle is
equipped with the audio system.
If the vehicle is equipped with the touch screen
audio and telematics system, some menus are
only accessible via its audio system control panel.
For safety reasons, some menus are
only accessible with the ignition off.
This MODE button allows you to:
– access the menus and sub-menus,– validate your choices, within a menu,– exit menus.A long press allows you to return to
the home screen.
This button allows you to:
– scroll up within a menu,– increase a value.
This button allows you to:
– scroll down within a menu,– decrease a value.
Page 16 of 196
14
Instruments
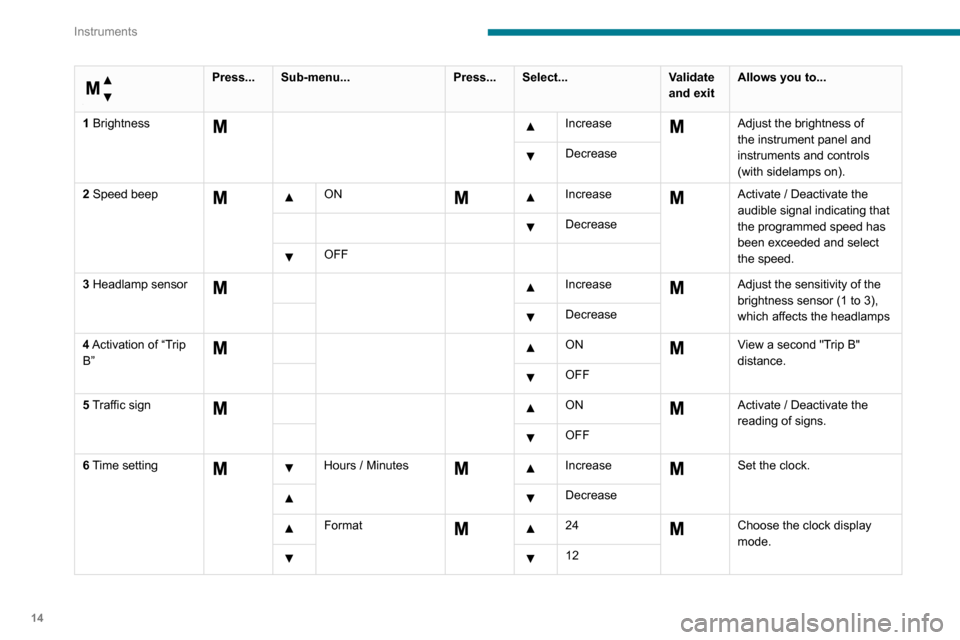
Menu...
Press...Sub-menu... Press...Select... Validate
and exitAllows you to...
1 Brightness
IncreaseAdjust the brightness of
the instrument panel and
instruments and controls
(with sidelamps on).
Decrease
2 Speed beep
ON Increase Activate / Deactivate the
audible signal indicating that
the programmed speed has
been exceeded and select
the speed.
Decrease
OFF
3 Headlamp sensor
Increase Adjust the sensitivity of the
brightness sensor (1 to 3),
which affects the headlamps
Decrease
4 Activation of “Trip
B”
ON View a second "Trip B"
distance.
OFF
5 Traffic sign
ON Activate / Deactivate the
reading of signs.
OFF
6 Time setting
Hours / Minutes Increase Set the clock.
Decrease
Format 24Choose the clock display
mode.
12
Page 17 of 196
15
Instruments
1
Menu...
Press...Sub-menu... Press...Select... Validate
and exitAllows you to...
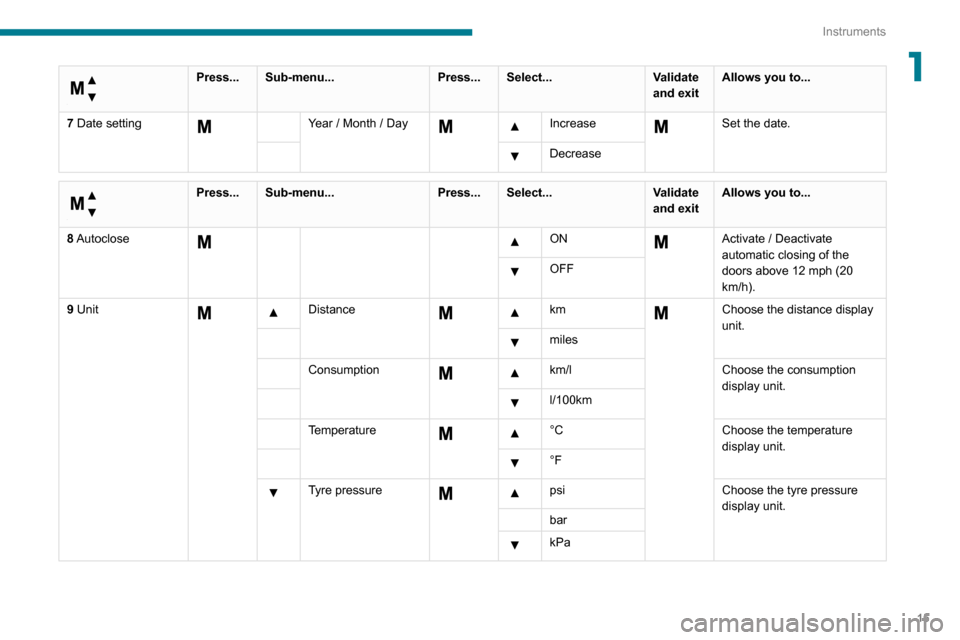
7 Date setting
Year / Month / Day Increase Set the date.
Decrease
Menu…
Press... Sub-menu... Press...Select... Validate
and exitAllows you to...
8 Autoclose
ON Activate / Deactivate
automatic closing of the
doors above 12 mph (20
km/h).
OFF
9 Unit
Distance km Choose the distance display
unit.
miles
Consumption
km/l
Choose the consumption
display unit.
l/100km
Temperature
°C
Choose the temperature
display unit.
°F
Tyre pressure psiChoose the tyre pressure
display unit.
bar
kPa
Page 18 of 196
16
Instruments
Menu…
Press...Sub-menu... Press...Select... Validate
and exitAllows you to...
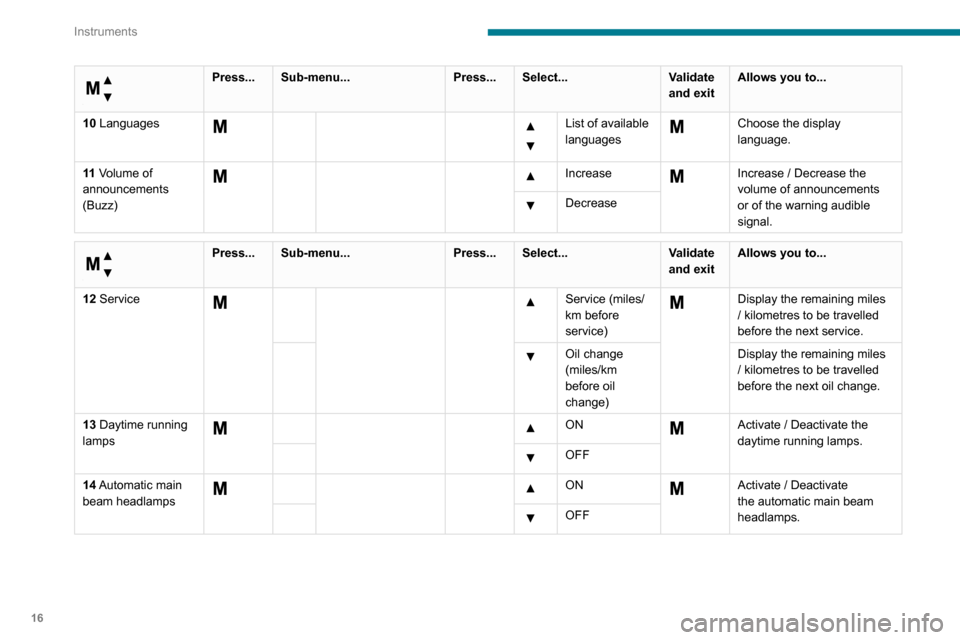
10 Languages
List of available
languages Choose the display
language.
11 Volume of
announcements
(Buzz)
IncreaseIncrease / Decrease the
volume of announcements
or of the warning audible
signal.
Decrease
Menu…
Press... Sub-menu... Press...Select... Validate
and exitAllows you to...
12 Service
Service (miles/
km before
service) Display the remaining miles
/ kilometres to be travelled
before the next service.
Oil change
(miles/km
before oil
change) Display the remaining miles
/ kilometres to be travelled
before the next oil change.
13 Daytime running
lamps
ON Activate / Deactivate the
daytime running lamps.
OFF
14 Automatic main
beam headlamps
ON Activate / Deactivate the automatic main beam headlamps. OFF
Page 19 of 196
17
Instruments
1
Menu…
Press...Sub-menu... Press...Select... Validate
and exitAllows you to...
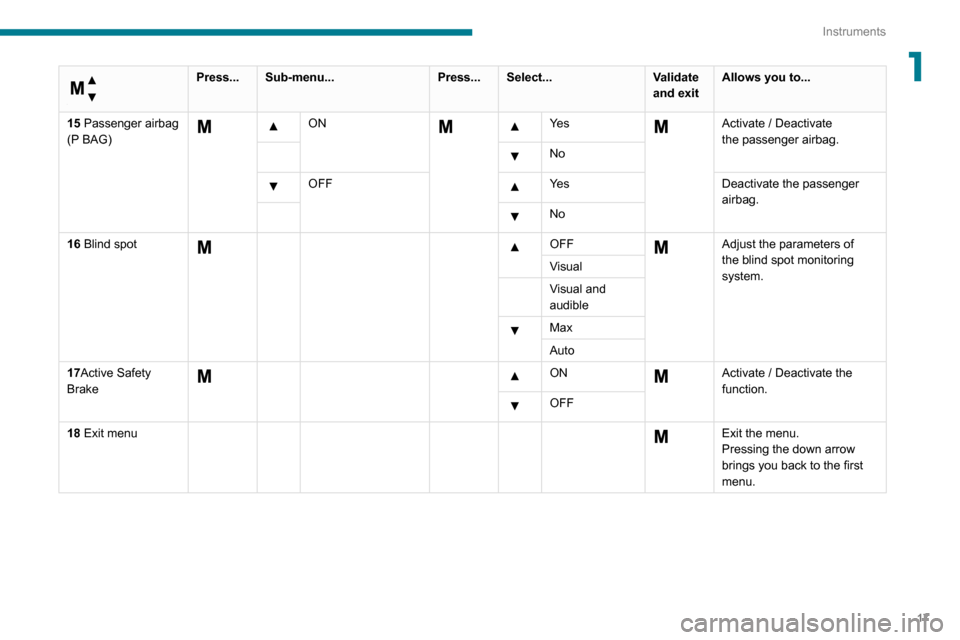
15 Passenger airbag
(P BAG)
ON Ye s Activate / Deactivate the passenger airbag. No
OFF Ye sDeactivate the passenger airbag. No
16 Blind spot
OFF Adjust the parameters of
the blind spot monitoring
system.
Visual
Visual and
audible
Max
Auto
17Active Safety
Brake
ON Activate / Deactivate the
function.
OFF
18 Exit menu
Exit the menu.
Pressing the down arrow
brings you back to the first
menu.
Page 20 of 196
18
Instruments
Touch screen audio and telematics system
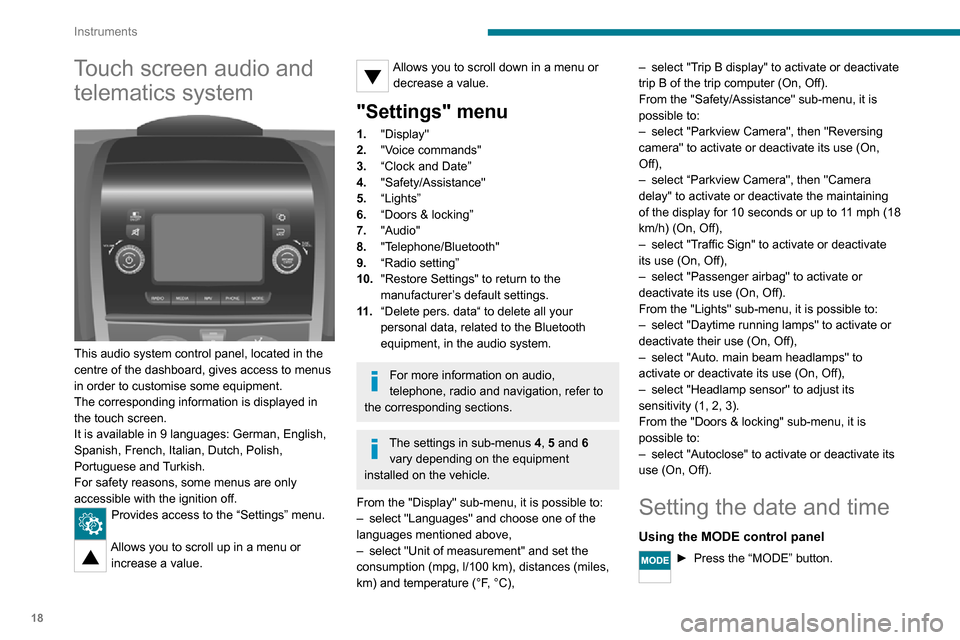
This audio system control panel, located in the
centre of the dashboard, gives access to menus
in order to customise some equipment.
The corresponding information is displayed in
the touch screen.
It is available in 9 languages: German, English,
Spanish, French, Italian, Dutch, Polish,
Portuguese and Turkish.
For safety reasons, some menus are only
accessible with the ignition off.
Provides access to the “Settings” menu.
Allows you to scroll up in a menu or
increase a value.
Allows you to scroll down in a menu or decrease a value.
"Settings" menu
1. "Display"
2. "Voice commands"
3. “Clock and Date”
4. "Safety/Assistance"
5. “Lights”
6. “Doors & locking”
7. "Audio"
8. "Telephone/Bluetooth"
9. “Radio setting”
10. "Restore Settings" to return to the
manufacturer’s default settings.
11 . “Delete pers. data“ to delete all your
personal data, related to the Bluetooth
equipment, in the audio system.
For more information on audio,
telephone, radio and navigation, refer to
the corresponding sections.
The settings in sub-menus 4, 5 and 6
vary depending on the equipment
installed on the vehicle.
From the "Display" sub-menu, it is possible to:
– select "Languages" and choose one of the languages mentioned above,– select "Unit of measurement" and set the consumption (mpg, l/100 km), distances (miles,
km) and temperature (°F, °C),
– select "Trip B display" to activate or deactivate trip B of the trip computer (On, Off).
From the "Safety/Assistance" sub-menu, it is
possible to:
– select "Parkview Camera", then "Reversing camera" to activate or deactivate its use (On,
Off),
– select “Parkview Camera", then "Camera delay" to activate or deactivate the maintaining
of the display for 10 seconds or up to 11 mph (18
km/h) (On, Off),
– select "Traffic Sign" to activate or deactivate its use (On, Off),– select "Passenger airbag" to activate or deactivate its use (On, Off).
From the "Lights" sub-menu, it is possible to:
– select "Daytime running lamps" to activate or deactivate their use (On, Off),– select "Auto. main beam headlamps" to activate or deactivate its use (On, Off),– select "Headlamp sensor" to adjust its sensitivity (1, 2, 3).
From the "Doors & locking" sub-menu, it is
possible to:
– select "Autoclose" to activate or deactivate its use (On, Off).
Setting the date and time
Using the MODE control panel
► Press the “MODE” button.