PEUGEOT BOXER 2021 Owner's Guide
Manufacturer: PEUGEOT, Model Year: 2021, Model line: BOXER, Model: PEUGEOT BOXER 2021Pages: 212, PDF Size: 6.37 MB
Page 31 of 212
29
Access
2Always remove the key from the ignition when leaving the vehicle, even for a
short time.
If an obstacle is encountered during operation
of the electric windows, you must reverse the
movement of the window. To do this, press
the window control concerned.
When the driver operates the passenger
electric windows, they must ensure that
no one is preventing correct closing of the
windows.
The driver must ensure that all passengers
make correct use of electric windows.
Be particularly aware of children when
operating the windows.
Page 32 of 212
30
Ease of use and comfort
Driver's seat
For safety reasons, seat adjustments
must only be made when the vehicle is
stationary.
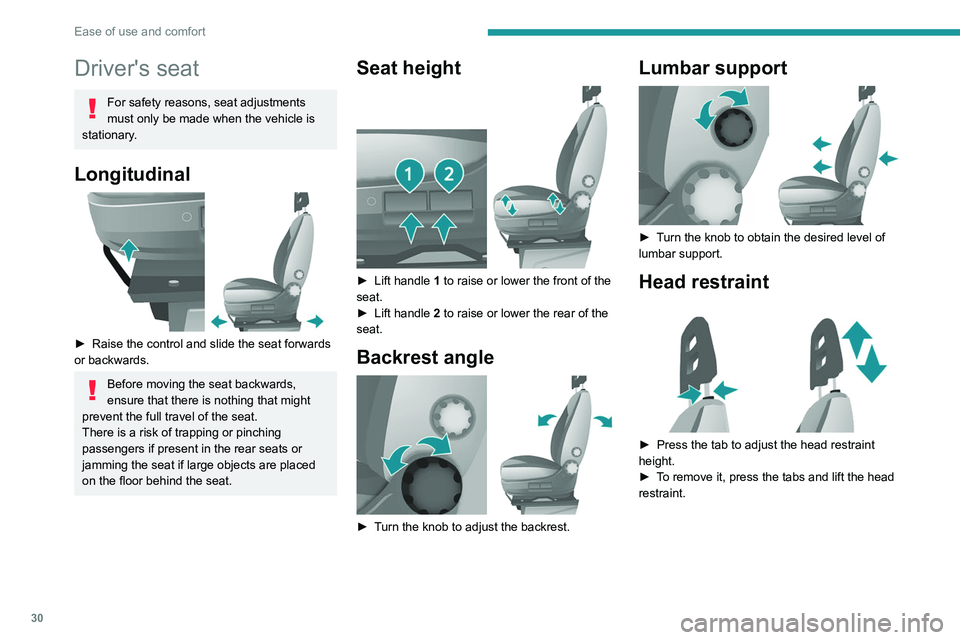
Longitudinal
► Raise the control and slide the seat forwards
or backwards.
Before moving the seat backwards,
ensure that there is nothing that might
prevent the full travel of the seat.
There is a risk of trapping or pinching
passengers if present in the rear seats or
jamming the seat if large objects are placed
on the floor behind the seat.
Seat height
► Lift handle 1 to raise or lower the front of the
seat.
►
Lift handle 2
to raise or lower the rear of the
seat.
Backrest angle
► Turn the knob to adjust the backrest.
Lumbar support
► Turn the knob to obtain the desired level of
lumbar support.
Head restraint
► Press the tab to adjust the head restraint
height.
►
T
o remove it, press the tabs and lift the head
restraint.
Page 33 of 212
31
Ease of use and comfort
3Adjustable armrest
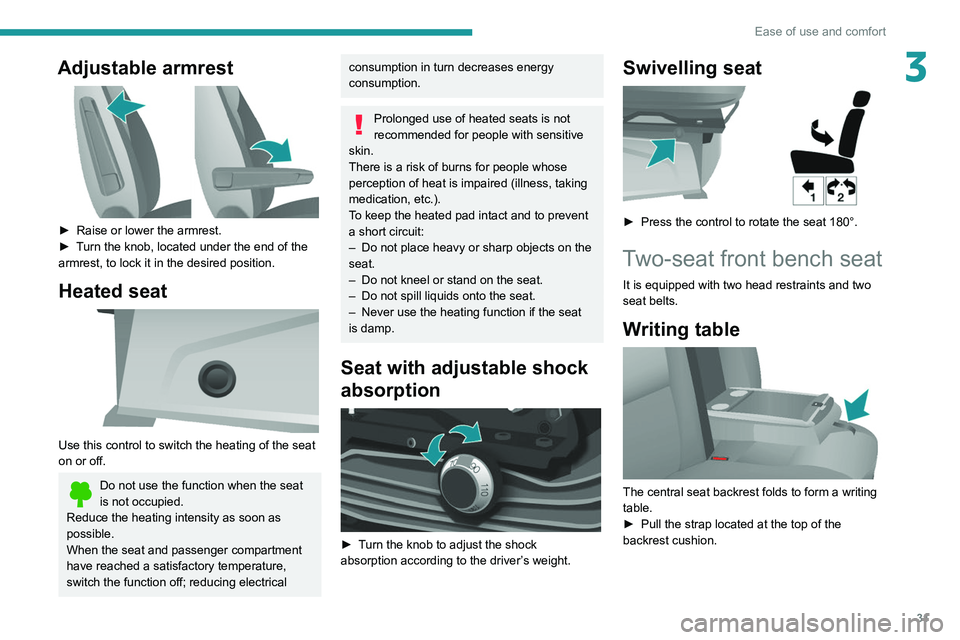
► Raise or lower the armrest.
► T urn the knob, located under the end of the
armrest, to lock it in the desired position.
Heated seat
Use this control to switch the heating of the seat
on or off.
Do not use the function when the seat
is not occupied.
Reduce the heating intensity as soon as
possible.
When the seat and passenger compartment
have reached a satisfactory temperature,
switch the function off; reducing electrical
consumption in turn decreases energy
consumption.
Prolonged use of heated seats is not
recommended for people with sensitive
skin.
There is a risk of burns for people whose
perception of heat is impaired (illness, taking
medication, etc.).
To keep the heated pad intact and to prevent
a short circuit:
–
Do not place heavy or sharp objects on the
seat.
–
Do not kneel or stand on the seat.
–
Do not spill liquids onto the seat.
–
Never use the heating function if the seat
is damp.
Seat with adjustable shock
absorption
► Turn the knob to adjust the shock
absorption according to the driver’s weight.
Swivelling seat
► Press the control to rotate the seat 180°.
Two-seat front bench seat
It is equipped with two head restraints and two
seat belts.
Writing table
The central seat backrest folds to form a writing
table.
►
Pull the strap located at the top of the
backrest cushion.
Page 34 of 212
32
Ease of use and comfort
Rear seats
Backrest angle
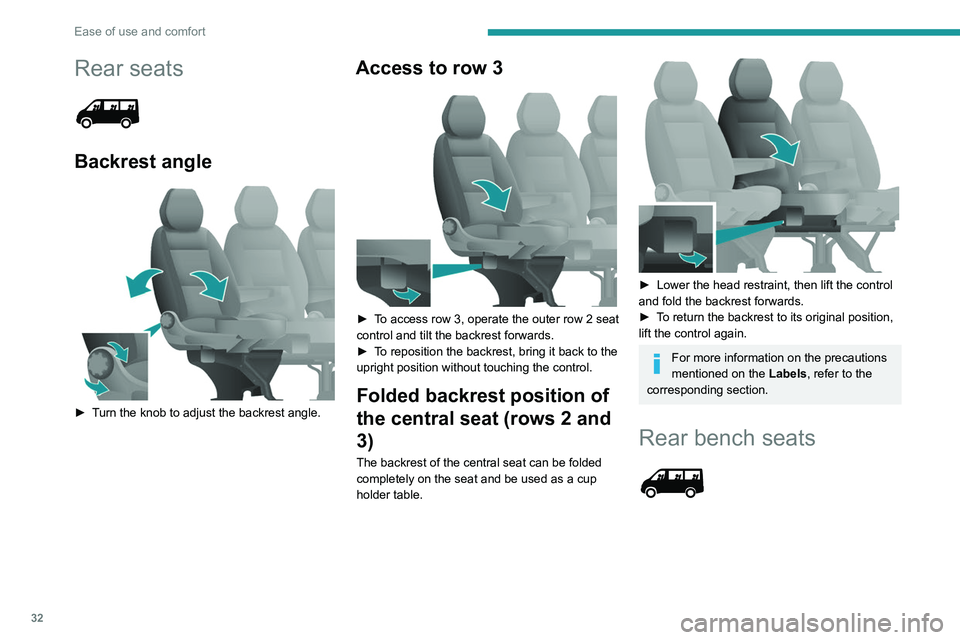
► Turn the knob to adjust the backrest angle.
Access to row 3
► To access row 3, operate the outer row 2 seat
control and tilt the backrest forwards.
►
T
o reposition the backrest, bring it back to the
upright position without touching the control.
Folded backrest position of
the central seat (rows 2 and
3)
The backrest of the central seat can be folded
completely on the seat and be used as a cup
holder table.
► Lower the head restraint, then lift the control
and fold the backrest forwards.
►
T
o return the backrest to its original position,
lift the control again.
For more information on the precautions
mentioned on the Labels, refer to the
corresponding section.
Rear bench seats
Page 35 of 212
33
Ease of use and comfort
3
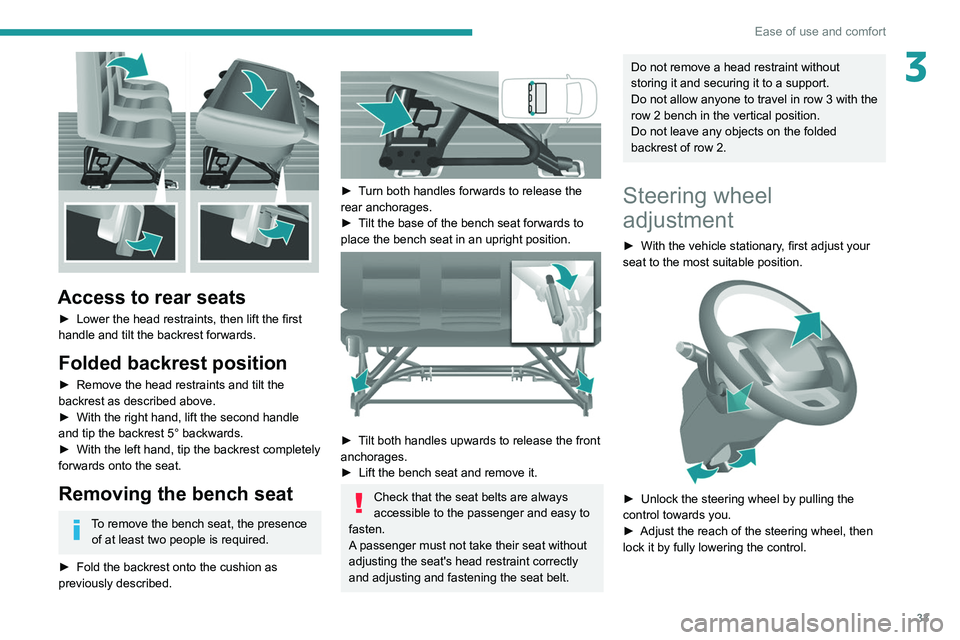
Access to rear seats
► Lower the head restraints, then lift the first
handle and tilt the backrest forwards.
Folded backrest position
► Remove the head restraints and tilt the
backrest as described above.
►
With the right hand, lift the second handle
and tip the backrest 5° backwards.
►
With the left hand, tip the backrest completely
forwards onto the seat.
Removing the bench seat
To remove the bench seat, the presence of at least two people is required.
►
Fold the backrest onto the cushion as
previously described.
► Turn both handles forwards to release the
rear anchorages.
►
T
ilt the base of the bench seat forwards to
place the bench seat in an upright position.
► Tilt both handles upwards to release the front
anchorages.
►
Lift the bench seat and remove it.
Check that the seat belts are always
accessible to the passenger and easy to
fasten.
A passenger must not take their seat without
adjusting the seat's head restraint correctly
and adjusting and fastening the seat belt.
Do not remove a head restraint without
storing it and securing it to a support.
Do not allow anyone to travel in row 3 with the
row 2 bench in the vertical position.
Do not leave any objects on the folded
backrest of row 2.
Steering wheel
adjustment
► With the vehicle stationary , first adjust your
seat to the most suitable position.
► Unlock the steering wheel by pulling the
control towards you.
►
Adjust the reach of the steering wheel, then
lock it by fully lowering the control.
Page 36 of 212
34
Ease of use and comfort
As a safety precaution, these operations should only be carried out while the
vehicle is stationary.
Mirrors
Door mirrors
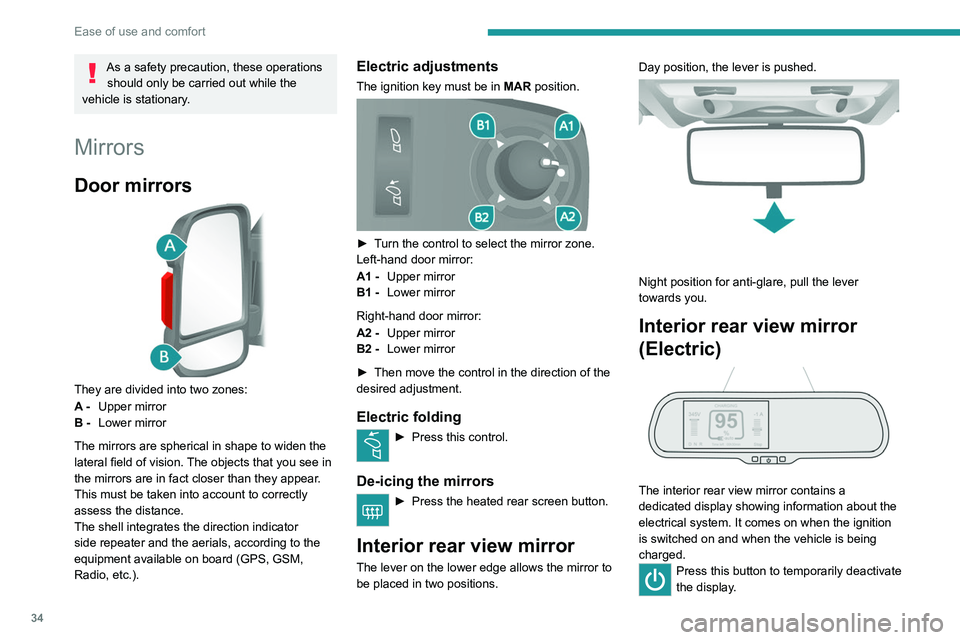
They are divided into two zones:
A - Upper mirror
B - Lower mirror
The mirrors are spherical in shape to widen the
lateral field of vision. The objects that you see in
the mirrors are in fact closer than they appear.
This must be taken into account to correctly
assess the distance.
The shell integrates the direction indicator
side repeater and the aerials, according to the
equipment available on board (GPS, GSM,
Radio, etc.).
Electric adjustments
The ignition key must be in MAR position.
► Turn the control to select the mirror zone.
Left-hand door mirror:
A1 -Upper mirror
B1 - Lower mirror
Right-hand door mirror:
A2 - Upper mirror
B2 - Lower mirror
►
Then move the control in the direction of the
desired adjustment.
Electric folding
► Press this control.
De-icing the mirrors
► Press the heated rear screen button.
Interior rear view mirror
The lever on the lower edge allows the mirror to
be placed in two positions. Day position, the lever is pushed.
Night position for anti-glare, pull the lever
towards you.
Interior rear view mirror
(Electric)
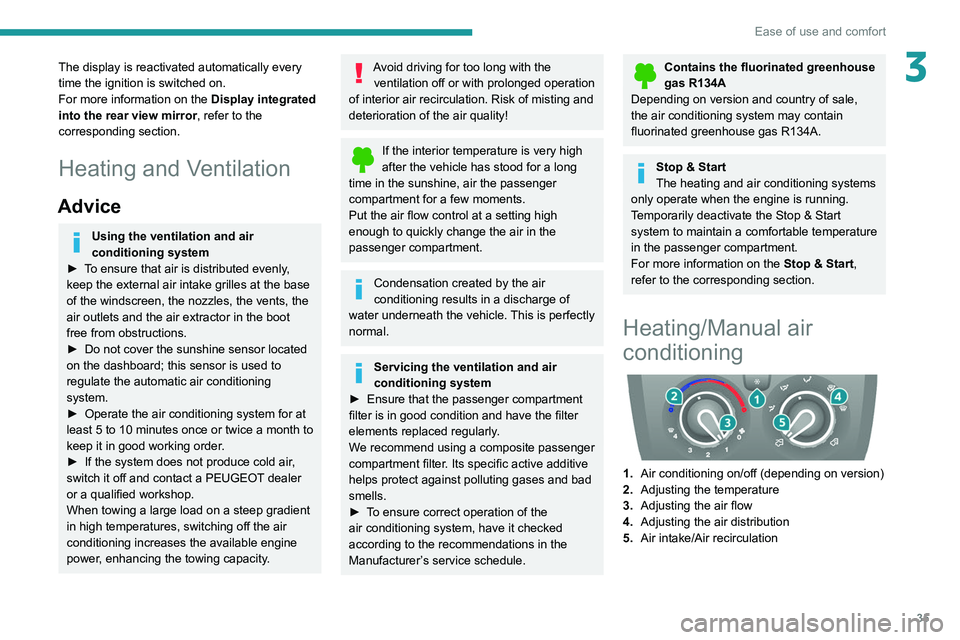
The interior rear view mirror contains a
dedicated display showing information about the
electrical system. It comes on when the ignition
is switched on and when the vehicle is being
charged.
Press this button to temporarily deactivate
the display .
Page 37 of 212
35
Ease of use and comfort
3The display is reactivated automatically every
time the ignition is switched on.
For more information on the Display integrated
into the rear view mirror, refer to the
corresponding section.
Heating and Ventilation
Advice
Using the ventilation and air
conditioning system
►
T
o ensure that air is distributed evenly,
keep the external air intake grilles at the base
of the windscreen, the nozzles, the vents, the
air outlets and the air extractor in the boot
free from obstructions.
►
Do not cover the sunshine sensor located
on the dashboard; this sensor is used to
regulate the automatic air conditioning
system.
►
Operate the air conditioning system for at
least 5 to 10 minutes once or twice a month to
keep it in good working order
.
►
If the system does not produce cold air
,
switch it off and contact a PEUGEOT dealer
or a qualified workshop.
When towing a large load on a steep gradient
in high temperatures, switching off the air
conditioning increases the available engine
power, enhancing the towing capacity.
Avoid driving for too long with the ventilation off or with prolonged operation
of interior air recirculation. Risk of misting and
deterioration of the air quality!
If the interior temperature is very high
after the vehicle has stood for a long
time in the sunshine, air the passenger
compartment for a few moments.
Put the air flow control at a setting high
enough to quickly change the air in the
passenger compartment.
Condensation created by the air
conditioning results in a discharge of
water underneath the vehicle. This is perfectly
normal.
Servicing the ventilation and air
conditioning system
►
Ensure that the passenger compartment
filter is in good condition and have the filter
elements replaced regularly
.
We recommend using a composite passenger
compartment filter. Its specific active additive
helps protect against polluting gases and bad
smells.
►
T
o ensure correct operation of the
air conditioning system, have it checked
according to the recommendations in the
Manufacturer’s service schedule.
Contains the fluorinated greenhouse
gas R134A
Depending on version and country of sale,
the air conditioning system may contain
fluorinated greenhouse gas R134A.
Stop & Start
The heating and air conditioning systems
only operate when the engine is running.
Temporarily deactivate the Stop & Start
system to maintain a comfortable temperature
in the passenger compartment.
For more information on the Stop & Start,
refer to the corresponding section.
Heating/Manual air
conditioning
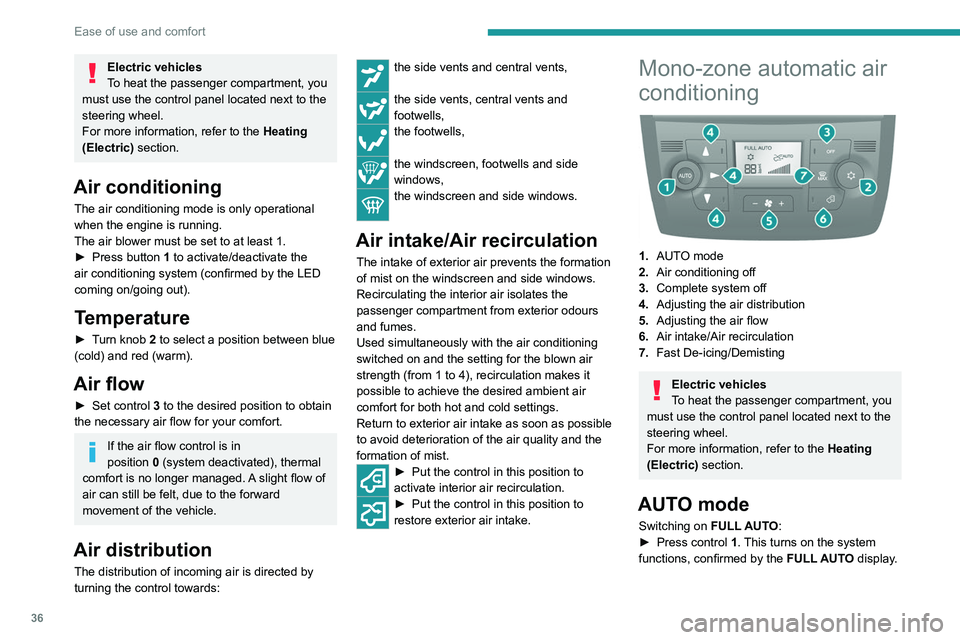
1. Air conditioning on/off (depending on version)
2. Adjusting the temperature
3. Adjusting the air flow
4. Adjusting the air distribution
5. Air intake/Air recirculation
Page 38 of 212
36
Ease of use and comfort
Electric vehicles
To heat the passenger compartment, you
must use the control panel located next to the
steering wheel.
For more information, refer to the Heating
(Electric) section.
Air conditioning
The air conditioning mode is only operational
when the engine is running.
The air blower must be set to at least 1.
►
Press button
1 to activate/deactivate the
air conditioning system (confirmed by the LED
coming on/going out).
Temperature
► Turn knob 2 to select a position between blue
(cold) and red (warm).
Air flow
► Set control 3 to the desired position to obtain
the necessary air flow for your comfort.
If the air flow control is in
position 0 (system deactivated), thermal
comfort is no longer managed. A slight flow of
air can still be felt, due to the forward
movement of the vehicle.
Air distribution
The distribution of incoming air is directed by
turning the control towards:
the side vents and central vents,
the side vents, central vents and
footwells,
the footwells,
the windscreen, footwells and side
windows,
the windscreen and side windows.
Air intake/Air recirculation
The intake of exterior air prevents the formation
of mist on the windscreen and side windows.
Recirculating the interior air isolates the
passenger compartment from exterior odours
and fumes.
Used simultaneously with the air conditioning
switched on and the setting for the blown air
strength (from 1 to 4), recirculation makes it
possible to achieve the desired ambient air
comfort for both hot and cold settings.
Return to exterior air intake as soon as possible
to avoid deterioration of the air quality and the
formation of mist.
► Put the control in this position to
activate interior air recirculation.
► Put the control in this position to
restore exterior air intake.
Mono-zone automatic air
conditioning
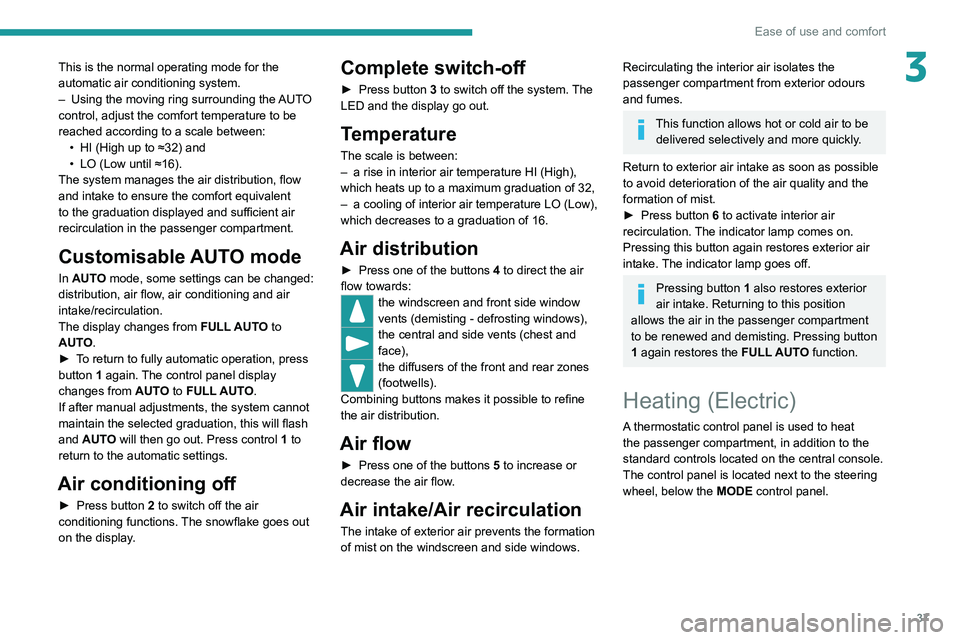
1. AUTO mode
2. Air conditioning off
3. Complete system off
4. Adjusting the air distribution
5. Adjusting the air flow
6. Air intake/Air recirculation
7. Fast De-icing/Demisting
Electric vehicles
To heat the passenger compartment, you
must use the control panel located next to the
steering wheel.
For more information, refer to the Heating
(Electric) section.
AUTO mode
Switching on FULL AUTO:
► Press control 1. This turns on the system
functions, confirmed by the FULL AUTO display.
Page 39 of 212
37
Ease of use and comfort
3This is the normal operating mode for the
automatic air conditioning system.
–
Using the moving ring surrounding the
AUTO
control, adjust the comfort temperature to be
reached according to a scale between: •
HI (High up to ≈32) and
•
LO (Low until ≈16).
The system manages the air distribution, flow
and intake to ensure the comfort equivalent
to the graduation displayed and sufficient air
recirculation in the passenger compartment.
Customisable AUTO mode
In AUTO mode, some settings can be changed:
distribution, air flow, air conditioning and air
intake/recirculation.
The display changes from FULL AUTO to
AUTO.
►
T
o return to fully automatic operation, press
button 1 again. The control panel display
changes from AUTO to
FULL AUTO.
If after manual adjustments, the system cannot
maintain the selected graduation, this will flash
and AUTO will then go out. Press control 1 to
return to the automatic settings.
Air conditioning off
► Press button 2 to switch off the air
conditioning functions. The snowflake goes out
on the display.
Complete switch-off
► Press button 3 to switch off the system. The
LED and the display go out.
Temperature
The scale is between:
– a rise in interior air temperature HI (High),
which heats up to a maximum graduation of 32,
–
a cooling of interior air temperature LO (Low),
which decreases to a graduation
of 16.
Air distribution
► Press one of the buttons 4 to direct the air
flow towards:
the windscreen and front side window
vents (demisting - defrosting windows),
the central and side vents (chest and
face),
the diffusers of the front and rear zones
(footwells).
Combining buttons makes it possible to refine
the air distribution.
Air flow
► Press one of the buttons 5 to increase or
decrease the air flow.
Air intake/Air recirculation
The intake of exterior air prevents the formation
of mist on the windscreen and side windows.
Recirculating the interior air isolates the
passenger compartment from exterior odours
and fumes.
This function allows hot or cold air to be delivered selectively and more quickly.
Return to exterior air intake as soon as possible
to avoid deterioration of the air quality and the
formation of mist.
►
Press button
6 to activate interior air
recirculation. The indicator lamp comes on.
Pressing this button again restores exterior air
intake. The indicator lamp goes off.
Pressing button 1 also restores exterior
air intake. Returning to this position
allows the air in the passenger compartment
to be renewed and demisting. Pressing button
1
again restores the FULL AUTO function.
Heating (Electric)
A thermostatic control panel is used to heat
the passenger compartment, in addition to the
standard controls located on the central console.
The control panel is located next to the steering
wheel, below the MODE control panel.
Page 40 of 212
38
Ease of use and comfort
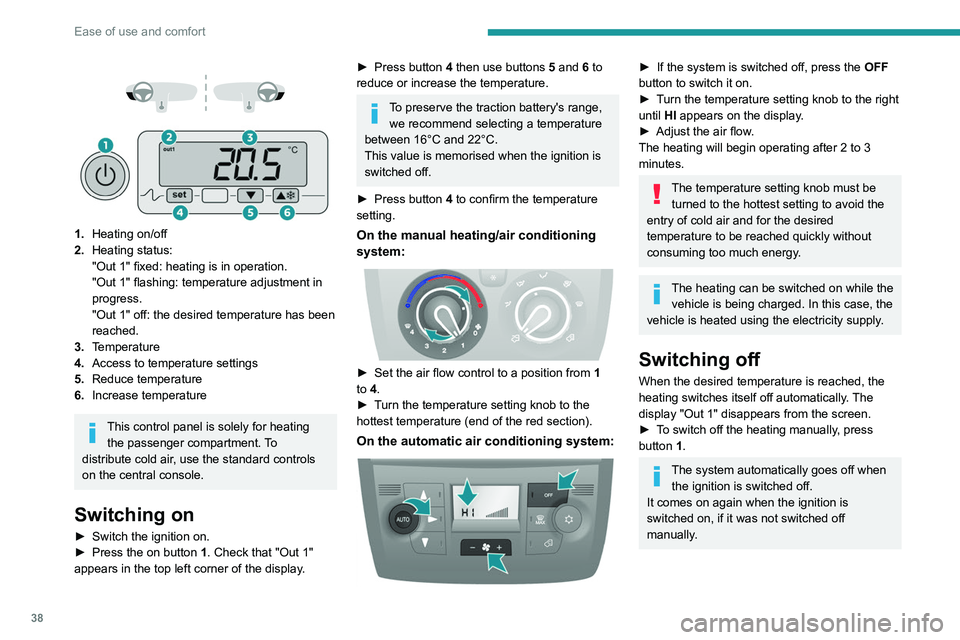
1. Heating on/off
2. Heating status:
"Out 1" fixed: heating is in operation.
"Out 1" flashing: temperature adjustment in
progress.
"Out 1" off: the desired temperature has been
reached.
3. Temperature
4. Access to temperature settings
5. Reduce temperature
6. Increase temperature
This control panel is solely for heating
the passenger compartment. To
distribute cold air, use the standard controls
on the central console.
Switching on
► Switch the ignition on.
► Press the on button 1. Check that "Out 1"
appears in the top left corner of the display.
► Press button 4 then use buttons 5 and 6 to
reduce or increase the temperature.
To preserve the traction battery's range, we recommend selecting a temperature
between 16°C and 22°C.
This value is memorised when the ignition is
switched off.
►
Press button
4 to confirm the temperature
setting.
On the manual heating/air conditioning
system:
► Set the air flow control to a position from 1
to 4.
►
T
urn the temperature setting knob to the
hottest temperature (end of the red section).
On the automatic air conditioning system:
► If the system is switched off, press the OFF
button to switch it on.
►
T
urn the temperature setting knob to the right
until HI appears on the display.
►
Adjust the air flow
.
The heating will begin operating after 2 to 3
minutes.
The temperature setting knob must be turned to the hottest setting to avoid the
entry of cold air and for the desired
temperature to be reached quickly without
consuming too much energy.
The heating can be switched on while the vehicle is being charged. In this case, the
vehicle is heated using the electricity supply.
Switching off
When the desired temperature is reached, the
heating switches itself off automatically. The
display "Out 1" disappears from the screen.
►
T
o switch off the heating manually, press
button 1.
The system automatically goes off when the ignition is switched off.
It comes on again when the ignition is
switched on, if it was not switched off
manually.