PEUGEOT LANDTREK 2023 Service Manual
Manufacturer: PEUGEOT, Model Year: 2023, Model line: LANDTREK, Model: PEUGEOT LANDTREK 2023Pages: 164, PDF Size: 6.1 MB
Page 41 of 164
39
Ease of use and comfort
3When the indicator lamp in the button is on, the
air conditioning system operates automatically:
the system manages the temperature, air
flow and air distribution in the passenger
compartment in an optimum way according to
the selected comfort level.
In cold weather with the engine cold, the
air flow is increased gradually until the
comfort setting has been reached, in order to
limit the delivery of cold air into the passenger
compartment.
On entering the vehicle, if the interior
temperature is much colder or warmer than
the comfort setting requested, there is no
need to alter the value displayed to more
quickly reach the required level of comfort.
The system automatically corrects the
temperature difference as quickly as possible.
Manual mode
It is possible to make a different choice from that
offered by the system by changing a setting.
The other functions will still be automatically
managed.
The indicator lamp in the " AUTO” button goes
out if you change a setting.
Visibility programme
► Press the " visibility" button 5 to demist or
de-ice the windscreen and side windows more
quickly. The system automatically manages the air
conditioning, air flow and air intake, and provides
optimum distribution towards the windscreen and
side windows.
►
Press the "
visibility
" button 5 again to stop
the programme.
Or
►
Press the "
AUTO" button 10 to return to the
automatic comfort programme.
"Dual” function
The comfort setting for the passenger side
can be indexed to the driver's comfort setting
(mono-zone).
►
Press the corresponding button 11 to
activate/deactivate the function.
The indicator lamp in the button comes on when
the function is activated.
The function is deactivated automatically if a
passenger uses the temperature control.
Maximum air conditioning
The system automatically adjusts the
temperature setting to the lowest possible, the
air distribution towards the central and side air
vents, the air flow to maximum and activates
recirculation of interior air.
►
Press button
8 to activate/deactivate the
function (confirmed by the indicator lamp coming
on/going off).
Once the function is deactivated, the system
returns to the previous settings.
Interior air recirculation
The intake of exterior air prevents the formation
of mist on the windscreen and side windows.
Recirculating the interior air isolates the
passenger compartment from outside odours
and fumes and allows the desired passenger
compartment temperature to be achieved more
rapidly.
► Press this button to activate/deactivate
the function (confirmed by the
illumination/extinction of the indicator lamp).
This function is activated automatically when reverse gear is engaged.
Switching off the air
conditioning system
With heating or manual air conditioning
– Adjust the air flow to the minimum setting,
" OFF " position.
With automatic dual-zone air conditioning
► Press this button.
This action deactivates all of the functions of the
air conditioning system.
The temperature is no longer regulated. A slight
flow of air can still be felt, due to the forward
movement of the vehicle. CarM an uals 2 .c o m
Page 42 of 164

40
Ease of use and comfort
Front demisting/defrosting
With heating or manual air
conditioning
► Adjust the temperature to maximum (red).
► Adjust the air flow to maximum.
► Press this button to activate the air
distribution to the "Windscreen" position;
its indicator lamp comes on.
►
Check that the recirculation of interior air is
deactivated; its indicator lamp must be off.
►
Depending on version, switch on the air
conditioning by pressing the " A/C
" button; its
indicator lamp comes on.
With automatic dual-zone
air conditioning
Automatic Visibility programme
This mode allows the windscreen and side
windows to be demisted or defrosted as quickly
as possible.
► Press this button to activate/deactivate
the mode (confirmed by the illumination/
extinction of the
indicator lamp).
The programme automatically manages the air
conditioning (depending on version), air flow
and air intake, and provides optimum distribution
towards the windscreen and side windows.
It is possible to manually change the air flow
without deactivating the automatic Visibility
programme.
In wintry conditions, before moving off, it
is essential to remove any snow or ice
from the windscreen around the sensor.
Otherwise, the operation of equipment which
uses the sensor may be affected.
Rear screen demisting/
defrosting
This demisting/de-icing only works with the engine running.
Depending on version, it also demists/de-ices
the door mirrors.
► Press this button to activate/deactivate
the function (confirmed by the indicator
lamp coming on/switching off).
Demisting/defrosting switches off automatically
to prevent an excessive consumption of
electrical current.
Switch off demisting/defrosting when
you no longer need it; reducing
electrical consumption in turn decreases
energy consumption.
Front fittings
1. Grab handle
2. Sun visor
3. Boarding assistance handle
4. Glasses holder
5. Illuminated glove box with refrigeration
(depending on version)
6. Door pockets CarM an uals 2 .c o m
Page 43 of 164
41
Ease of use and comfort
37.Retractable cup holder (press on it to
release)
8. USB socket and USB charger socket
9. Cigarette lighter/12
V (120 W) accessory
socket
10. Storage compartment
11 . Card holder
12. Cup holder and storage compartment
13. Front armrest with storage (depending on
version)
Ensure the retractable cup holder 7 is
clean before putting it back in its housing
- risk of jamming the mechanism.
Make sure you do not leave any item in
the passenger compartment which could
act like a magnifying glass under the effect of
the sun's rays and cause a fire - risk of fire or
damage to interior surfaces!
Glove box
► To open the glove box, lift the handle.
With the ignition on, the glove box is lit when
open.
Depending on version, it contains an adjustable
ventilation nozzle, distributing the same
conditioned air as the vents in the passenger
compartment.
Never drive with the glove box open
when a passenger is at the front. It may
cause injury during sharp deceleration!
Cigarette lighter/12 V
accessory socket(s)
► To use the cigarette lighter, press it in and
wait a few seconds until it pops out automatically.
►
T
o use a 12 V accessory (max. power:
120
W), remove the cigarette lighter and connect
a suitable adaptor.
You can use this socket to connect a telephone
charger, a bottle warmer, etc.
After use, put the cigarette lighter back into place
straight away.
The connection of an electrical device not approved by PEUGEOT, such as a
USB charger, may adversely affect the
operation of vehicle electrical systems,
causing faults such as poor radio reception or
interference with displays in the screens.
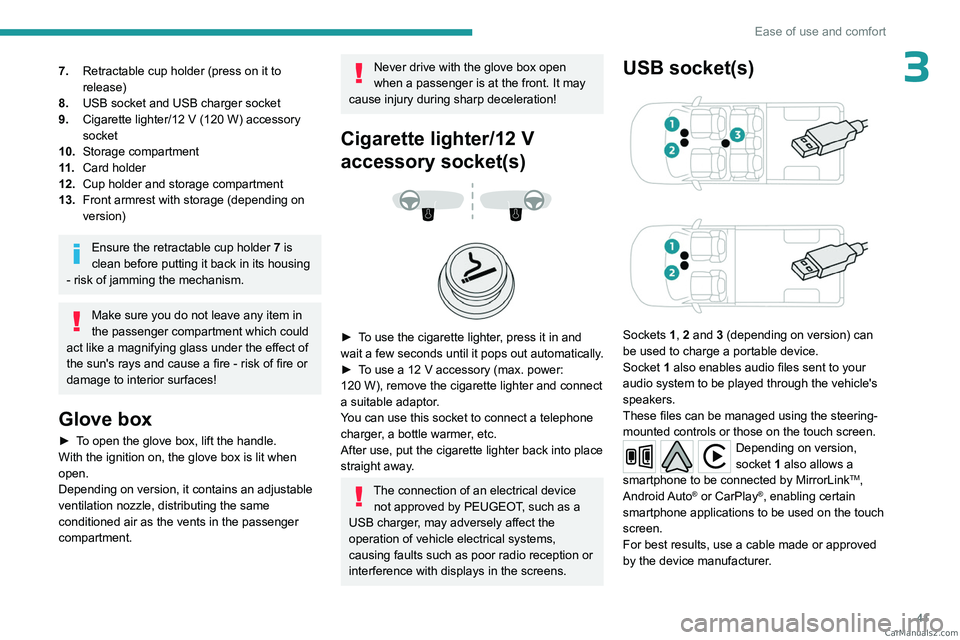
USB socket(s)
Sockets 1, 2 and 3 (depending on version) can
be used to charge a portable device.
Socket
1 also enables audio files sent to your
audio system to be played through the vehicle's
speakers.
These files can be managed using the steering-
mounted controls or those on the touch screen.
Depending on version,
socket 1 also allows a
smartphone to be connected by MirrorLink
TM,
Android Auto® or CarPlay®, enabling certain
smartphone applications to be used on the touch
screen.
For best results, use a cable made or approved
by the device manufacturer. CarM an uals 2 .c o m
Page 44 of 164
42
Ease of use and comfort
These applications can be managed using the
steering-mounted controls or the audio system
controls.
When the USB socket is used, the
portable device charges automatically.
For more information about how to use this
equipment, refer to the sections describing
the audio and telematics systems.
Front armrest
(Depending on version)
It includes a storage space.
Opening
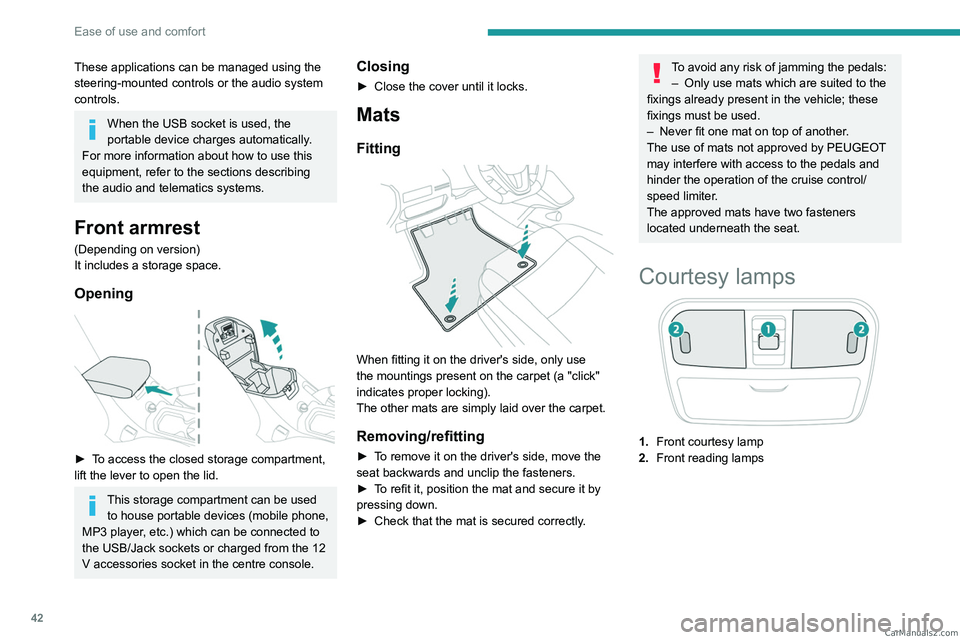
► To access the closed storage compartment,
lift the lever to open the lid.
This storage compartment can be used to house portable devices (mobile phone,
MP3 player, etc.) which can be connected to
the USB/Jack sockets or charged from the 12
V accessories socket in the centre console.
Closing
► Close the cover until it locks.
Mats
Fitting
When fitting it on the driver's side, only use
the mountings present on the carpet (a "click"
indicates proper locking).
The other mats are simply laid over the carpet.
Removing/refitting
► To remove it on the driver's side, move the
seat backwards and unclip the fasteners.
►
T
o refit it, position the mat and secure it by
pressing down.
►
Check that the mat is secured correctly
.
To avoid any risk of jamming the pedals:– Only use mats which are suited to the
fixings already present in the vehicle; these
fixings must be used.
–
Never fit one mat on top of another
.
The use of mats not approved by PEUGEOT
may interfere with access to the pedals and
hinder the operation of the cruise control/
speed limiter.
The approved mats have two fasteners
located underneath the seat.
Courtesy lamps
1. Front courtesy lamp
2. Front reading lamps CarM an uals 2 .c o m
Page 45 of 164

43
Ease of use and comfort
3
3.Rear courtesy lamp
Front courtesy lamp
DOOR► Press this button, the courtesy lamp
gradually lights up:
•
when
unlocking the vehicle,
•
when
removing the key from the ignition,
•
when
opening a door,
•
when the remote control locking button is
activated, in order to locate your vehicle.
It switches off gradually:
–
when the vehicle is locked,
–
when the ignition is switched on,
–
30 seconds after the last door is closed.
►
Press this button again to permanently switch
the courtesy lamp off.
Front reading lamps
► With the ignition on, activate the
corresponding reading lamp by pressing control
2.
Take care not to place anything in contact with the courtesy lamps.
Rear courtesy lamp
► Press button 3 to switch the courtesy lamp
on/off.
Rear fittings
Rear armrest
The armrest incorporates two cup holders.
Hooks
Installed on the back of each front seat, they are
used to hang shopping bags.
Take care to only hang lightweight bags under 4 kg. CarM an uals 2 .c o m
Page 46 of 164
44
Ease of use and comfort
Storage boxes
Storage boxes are provided in the floor, under
the cushions of the rear bench seat.
They may contain the vehicle’s tools.
►
T
o open them, raise the corresponding
seat cushion and lift the carpet (depending on
version).
For more information on the Rear bench seat,
and especially on tilting the seat cushions, refer
to the corresponding section.
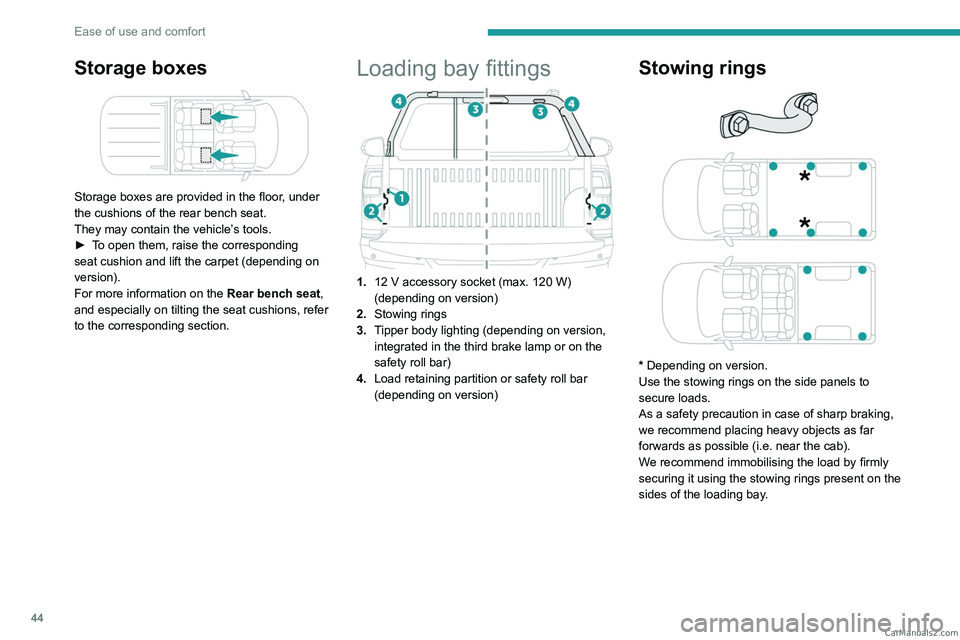
Loading bay fittings
1. 12 V accessory socket (max. 120 W)
(depending on version)
2. Stowing rings
3. Tipper body lighting (depending on version,
integrated in the third brake lamp or on the
safety roll bar)
4. Load retaining partition or safety roll bar
(depending on version)
Stowing rings
* Depending on version.
Use the stowing rings on the side panels to
secure loads.
As a safety precaution in case of sharp braking,
we recommend placing heavy objects as far
forwards as possible (i.e. near the cab).
We recommend immobilising the load by firmly
securing it using the stowing rings present on the
sides of the loading bay. CarM an uals 2 .c o m
Page 47 of 164

45
Ease of use and comfort
3Load retaining partition
On the structure of the loading bay, behind the
rear window, a vertical separation protects the
driver and passengers against the risk of load
movement.
Bars separate the loading area from the cab.
Retractable hooks, integrated into the upper bar,
are used to secure the loads in the loading bay.
Recommendations on
loading
The weight of the load must comply with the Gross Train Weight (GTW).
For more information on Engine technical
data and towed loads , refer to the
corresponding section.
Make sure that the size, shape and
volume of the loads carried are
compatible with the highway code and safety
regulations and do not impair the driver’s field
of vision.
The load must be evenly distributed in the loading area so as not to interfere
with driving the vehicle.
Place the load close to the side wall panels,
or push it against the side wall panels
between the wheel arches.
However, it is recommended that heavy
objects are placed as close to the cab as
possible as a precaution in case of sharp
braking.
Secure all loads firmly using the stowing
rings present on the side panels of the
loading bay.
For more information on the Loading bay
fittings, and in particular on the stowing
rings, refer to the corresponding section.
To avoid the risk of injury or accident, the load must be made stable so that it
cannot slide, tip over, fall or be projected. To
do this, use only retaining straps that conform
to current standards (DIN, for example).
For more information on putting straps in
place, refer to the manufacturer’s user guide.
To prevent the load from sliding, there must
not be any empty spaces between the load
items and the vehicle wall panels.
As well as the straps, optimise the stability
of the load with stable handling equipment
(wedges, rigid blocks of wood or padding).
When washing the vehicle, never clean
the interior directly with a water jet.
12 V accessory socket
(Depending on version)
► To connect a 12 V accessory (maximum
power: 120 W), lift the cover and plug in a
suitable adaptor.
►
Switch the ignition on.
The connection of an electrical device not approved by PEUGEOT, such as a
USB charger, may adversely affect the
operation of vehicle electrical systems,
causing faults such as poor radio reception or
interference with displays in the screens. CarM an uals 2 .c o m
Page 48 of 164
46
Ease of use and comfort
Loading bay lighting
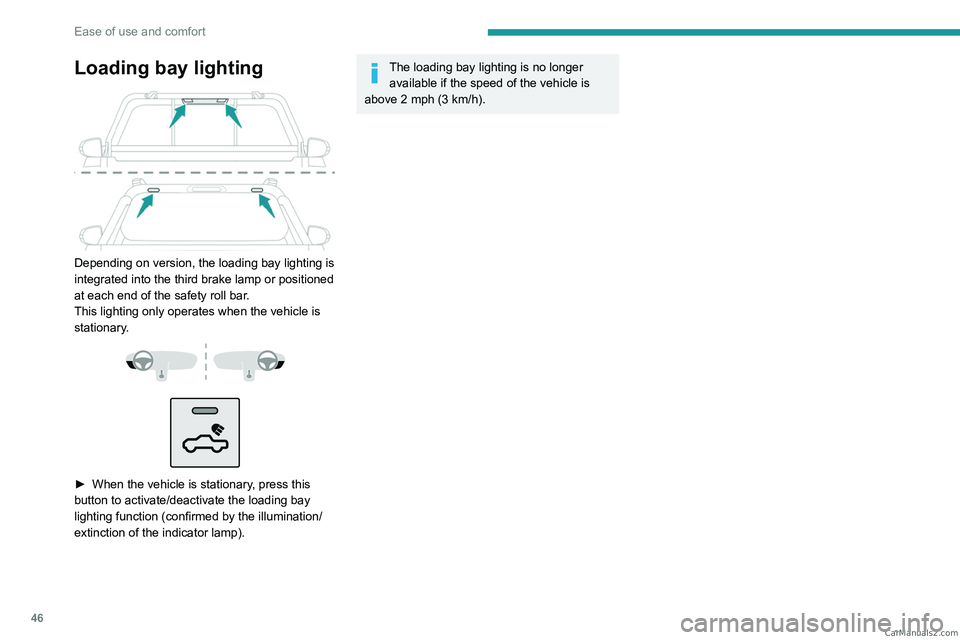
Depending on version, the loading bay lighting is
integrated into the third brake lamp or positioned
at each end of the safety roll bar.
This lighting only operates when the vehicle is
stationary.
► When the vehicle is stationary , press this
button to activate/deactivate the loading bay
lighting function (confirmed by the illumination/
extinction of the indicator lamp).
The loading bay lighting is no longer available if the speed of the vehicle is
above 2 mph (3
km/h). CarM an uals 2 .c o m
Page 49 of 164
47
Lighting and visibility
4Exterior lighting control
stalk
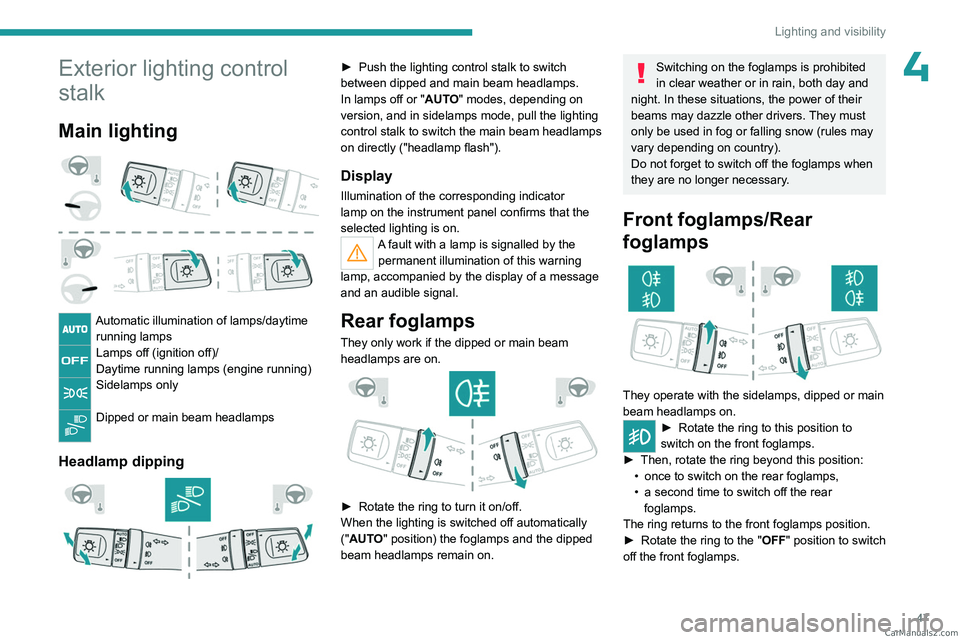
Main lighting
Automatic illumination of lamps/daytime running lamps
Lamps off (ignition off)/
Daytime running lamps (engine running)
Sidelamps only
Dipped or main beam headlamps
Headlamp dipping
► Push the lighting control stalk to switch
between dipped and main beam headlamps.
In lamps off or "
AUTO" modes, depending on
version, and in sidelamps mode, pull the lighting
control stalk to switch the main beam headlamps
on directly ("headlamp flash").
Display
Illumination of the corresponding indicator
lamp on the instrument panel confirms that the
selected lighting is on.
A fault with a lamp is signalled by the permanent illumination of this warning
lamp, accompanied by the display of a message
and an audible signal.
Rear foglamps
They only work if the dipped or main beam headlamps are on.
► Rotate the ring to turn it on/off.
When the lighting is switched off automatically
("
AUTO" position) the foglamps and the dipped
beam headlamps remain on.
Switching on the foglamps is prohibited
in clear weather or in rain, both day and
night. In these situations, the power of their
beams may dazzle other drivers. They must
only be used in fog or falling snow (rules may
vary depending on country).
Do not forget to switch off the foglamps when
they are no longer necessary.
Front foglamps/Rear
foglamps
They operate with the sidelamps, dipped or main
beam headlamps on.
► Rotate the ring to this position to
switch on the front foglamps.
►
Then, rotate the ring beyond this position:
•
once to switch on the rear foglamps,
•
a second time to switch off the rear
foglamps.
The ring returns to the front foglamps position.
►
Rotate the ring to the "
OFF" position to switch
off the front foglamps. CarM an uals 2 .c o m
Page 50 of 164
48
Lighting and visibility
If the lighting is switched off automatically (with
AUTO model) or the dipped beam headlamps
are switched off manually, the foglamps and
sidelamps remain on.
►
Rotate the ring to the "
OFF" position to switch
off the foglamps; the sidelamps will then switch
off.
Switching off of the lighting when the
ignition is switched off
When the ignition is switched off, all of the
lamps turn off immediately, except for the
dipped beam headlamps if automatic guide-
me-home lighting is activated.
Switching on the lamps after
switching off the ignition
To reactivate the lighting control, rotate the
ring, depending on version, to the " OFF"
position - lamps off, or to the "AUTO" position,
then to the desired position.
If the driver's door is opened, a temporary
audible signal warns the driver that the lamps
are on.
They will go off automatically after a period
of time that depends on the level of charge in
the battery (entering energy economy mode).
In some weather conditions (e.g. low
temperature or humidity), misting on the
internal surface of the glass of the headlamps
and rear lamps is normal, and will disappear
after the lamps have been on for a few
minutes.
Never look too closely at the light beam
of LED technology lamps - risk of serious
eye injury!
Travelling abroad
Vehicles equipped with halogen
headlamps:
If planning to use your vehicle in a country
that drives on the other side of the road, the
dipped beam headlamps must be adjusted to
avoid dazzling oncoming drivers. Consult a
PEUGEOT dealer or a qualified workshop.
Daytime running lamps/
Sidelamps
These lamps at the front and rear of the vehicle
light up automatically when the engine starts.
They perform the following functions:
–
Daytime running lamps (lighting control stalk
at position "
OFF" or "AUTO" with adequate
ambient light).
–
Sidelamps (lighting control stalk at position
"
AUTO" with low ambient light or "Sidelamps
only" or "Dipped/main beam headlamps").
Cornering lighting
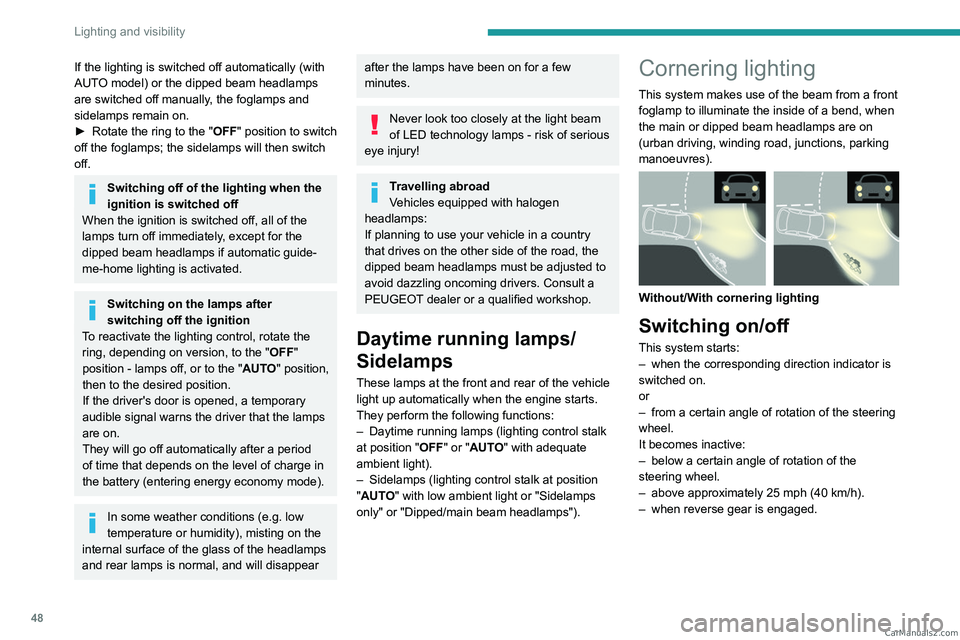
This system makes use of the beam from a front
foglamp to illuminate the inside of a bend, when
the main or dipped beam headlamps are on
(urban driving, winding road, junctions, parking
manoeuvres).
Without/With cornering lighting
Switching on/off
This system starts:
– when the corresponding direction indicator is
switched on.
or
–
from a certain angle of rotation of the steering
wheel.
It becomes inactive:
–
below a certain angle of rotation of the
steering wheel.
–
above approximately 25 mph (40
km/h).
–
when reverse gear is engaged. CarM an uals 2 .c o m