brake fluid PEUGEOT LANDTREK 2023 Owners Manual
[x] Cancel search | Manufacturer: PEUGEOT, Model Year: 2023, Model line: LANDTREK, Model: PEUGEOT LANDTREK 2023Pages: 164, PDF Size: 6.1 MB
Page 12 of 164
10
Dashboard instruments
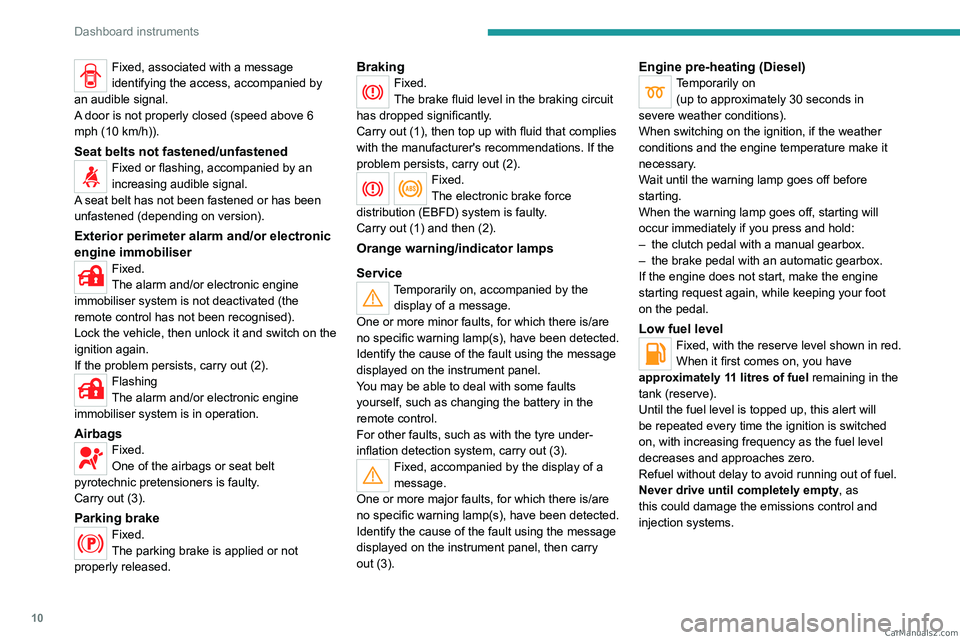
Fixed, associated with a message
identifying the access, accompanied by
an audible signal.
A door is not properly closed (speed above 6
mph (10 km/h)).
Seat belts not fastened/unfastenedFixed or flashing, accompanied by an
increasing audible signal.
A seat belt has not been fastened or has been
unfastened (depending on version).
Exterior perimeter alarm and/or electronic
engine immobiliser
Fixed.
The alarm and/or electronic engine
immobiliser system is not deactivated (the
remote control has not been recognised).
Lock the vehicle, then unlock it and switch on the
ignition again.
If the problem persists, carry out (2).
Flashing
The alarm and/or electronic engine
immobiliser system is in operation.
AirbagsFixed.
One of the airbags or seat belt
pyrotechnic pretensioners is faulty.
Carry out (3).
Parking brakeFixed.
The parking brake is applied or not
properly released.
BrakingFixed.
The brake fluid level in the braking circuit
has dropped significantly.
Carry out (1), then top up with fluid that complies
with the manufacturer's recommendations. If the
problem persists, carry out (2).
Fixed.
The electronic brake force
distribution
(EBFD) system is faulty.
Carry out (1) and then (2).
Orange warning/indicator lamps
Service
Temporarily on, accompanied by the display of a message.
One or more minor faults, for which there is/are
no specific warning lamp(s), have been detected.
Identify the cause of the fault using the message
displayed on the instrument panel.
You may be able to deal with some faults
yourself, such as changing the battery in the
remote control.
For other faults, such as with the tyre under-
inflation detection system, carry out (3).
Fixed, accompanied by the display of a
message.
One or more major faults, for which there is/are
no specific warning lamp(s), have been detected.
Identify the cause of the fault using the message
displayed on the instrument panel, then carry
out (3).
Engine pre-heating (Diesel)Temporarily on (up to approximately 30 seconds in
severe weather conditions).
When switching on the ignition, if the weather
conditions and the engine temperature make it
necessary.
Wait until the warning lamp goes off before
starting.
When the warning lamp goes off, starting will
occur immediately if you press and hold:
–
the clutch pedal with a manual gearbox.
–
the brake pedal with an automatic gearbox.
If the engine does not start, make the engine
starting request again, while keeping your foot
on the pedal.
Low fuel levelFixed, with the reserve level shown in red.
When it first comes on, you have
approximately 11 litres of fuel remaining in the
tank (reserve).
Until the fuel level is topped up, this alert will
be repeated every time the ignition is switched
on, with increasing frequency as the fuel level
decreases and approaches zero.
Refuel without delay to avoid running out of fuel.
Never drive until completely empty, as
this could damage the emissions control and
injection systems. CarM an uals 2 .c o m
Page 16 of 164
14
Dashboard instruments
Resetting the service
indicator
A qualified workshop, equipped with the
diagnostic tool, will stop the permanent lighting
of the warning lamps after each service.
If you have serviced the vehicle yourself, reset
the service indicator as follows:
►
Insert the key into the ignition switch and turn
it to the
3-Ignition
position.
or
►
Press the "
START/STOP" button.
►
In both cases, simultaneously depress the
brake and accelerator pedals for more than
15
seconds.
Refer to the checklist in the
Manufacturer's service schedule
provided on delivery of the vehicle.
AdBlue® range indicators
(BlueHDi)
The Diesel BlueHDi engines are equipped with
a system that associates the SCR (Selective
Catalytic Reduction) emissions control system
and the Diesel particle filter (DPF) for the
treatment of exhaust gases. They cannot
function without AdBlue
® fluid.
When the level of AdBlue® falls below the
reserve level (between 1,500 and 0 miles (2,400
and 0
km)), a warning lamp lights up when
the ignition is switched on and an estimate
of the distance that can be travelled before
engine starting is prevented is displayed in the
instrument panel.
The engine starting prevention system required by regulations is activated
automatically once the AdBlue
® tank is empty.
It is then no longer possible to start the
engine until the minimum level of AdBlue
® has
been topped up.
Manual display of driving
range
While the driving range is greater than
1,500 miles (2,400 km), it is not displayed
automatically.
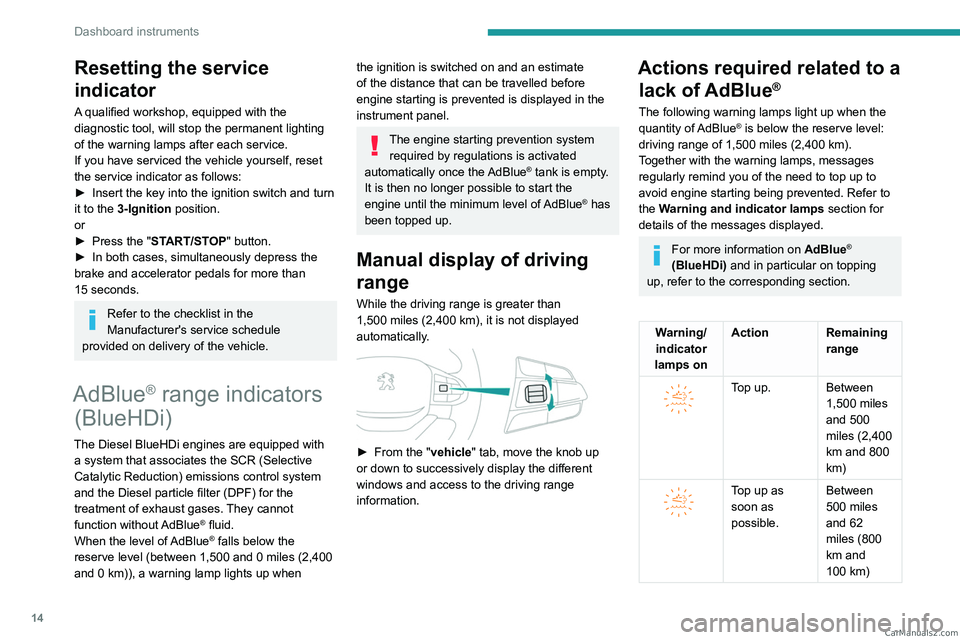
► From the " vehicle" tab, move the knob up
or down to successively display the different
windows and access to the driving range
information.
Actions required related to a lack of AdBlue
®
The following warning lamps light up when the
quantity of AdBlue® is below the reserve level:
driving range of 1,500 miles (2,400 km).
Together with the warning lamps, messages
regularly remind you of the need to top up to
avoid engine starting being prevented. Refer to
the Warning and indicator lamps section for
details of the messages displayed.
For more information on AdBlue®
(BlueHDi) and in particular on topping
up, refer to the corresponding section.
Warning/ indicator
lamps on Action Remaining
range
Top up. Between 1,500 miles
and 500
miles (2,400
km and 800
km)
Top up as
soon as
possible.Between
500 miles
and 62
miles (800
km and
100
km) CarM an uals 2 .c o m
Page 100 of 164
98
Practical information
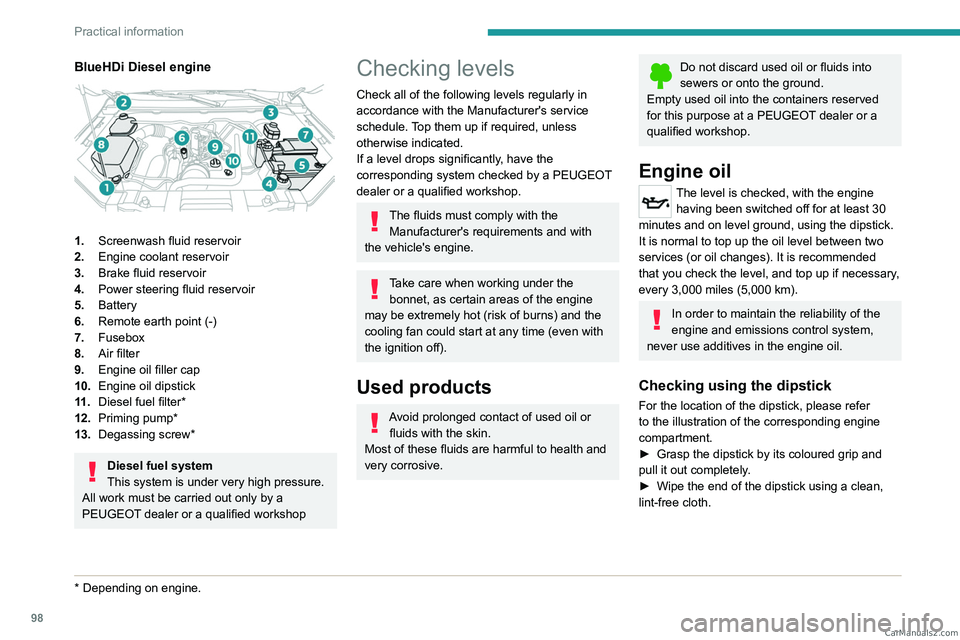
BlueHDi Diesel engine
1.Screenwash fluid reservoir
2. Engine coolant reservoir
3. Brake fluid reservoir
4. Power steering fluid reservoir
5. Battery
6. Remote earth point (-)
7. Fusebox
8. Air filter
9. Engine oil filler cap
10. Engine oil dipstick
11 . Diesel fuel filter*
12. Priming pump*
13. Degassing screw*
Diesel fuel system
This system is under very high pressure.
All work must be carried out only by a
PEUGEOT dealer or a qualified workshop
* Depending on engine.
Checking levels
Check all of the following levels regularly in
accordance with the Manufacturer's service
schedule. Top them up if required, unless
otherwise indicated.
If a level drops significantly, have the
corresponding system checked by a PEUGEOT
dealer or a qualified workshop.
The fluids must comply with the Manufacturer's requirements and with
the vehicle's engine.
Take care when working under the bonnet, as certain areas of the engine
may be extremely hot (risk of burns) and the
cooling fan could start at any time (even with
the ignition off).
Used products
Avoid prolonged contact of used oil or fluids with the skin.
Most of these fluids are harmful to health and
very corrosive.
Do not discard used oil or fluids into
sewers or onto the ground.
Empty used oil into the containers reserved
for this purpose at a PEUGEOT dealer or a
qualified workshop.
Engine oil
The level is checked, with the engine having been switched off for at least 30
minutes and on level ground, using the dipstick.
It is normal to top up the oil level between two
services (or oil changes). It is recommended
that you check the level, and top up if necessary,
every 3,000 miles (5,000 km).
In order to maintain the reliability of the
engine and emissions control system,
never use additives in the engine oil.
Checking using the dipstick
For the location of the dipstick, please refer
to the illustration of the corresponding engine
compartment.
►
Grasp the dipstick by its coloured grip and
pull it out completely
.
►
Wipe the end of the dipstick using a clean,
lint-free cloth.
CarM an uals 2 .c o m
Page 101 of 164
99
Practical information
7
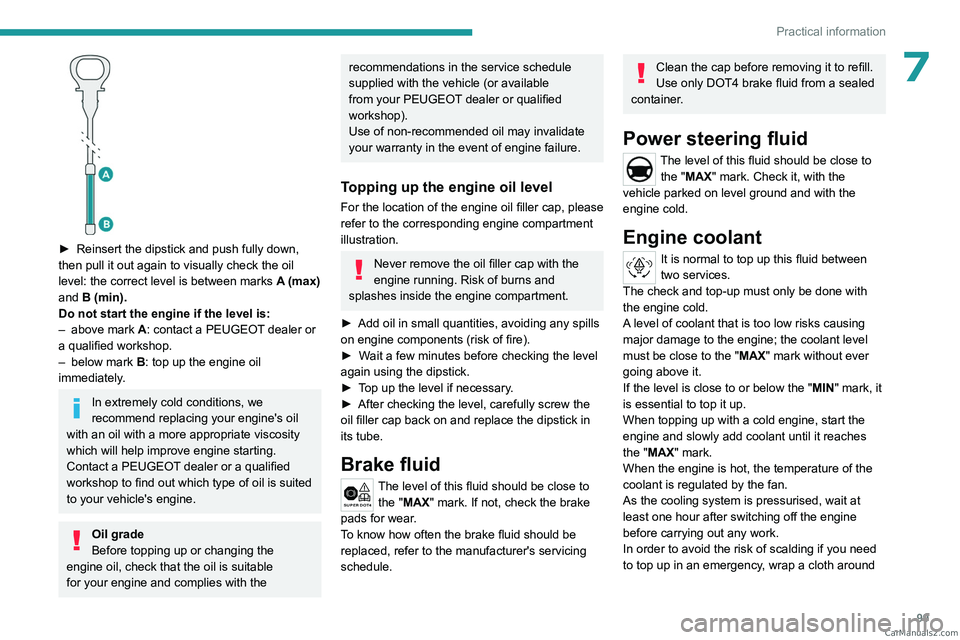
► Reinsert the dipstick and push fully down,
then pull it out again to visually check the oil
level: the correct level is between marks
A
(max)
and
B (min).
Do not start the engine if the level is:
–
above mark
A: contact a PEUGEOT dealer or
a qualified workshop.
–
below mark
B
: top up the engine oil
immediately.
In extremely cold conditions, we
recommend replacing your engine's oil
with an oil with a more appropriate viscosity
which will help improve engine starting.
Contact a PEUGEOT dealer or a qualified
workshop to find out which type of oil is suited
to your vehicle's engine.
Oil grade
Before topping up or changing the
engine oil, check that the oil is suitable
for your engine and complies with the
recommendations in the service schedule
supplied with the vehicle (or available
from your PEUGEOT dealer or qualified
workshop).
Use of non-recommended oil may invalidate
your warranty in the event of engine failure.
Topping up the engine oil level
For the location of the engine oil filler cap, please
refer to the corresponding engine compartment
illustration.
Never remove the oil filler cap with the
engine running. Risk of burns and
splashes inside the engine compartment.
►
Add oil in small quantities, avoiding any spills
on engine components (risk of fire).
►
W
ait a few minutes before checking the level
again using the dipstick.
►
T
op up the level if necessary.
►
After checking the level, carefully screw the
oil filler cap back on
and replace the dipstick in
its tube.
Brake fluid
�� ������ ��
The level of this fluid should be close to
the "MAX" mark. If not, check the brake
pads for wear.
To know how often the brake fluid should be
replaced, refer to the manufacturer's servicing
schedule.
Clean the cap before removing it to refill.
Use only DOT4 brake fluid from a sealed
container.
Power steering fluid
The level of this fluid should be close to the "MAX" mark. Check it, with the
vehicle parked on level ground and with the
engine cold.
Engine coolant
It is normal to top up this fluid between
two services.
The check and top-up must only be done with
the engine cold.
A level of coolant that is too low risks causing
major damage to the engine; the coolant level
must be close to the "MAX" mark without ever
going above it.
If the level is close to or below the " MIN" mark, it
is essential to top it up.
When topping up with a cold engine, start the
engine and slowly add coolant until it reaches
the "MAX" mark.
When the engine is hot, the temperature of the
coolant is regulated by the fan.
As the cooling system is pressurised, wait at
least one hour after switching off the engine
before carrying out any work.
In order to avoid the risk of scalding if you need
to top up in an emergency, wrap a cloth around CarM an uals 2 .c o m
Page 104 of 164
102
Practical information
used in town, over short distances. It may be
necessary to have the condition of the brakes
checked, even between vehicle services.
Unless there is a leak in the circuit, a drop in the
brake fluid level indicates that the brake pads
are worn.
After washing the vehicle, moisture, or in wintry conditions, ice can form on the
brake discs and pads: braking efficiency may
be reduced. Gently dab the brakes to dry and
defrost them.
Brake disc wear
For information on checking brake disc
wear, contact a PEUGEOT dealer or a
qualified workshop.
Manual parking brake
If you notice excessive brake lever travel
or decreased effectiveness, the parking
brake must be adjusted, even between two
services.
This system must be checked by a PEUGEOT
dealer or a qualified workshop.
Steering wheel
Play or a loss of precision in the steering
means that this system needs to be
checked.
This system must be checked by a PEUGEOT
dealer or a qualified workshop.
Wheels and tyres
The inflation pressure of all tyres, including the spare wheel, must be
checked on "cold” tyres at least once a month.
The pressures indicated on the tyre pressure
label are valid for "cold" tyres. If you have driven
for more than 10 minutes or more than 6 miles
(10 kilometres) at over 31 mph (50
km/h), add
0.3 bar (30 kPa) to the values indicated on the
label.
The pressure difference between the left-hand
side and right-hand side tyres must not exceed
0.05 bar (5 kPa).
Under-inflation increases energy
consumption. Non-compliant tyre
pressures cause tyres to wear prematurely
and have an adverse effect on the vehicle's
road holding - risk of accident!
Driving with worn or damaged tyres reduces the
braking and road holding performance of the
vehicle. Regularly check the condition of the
tyres (tread and sidewalls) and rims as well as
the presence of the valve caps.
When the wear indicators no longer appear set
back from the tread, the depth of the grooves is
less than 1.6 mm; replace the tyres as soon as
possible.
Regularly remove foreign bodies trapped in the
tyre tread.
Using different size wheels and tyres from those
specified can affect the lifetime of tyres, wheel
rotation, ground clearance, the speedometer
reading and have an adverse effect on road
holding.
Fitting different tyres on the front and rear axles
can cause the ESC to mistime.
Fitting winter tyres to only one axle could cause
you to lose control of the vehicle. Fitting winter
tyres to both axles is recommended.
Always mark the direction of rotation on the tyres
that will be stored when fitting winter or summer
tyres. Store them in a cool, dry place and away
from direct exposure to the sun's rays.
Winter or 4-seasons tyres can be
identified by this symbol on their
sidewalls.
Tyres older than 6 years should always be replaced, even if no damage or wear
has been found.
When a rim is warped, cracked or corroded,
it is essential to replace it as it may cause the
tyre to come off. Do not use a wheel with a
rim that has been damaged (even if has been
straightened out). CarM an uals 2 .c o m
Page 154 of 164
152
Alphabetical index
Container, AdBlue® 104
Control, emergency door
24
Control stalk, lighting
47, 49
Control stalk, wipers
50, 52
Courtesy lamp, rear
43
Courtesy lamps
43
Cruise control
82–84
Cup holder
41
D
Date (setting) 17, 147
Daytime running lamps
48, 120
Deactivating the passenger airbag
60, 63–64
Defrosting
33, 40
Defrosting, front
40
Defrosting, rear screen
40
Demisting
33, 40
Demisting, front
40
Demisting, rear
40
Dials and gauges
8
Dimensions
135
Dipstick
98
Direction indicators
(turn signals)
49, 120, 122–123
Display screen, instrument panel
8
Door pockets
41
Doors
25–26
Driving
66–67
Driving aids camera (warnings)
80
Driving aids (recommendations)
80
Driving economically 6
Dynamic stability control (DSC)
54–55
E
EBFD 54
Eco-driving (advice)
6
ECO mode
77
Electric windows
28
Electronic brake force distribution (EBFD)
54
Emergency braking assistance (EBA)
54
Emergency switching off
71
Emergency warning lamps
53, 114
Emissions control system, SCR
15, 103
Engine
103
Engine compartment
97–98
Engine, Diesel
94, 97, 115, 133–134
Engine, petrol
97, 132
Engines
131–134
Environment
6, 25
ESC (electronic stability control)
54
Extinguisher
11 4
F
Filling the AdBlue® tank 100, 104
Filling the fuel tank
94
Filter, air
101, 108
Filter, Diesel fuel
109
Filter, oil
101, 109
Filter, particle 101
Filter, passenger compartment
36, 100, 107
Fitting a wheel
117, 119
Fitting roof bars
96
Fittings, front
41
Fittings, interior
41–42
Fittings, rear
43–44
Flap, fuel filler
94
Flashing indicators
49, 122
Floor storage compartment
35
Fluid, brake
99
Fluid, engine coolant
99
Fluid, power steering
99
Foglamps, front
47–48, 120, 123
Foglamps, rear
47
Folding the rear seat backrest
32
Folding the rear seats
34
Fuel
6, 94
Fuel consumption
6
Fuel level, low
94
Fuel (tank)
94
Fuses
124
G
Gauge, fuel 94
Gearbox, automatic
75, 78, 101, 125
Gearbox, manual
74–75, 78, 101
Gear lever, manual gearbox
74–75
Gear shift indicator
78
Glove box
41 CarM an uals 2 .c o m
Page 155 of 164
153
Alphabetical index
Grab handles 41
H
Hazard warning lamps 53, 114
Headlamp beam height
49
Headlamps (adjustment)
49
Headlamps, automatic operation
49
Headlamps, dipped beam
120, 122
Headlamps, halogen
120–121
Headlamps, main beam
120, 122
Head restraints, front
30
Head restraints, rear
32, 34
Heating
36–38, 40
Hill Assist Descent Control (HADC)
56
Hill start assist
77–78
Hooks
43
Horn
54
I
Ignition 71
Ignition on
71
Immobiliser, electronic
68
Indicator, AdBlue® range
14
Indicator, coolant temperature
13
Indicators, direction
49, 122
Indicator, service
13–14
Inflating tyres
102, 136
Information, vehicle
148
Infrared camera 80
Instrument panel
8, 16, 81
ISOFIX mountings
64
J
Jack 116–117
Jump starting
126
K
Key 20–21, 24
Key, electronic
22–23
Keyless Entry and Starting
22, 70
Key not recognised
71
Key with remote control
20–21, 68
Kit, hands-free
139–140
Klaxon
54
L
Labels, identification 135
Lamps, parking
49
Lamps, rear
123
Lamps with Full LED technology
48
Lane Departure Warning (LDW)
84, 86
Leather (care)
11 3
LEDs - Light-emitting diodes
48, 120, 123
Level, AdBlue®
100
Level, brake fluid 99
Level, Diesel additive
101
Level, engine coolant
13, 99
Level, engine oil
98
Level, power steering fluid
99
Levels and checks
97–100
Level, screenwash fluid
51, 100
Light-emitting diodes - LEDs
48, 120, 123
Lighting
46
Lighting, cornering
48
Lighting dimmer
16
Lighting, exterior
47
Lighting, guide-me home
50
Lighting, interior
43
Lighting, mood
16
Lighting, welcome
50
Loading
45, 96
Load restraint
45
Locating your vehicle
21
Locking
21–22
Locking from the inside
23
Locking the doors
23
M
Maintenance 105
Maintenance (advice)
111
Maintenance, routine
81, 100, 103
Manoeuvring aids (recommendations)
80
Map reading lamps
43
Map reading lamps, front
43 CarM an uals 2 .c o m