clock PEUGEOT LANDTREK 2023 Owners Manual
[x] Cancel search | Manufacturer: PEUGEOT, Model Year: 2023, Model line: LANDTREK, Model: PEUGEOT LANDTREK 2023Pages: 164, PDF Size: 6.1 MB
Page 107 of 164

105
Practical information
7► Turn the blue cap of the AdBlue® tank anti-
clockwise and remove it.
►
With a container of
AdBlue
®: after checking
the expiry date, read the instructions on the
label carefully before pouring the contents of the
container into the vehicle's AdBlue
® tank.
►
With an
AdBlue® pump: insert the nozzle and
fill the tank until the nozzle automatically cuts
out.
In order not to overfill the AdBlue® tank:
–
Add between 10 and 13 litres using
AdBlue® containers.
–
Stop after the nozzle’ s first automatic cut-
out, if you are refilling at a service station.
The system only registers AdBlue
®
intermediate top-ups of 5
litres or more.
If the AdBlue® tank is completely empty
– which is confirmed by the message
“Top up AdBlue: Starting impossible ” – it is
essential to add at least 10
litres.
Top-up detection may not be instantaneous
after addition. It may take a few minutes of
driving before the top-up detection is effective.
Maintenance
For more information on the Engine
compartment, in particular the location of the
components under the bonnet, refer to the
corresponding section.
For the maintenance of your vehicle, you can
also contact a PEUGEOT dealer or a qualified
workshop.
Vehicle maintenance must always be
carried out with the engine switched off
and the ignition off.
Take care when working under the bonnet, as
certain areas of the engine may be extremely
hot (risk of burns) and the cooling fan could
start at any time (even with the ignition off).
Wait at least one hour after switching off the
engine before working on the vehicle - risk of
burns!
Take care with objects or clothing that could
be caught in the blades of the cooling fan -
risk of strangulation!
Always wear gloves, protective glasses and
suitable clothing to avoid direct contact with
liquids against the skin or eyes.
In the event of contact with the skin, wash
the affected area thoroughly with soap and
running water.
In the event of contact with the eyes,
immediately rinse the eyes with large
amounts of water or with an eye wash
solution for at least 15 minutes. Seek medical
attention if you feel a persistent burning
sensation or irritation.
Never go underneath the vehicle raised
using a jack; always use an axle
stand-type support.
When working on the vehicle's electrical
system, take care not to cause a short circuit -
risk of burns and fire.
Flammable products and all sources of heat
(sparks, for example) must be kept away from
the battery, the fuel tank and all components
of the fuel system.
Never run the engine in a closed space
without sufficient ventilation; always use a
ventilation system such as an exhaust gas
extractor, for example.
Never leave liquids (oil, coolant) unattended.
Keep these liquids out of the reach of children
and animals.
The liquids and components replaced must have the same characteristics and
comply with the manufacturer's
recommendations.
General checks
Check the following components to ensure
proper operation and longevity of the vehicle.
For more information on the components
to be
checked, refer to the Checking levels, Checks
and Advice on care
sections. CarM an uals 2 .c o m
Page 119 of 164

11 7
In the event of a breakdown
8
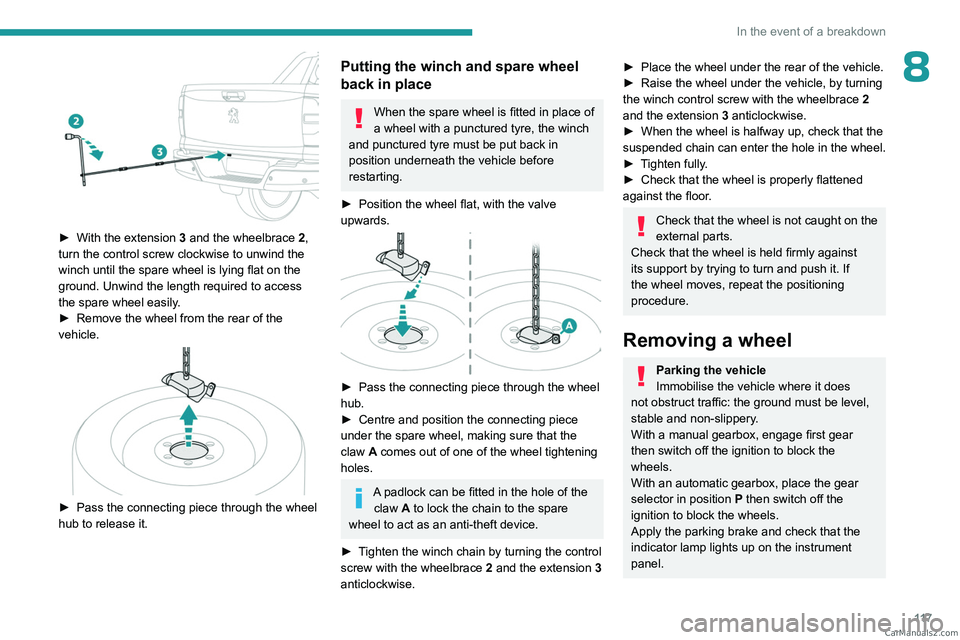
► With the extension 3 and the wheelbrace 2,
turn the control screw clockwise to unwind the
winch until the spare wheel is lying flat on the
ground. Unwind the length required to access
the spare wheel easily.
►
Remove the wheel from the rear of the
vehicle.
► Pass the connecting piece through the wheel
hub to release it.
Putting the winch and spare wheel
back in place
When the spare wheel is fitted in place of
a wheel with a punctured tyre, the winch
and punctured tyre must be put back in
position underneath the vehicle before
restarting.
►
Position the wheel flat, with the valve
upwards.
► Pass the connecting piece through the wheel
hub.
►
Centre and position the connecting piece
under the spare wheel, making sure that the
claw
A comes out of one of the wheel tightening
holes.
A padlock can be fitted in the hole of the claw A to lock the chain to the spare
wheel to act as an anti-theft device.
►
T
ighten the winch chain by turning the control
screw with the wheelbrace 2 and the extension 3
anticlockwise.
► Place the wheel under the rear of the vehicle.
► Raise the wheel under the vehicle, by turning
the winch control screw with the wheelbrace 2
and the extension 3 anticlockwise.
►
When the wheel is halfway up, check that the
suspended
chain can enter the hole in the wheel.
►
T
ighten fully.
►
Check that the wheel is properly flattened
against the floor
.
Check that the wheel is not caught on the
external parts.
Check that the wheel is held firmly against
its support by trying to turn and push it. If
the wheel moves, repeat the positioning
procedure.
Removing a wheel
Parking the vehicle
Immobilise the vehicle where it does
not obstruct traffic: the ground must be level,
stable and non-slippery.
With a manual gearbox, engage first gear
then switch off the ignition to block the
wheels.
With an automatic gearbox, place the gear
selector in position P then switch off the
ignition to block the wheels.
Apply the parking brake and check that the
indicator lamp lights up on the instrument
panel. CarM an uals 2 .c o m
Page 124 of 164

122
In the event of a breakdown
Dipped beam headlamps
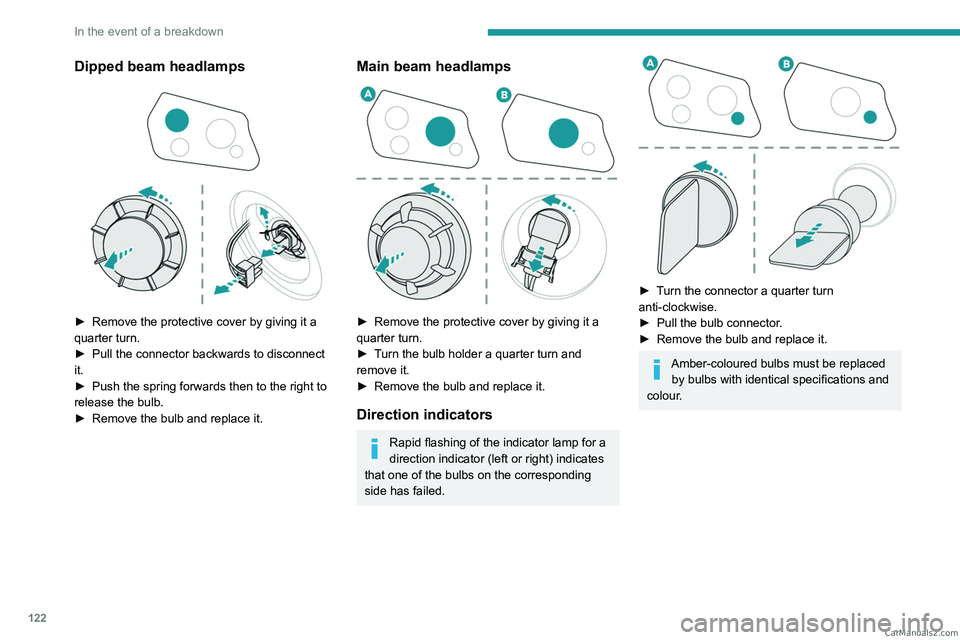
► Remove the protective cover by giving it a
quarter turn.
►
Pull the connector backwards to disconnect
it.
►
Push the spring forwards then to the right to
release the bulb.
►
Remove the bulb and replace it.
Main beam headlamps
► Remove the protective cover by giving it a
quarter turn.
►
T
urn the bulb holder a quarter turn and
remove it.
►
Remove the bulb and replace it.
Direction indicators
Rapid flashing of the indicator lamp for a
direction indicator (left or right) indicates
that one of the bulbs on the corresponding
side has failed.
► Turn the connector a quarter turn
anti-clockwise.
►
Pull the bulb connector
.
►
Remove the bulb and replace it.
Amber-coloured bulbs must be replaced by bulbs with identical specifications and
colour. CarM an uals 2 .c o m
Page 126 of 164

124
In the event of a breakdown
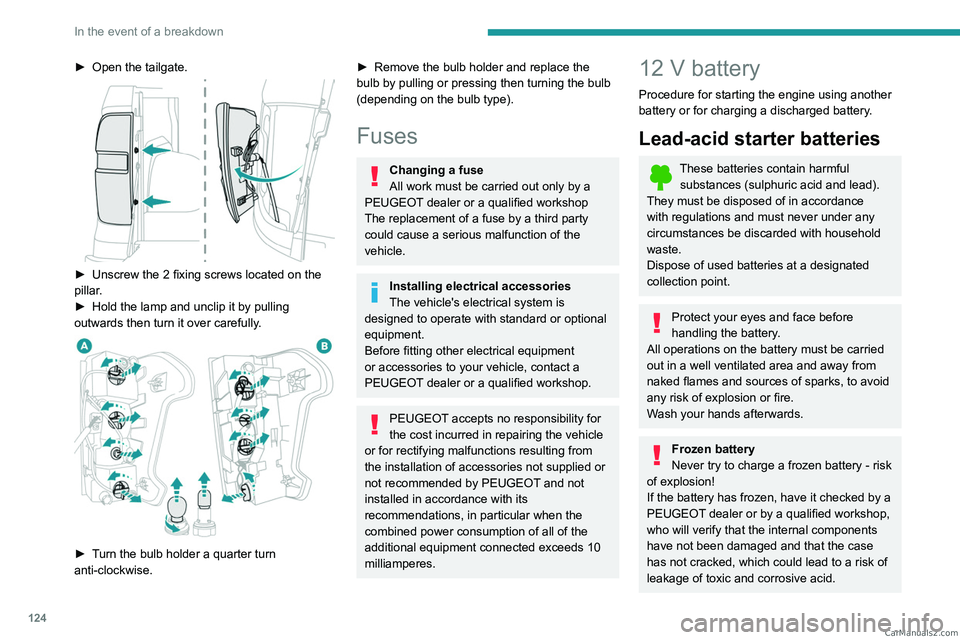
► Open the tailgate.
► Unscrew the 2 fixing screws located on the
pillar .
►
Hold the lamp and unclip it by pulling
outwards then turn it over carefully
.
► Turn the bulb holder a quarter turn
anti-clockwise.
► Remove the bulb holder and replace the
bulb by pulling or pressing then turning the bulb
(depending on the bulb type).
Fuses
Changing a fuse
All work must be carried out only by a
PEUGEOT dealer or a qualified workshop
The replacement of a fuse by a third party
could cause a serious malfunction of the
vehicle.
Installing electrical accessories
The vehicle's electrical system is
designed to operate with standard or optional
equipment.
Before fitting other electrical equipment
or accessories to your vehicle, contact a
PEUGEOT dealer or a qualified workshop.
PEUGEOT accepts no responsibility for
the cost incurred in repairing the vehicle
or for rectifying malfunctions resulting from
the installation of accessories not supplied or
not recommended by PEUGEOT and not
installed in accordance with its
recommendations, in particular when the
combined power consumption of all of the
additional equipment connected exceeds 10
milliamperes.
12 V battery
Procedure for starting the engine using another
battery or for charging a discharged battery.
Lead-acid starter batteries
These batteries contain harmful substances (sulphuric acid and lead).
They must be disposed of in accordance
with regulations and must never under any
circumstances be discarded with household
waste.
Dispose of used batteries at a designated
collection point.
Protect your eyes and face before
handling the battery.
All operations on the battery must be carried
out in a well ventilated area and away from
naked flames and sources of sparks, to avoid
any risk of explosion or fire.
Wash your hands afterwards.
Frozen battery
Never try to charge a frozen battery - risk
of explosion!
If the battery has frozen, have it checked by a
PEUGEOT dealer or by a qualified workshop,
who will verify that the internal components
have not been damaged and that the case
has not cracked, which could lead to a risk of
leakage of toxic and corrosive acid. CarM an uals 2 .c o m