fold seats PEUGEOT LANDTREK 2023 Owners Manual
[x] Cancel search | Manufacturer: PEUGEOT, Model Year: 2023, Model line: LANDTREK, Model: PEUGEOT LANDTREK 2023Pages: 164, PDF Size: 6.1 MB
Page 33 of 164

31
Ease of use and comfort
3► Raise the control bar and slide the seat
forwards or backwards.
►
Release the control bar to lock the seat in
position on one of the notches.
Backrest angle
► Pull the control all the way up and tilt the
backrest forwards or backwards to adjust it.
Height
(driver only)
► Pull the control upwards to raise or push it
downwards to lower , until you obtain the position
required.
Electrically-adjustable seats
Longitudinal
► Push the control forwards or backwards to
slide the seat.
Backrest angle
► Tilt the control forwards or rearwards.
Cushion height and angle
(driver only)
► Tilt the rear of the control upwards or
downwards to obtain the required height and
angle.
Electric lumbar adjustment
(driver only)
► Press and hold the front or rear of the
control to increase or reduce the lumbar
support.
2-seat front bench seat
It includes 2 fixed cushions with 2 independent
backrests (adjustable and foldable in the table
position).
The backrest of the seat located next to the
driver, once in the table position, can also be
used as an armrest and has 2 cup/can holders
and a support strap.
For more information on the Seat belts,
refer to the corresponding section. CarM an uals 2 .c o m
Page 36 of 164
34
Ease of use and comfort
► Pull the lever to change to the anti-dazzle
"night" position.
►
Push the lever to change to the normal "day"
position.
Adjustment
►
Adjust the mirror to the normal "day" position.
Rear bench seat
Bench seat with folding cushions (giving access
to storage compartments) and split folding
backrests (2/3-1/3).
Rear head restraints
High position (use):
► Pull the head restraint fully up.
Low position (stowing; when the seats are not
in use):
►
Press the lug
A to release the head restraint
and push it down.
The rear head restraints can be removed.
Removing a head restraint
► Pull the head restraint fully up.
► Press the lug A to release the head restraint
and remove it completely.
►
Store the head restraint.
Refitting a head restraint
► Insert the head restraint rods into the guides
in the corresponding seat backrest.
►
Push the head restraint down as far as it will
go.
►
Press the lug
A to release the head restraint
and push it fully down.
Never drive with passengers seated at
the rear when the head restraints are
removed; the head restraints should be in
place and in the high position.
The head restraint for the centre seat
and those for the outer seats are not
interchangeable.
Folding the backrests
Manoeuvring the backrests should only
be done when the vehicle is stationary.
First steps:
► Lower the head restraints.
►
If necessary
, move the front seats forward.
►
Check
that no person or object might interfere
with the folding of the backrests (e.g.
clothing,
luggage).
►
Check that the seat belts are free, not
engaged in the buckles. Release them so that
the backrest can be moved.
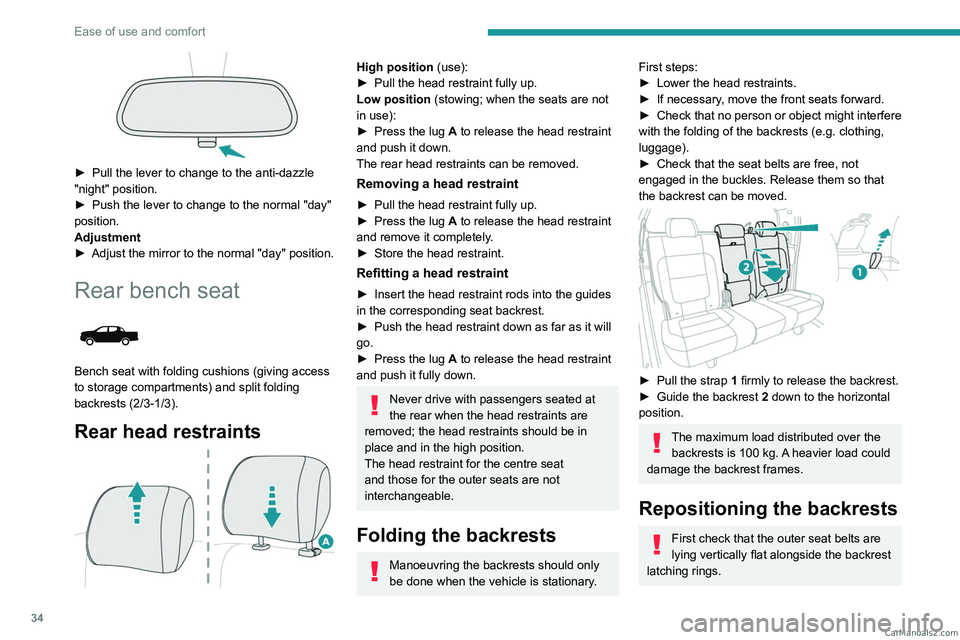
► Pull the strap 1 firmly to release the backrest.
► Guide the backrest 2 down to the horizontal
position.
The maximum load distributed over the backrests is 100 kg. A heavier load could
damage the backrest frames.
Repositioning the backrests
First check that the outer seat belts are
lying vertically flat alongside the backrest
latching rings. CarM an uals 2 .c o m
Page 61 of 164
59
Safety
51 minute, the warning lamp(s) remain(s) on
until the driver or passenger(s) (depending on
version) fasten(s) their seat belt(s).
Advice
The driver must ensure that passengers use the seat belts correctly and that they
are all fastened before setting off.
Wherever seated in the vehicle, you must
always fasten the seat belt, even for short
journeys.
Do not invert the seat belt buckles, as they
will not fulfil their role properly.
To ensure the proper functioning of the belt
buckles, make sure that there are no foreign
bodies present (e.g.
a coin) before fastening.
Before and after use, ensure that the seat belt
is reeled in correctly.
After folding or moving a seat or rear bench
seat, ensure that the seat belt is positioned
and reeled in correctly.
Installation
The lower part of the strap must be
positioned as low as possible over the pelvis.
The upper part must be positioned in the
hollow of the shoulder.
At the front, adjusting the position of the
seat belt may require the seat height to be
adjusted.
In order to be effective, a seat belt must:
– be tightened as close to the body as
possible.
–
be pulled in front of you with a smooth
movement, checking that it is not twisted.
–
must only be used to secure one person.
–
not show signs of tearing or fraying.
–
not be changed or modified, in order to
avoid affecting its performance.
Recommendations for children
Use a suitable child seat if the passenger
is less than 12 years old or shorter than 1.5
metres.
Never use the same seat belt to secure more
than one child.
Never carry a child on your lap.
For more information on Child seats, refer to
the corresponding section.
Maintenance
In accordance with current safety
regulations, for all work on your vehicle's
seat belts, contact a qualified workshop with
the skills and equipment needed, which a
PEUGEOT dealer is able to provide.
Have the seat belts checked regularly by a
PEUGEOT dealer or a qualified workshop,
particularly if the straps show signs of
damage.
Clean the seat belt straps with soapy water or
a textile cleaning product, sold by PEUGEOT
dealers.
Airbags
General information
The airbags have been designed to optimise the
safety of the occupants in the event of a violent
collision; they supplement the action of the seat
belts equipped with a force limiting system.
Electronic detectors record and analyse the
front and side impacts sustained in the impact
detection zones:
–
In the event of violent impact, the airbags
deploy instantly and help better protect the
occupants of the vehicle; immediately after the
impact, the airbags deflate rapidly in order not
to hinder the visibility or the possible exit of the
occupants.
–
In the event of a slight impact, a rear impact
and under certain rollover conditions, the airbags
may not deploy; only the seat belt helps to
protect you in these situations.
The seriousness of the impact depends on the
nature of the obstacle and the speed of the
vehicle at the moment of collision.
The airbags do not operate when the
ignition is switched off.
This equipment will only deploy once. If a
second impact occurs (during the same or a
subsequent accident), the airbag will not be
deployed again. CarM an uals 2 .c o m
Page 112 of 164
11 0
Practical information
BlueHDi Diesel engine
► Switch off the engine and the ignition.
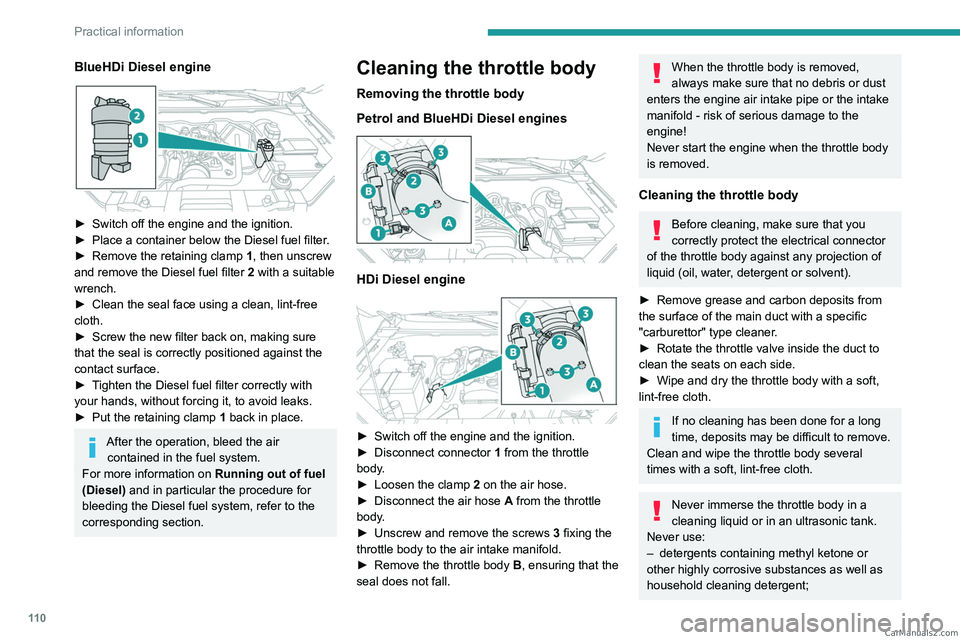
► Place a container below the Diesel fuel filter .
►
Remove the retaining clamp 1
, then unscrew
and remove the Diesel fuel filter 2 with a suitable
wrench.
►
Clean the seal face using a clean, lint-free
cloth.
►
Screw the new filter back on, making sure
that the seal is correctly positioned against the
contact surface.
►
T
ighten the Diesel fuel filter correctly with
your hands, without forcing it, to avoid leaks.
►
Put the retaining clamp 1
back in place.
After the operation, bleed the air contained in the fuel system.
For more information on Running out of fuel
(Diesel) and in particular the procedure for
bleeding the Diesel fuel system, refer to the
corresponding section.
Cleaning the throttle body
Removing the throttle body
Petrol and BlueHDi Diesel engines
HDi Diesel engine
► Switch off the engine and the ignition.
► Disconnect connector 1
from the throttle
body.
►
Loosen the clamp 2
on the air hose.
►
Disconnect the air hose A
from the throttle
body.
►
Unscrew and remove the screws 3
fixing the
throttle body to the air intake manifold.
►
Remove the throttle body B
, ensuring that the
seal does not fall.
When the throttle body is removed,
always make sure that no debris or dust
enters the engine air intake pipe or the intake
manifold - risk of serious damage to the
engine!
Never start the engine when the throttle body
is removed.
Cleaning the throttle body
Before cleaning, make sure that you
correctly protect the electrical connector
of the throttle body against any projection of
liquid (oil, water, detergent or solvent).
►
Remove grease and carbon deposits from
the surface of the main duct with a specific
"carburettor" type cleaner
.
►
Rotate the throttle valve inside the duct to
clean the seats on each side.
►
Wipe and dry the throttle body with a soft,
lint-free cloth.
If no cleaning has been done for a long
time, deposits may be difficult to remove.
Clean and wipe the throttle body several
times with a soft, lint-free cloth.
Never immerse the throttle body in a
cleaning liquid or in an ultrasonic tank.
Never use:
–
detergents containing methyl ketone or
other highly corrosive substances as well as
household cleaning detergent; CarM an uals 2 .c o m
Page 116 of 164
11 4
In the event of a breakdown
Warning triangle
This reflective and dismantlable device is to be
installed on the side of the road when a vehicle
is broken down or damaged.
Before getting out of the vehicle
Turn on the hazard warning lamps, then
put on the safety vest to assemble and install
the triangle.
Storage
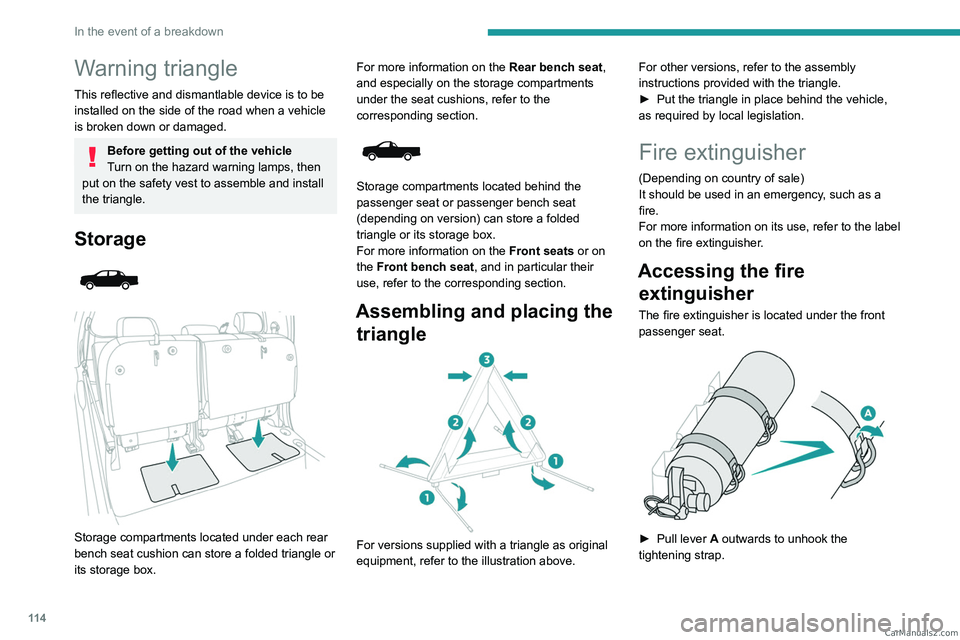
Storage compartments located under each rear
bench seat cushion can store a folded triangle or
its storage box. For more information on the
Rear bench seat,
and especially on the storage compartments
under the seat cushions, refer to the
corresponding section.
Storage compartments located behind the
passenger seat or passenger bench seat
(depending on version) can store a folded
triangle or its storage box.
For more information on the Front seats or on
the Front bench seat, and in particular their
use, refer to the corresponding section.
Assembling and placing the triangle
For versions supplied with a triangle as original
equipment, refer to the illustration above. For other versions, refer to the assembly
instructions provided with the triangle.
►
Put the triangle in place behind the vehicle,
as required by local legislation.
Fire extinguisher
(Depending on country of sale)
It should be used in an emergency, such as a
fire.
For more information on its use, refer to the label
on the fire extinguisher.
Accessing the fire extinguisher
The fire extinguisher is located under the front
passenger seat.
► Pull lever A outwards to unhook the
tightening strap. CarM an uals 2 .c o m
Page 118 of 164
11 6
In the event of a breakdown
► Open the passenger door.
► Fold down the seat backrest to access the
jack.
►
T
ake the rest of the tools from the pocket
behind the driver's seat backrest.
For more information on the Front bench seats,
Rear bench seats and Front seats, and in
particular their use, refer to the corresponding
section.
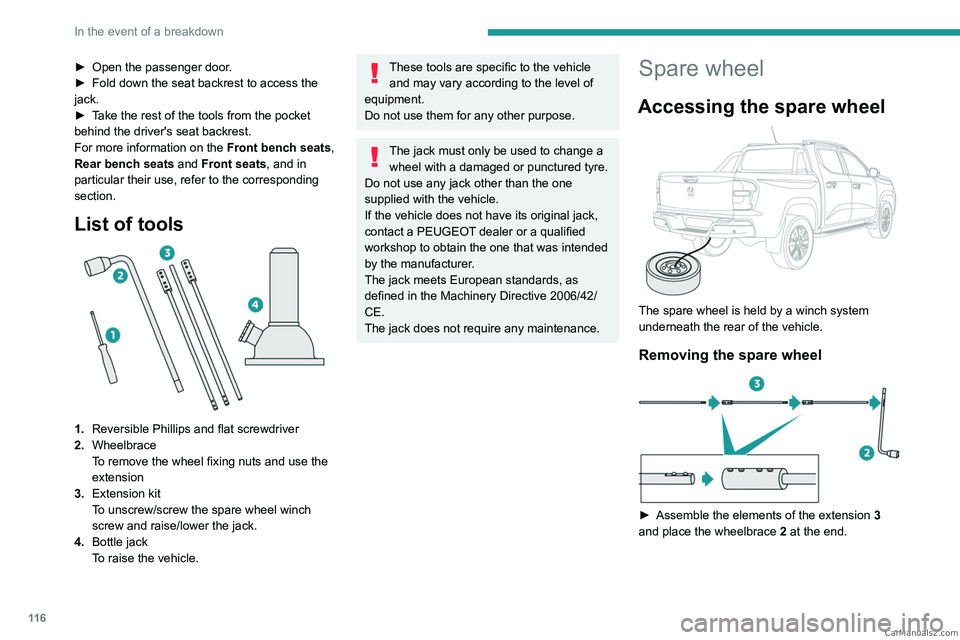
List of tools
1. Reversible Phillips and flat screwdriver
2. Wheelbrace
To remove the wheel fixing nuts and use the
extension
3. Extension kit
To unscrew/screw the spare wheel winch
screw and raise/lower the jack.
4. Bottle jack
To raise the vehicle.
These tools are specific to the vehicle
and may vary according to the level of
equipment.
Do not use them for any other purpose.
The jack must only be used to change a wheel with a damaged or punctured tyre.
Do not use any jack other than the one
supplied with the vehicle.
If the vehicle does not have its original jack,
contact a PEUGEOT dealer or a qualified
workshop to obtain the one that was intended
by the manufacturer.
The jack meets European standards, as
defined in the Machinery Directive 2006/42/
CE.
The jack does not require any maintenance.
Spare wheel
Accessing the spare wheel
The spare wheel is held by a winch system
underneath the rear of the vehicle.
Removing the spare wheel
► Assemble the elements of the extension 3
and place the wheelbrace 2 at the end.
CarM an uals 2 .c o m
Page 153 of 164
151
Alphabetical index
360° camera 89
A
ABS 54
Accessories
53
AdBlue®
14, 103
AdBlue® tank
104
Additive, Diesel
101
Adjusting headlamp beam height
49
Adjusting headlamps
49
Adjusting head restraints
30
Adjusting seat
30–31
Adjusting the air distribution
39
Adjusting the air flow
39
Adjusting the date
17, 147
Adjusting the headlamp beam height
49
Adjusting the height and reach
of the steering wheel
32
Adjusting the seat angle
31
Adjusting the seat belt height
58
Adjusting the temperature
39
Adjusting the time
17, 147
Advice on care and maintenance
111
Advice on driving
6, 66–67
Airbags
59–61, 63
Airbags, curtain
60–61
Airbags, front
60–61, 64
Airbags, lateral
60–61
Air conditioning
36, 38, 39
Air conditioning, automatic
40
Air conditioning, dual-zone automatic 38–40
Air conditioning, manual
37, 40
Air intake
39
Air vents
36
Alarm
27
Anti-lock braking system (ABS)
54
Antitheft / Immobiliser
21
Area, loading
45
Armrest, front
42
Armrest, rear
43
Assistance, emergency braking
54
Audio streaming (Bluetooth)
139
B
Battery 106
Battery, 12 V
100, 106, 124–128
Battery, charging
124, 127
Battery, remote control
24–25
Bench seat, folding
35
BlueHDi
14, 100, 115
Bluetooth (hands-free)
139–140
Bluetooth (telephone)
145
Bodywork
11 2
Bonnet
96–97
Brake discs
102
Brake lamps
123
Brakes
101–102
Braking assistance system
54
Bulbs
121
Bulbs (changing)
120, 123
C
Capacity, fuel tank 94
Cap, fuel filler
94
Care of the bodywork
11 2
Central locking
21, 23
Changing a bulb
120, 123
Changing a fuse
124
Changing a wheel
115–117
Changing a wiper blade
51
Changing the remote control battery
24
Changing to free-wheeling
111
Checking the levels
98–100
Checks
97–98, 100–103
Checks, routine
100–102, 105
Child lock
65
Children
59, 64
Children (safety)
65
Child seats
59, 62–63
Child seats, ISOFIX
64
Cigar lighter
41
Cleaning (advice)
110–113
Cleaning the engine throttle housing
11 0
Closing the boot
22
Closing the doors
22–23, 25–26
Closing the tailgate
26
Configuration, vehicle
17–19
Connection, Android Auto
146
Connection, Apple CarPlay
145
Connection, Bluetooth
140, 145
Connection, MirrorLink
146
Connectivity
145 CarM an uals 2 .c o m
Page 154 of 164
152
Alphabetical index
Container, AdBlue® 104
Control, emergency door
24
Control stalk, lighting
47, 49
Control stalk, wipers
50, 52
Courtesy lamp, rear
43
Courtesy lamps
43
Cruise control
82–84
Cup holder
41
D
Date (setting) 17, 147
Daytime running lamps
48, 120
Deactivating the passenger airbag
60, 63–64
Defrosting
33, 40
Defrosting, front
40
Defrosting, rear screen
40
Demisting
33, 40
Demisting, front
40
Demisting, rear
40
Dials and gauges
8
Dimensions
135
Dipstick
98
Direction indicators
(turn signals)
49, 120, 122–123
Display screen, instrument panel
8
Door pockets
41
Doors
25–26
Driving
66–67
Driving aids camera (warnings)
80
Driving aids (recommendations)
80
Driving economically 6
Dynamic stability control (DSC)
54–55
E
EBFD 54
Eco-driving (advice)
6
ECO mode
77
Electric windows
28
Electronic brake force distribution (EBFD)
54
Emergency braking assistance (EBA)
54
Emergency switching off
71
Emergency warning lamps
53, 114
Emissions control system, SCR
15, 103
Engine
103
Engine compartment
97–98
Engine, Diesel
94, 97, 115, 133–134
Engine, petrol
97, 132
Engines
131–134
Environment
6, 25
ESC (electronic stability control)
54
Extinguisher
11 4
F
Filling the AdBlue® tank 100, 104
Filling the fuel tank
94
Filter, air
101, 108
Filter, Diesel fuel
109
Filter, oil
101, 109
Filter, particle 101
Filter, passenger compartment
36, 100, 107
Fitting a wheel
117, 119
Fitting roof bars
96
Fittings, front
41
Fittings, interior
41–42
Fittings, rear
43–44
Flap, fuel filler
94
Flashing indicators
49, 122
Floor storage compartment
35
Fluid, brake
99
Fluid, engine coolant
99
Fluid, power steering
99
Foglamps, front
47–48, 120, 123
Foglamps, rear
47
Folding the rear seat backrest
32
Folding the rear seats
34
Fuel
6, 94
Fuel consumption
6
Fuel level, low
94
Fuel (tank)
94
Fuses
124
G
Gauge, fuel 94
Gearbox, automatic
75, 78, 101, 125
Gearbox, manual
74–75, 78, 101
Gear lever, manual gearbox
74–75
Gear shift indicator
78
Glove box
41 CarM an uals 2 .c o m