low beam PEUGEOT LANDTREK 2023 Owners Manual
[x] Cancel search | Manufacturer: PEUGEOT, Model Year: 2023, Model line: LANDTREK, Model: PEUGEOT LANDTREK 2023Pages: 164, PDF Size: 6.1 MB
Page 7 of 164
5
Overview
B.Activate Cruise control
C. Decrease/Increase Speed limiter/Cruise
control speed setting
Memorising speeds function (SET) or
reactivation of the programmed speed
function (RES)
D. Voice recognition/Media
E. Activate Speed limiter
F. Select menus on the instrument panel and
validate
G. Decrease/Increase volume
H. Select the instrument panel display mode and
navigate in the menus
I. Access the Telephone menu /Answer a call
Select next media
J. Access the Telephone menu/End a call
Select previous media
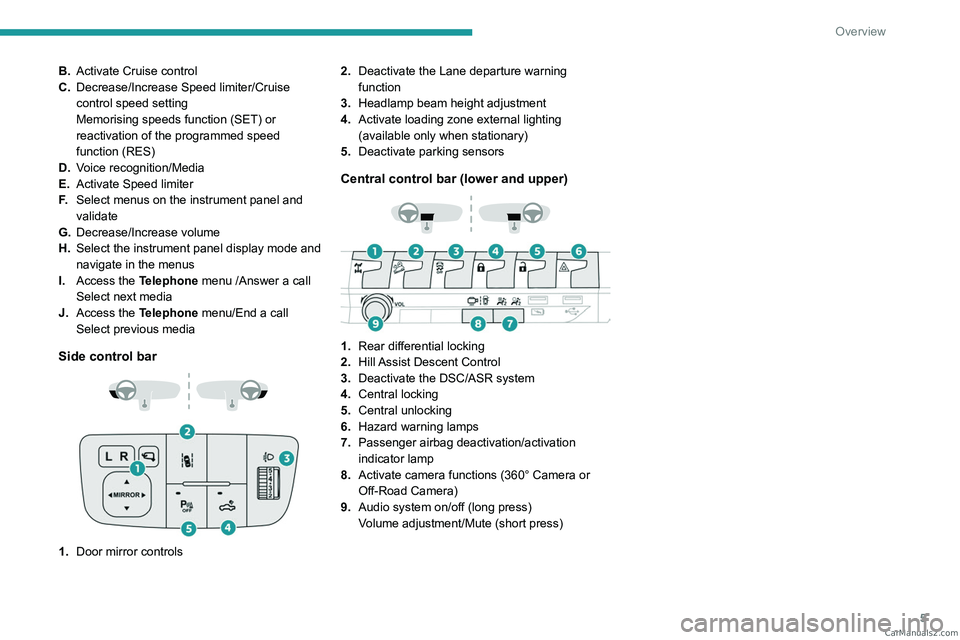
Side control bar
1.Door mirror controls 2.
Deactivate the Lane departure warning
function
3. Headlamp beam height adjustment
4. Activate loading zone external lighting
(available only when stationary)
5. Deactivate parking sensors
Central control bar (lower and upper)
1.Rear differential locking
2. Hill Assist Descent Control
3. Deactivate the DSC/ASR system
4. Central locking
5. Central unlocking
6. Hazard warning lamps
7. Passenger airbag deactivation/activation
indicator lamp
8. Activate camera functions (360° Camera or
Off-Road Camera)
9. Audio system on/off (long press)
Volume adjustment/Mute (short press) CarM an uals 2 .c o m
Page 15 of 164
13
Dashboard instruments
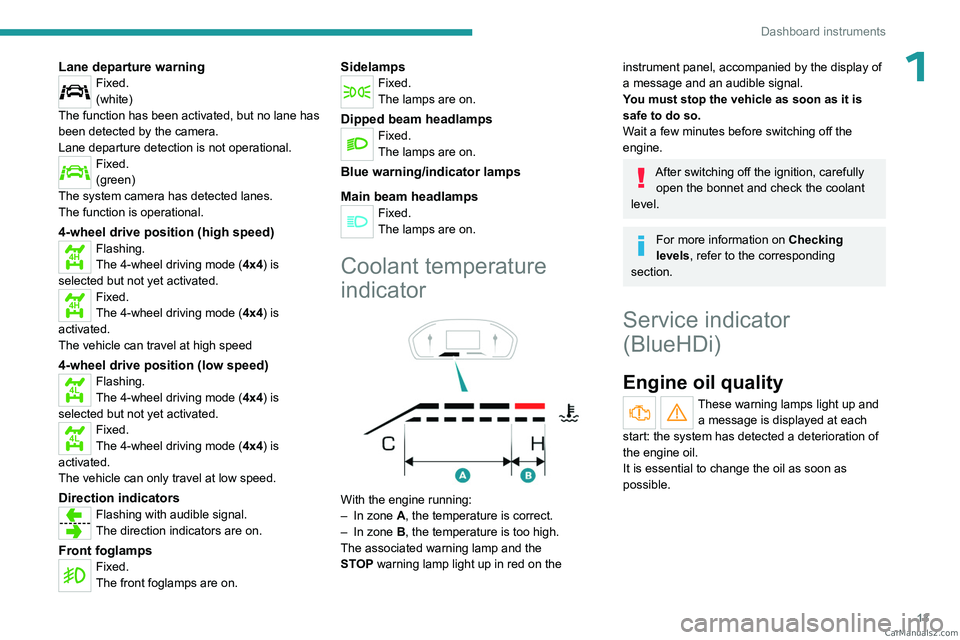
1Lane departure warningFixed.
(white)
The function has been activated, but no lane has
been detected by the camera.
Lane departure detection is not operational.
Fixed.
(green)
The system camera has detected lanes.
The function is operational.
4-wheel drive position (high speed)
4HFlashing.
The 4-wheel driving mode ( 4x4) is
selected but not yet activated.
4HFixed.
The 4-wheel driving mode ( 4x4) is
activated.
The vehicle can travel at high speed
4-wheel drive position (low speed)
4LFlashing.
The 4-wheel driving mode ( 4x4) is
selected but not yet activated.
4LFixed.
The 4-wheel driving mode ( 4x4) is
activated.
The vehicle can only travel at low speed.
Direction indicatorsFlashing with audible signal.
The direction indicators are on.
Front foglampsFixed.
The front foglamps are on.
SidelampsFixed.
The lamps are on.
Dipped beam headlampsFixed.
The lamps are on.
Blue warning/indicator lamps
Main beam headlamps
Fixed.
The lamps are on.
Coolant temperature
indicator
With the engine running:
– In zone A, the temperature is correct.
–
In zone
B, the temperature is too high.
The associated warning lamp and the
STOP
warning lamp light up in red on the
instrument panel, accompanied by the display of
a message and an audible signal.
You must stop the vehicle as soon as it is
safe to do so.
Wait a few minutes before switching off the
engine.
After switching off the ignition, carefully open the bonnet and check the coolant
level.
For more information on Checking
levels, refer to the corresponding
section.
Service indicator
(BlueHDi)
Engine oil quality
These warning lamps light up and a message is displayed at each
start: the system has detected a deterioration of
the engine oil.
It is essential to change the oil as soon as
possible. CarM an uals 2 .c o m
Page 50 of 164
48
Lighting and visibility
If the lighting is switched off automatically (with
AUTO model) or the dipped beam headlamps
are switched off manually, the foglamps and
sidelamps remain on.
►
Rotate the ring to the "
OFF" position to switch
off the foglamps; the sidelamps will then switch
off.
Switching off of the lighting when the
ignition is switched off
When the ignition is switched off, all of the
lamps turn off immediately, except for the
dipped beam headlamps if automatic guide-
me-home lighting is activated.
Switching on the lamps after
switching off the ignition
To reactivate the lighting control, rotate the
ring, depending on version, to the " OFF"
position - lamps off, or to the "AUTO" position,
then to the desired position.
If the driver's door is opened, a temporary
audible signal warns the driver that the lamps
are on.
They will go off automatically after a period
of time that depends on the level of charge in
the battery (entering energy economy mode).
In some weather conditions (e.g. low
temperature or humidity), misting on the
internal surface of the glass of the headlamps
and rear lamps is normal, and will disappear
after the lamps have been on for a few
minutes.
Never look too closely at the light beam
of LED technology lamps - risk of serious
eye injury!
Travelling abroad
Vehicles equipped with halogen
headlamps:
If planning to use your vehicle in a country
that drives on the other side of the road, the
dipped beam headlamps must be adjusted to
avoid dazzling oncoming drivers. Consult a
PEUGEOT dealer or a qualified workshop.
Daytime running lamps/
Sidelamps
These lamps at the front and rear of the vehicle
light up automatically when the engine starts.
They perform the following functions:
–
Daytime running lamps (lighting control stalk
at position "
OFF" or "AUTO" with adequate
ambient light).
–
Sidelamps (lighting control stalk at position
"
AUTO" with low ambient light or "Sidelamps
only" or "Dipped/main beam headlamps").
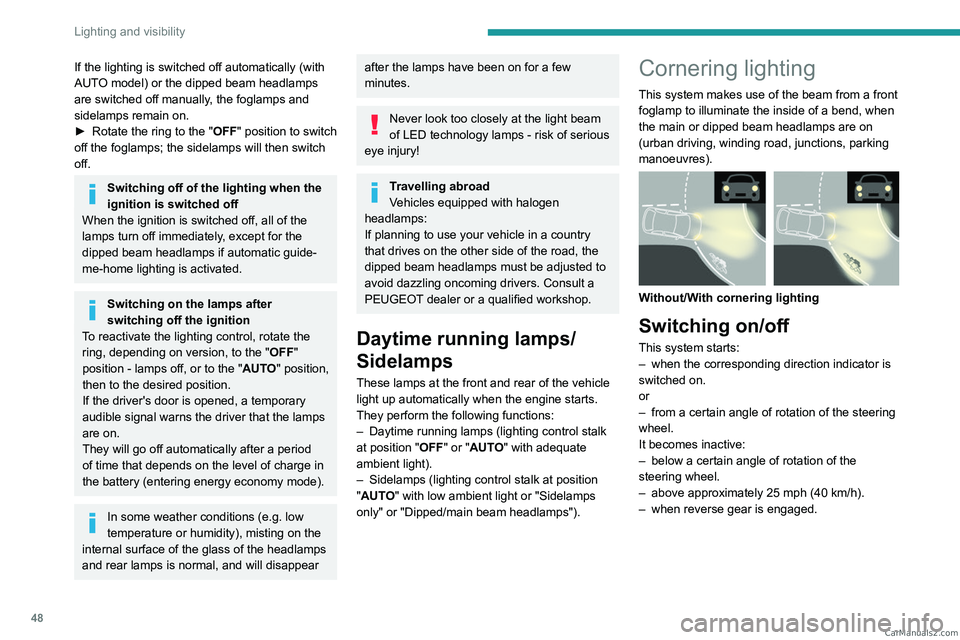
Cornering lighting
This system makes use of the beam from a front
foglamp to illuminate the inside of a bend, when
the main or dipped beam headlamps are on
(urban driving, winding road, junctions, parking
manoeuvres).
Without/With cornering lighting
Switching on/off
This system starts:
– when the corresponding direction indicator is
switched on.
or
–
from a certain angle of rotation of the steering
wheel.
It becomes inactive:
–
below a certain angle of rotation of the
steering wheel.
–
above approximately 25 mph (40
km/h).
–
when reverse gear is engaged. CarM an uals 2 .c o m
Page 51 of 164
49
Lighting and visibility
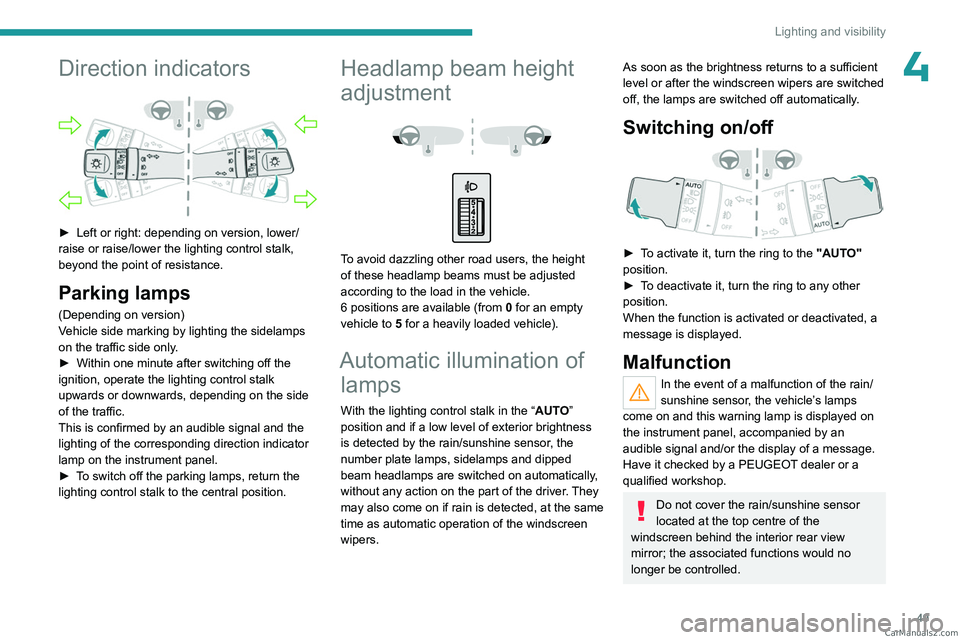
4Direction indicators
► Left or right: depending on version, lower/
raise or raise/lower the lighting control stalk,
beyond the point of resistance.
Parking lamps
(Depending on version)
Vehicle side marking by lighting the sidelamps
on the traffic side only.
►
Within one minute after switching off the
ignition, operate the lighting control stalk
upwards or downwards, depending on the side
of the traffic.
This is confirmed by an audible signal and the
lighting of the corresponding direction indicator
lamp on the instrument panel.
►
T
o switch off the parking lamps, return the
lighting control stalk to the central position.
Headlamp beam height
adjustment
To avoid dazzling other road users, the height
of these headlamp beams must be adjusted
according to the load in the vehicle.
6 positions are available (from 0 for an empty
vehicle to 5 for a heavily loaded vehicle).
Automatic illumination of lamps
With the lighting control stalk in the “ AUTO”
position and if a low level of exterior brightness
is detected by the rain/sunshine sensor, the
number plate lamps, sidelamps and dipped
beam headlamps are switched on automatically,
without any action on the part of the driver. They
may also come on if rain is detected, at the same
time as automatic operation of the windscreen
wipers.
As soon as the brightness returns to a sufficient
level or after the windscreen wipers are switched
off, the lamps are switched off automatically.
Switching on/off
► To activate it, turn the ring to the "AUTO"
position.
►
T
o deactivate it, turn the ring to any other
position.
When the function is activated or deactivated, a
message is displayed.
Malfunction
In the event of a malfunction of the rain/
sunshine sensor, the vehicle’s lamps
come on and this warning lamp is displayed on
the instrument panel, accompanied by an
audible signal and/or the display of a message.
Have it checked by a PEUGEOT dealer or a
qualified workshop.
Do not cover the rain/sunshine sensor
located at the top centre of the
windscreen behind the interior rear view
mirror; the associated functions would no
longer be controlled. CarM an uals 2 .c o m
Page 52 of 164
50
Lighting and visibility
In fog or snow, the rain/sunshine sensor
may detect sufficient light. For this
reason, the lighting will not come on
automatically.
The inner surface of the windscreen may become misted up and affect the proper
operation of the rain/sunshine sensor.
In humid and cold weather, demist the
windscreen regularly.
Guide-me-home and
welcome lighting
Guide-me-home lighting
Depending on version, when the light is poor, the
dipped beam headlamps come on automatically
when the ignition is switched off.
Guide-me-home lighting goes off automatically
after a period of time.
You can activate/deactivate this function and adjust the guide-me-home lighting
duration in the Vehicle settings
touch screen
menu.
Welcome lighting
When unlocking the vehicle, this system
automatically switches on the dipped beam
headlamps and certain lights in the passenger
compartment.
DOORWhen the front courtesy lamp control is
activated, the front courtesy lamp comes
on automatically when a door is opened.
Depending on version, the front doors have sill
lighting. Each sill light automatically switches on
when a front door is opened to facilitate entry
into the vehicle at night.
You can activate/deactivate this function and adjust the welcome lighting duration
in the Vehicle settings touch screen menu.
Wiper control stalk
Before operating the wipers in wintry
conditions, clear any snow, ice or frost
from the windscreen and around the wiper
arms and blades.
Do not operate the wipers on a dry
windscreen. In extremely hot or cold
weather, check that the wiper blades are not
stuck to the windscreen before operating the
wipers.
After using an automatic car wash, you may temporarily notice abnormal noises
and poorer wiping performance.
You do not
need to replace the wiper blades.
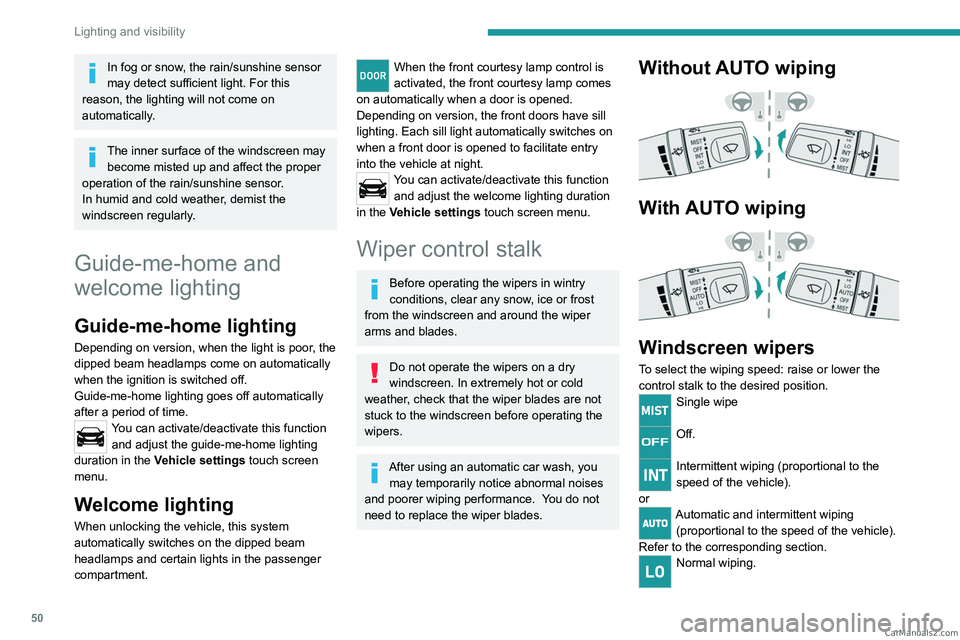
Without AUTO wiping
With AUTO wiping
Windscreen wipers
To select the wiping speed: raise or lower the
control stalk to the desired position.
Single wipe
Off.
Intermittent wiping (proportional to the
speed of the vehicle).
or
Automatic and intermittent wiping (proportional to the speed of the vehicle).
Refer to the corresponding section.
Normal wiping. CarM an uals 2 .c o m
Page 70 of 164
68
Driving
Do not exceed the maximum towable
weights.
At altitude: reduce the maximum load by
10% per 1,000 metres of altitude; the lower
air density at high altitudes decreases engine
performance.
New vehicle: do not tow a trailer until the
vehicle has driven at least 620 miles
(1,000 kilometres).
If the outside temperature is high, let the
engine idle for 1 to 2 minutes after the
vehicle comes to a stop, to help it to cool.
Before setting off
Nose weight
► Distribute the load in the trailer so that the
heaviest items are as close as possible to the
axle and the nose weight (at the point where it
joins your vehicle) approaches the maximum
permitted without exceeding it.
Tyres
► Check the tyre pressures of the towing
vehicle and of the trailer , observing the
recommended pressures.
Lighting
► Check the electrical signalling on the trailer
and the headlamp beam height of your vehicle.
If a genuine PEUGEOT towing device is
used, the rear parking sensors will be
deactivated automatically to avoid the audible
signal.
When driving
Cooling
Towing a trailer uphill causes the coolant
temperature to increase. The maximum towable
load depends on the gradient and the exterior
temperature. The fan’s cooling capacity does not
increase with engine speed.
►
Reduce speed and lower the engine speed to
limit the amount of heating produced.
►
Pay constant attention to the coolant
temperature.
If this warning lamp and the STOP
warning lamp come on, stop the vehicle
and switch off the engine as soon as possible.
Brakes
Using the engine brake is recommended to limit
the overheating of the brakes. Braking distances
are increased when towing a trailer.
Side wind
Bear in mind that the vehicle will be more
susceptible to wind when towing.
Anti-theft protection
Electronic immobiliser
The keys contain a code, which must be
recognised by the vehicle before starting is
possible.
If the system malfunctions, indicated by the
display of a message, the engine will not start.
Contact a PEUGEOT dealer.
Starting / Switching off the
engine with the key
Key ignition switch
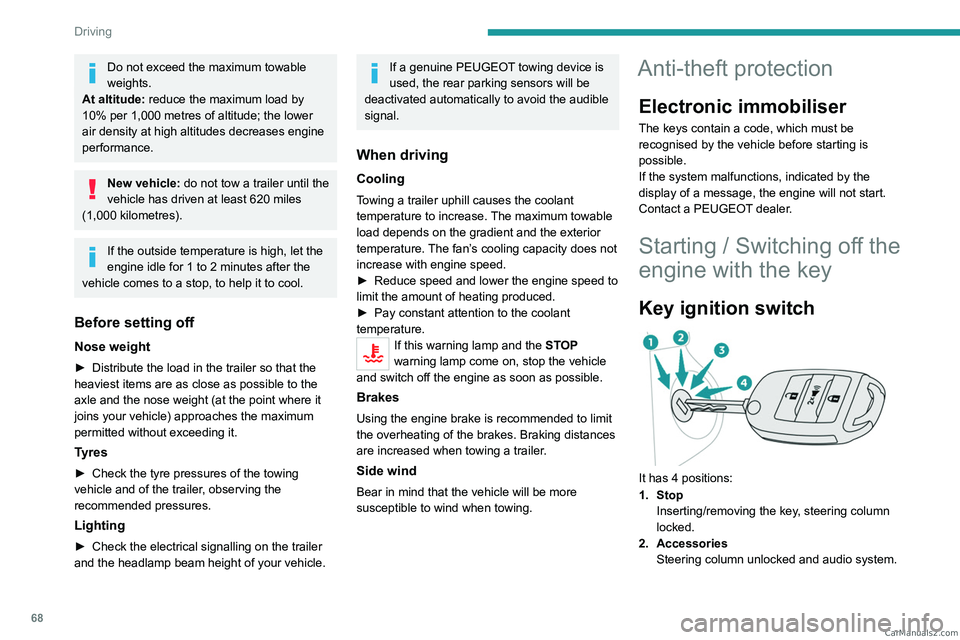
It has 4 positions:
1. Stop Inserting/removing the key, steering column
locked.
2. Accessories Steering column unlocked and audio system. CarM an uals 2 .c o m
Page 122 of 164
120
In the event of a breakdown
After changing a wheel
The use of the non-standard steel spare wheel is temporary. The driver must drive
carefully at a moderate speed and limit the
distance covered.
Visit a PEUGEOT dealer or a qualified
workshop as soon as possible to have the
tightness of the nuts and the pressure of the
spare wheel checked.
Have the punctured tyre examined. After
inspection, the technician will advise you on
whether the tyre can be repaired or if it must
be replaced.
Changing a bulb
In some weather conditions (e.g. low
temperature or humidity), misting on the
internal surface of the glass of the headlamps
and rear lamps is normal, and will disappear
after the lamps have been on for a few
minutes.
The headlamps have polycarbonate lenses with a protective coating:
–
Do not clean them with a dry or abrasive
cloth, nor with detergent or solvent
products.
–
Use a sponge and soapy water or a pH
neutral product.
– When using a high-pressure washer on
persistent marks, do not keep the lance
directed towards the headlamps, lamps or
their edges for too long, so as not to damage
their protective coating and seals.
Changing a bulb must only be done with
the ignition off and after the headlamp /
lamp has been switched off for several
minutes - risk of serious burns!
Do not touch the bulb directly with your
fingers; use a lint-free cloth.
It is essential only to use anti-ultraviolet
(UV) type bulbs, so as not to damage the
headlamp.
Always replace a failed bulb with a new bulb
of the same type and specification. To avoid
lighting imbalance, replace the bulbs in pairs.
After changing a bulb
To refit, carry out the operations in
reverse order to removal.
Close the protective cover very carefully to
guarantee the sealing of the lamps.
Light-emitting diode (LED)
headlamps and lamps
Depending on version, the affected types of
headlamps/lamps are:
–
Offset daytime running lamps.
–
Direction indicator side repeaters.
– Rear sidelamps.
– Third brake lamp and loading bay lighting.
If you need to replace this type of bulb,
you must contact a PEUGEOT dealer or
a qualified workshop.
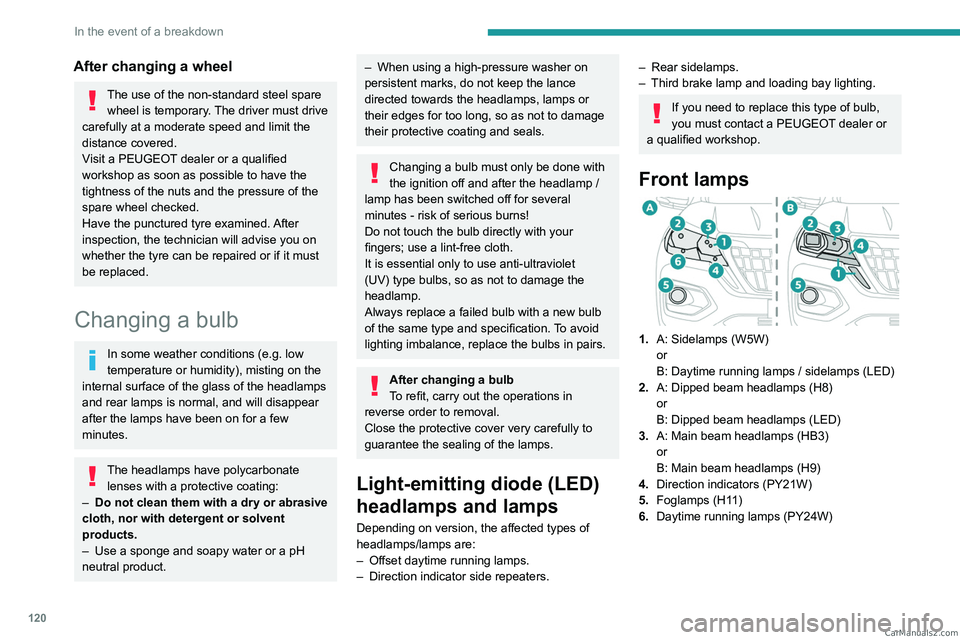
Front lamps
1. A: Sidelamps (W5W)
or
B: Daytime running lamps / sidelamps (LED)
2. A: Dipped beam headlamps (H8)
or
B: Dipped beam headlamps (LED)
3. A: Main beam headlamps (HB3)
or
B: Main beam headlamps (H9)
4. Direction indicators (PY21W)
5. Foglamps (H11)
6. Daytime running lamps (PY24W) CarM an uals 2 .c o m
Page 153 of 164
151
Alphabetical index
360° camera 89
A
ABS 54
Accessories
53
AdBlue®
14, 103
AdBlue® tank
104
Additive, Diesel
101
Adjusting headlamp beam height
49
Adjusting headlamps
49
Adjusting head restraints
30
Adjusting seat
30–31
Adjusting the air distribution
39
Adjusting the air flow
39
Adjusting the date
17, 147
Adjusting the headlamp beam height
49
Adjusting the height and reach
of the steering wheel
32
Adjusting the seat angle
31
Adjusting the seat belt height
58
Adjusting the temperature
39
Adjusting the time
17, 147
Advice on care and maintenance
111
Advice on driving
6, 66–67
Airbags
59–61, 63
Airbags, curtain
60–61
Airbags, front
60–61, 64
Airbags, lateral
60–61
Air conditioning
36, 38, 39
Air conditioning, automatic
40
Air conditioning, dual-zone automatic 38–40
Air conditioning, manual
37, 40
Air intake
39
Air vents
36
Alarm
27
Anti-lock braking system (ABS)
54
Antitheft / Immobiliser
21
Area, loading
45
Armrest, front
42
Armrest, rear
43
Assistance, emergency braking
54
Audio streaming (Bluetooth)
139
B
Battery 106
Battery, 12 V
100, 106, 124–128
Battery, charging
124, 127
Battery, remote control
24–25
Bench seat, folding
35
BlueHDi
14, 100, 115
Bluetooth (hands-free)
139–140
Bluetooth (telephone)
145
Bodywork
11 2
Bonnet
96–97
Brake discs
102
Brake lamps
123
Brakes
101–102
Braking assistance system
54
Bulbs
121
Bulbs (changing)
120, 123
C
Capacity, fuel tank 94
Cap, fuel filler
94
Care of the bodywork
11 2
Central locking
21, 23
Changing a bulb
120, 123
Changing a fuse
124
Changing a wheel
115–117
Changing a wiper blade
51
Changing the remote control battery
24
Changing to free-wheeling
111
Checking the levels
98–100
Checks
97–98, 100–103
Checks, routine
100–102, 105
Child lock
65
Children
59, 64
Children (safety)
65
Child seats
59, 62–63
Child seats, ISOFIX
64
Cigar lighter
41
Cleaning (advice)
110–113
Cleaning the engine throttle housing
11 0
Closing the boot
22
Closing the doors
22–23, 25–26
Closing the tailgate
26
Configuration, vehicle
17–19
Connection, Android Auto
146
Connection, Apple CarPlay
145
Connection, Bluetooth
140, 145
Connection, MirrorLink
146
Connectivity
145 CarM an uals 2 .c o m