lock Peugeot Partner 2011 - RHD (UK, Australia) Owner's Guide
[x] Cancel search | Manufacturer: PEUGEOT, Model Year: 2011, Model line: Partner, Model: Peugeot Partner 2011Pages: 200, PDF Size: 7.41 MB
Page 64 of 200

62
Ventilation
DE-ICING AND DEMISTING GOOD PRACTICE
Vents
"Leave them open"
For optimum distribution and diffusion
of hot or cool air in the passenger
compartment, there are adjustable
central and side vents which can
be directed sideways (right or left)
or vertically (up or down). For your
comfort while driving, do not close
them and direct the fl ow of air towards
the windows instead.
Air vents in the footwells and directed
towards the windscreen complete the
equipment.
Do not block the vents located at the
windscreen or the air extractor located
in the boot.
Dust filter, odour filter
(activated carbon)
This fi lter traps certain dust and limits
odours.
Ensure that this fi lter is in good
condition and have all of the fi lter
elements replaced regularly.
Refer to the "Checks" section of
chapter 6.
Air conditioning
In all seasons, the air conditioning
should only be used with the windows
closed. However, if the interior
temperature remains high after a
prolonged period parked in the sun, do
not hesitate to ventilate the passenger
compartment for a few minutes.
Use the AUTO mode as much as
possible as it permits optimised
control of all of the functions: air fl ow,
passenger compartment comfort
temperature, air distribution, air
intake mode or air recirculation in the
passenger compartment.
Operate the air conditioning system for
5 to 10 minutes, once or twice a month,
to keep it in perfect working order.
It is normal that the condensation
created by the air conditioning system
results in a fl ow of water which may
form a puddle under the vehicle when
parked.
If the system does not produce cold air,
do not use it and contact a PEUGEOT
dealer.
Automatic mode: visibility
programme
The comfort programme (AUTO) may
not be suffi cient to quickly demist or
de-ice the windows (humidity, several
passengers, ice).
In this case, select the visibility
programme. The visibility programme
indicator light comes on.
It activates the air conditioning, the air
fl ow and provides optimum distribution
of the ventilation to the windscreen and
side windows.
It deactivates the air recirculation.
Page 66 of 200

64
Seats
Never drive with the head
restraints removed; they must be
in place and correctly adjusted.
PASSENGER SEAT
The back of the individual passenger
seat can be folded to form a
writing table.
This position also permits the
transportation of long loads.
Head restraint height adjustment
To raise the head restraint, slide it
vertically upwards.
To lower the head restraint, press the
button and slide the head restraint
vertically downwards.
The adjustment is correct when the
upper edge of the head restraint is
level with the top of the head.
To remove the head restraint,
press the button and pull the head
restraint upwards.
To re-install, engage the head restraint
rods in the holes, making sure they are
aligned with the seat back.
Folding the seat back
Pull the lever forwards then tilt the seat
back.
Returning the seat back to its
original position
Pull the lever forwards then raise the
seat back until it locks.
Armrest
To access the vertical position, raise
the armrest until it locks.
Lower the armrest to put it back in the
position for use.
To remove the armrest, press the
release button from the vertical position
and move aside the armrest.
To put the armrest back in place,
clip it in the vertical position.
If the vehicle is fi tted with the additional
console and an armrest, to fold the
passenger seat to the table position
remove the console or the armrest.
Page 67 of 200

65
EASE OF USE and COMFOR
T
33
Seats
Mobile offi ce position
Pull the tab located on the lower edge
of the seat to lower the seat back
incorporating a writing table equipped
with a strap.
To return the seat back to the upright
position, pull the tab and guide the seat
back until it locks.
During the operations, take care not to
trap the tab under the seat cushion.
Storage compartment under
the seat cushion
Raise the centre seat cushion to gain
access to the storage compartment.
This space can be made secure by
fi tting a padlock (not supplied).
Centre seat
This is fi tted with a 3-point seat belt
with the seat belt return fi xed on the
load retaining ladder behind the driver.
Before locking the seat in the
sitting position, always take care
to leave the seat belt buckles
visible and the associated straps
available for the passengers.
Page 68 of 200

66
Seats
Foldaway position
Raise the yellow lever located at the
base of the seat to release and raise
the entire seat to the foldaway position
(seat cushion raised against the seat
back) until it locks.
This position permits the transportation
of high loads in the cab part.
To return the seat to the sitting position,
push the yellow lever located under the
seat cushion and lower the entire seat
until it is upright and locked on the fl oor
in the seat position.
Side seat
The back of the side seat is fi tted with
a metal shell.
Retracted position
Pull the tab located on the upper edge
of the seat by the head restraint to tilt
and guide the entire seat.
It inserts itself into the fl oor in the front
seat position and so forms a continuous
fl at fl oor with the load space.
This position permits the transportation
of long loads inside the vehicle, up to
3 m (3.25 m in the case of the long
versions) with the doors closed.
In the retracted position, the maximum
weight on the seat back is 50 Kg.
To return the seat to the sitting position,
raise the seat back until it locks on the
fl oor in the seat position.
Page 72 of 200
70
Practical information
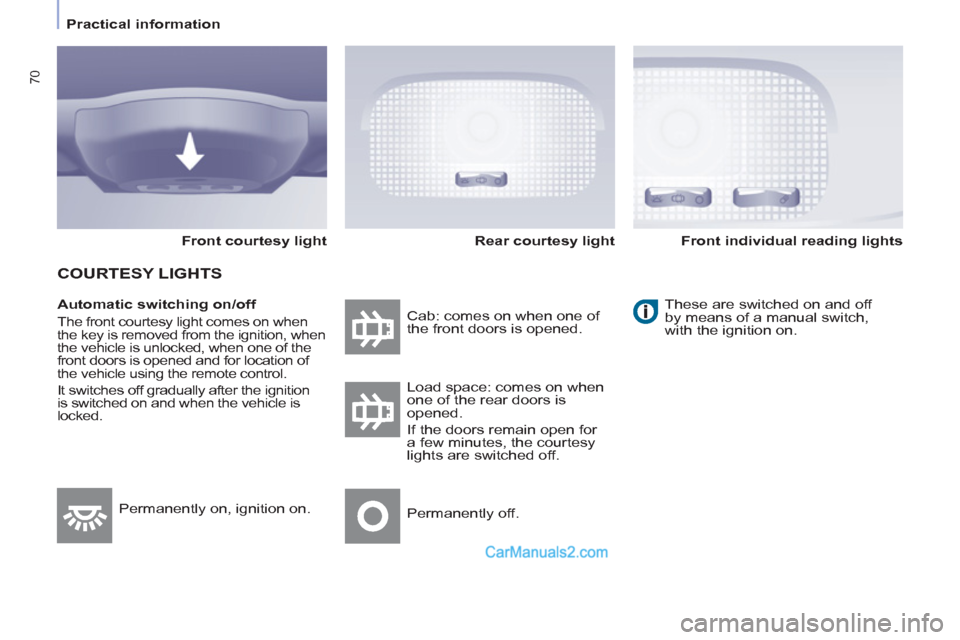
Automatic switching on/off
The front courtesy light comes on when
the key is removed from the ignition, when
the vehicle is unlocked, when one of the
front doors is opened and for location of
the vehicle using the remote control.
It switches off gradually after the ignition
is switched on and when the vehicle is
locked. Cab: comes on when one of
the front doors is opened. These are switched on and off
by means of a manual switch,
with the ignition on.
Load space: comes on when
one of the rear doors is
opened.
If the doors remain open for
a few minutes, the courtesy
lights are switched off.
Permanently off. Permanently on, ignition on.
Front courtesy light
COURTESY LIGHTS
Rear courtesy light
Front individual reading lights
Page 75 of 200
73
EASE OF USE and COMFOR
T
33
Practical information
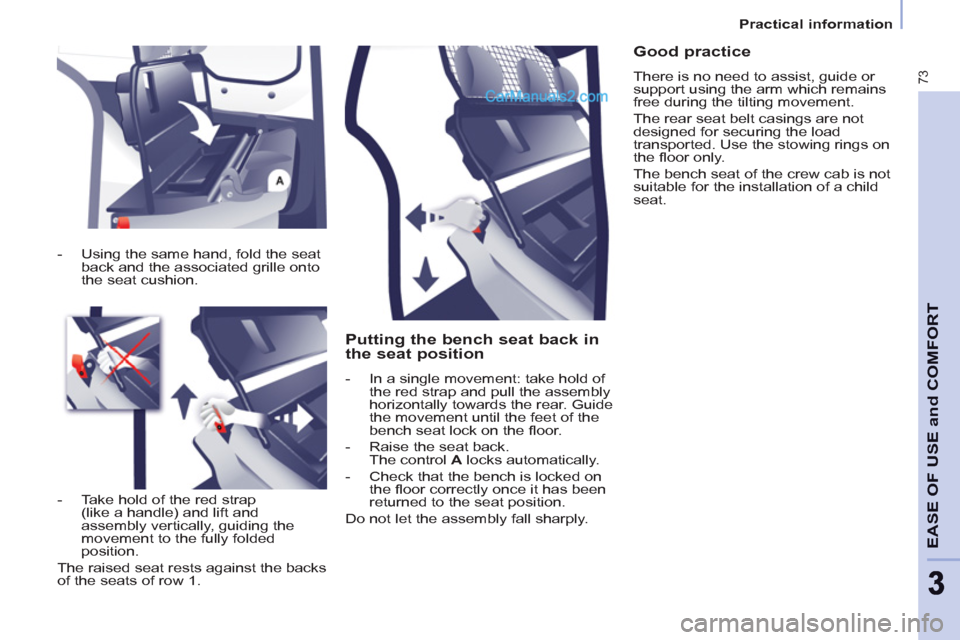
Putting the bench seat back in
the seat position
- In a single movement: take hold of
the red strap and pull the assembly
horizontally towards the rear. Guide
the movement until the feet of the
bench seat lock on the fl oor.
- Raise the seat back.
The control A
locks automatically.
- Check that the bench is locked on
the fl oor correctly once it has been
returned to the seat position.
Do not let the assembly fall sharply.
Good practice
There is no need to assist, guide or
support using the arm which remains
free during the tilting movement.
The rear seat belt casings are not
designed for securing the load
transported. Use the stowing rings on
the fl oor only.
The bench seat of the crew cab is not
suitable for the installation of a child
seat.
- Using the same hand, fold the seat
back and the associated grille onto
the seat cushion.
- Take hold of the red strap
(like a handle) and lift and
assembly vertically, guiding the
movement to the fully folded
position.
The raised seat rests against the backs
of the seats of row 1.
Page 85 of 200

ABS
ABS
83
SAFETY
4
Driving safely
ANTI-LOCK BRAKING SYSTEM
(ABS - EBFD)
The ABS and EBFD (electronic brake
force distribution) systems improve the
stability and manoeuvrability of your
vehicle on braking, in particular on
poor or slippery surfaces.
The ABS prevents locking of the
wheels, the EBFD provides control of
the braking pressure wheel by wheel. If this warning light comes on,
accompanied by an audible
signal and a message on
the display, it indicates a
malfunction of the ABS which
could result in a loss of control of the
vehicle on braking.
If this warning light comes
on, together with the brake
and STOP warning lights,
accompanied by an audible
signal and a message on the
display, it indicates a malfunction of
the electronic brake force distribution
which could result in a loss of control of
the vehicle on braking.
EMERGENCY BRAKING
ASSISTANCE SYSTEM
(EBA)
In an emergency, this system enables
the optimum braking pressure to be
reached more quickly, press the pedal
fi rmly without releasing it.
It is triggered by the speed at which the
brake pedal is activated.
This alters the resistance of the brake
pedal under your foot.
To prolong the operation of the
emergency braking assistance system:
keep your foot on the brake pedal.
Good practice
The anti-lock braking system comes
into operation automatically when
there is a risk of wheel lock. It does not
reduce the braking distance.
On very slippery surfaces (ice,
oil, etc...) the ABS may increase
the braking distance. When braking
in an emergency, do not hesitate to
press the brake pedal fi rmly, without
releasing the pressure, even on a
slippery surface, you will then be able
to continue to manoeuvre the vehicle
to avoid an obstacle.
Normal operation of the ABS may be felt
by slight vibration of the brake pedal.
When changing wheels (tyres
and rims), ensure that these are
recommended by PEUGEOT.
Stop immediately.
In both cases, contact a PEUGEOT
dealer.
Page 91 of 200

Seat belts
89
SAFETY
4
The inertia reels are fi tted with a device
which automatically locks the strap in
the event of a collision or emergency
braking or if the vehicle rolls over.
You can unfasten the seat belt by
pressing the red button on the buckle.
Guide the seat belt after unfastening.
The airbag warning light comes on
if the pretensioners are triggered.
Consult a PEUGEOT dealer.
Recommendations for children:
- use a suitable child seat if the
passenger is less than 12 years old
or shorter than one metre fi fty,
- never allow a child to travel on
your lap, even with the seat belt
fastened.
For further information regarding
child seats, refer to the "Children
on board" section of chapter 4.
Clean the seat belt straps with
soapy water or a textile cleaning
product, sold by PEUGEOT
dealers.
In accordance with current safety
regulations, your PEUGEOT dealer
guarantees all work or any checks,
from testing to maintenance, on your
seat belt equipment.
Have the seat belts checked regularly
(even after a minor impact) by a
PEUGEOT dealer: they must not show
any signs of wear, cutting or fraying
and they must not be transformed or
modifi ed.
Front seat belts
The front seats are fi tted with
pretensioners and force limiters.
The seat belt associated with the centre
seat of the front bench does not have a
pretensioner.
In order to be effective, a seat belt
must:
- restrain one person only,
- must not be twisted, check by
pulling in front of you with an even
movement,
- be tightened as close to the body
as possible.
The upper part of the seat belt should
be positioned in the hollow of the
shoulder.
The lap part should be placed as low
as possible on the pelvis.
Do not invert the seat belt buckles as
they will not fulfi l their role completely.
If the seats are fi tted with armrests, the
lap part of the seat belt should always
pass under the armrest.
Check that the seat belt is fastened
correctly by pulling the strap fi rmly.
Page 99 of 200

Child safety
97
SAFETY
4
ADVICE ON CHILD SEATS
The incorrect installation of a child seat
in a vehicle compromises the child's
protection in the event of an accident.
Remember to fasten the seat belts or
the child seat harnesses keeping the
slack
in relation to the child's body to a
minimum
, even for short journeys.
For optimum installation of the "forward
facing" child seat, ensure that the back
of the child seat is in contact with the
back of the vehicle's seat and that the
head restraint does not cause any
discomfort.
If the head restraint has to be removed,
ensure that it is stored or attached
securely to prevent it from being
thrown around the vehicle in the event
of sharp braking.
Children under the age of 10 must not
travel in the "forward facing" position
on the front passenger seat, unless
the rear seats are already occupied by
other children, cannot be used or are
absent.
Deactivate the passenger airbag when
a "rear facing" child seat is installed on
the front seat.
Otherwise, the child would risk being
seriously injured or killed if the airbag
were to infl ate.
As a safety precaution, do not leave:
- one or more children alone and
unsupervised in a vehicle,
- a child or an animal in a vehicle
which is exposed to the sun, with
the windows closed,
- the keys within reach of children
inside the vehicle.
To prevent accidental opening of the
doors, use the "Child Lock".
Take care not to open the rear windows
by more than one third.
To protect young children from the rays
of the sun, fi t side blinds to the rear
windows.
Installing a booster seat
The chest part of the seat belt must
be positioned on the child's shoulder
without touching the neck.
Ensure that the lap part of the seat belt
passes correctly over the child's thighs.
PEUGEOT recommends the use of a
booster seat which has a back, fi tted
with a seat belt guide at shoulder level.
Page 104 of 200

102
Opening the bonnet
OPENING THE BONNET
Bonnet strut
Secure the strut in its location,
identifi ed by a sticker on the left-hand
panel side of the vehicle, to hold the
bonnet open.
Before closing the bonnet, put the strut
back in its clip without using excessive
force.
On the outside
Raise the bonnet slightly by reaching
in a fl at hand, palm down, to make
access to the lever easier.
With this hand, push the lever to the
left. Raise the bonnet.
On the inside
Pull the lever under the fascia panel
towards you. The bonnet is unlocked.
To close
Lower the bonnet and release it at the
end of its travel. Check that the bonnet
is locked.
Avoid manoeuvring the bonnet in
strong winds.
102