Door Peugeot Partner 2019 Workshop Manual
[x] Cancel search | Manufacturer: PEUGEOT, Model Year: 2019, Model line: Partner, Model: Peugeot Partner 2019Pages: 312, PDF Size: 9.56 MB
Page 161 of 312
159
Fatigue detection system
Take a break as soon as you feel tired or at
least every two hours.
These systems cannot in any circumstances
replace the need for vigilance on the part of
the driver who must remain in control of their
decisions. It is never the intention of these
systems to keep the driver awake or to prevent
the driver from falling asleep at the wheel.
It is the driver’s responsibility to stop if feeling
tired.
Activation/Deactivation
The function is activated or
deactivated via the vehicle
configuration menu.
The state of the system stays in the memory
when the ignition is switched off.
Driver Attention Warning
The system triggers an alert as soon
as it detects that the driver has not
taken a break after two hours of driving
at a speed above 40
mph (65 km/h).
This alert is issued via the display of a
message encouraging you to take a break,
accompanied by an audible signal.
If the driver does not follow this advice, the
alert is repeated hourly until the vehicle is
stopped.
The system resets itself if one of the following
conditions is met:
-
e
ngine running, the vehicle has been
stationary for more than 15
minutes,
-
t
he ignition has been switched off for a few
minutes,
-
t
he driver's seat belt is unfastened and their
door is opened.
As soon as the speed of the vehicle drops
below 40
mph (65 km/h), the system goes
into standby.
The driving time is counted again once the
speed is above 40
mph (65 km/h).
Driver Attention Alert
Depending on version, the "Driver Attention
Warning" system is combined with the "Driver
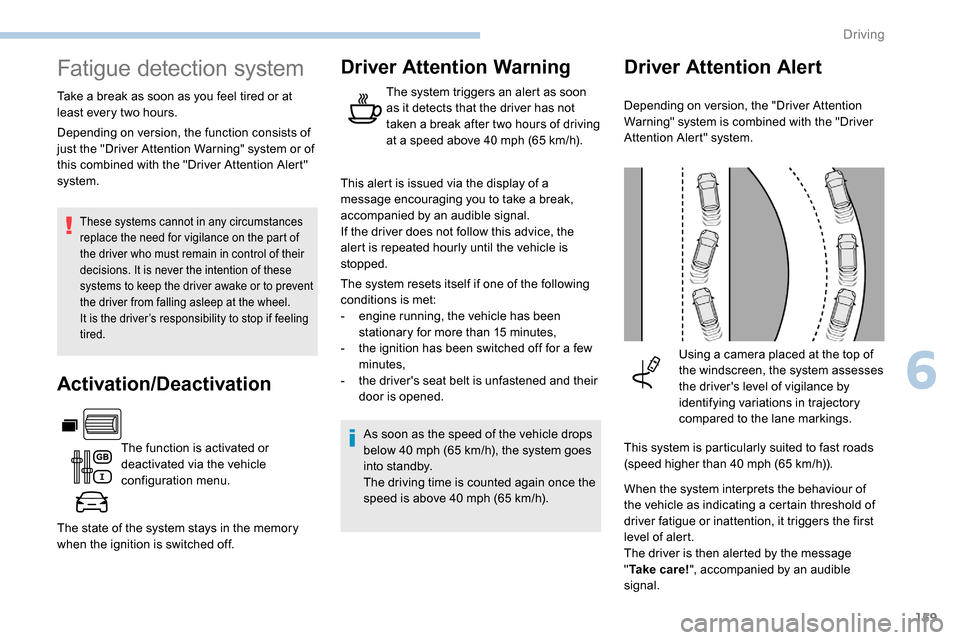
Attention Alert" system.Using a camera placed at the top of
the windscreen, the system assesses
the driver's level of vigilance by
identifying variations in trajectory
compared to the lane markings.
This system is particularly suited to fast roads
(speed higher than 40
mph (65 km/h)).
When the system interprets the behaviour of
the vehicle as indicating a certain threshold of
driver fatigue or inattention, it triggers the first
level of alert.
The driver is then alerted by the message
" Ta k e c a r e ! ", accompanied by an audible
signal.
Depending on version, the function consists of
just the "Driver Attention Warning" system or of
this combined with the "Driver Attention Alert"
system.
6
Driving
Page 166 of 312
164
Maintenance
recommendations
In bad or wintry weather, ensure that the
camera is not covered by mud, frost or snow.
Check the cleanliness of the camera lens
regularly.
If necessary, clean the camera with a soft, dry
cloth.
When washing the vehicle using a high-
pressure jet, keep the spray directed at least
30 cm away from the camera.
Surround Rear Vision
With the ignition on, in order to improve
visibility of the passenger side blind spot and
the rear of the vehicle, this system uses two
cameras to display the views of the vehicle’s
close surroundings on the output screen (if it is
a panel van or has a solid partition).
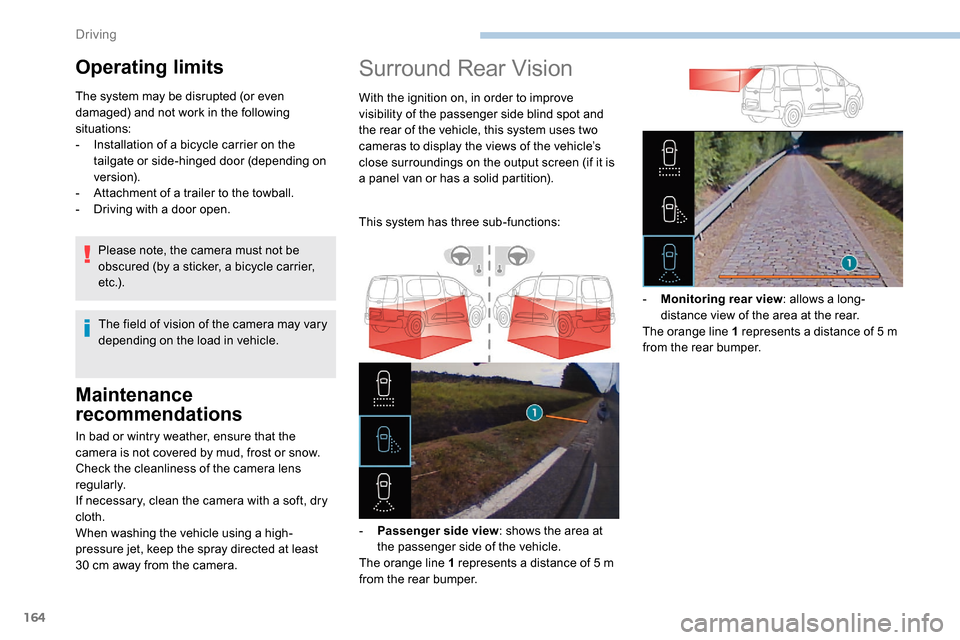
This system has three sub-functions:
-
P
assenger side view : shows the area at
the passenger side of the vehicle.
The orange line 1 represents a distance of 5
m
from the rear bumper. -
M
onitoring rear view: allows a long-
distance view of the area at the rear.
The orange line 1 represents a distance of 5
m
from the rear bumper.
Operating limits
The system may be disrupted (or even
damaged) and not work in the following
situations:
-
I
nstallation of a bicycle carrier on the
tailgate or side-hinged door (depending on
ve r s i o n).
-
A
ttachment of a trailer to the towball.
-
D
riving with a door open.
The field of vision of the camera may vary
depending on the load in vehicle.
Please note, the camera must not be
obscured (by a sticker, a bicycle carrier,
e t c .) .
Driving
Page 167 of 312
165
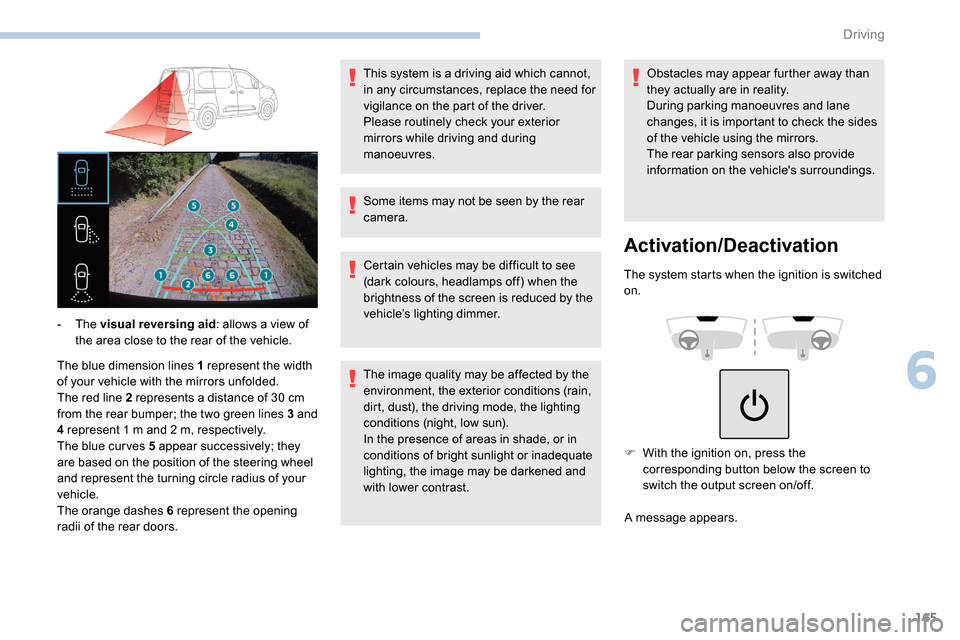
The blue dimension lines 1 represent the width
of your vehicle with the mirrors unfolded.
The red line 2 represents a distance of 30 cm
from the rear bumper; the two green lines 3 and
4 represent 1
m and 2 m, respectively.
The blue cur ves 5 appear successively; they
are based on the position of the steering wheel
and represent the turning circle radius of your
vehicle.
The orange dashes 6 represent the opening
radii of the rear doors. - The
visual reversing aid : allows a view of
the area close to the rear of the vehicle. Some items may not be seen by the rear
camera.
Certain vehicles may be difficult to see
(dark colours, headlamps off) when the
brightness of the screen is reduced by the
vehicle’s lighting dimmer.
The image quality may be affected by the
environment, the exterior conditions (rain,
dirt, dust), the driving mode, the lighting
conditions (night, low sun).
In the presence of areas in shade, or in
conditions of bright sunlight or inadequate
lighting, the image may be darkened and
with lower contrast.Obstacles may appear further away than
they actually are in reality.
During parking manoeuvres and lane
changes, it is important to check the sides
of the vehicle using the mirrors.
The rear parking sensors also provide
information on the vehicle's surroundings.
Activation/Deactivation
The system starts when the ignition is switched
on.
This system is a driving aid which cannot,
in any circumstances, replace the need for
vigilance on the part of the driver.
Please routinely check your exterior
mirrors while driving and during
manoeuvres.
F
W
ith the ignition on, press the
corresponding button below the screen to
switch the output screen on/off.
A message appears.
6
Driving
Page 168 of 312
166
Operating limits
The system may be disrupted (or even
damaged) and not work in the following
situations:
-
I
nstallation of a bicycle carrier on the
tailgate or side-hinged door (depending on
ve r s i o n).
-
A
ttachment of a trailer to the towball.
-
D
riving with a door open.
Please note, the cameras must not be
obscured (by a sticker, a bicycle carrier,
e t c .) .
The field of vision of the rear camera
( monitoring rear view and visual
reversing aid ) may vary depending on the
load in the vehicle.
If the side-hinged door is opened during
use of the monitoring rear view or the
visual reversing aid, in for ward gear or
reverse gear, the output screen becomes
grey.
If the front passenger door is opened
during use of the passenger side view ,
in for ward gear or reverse gear, the output
screen becomes grey.
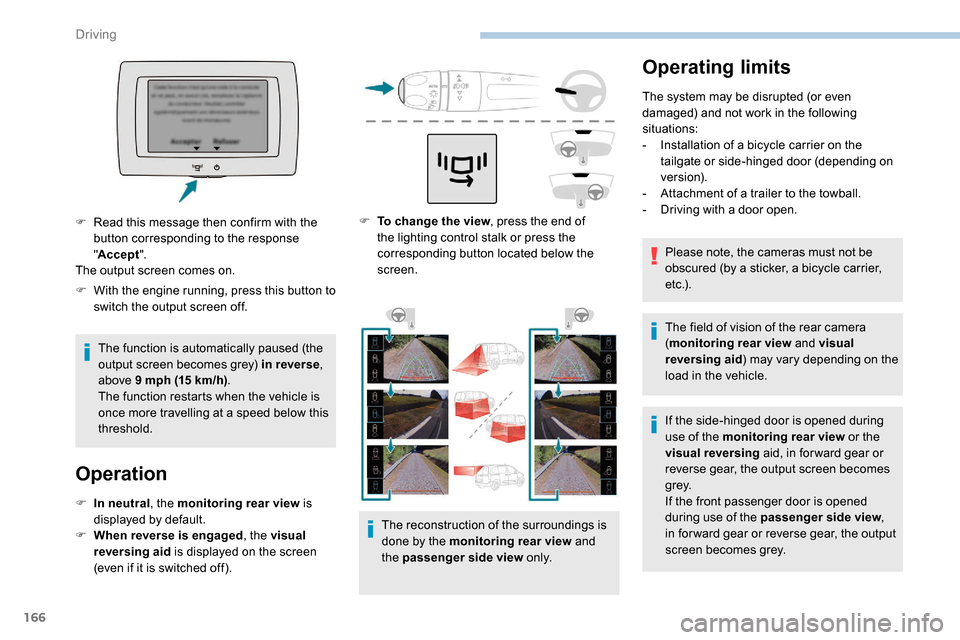
F
T
o change the view , press the end of
the lighting control stalk or press the
corresponding button located below the
screen.
The reconstruction of the surroundings is
done by the monitoring rear view and
the passenger side view o n l y.
F
W
ith the engine running, press this button to
switch the output screen off.
The function is automatically paused (the
output screen becomes grey) in reverse ,
above 9
mph (15
km/h) .
The function restarts when the vehicle is
once more travelling at a speed below this
threshold.
Operation
F In neutral , the monitoring rear view is
displayed by default.
F
W
hen reverse is engaged , the visual
reversing aid is displayed on the screen
(even if it is switched off).
F
R
ead this message then confirm with the
button corresponding to the response
" Accept ".
The output screen comes on.
Driving
Page 173 of 312
171
Fuel tank
Capacity of the tank:
- around 61
litres (petrol).
-
around 50
litres (Diesel).
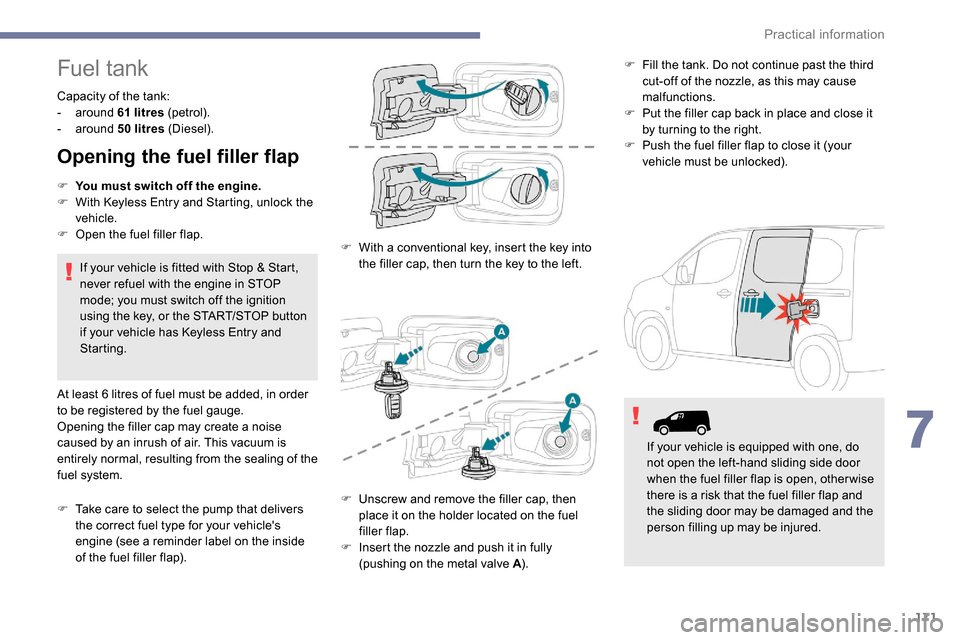
Opening the fuel filler flap
F You must switch off the engine.
F W ith K eyless Entry and Starting, unlock the
vehicle.
F
O
pen the fuel filler flap.
If your vehicle is fitted with Stop & Start,
never refuel with the engine in STOP
mode; you must switch off the ignition
using the key, or the START/STOP button
if your vehicle has
K
eyless Entry and
Starting.
At least 6
litres of fuel must be added, in order
to be registered by the fuel gauge.
Opening the filler cap may create a noise
caused by an inrush of air. This vacuum is
entirely normal, resulting from the sealing of the
fuel system.
F
T
ake care to select the pump that delivers
the correct fuel type for your vehicle's
engine (see a reminder label on the inside
of the fuel filler flap). F
W
ith a conventional key, insert the key into
the filler cap, then turn the key to the left. F
F
ill the tank. Do not continue past the third
cut-off of the nozzle, as this may cause
malfunctions.
F
P
ut the filler cap back in place and close it
by turning to the right.
F
P
ush the fuel filler flap to close it (your
vehicle must be unlocked).
F
U
nscrew and remove the filler cap, then
place it on the holder located on the fuel
filler flap.
F
I
nsert the nozzle and push it in fully
(pushing on the metal valve A ).If your vehicle is equipped with one, do
not open the left-hand sliding side door
when the fuel filler flap is open, other wise
there is a risk that the fuel filler flap and
the sliding door may be damaged and the
person filling up may be injured.
7
Practical information
Page 174 of 312
172
/2
1 1
Your vehicle is fitted with a catalytic converter,
a device which helps to reduce the level of
harmful emissions in the exhaust gases.
If you have put in the wrong fuel for
your vehicle, you must have the fuel
tank drained and filled with the correct
fuel before star ting the engine.
Low fuel level
When the low fuel level in the
tank is reached, this warning lamp
comes on in the instrument panel,
accompanied by an audible signal
and a message.
Fuel cut- of f
When it first comes on, less than 6 litres of
f uel remain in the tank.
You must refuel as soon as possible to avoid
running out of fuel. Your vehicle is fitted with a safety system that
cuts off the supply of fuel in the event of an
impact.
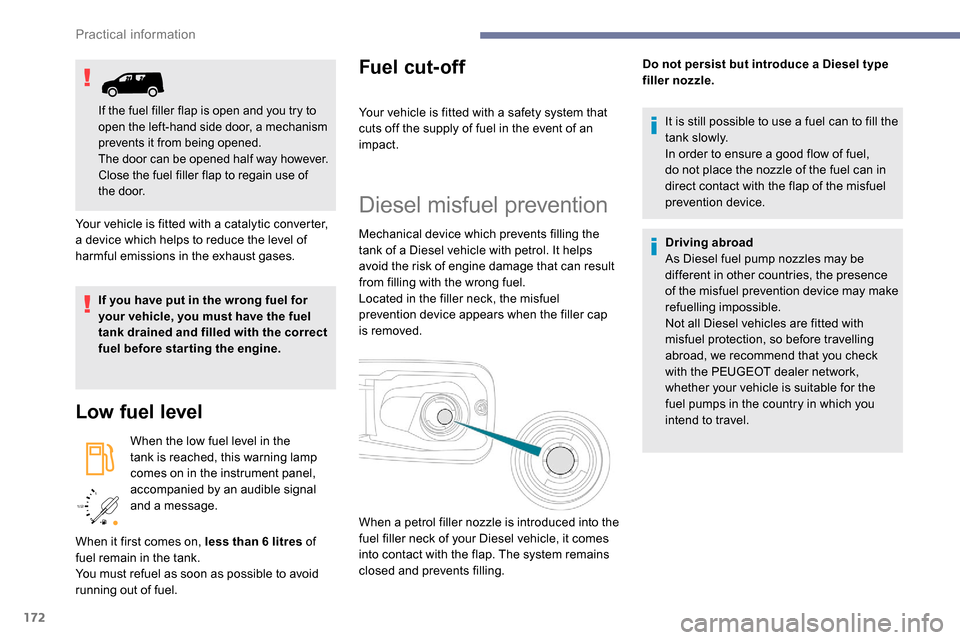
Diesel misfuel prevention
Mechanical device which prevents filling the
tank of a Diesel vehicle with petrol. It helps
avoid the risk of engine damage that can result
from filling with the wrong fuel.
Located in the filler neck, the misfuel
prevention device appears when the filler cap
is removed.
It is still possible to use a fuel can to fill the
t a n k s l ow l y.
In order to ensure a good flow of fuel,
do not place the nozzle of the fuel can in
direct contact with the flap of the misfuel
prevention device.
Driving abroad
As Diesel fuel pump nozzles may be
different in other countries, the presence
of the misfuel prevention device may make
refuelling impossible.
Not all Diesel vehicles are fitted with
misfuel protection, so before travelling
abroad, we recommend that you check
with the PEUGEOT dealer network,
whether your vehicle is suitable for the
fuel pumps in the country in which you
intend to travel.
When a petrol filler nozzle is introduced into the
fuel filler neck of your Diesel vehicle, it comes
into contact with the flap. The system remains
closed and prevents filling. Do not persist but introduce a Diesel type
filler nozzle.
If the fuel filler flap is open and you try to
open the left-hand side door, a mechanism
prevents it from being opened.
The door can be opened half way however.
Close the fuel filler flap to regain use of
the door.
Practical information
Page 180 of 312
178
Engines
Petrol
Diesel
The location of the interior bonnet release
lever prevents opening of the bonnet when
the left-hand front door is shut.
When the engine is hot, handle the
exterior safety catch and the stay with
care (risk of burns), using the protected
area.
When the bonnet is open, take care not to
damage the safety catch.
Do not open the bonnet under very windy
conditions.
The cooling fan may star t after
switching off the engine: take care
with articles and clothing that might be
caught by the fan blades.
Opening
F Open the left-hand front door.F
P
ull the release lever, located at the bottom
of the door aperture, towards you.
F
L
ift the safety catch and raise the bonnet.
F
U
nclip the stay
from its housing
and place it in the
support slot to hold
the bonnet open.
Closing
F Take the stay out of the support slot.
F C lip the stay in its housing.
F
L
ower the bonnet and release it near the
end of its travel.
F
P
ull on the bonnet to check that it is fully
latched.
Because of the presence of electrical
equipment under the bonnet, it is
recommended that exposure to water
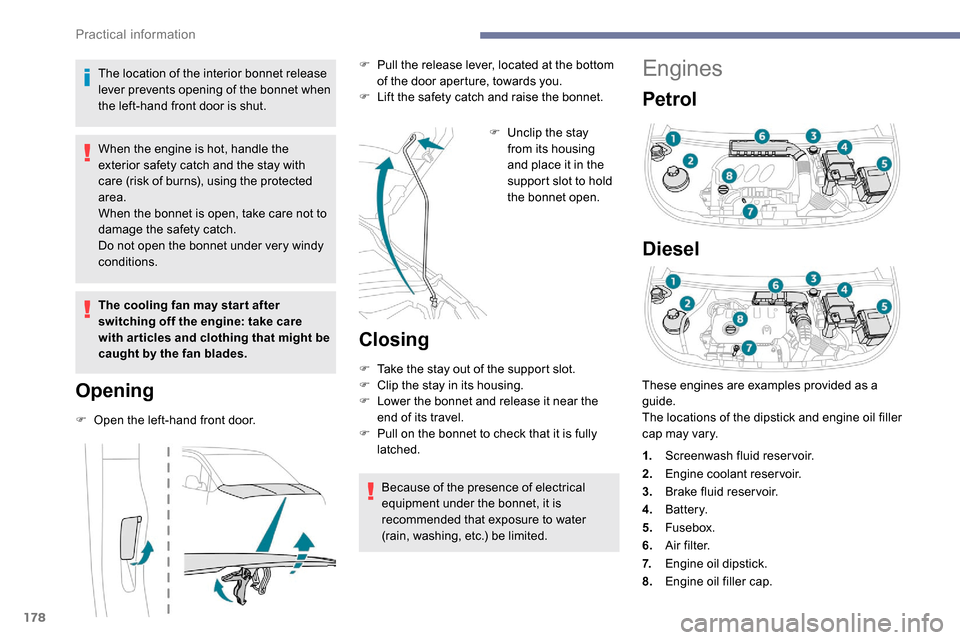
(rain, washing, etc.) be limited. These engines are examples provided as a
guide.
The locations of the dipstick and engine oil filler
cap may vary.
1.
Screenwash fluid reservoir.
2. Engine coolant reservoir.
3. Brake fluid reser voir.
4. Battery.
5. Fusebox.
6. A i r f i l t e r.
7. Engine oil dipstick.
8. Engine oil filler cap.
Practical information
Page 187 of 312
185
cannot be discounted: do not inhale the fluid.
Ammonia vapour has an irritant effect on mucous
membranes (eyes, nose and throat).
Keep AdBlue® out of reach of children, in
its original container or bottle.
Procedure
Before starting the top up procedure, ensure
that the vehicle is parked on a flat and level
sur face.
In winter, check that the temperature of the
vehicle is above -11°C. If not, due to freezing,
the AdBlue
® cannot be poured into the tank.
Park your vehicle somewhere warmer for a few
hours before topping up.
In the event of an AdBlue
® breakdown,
confirmed by the message "Add AdBlue:
Starting impossible", you must top up with
at least 5
litres.
Never pour AdBlue
® into the Diesel fuel
tank. If any AdBlue
® is splashed, or if there are
any spillages on the side of the body, rinse
immediately with cold water or wipe with a
damp cloth.
If the fluid has crystallised, clean it off
using a sponge and hot water.
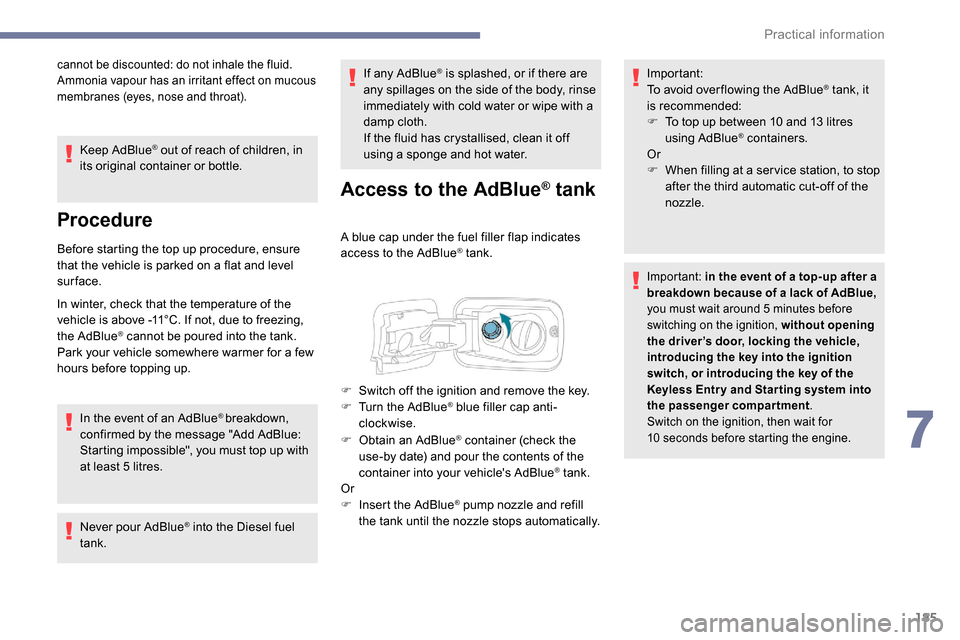
Access to the AdBlue® tank
A blue cap under the fuel filler flap indicates
access to the AdBlue® tank.
F
O
btain an AdBlue
® container (check the
use-by date) and pour the contents of the
container into your vehicle's AdBlue
® tank.
Or
F
I
nsert the AdBlue
® pump nozzle and refill
the tank until the nozzle stops automatically. Important:
To avoid over flowing the AdBlue
® tank, it
i
s recommended:
F
T
o top up between 10 and 13
litres
using AdBlue
® containers.
Or
F
W
hen filling at a ser vice station, to stop
after the third automatic cut-off of the
nozzle.
Important: in the event of a top-up after a
breakdown because of a lack of AdBlue,
you must wait around 5
minutes before
switching on the ignition, without opening
the driver’s door, locking the vehicle,
introducing the key into the ignition
switch, or introducing the key of the
K
eyless Entr y and Star ting system into
the passenger compartment.
Switch on the ignition, then wait for
10
seconds before starting the engine.
F Switch off the ignition and remove the key.
F T urn the AdBlue® blue filler cap anti-
clockwise.
7
Practical information
Page 188 of 312
186
Advice on care
General recommendations on the care and maintenance of your vehicle are given in the warranty
and maintenance record.Observe the following recommendations to
avoid damaging your vehicle:
-
D
o not clean your headlamps with a dry
or abrasive cloth, nor with detergent or
solvent products. Use a sponge and
soapy water or a pH neutral product.
-
W
hen using a high-pressure washer on
stubborn dirt, avoid prolonged use on the
headlamps, the lamps and their edges to
avoid damaging their lacquer finish and
seals.
-
N
ever use an abrasive sponge to clean
persistent dirt, as this may scratch the
paint sur face. Use a soft cloth with soapy
water instead.
-
W
hen washing your vehicle, never clean
the interior with a water jet.
-
W
hen washing your vehicle in an
automatic roller-brush car wash, be sure
to lock your doors and, depending on
version, remove the key. -
N
ever use high-pressure washing to
clean the engine compartment, in order
to avoid damaging the electrical units.
-
L
iquids carried in an open vessel (e.g.
a cup or mug) could be spilt, presenting
a risk of damage on contact with the
controls in the dashboard and centre
console. Be careful.
Depending on version, in order to avoid
damaging or unpeeling the stickers on the
bodywork, you are strongly advised against
using high-pressure cleaners to wash your
vehicle. It is recommended that you wash
it using a high-flow water jet and rinse the
vehicle down using demineralised water.
Only a microfibre cloth is recommended for
wiping your vehicle; it must be clean and
used gently.
It is always preferable to have paint repairs carried out by a PEUGEOT dealer or a qualified
workshop.
Practical information
Page 194 of 312
192
Access to the spare wheel
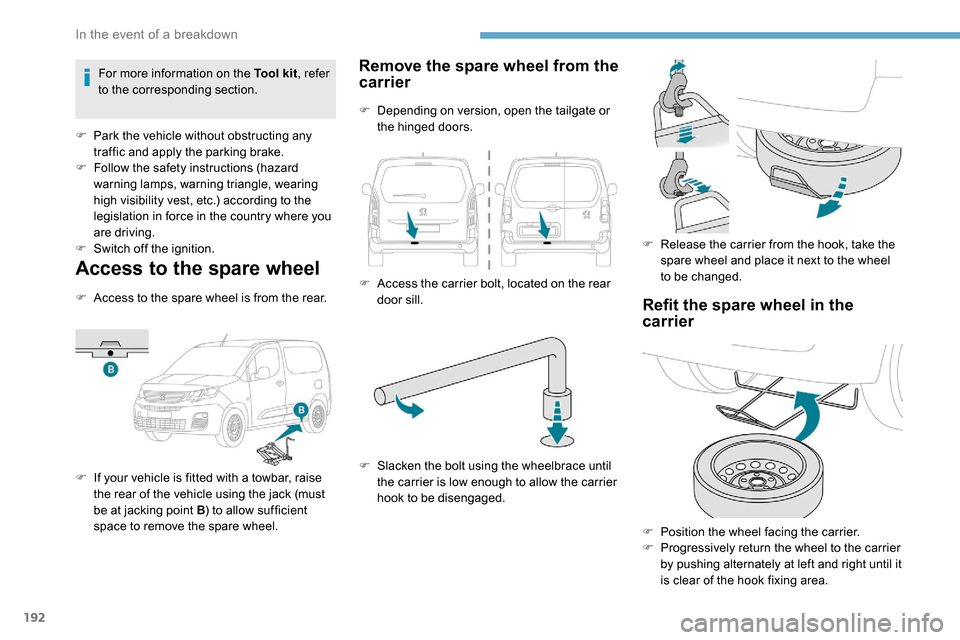
F Access to the spare wheel is from the rear.
F
I
f your vehicle is fitted with a towbar, raise
the rear of the vehicle using the jack (must
be at jacking point B ) to allow sufficient
space to remove the spare wheel.
Remove the spare wheel from the
carrier
F Depending on version, open the tailgate or the hinged doors.
F
A
ccess the carrier bolt, located on the rear
door sill.
F
S
lacken the bolt using the wheelbrace until
the carrier is low enough to allow the carrier
hook to be disengaged. F
R
elease the carrier from the hook, take the
spare wheel and place it next to the wheel
to be changed.
Refit the spare wheel in the
carrier
F Position the wheel facing the carrier.
F P rogressively return the wheel to the carrier
by pushing alternately at left and right until it
is clear of the hook fixing area.
For more information on the Tool kit
, refer
to the corresponding section.
F
P
ark the vehicle without obstructing any
traffic and apply the parking brake.
F
F
ollow the safety instructions (hazard
warning lamps, warning triangle, wearing
high visibility vest, etc.) according to the
legislation in force in the country where you
are driving.
F
S
witch off the ignition.
In the event of a breakdown