check engine light Peugeot Partner 2020 User Guide
[x] Cancel search | Manufacturer: PEUGEOT, Model Year: 2020, Model line: Partner, Model: Peugeot Partner 2020Pages: 260, PDF Size: 7.76 MB
Page 93 of 260
91
Driving
6Before setting off
Nose weight
► Distribute the load in the trailer so that the
heaviest items are as close as possible to the
axle and the nose weight (at the point where it
joins your vehicle) approaches the maximum
permitted without exceeding it.
Tyres
► Check the tyre pressures of the towing
vehicle and of the trailer , observing the
recommended pressures.
Lighting
► Check the electrical signalling on the trailer
and the headlamp beam height of your vehicle.
If a genuine PEUGEOT towing device is
used, the rear parking sensors will be
deactivated automatically to avoid the audible
signal.
When driving
Cooling
Towing a trailer uphill increases the temperature
of the coolant. The maximum towable load
depends on the gradient and the exterior
temperature. The cooling capacity of the fan
does not increase with engine speed.
►
Reduce speed and lower the engine speed,
so as to limit the heating-up. In all cases, pay attention to the coolant
temperature.
If this warning lamp and the
STOP
warning lamp come on, stop the vehicle
and switch off the engine as soon as possible.
Brakes
Braking distances are increased when towing a
trailer. To avoid overheating of the brakes, the
use of engine braking is recommended.
Side wind
Bear in mind the increased susceptibility to the
wind that the vehicle will have.
Anti-theft protection
Electronic immobiliser
The remote control contains an electronic chip
which has a special code. When the ignition is
switched on, this code must be recognised in
order for starting to be possible.
A few seconds after switching off the ignition,
this system locks the engine control system,
therefore preventing the engine from being
started in the event of a break-in.
In the event of a fault, you are informed
by illumination of this warning lamp, an
audible signal and a message on the screen.
The vehicle will not start; contact a PEUGEOT
dealer as soon as possible.
Starting/switching off the
engine
Starting
The parking brake must be applied.
►
With a manual gearbox, shift the gear lever
into neutral, press the clutch pedal to the floor
and keep the pedal down until the engine runs.
►
With
an automatic gearbox, place the selector
in position P then depress the brake pedal.
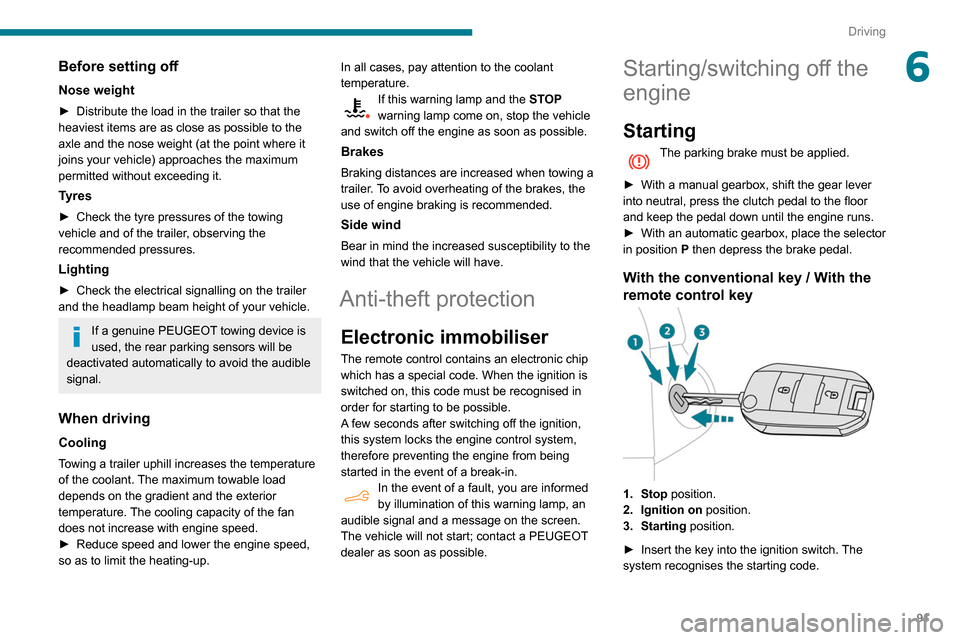
With the conventional key / With the
remote control key
1. Stop position.
2. Ignition on position.
3. Starting position.
►
Insert the key into the ignition switch.
The
system recognises the starting code.
Page 95 of 260
93
Driving
6climatic conditions, it is advised to follow the
recommendations below:
–
In mild conditions, do not leave the engine
at idle to warm up but move off straight away
and drive at moderate speed.
–
Depending on version, if the air
conditioning is activated and when the
exterior temperature exceeds 35°C, the idle
engine speed can accelerate up to 1,300
rpm depending on the air conditioning
requirements.
–
In wintry conditions, when the ignition is
switched on, the duration of lighting of the
preheating indicator lamp is extended. W
ait
until it goes off before starting the engine.
–
In very severe wintry
conditions
(temperature below -23°C), to
ensure correct operation and durability of
the mechanical components of the vehicle,
engine and gearbox, leave the engine
running for 4 minutes before moving off.
Never leave the engine running in an
enclosed area without adequate ventilation:
internal combustion engines emit toxic
exhaust gases, such as carbon monoxide.
Danger of poisoning and death!
With petrol engines , after a cold start,
preheating the catalytic converter can
cause noticeable engine vibrations for
anything up to 2 minutes while stationary with
the engine running (accelerated idle speed).
For Diesel vehicles, when the
temperature is below zero,
starting will only occur once the preheating
warning lamp is off.
If this warning lamp comes on after pressing
the "START/STOP" button, press down on the
brake or clutch pedal until the warning lamp
goes off, without pressing the "START/STOP"
button again, until the engine starts and runs.
The presence of the “Keyless Entry and Starting” system remote control is
imperative in the recognition zone.
Never leave the vehicle with the engine
running and with the remote control on your
person.
If the remote control leaves the recognition
zone, a message is displayed.
Move the remote control into the zone in
order to be able to start the engine.
If one of the starting conditions is not
met, a message is displayed in the
instrument panel. In some circumstances, it is
necessary to turn the steering wheel while
pressing the "START/STOP" button to assist
unlocking of the steering column. A message
is displayed.
Switching off
► Immobilise the vehicle, with the engine at
idle.
► With a manual gearbox, ideally put the gear
lever into neutral.
►
With an automatic gearbox, ideally select
position
P
.
With the conventional key/With the
remote control key
► Turn the key all the way to position 1 (Stop)
and remove it from the ignition.
►
T
o lock the steering column, turn the steering
wheel until it locks.
To facilitate unlocking of the steering column, it is recommended that the
wheels be returned to the straight ahead
position before switching off the engine.
►
Check that the parking brake is correctly
applied, particularly on sloping ground.
Never switch off the ignition before the
complete immobilisation of the vehicle.
With the engine off, the braking and steering
assistance systems are also turned off: risk of
loss of control of the vehicle.
As a safety measure, never leave the vehicle without taking the remote control
with you, even for a short time.
Avoid attaching heavy objects to the key or the remote control, which would weigh
down on its blade in the ignition switch and
could cause a malfunction.
Page 104 of 260

102
Driving
and from N to R. This will not cause any damage
to the gearbox.
Do not exceed 60 mph (100 km/h), local speed
restrictions permitting.
Have it checked by a PEUGEOT dealer or a
qualified workshop.
There is a risk of damage to the gearbox:– if you press the accelerator and
brake pedals at the same time (braking or
acceleration must be done only with the right
foot),
–
if you force the selector from position P
to
another position when the battery is flat.
To reduce fuel consumption when stationary for long periods with the
engine running (traffic jam, etc.), position the
selector on N and apply the parking brake.
If your vehicle has an automatic gearbox,
do not try to start the engine by pushing
the vehicle.
Gear efficiency indicator
(Depending on engine.)
This system helps reduce fuel consumption by
recommending the most appropriate gear.
Operation
Depending on the driving situation and the
vehicle's equipment, the system may advise to
skip one or more gears.
Gear shift recommendations should not be
considered compulsory. In fact, the road layout,
the traffic density and safety remain the deciding
factors when choosing the best gear. The driver
therefore remains responsible for deciding
whether or not to follow the indications issued by
the system.
This function cannot be deactivated.
With an automatic gearbox, the system is
only active in manual operation.
The information appears in the instrument panel, in the form of an ascending or
descending arrow and the recommended gear.
The system adapts its gear shift recommendation according to the driving
conditions (slope, load, etc.) and the driver’s
requirements (power, acceleration, braking,
etc.).
The system never suggests:
–
engaging first gear;
–
engaging reverse.
Stop & Start
The Stop & Start function puts the engine temporarily into standby - STOP mode - during
phases when the vehicle is stopped (red lights,
queues, etc.). The engine restarts automatically
- START mode - as soon as the driver wishes to
move off again.
Primarily designed for urban use, the function
is intended to reduce fuel consumption and
exhaust emissions as well as the noise level
when stationary.
The function does not affect the functionalities of
the vehicle, in particular the braking.
Opening the bonnet
Before doing anything under the bonnet,
deactivate the Stop & Start system to avoid
any risk of injury caused by the engine
restarting automatically.
Driving on flooded roads
Before entering into a flooded area, it is
strongly recommended that you deactivate
the Stop & Start system.
For more information on Driving
recommendations, particularly on flooded
roads, refer to the corresponding section.
Deactivation/Activation
With button
► To deactivate or reactivate the system, press
this button.
The indicator lamp is lit when the system is
deactivated.
With audio system/touch screen
The system is activated and deactivated via the vehicle
configuration menu.
If the system has been deactivated in
STOP mode, the engine restarts
immediately.
The system reactivates automatically whenever the engine is started by the
driver.
Page 120 of 260
11 8
Driving
save speed settings that will subsequently be
proposed for the purpose of configuring these
two systems.
You can memorise multiple speed settings for
each of the two systems.
By default, some speed settings are already
memorised.
As a safety measure, the driver must only change speed settings when stationary.
Changing a speed setting
In the Driving / Vehicle touch screen
menu, select "Driving functions " then
"Memorised speed settings".
"MEM" button
With this button, you can select a memorised
speed setting to use with the speed limiter or the
programmable cruise control.
For more information on the Speed limiter or
Programmable cruise control, refer to the
corresponding section.
Active Safety Brake with Distance Alert and
Intelligent emergency
braking assistance
Refer to the General recommendations on the
use of driving and manoeuvring aids .
This system allows:
–
the driver to be warned that their vehicle is at
risk of collision with the vehicle in front,
–
a collision to be prevented, or its severity to be
limited, by reducing the vehicle’
s speed.
This system is comprised of three functions:
–
Distance Alert,
–
Intelligent emergency braking assistance,
–
Active Safety Brake (automatic emergency
braking).
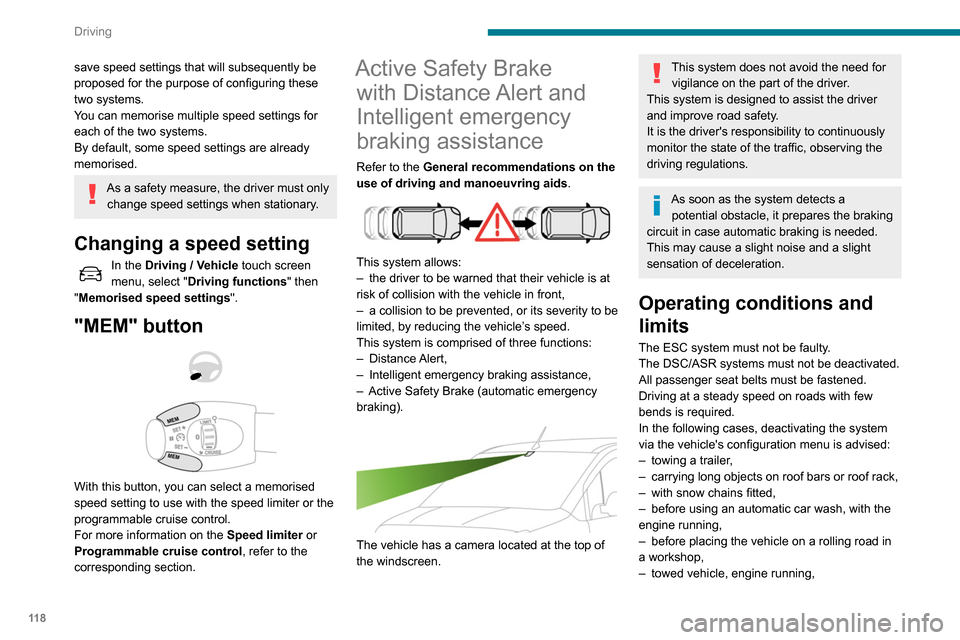
The vehicle has a camera located at the top of
the windscreen.
This system does not avoid the need for vigilance on the part of the driver.
This system is designed to assist the driver
and improve road safety.
It is the driver's responsibility to continuously
monitor the state of the traffic, observing the
driving regulations.
As soon as the system detects a potential obstacle, it prepares the braking
circuit in case automatic braking is needed.
This may cause a slight noise and a slight
sensation of deceleration.
Operating conditions and
limits
The ESC system must not be faulty.
The DSC/ASR systems must not be deactivated.
All passenger seat belts must be fastened.
Driving at a steady speed on roads with few
bends is required.
In the following cases, deactivating the system
via the vehicle's configuration menu is advised:
–
towing a trailer
,
–
carrying long objects on roof bars or roof rack,
–
with snow chains fitted,
–
before using an automatic car wash, with the
engine running,
–
before placing the vehicle on a rolling road in
a workshop,
–
towed vehicle, engine running,
– Following an impact to the windscreen close to
the detection camera.
The system is automatically deactivated after the use of certain "space-saver"
type spare wheels is detected (smaller
diameter).
The system is automatically deactivated
after detection of a fault with the brake pedal
switch or with at least two brake lamps.
It is possible that warnings are not given,
are given too late or seem unjustified.
Consequently, always stay in control of your
vehicle and be prepared to react at any time
to avoid an accident.
After an impact, the function automatically stops operating. Contact a
PEUGEOT dealer or a qualified workshop to
have the system checked.
Distance Alert
It warns the driver that their vehicle is at risk of
collision with the vehicle in front or a pedestrian
present in their traffic lane.
Operation
Depending on the degree of risk of collision
detected by the system and the alert threshold
chosen by the driver, several different levels
Page 122 of 260
120
Driving
Active Safety Brake
This function, also called automatic emergency
braking, intervenes following the alerts if the
driver does not react quickly enough and does
not operate the vehicle's brakes.
It aims to reduce the speed of impact or avoid a
collision where the driver fails to react.
Operation
The system operates under the following
conditions:
–
The vehicle's speed does not exceed 37 mph
(60 km/h) when a pedestrian is detected.
–
The vehicle's speed does not exceed 50 mph
(80 km/h) when a stationary vehicle is detected.
– The vehicle's speed is between 6 mph and
53 mph (10 km/h and 85 km/h) when a moving
vehicle is detected.
This warning lamp flashes (for about 10 seconds) once the function is acting on
the vehicle's brakes.
With an automatic gearbox, in the event of
automatic emergency braking until the vehicle
comes to a complete stop, keep the brake
pedal pressed down to prevent the vehicle from
starting off again.
With a manual gearbox, in the event of automatic
emergency braking until the vehicle comes to a
complete stop, the engine may stall.
The driver can maintain control of the vehicle at any time by sharply turning the
steering wheel and/or pressing the
accelerator pedal.
Operation of the function may be felt by
slight vibration in the brake pedal.
If the vehicle comes to a complete stop, the
automatic braking is maintained for 1 to 2
seconds.
Deactivation/Activation
By default, the system is automatically activated
at every engine start.
This system can be deactivated or activated via
the vehicle settings menu.
Deactivation of the system is signalled by
the illumination of this indicator lamp,
accompanied by the display of a message.
Malfunction
In the event of a system malfunction, this
warning lamp comes on on the instrument
panel, accompanied by an onscreen message
and an audible signal.
Contact a PEUGEOT dealer or a qualified
workshop to have the system checked.
If these warning lamps come on
after the engine has been switched
off and then restarted, contact a PEUGEOT
dealer or a qualified workshop to have the
system checked.
Active Lane Keeping Assistance
Refer to the General recommendations on the
use of driving and manoeuvring aids .
Using a camera located at the top of the
windscreen to identify lane markings on the road
and at the edges of the road (depending on
version), the system corrects the trajectory of the
vehicle while alerting the driver if it detects a risk
of unintentionally crossing a line or hard shoulder
(depending on version).
This system is particularly useful on motorways
and main roads.
Conditions for operation
– The speed of the vehicle must be between 40
and 112 mph (65 and 180 km/h).
– The traffic lane must be delimited by a dividing
line.
– The driver must hold the wheel with both
hands.
– The change of trajectory must not be
accompanied by operation of the direction
indicators.
– The ESC system must be activated and not
faulty.
The system helps the driver only when there is a risk of the vehicle involuntarily
wandering from the lane it is being driven in. It
Driving situations and related alerts
The table below describes the alerts and messages displayed in different driving situations.
These alerts are not displayed sequentially.
Page 133 of 260

131
Driving
6The blue dimension lines 1 represent the width
of your vehicle with the mirrors unfolded.
The red line 2 represents a distance of 30
cm
from the rear bumper; the two green lines 3 and
4 represent 1
m and 2 m, respectively.
The blue curves 5 appear successively; they
are based on the position of the steering wheel
and represent the turning circle radius of your
vehicle.
The orange dashes 6 represent the opening radii
of the rear doors.
Please routinely check your exterior
mirrors while driving and during
manoeuvres.
Some items may not be seen by the rear
camera.
Certain vehicles may be difficult to see
(dark colours, lamps off) when the
brightness of the screen is reduced using the
vehicle’s lighting dimmer.
The image quality may be affected by the environment, the exterior conditions
(rain, dirt, dust), the driving mode and the
lighting conditions (night, low sun).
In the presence of areas in shade, or in
conditions of bright sunlight or inadequate
lighting, the image may be darkened and with
lower contrast.
Obstacles may appear further away than
they actually are.
During parking manoeuvres and lane
changes, it is important to check the sides of
the vehicle using the mirrors.
The rear parking sensors also supplement the
information on the vehicle's surroundings.
Activation / Deactivation
The system starts when the ignition is switched
on.
► With the ignition on, press button 2 to switch
the reproduction screen on / off.
A message appears.
►
T
ake note of this message and validate
with button 1 corresponding to the “ Accept”
response.
The reproduction screen comes on.
► With the engine running, press button 2 to
switch the reproduction screen off.
The function is automatically paused (the reproduction screen becomes grey) in
reverse , above 9 mph (15
km/h).
The function restarts when the vehicle is
once more travelling at a speed below this
threshold.
Operation
► In neutral , the monitoring rear view is
displayed by default.
►
When reverse is engaged
, the visual
reversing aid is displayed on the screen (even if
it is switched off).
► To change the view , press the end of the
lighting control stalk or press the corresponding
button located below the screen.
Page 159 of 260
157
In the event of a breakdown
8The headlamps have polycarbonate lenses with a protective coating:
►
do not clean them with a dry or
abrasive cloth, nor with detergent or
solvent products,
►
use a sponge and soapy water or a pH
neutral product,
►
when using a high-pressure washer on
persistent marks, do not keep the lance
directed towards the lamps or their edges for
too long, so as not to damage their protective
coating and seals.
Changing a bulb must only be done with
the ignition off and after the lamp has
been switched off for several minutes - risk of
serious burns!
Do not touch the bulb directly with your
fingers, use a lint-free cloth.
It is essential only to use anti-ultraviolet
(UV) type bulbs, so as not to damage the
headlamp.
Always replace a failed bulb with a new bulb
of the same type and specification.
Opening the bonnet / Accessing the
bulbs
With the engine warm, proceed with caution -
risk of burns!
Take care with objects or clothing that could
be caught in the blades of the cooling fan -
risk of strangulation!
Halogen bulbs (Hx)
To ensure good quality lighting, check
that the bulb is correctly positioned in its
housing.
After changing a bulb
To refit, carry out the fitting operations in
reverse order.
Close the protective cover very carefully to
guarantee the sealing of the lamps.
Types of bulb
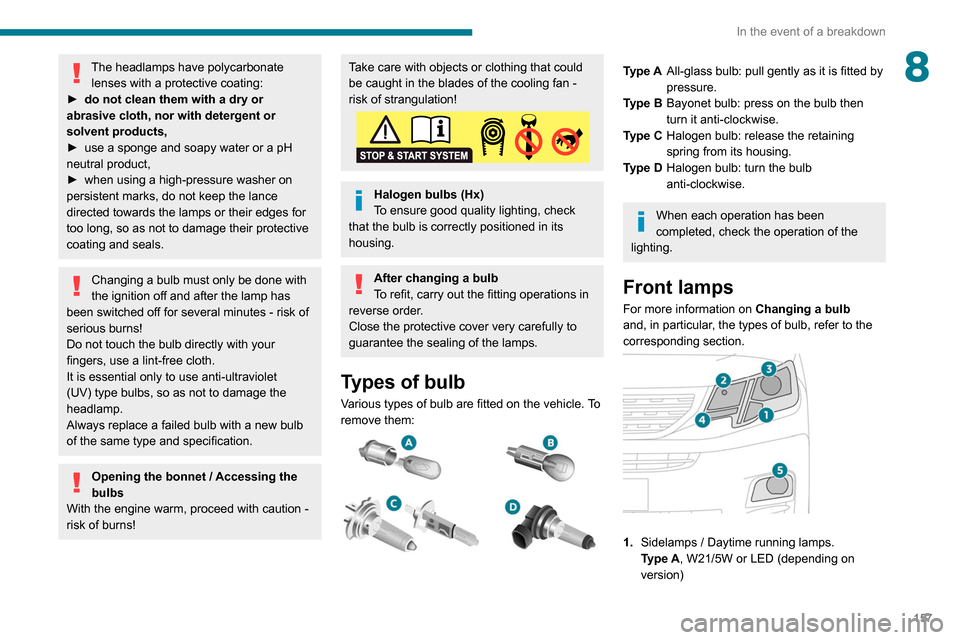
Various types of bulb are fitted on the vehicle. To
remove them:
Type A All-glass bulb: pull gently as it is fitted by
pressure.
Type B Bayonet bulb: press on the bulb then
turn it anti-clockwise.
Type C Halogen bulb: release the retaining
spring from its housing.
Type D Halogen bulb: turn the bulb
anti-clockwise.
When each operation has been
completed, check the operation of the
lighting.
Front lamps
For more information on Changing a bulb
and, in particular, the types of bulb, refer to the
corresponding section.
1. Sidelamps / Daytime running lamps.
Type
A, W21/5W or LED (depending on
version)
Page 166 of 260
164
In the event of a breakdown
The battery (-) terminal is not accessible.
There is a remote earth point near the battery.
For more information on the Bonnet and
the Engine , refer to the corresponding
sections.
Starting using another
battery
When your vehicle's battery is discharged, the
engine can be started using a backup battery
(external or from another vehicle) and jump
leads or using a battery booster.
Never start the engine by connecting a
battery charger.
Never use a 24
V or higher battery booster.
Check beforehand that the backup battery
has a nominal voltage of 12
V and a capacity
at least equal to that of the discharged
battery.
The two vehicles must not be in contact with
each other.
Switch off all the electrical consumers on both
vehicles (audio system, wipers, lighting, etc.).
Make sure that the jump leads are not close
to the moving parts of the engine (fan, belt,
etc.).
Do not disconnect the (+) terminal while the
engine is running.
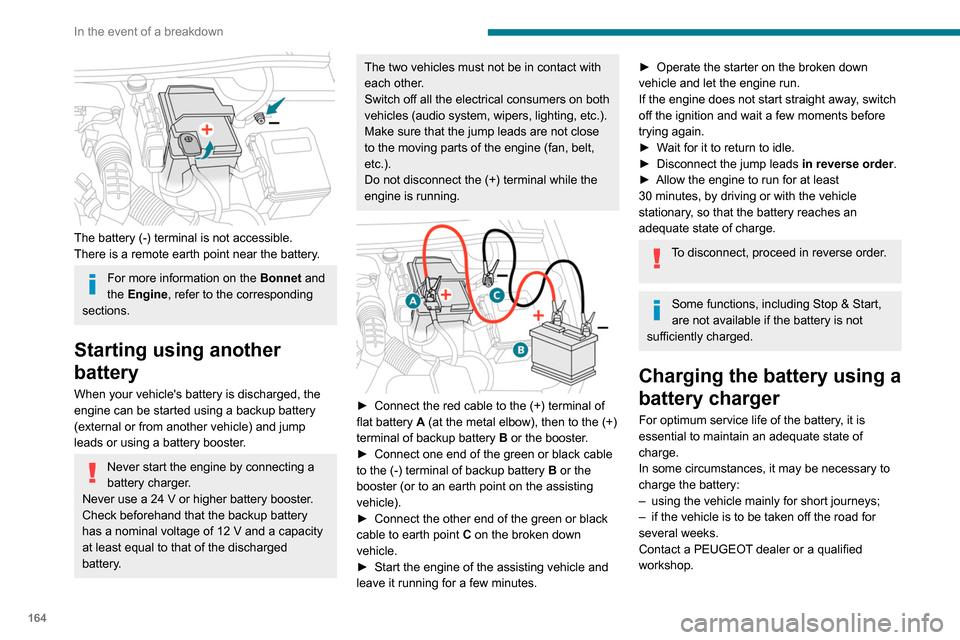
► Connect the red cable to the (+) terminal of
flat battery A (at the metal elbow), then to the (+)
terminal of backup battery
B
or the booster.
►
Connect one end of the green or black cable
to the (-) terminal of backup battery
B or the
booster (or to an earth point on the assisting
vehicle).
►
Connect the other end of the green or black
cable to earth point
C
on the broken down
vehicle.
►
Start the engine of the assisting vehicle and
leave it running for a few minutes.
► Operate the starter on the broken down
vehicle and let the engine run.
If the engine does not start straight away
, switch
off the ignition and wait a few moments before
trying again.
►
W
ait for it to return to idle.
►
Disconnect the jump leads in reverse order.
►
Allow the engine to run for at least
30
minutes, by driving or with the vehicle
stationary, so that the battery reaches an
adequate state of charge.
To disconnect, proceed in reverse order.
Some functions, including Stop & Start,
are not available if the battery is not
sufficiently charged.
Charging the battery using a
battery charger
For optimum service life of the battery, it is
essential to maintain an adequate state of
charge.
In some circumstances, it may be necessary to
charge the battery:
–
using the vehicle mainly for short journeys;
–
if the vehicle is to be taken off the road for
several weeks.
Contact a PEUGEOT
dealer or a qualified
workshop.
Page 167 of 260

165
In the event of a breakdown
8To charge the vehicle's battery yourself, use only a charger compatible with
lead-acid batteries with a nominal voltage of
12
V.
Follow the instructions provided by the
manufacturer of the charger.
Never reverse polarities.
It is not necessary to disconnect the
battery.
►
Switch off the ignition.
►
Switch off all electrical consumers (audio
system, lighting, wipers, etc.).
► Switch off charger B before connecting
the cables to the battery, so as to avoid any
dangerous sparks.
►
Ensure that the charger cables are in good
condition.
► Lift the plastic cover on the (+) terminal, if the
vehicle has one.
►
Connect the cables of charger B
as follows:
•
the positive (+) red cable to the (+) terminal
of battery
A,
•
the negative (-) black cable to earth point C
on the vehicle.
►
At the end of the charging operation, switch
off charger B
before disconnecting the cables
from battery A.
24v 12v
If this label is present, use only a 12 V
charger to avoid causing irreversible
damage to the electrical components related
to the Stop & Start system.
Never try to charge a frozen battery - risk
of explosion!
If the battery has frozen, have it checked by a
PEUGEOT dealer or by a qualified workshop
who will verify that the internal components
have not been damaged and that the case
has not cracked, which would mean a risk of
toxic and corrosive acid leaking.
Disconnecting the battery
In order to maintain an adequate state of
charge for starting the engine, we recommend
disconnecting the battery if the vehicle is to be
unused for an extended period.
Before disconnecting the battery:
►
close all doors, windows and the tailgate and
sunroof,
►
switch off all electricity consuming devices
(audio system, wipers, headlamps, etc.),
►
switch off the ignition and wait for four
minutes.
At the battery
, it is only necessary to disconnect
the (+) terminal.
Quick-release terminal clamp
Disconnecting the (+) terminal
► Raise the lever A fully to release the clamp
B.
►
Remove the clamp B
by lifting it off.
Reconnecting the (+) terminal
Page 188 of 260
186
Bluetooth® audio system
Interactive voice response
From the contextual menu, select "DTMF
tones" and confirm to use the digital
keypad to navigate in the interactive voice
response menu.
Confirm with OK.
Consultation call
From the contextual menu, select
"Switch" and validate to return to a call
left on hold.
Confirm with OK.
Directory
To access the directory, press and hold SRC/TEL.
Select "Directory " to see the list of
contacts.
Confirm with OK.
To modify the contacts saved in the system, press MENU then select
"Telephone" and confirm.
Select "Directory management " and confirm.
You can:
–
"Consult an entry",
–
"Delete an entry",
–
"Delete all entries".
The system accesses the telephone's contacts directory, depending on its
compatibility, and while it is connected via
Bluetooth.
With certain telephones connected by
Bluetooth you can send a contact to the
directory of the audio system.
Contacts imported in this way are saved in a
permanent directory visible to all, whatever the
telephone connected.
The menu for the directory is not accessible if it
is empty.
Voice recognition
This function allows you to use your
smartphone's voice recognition via the system.
To start voice recognition, depending on the type
of steering mounted controls:
Make a long press on the end of the lighting
control stalk.
OR
Press this button.
Voice recognition requires the use of a
compatible smartphone first connected to
the vehicle by Bluetooth.
Frequently asked
questions
The following information groups together the answers to the most frequently asked questions
concerning your audio system. With the engine off, the audio system
switches off after a few minutes of use.
When the engine is switched off, the audio
system operating time depends on the state of
charge of the battery.
The switch-off is normal: the audio system
switches to economy mode and switches off to
avoid discharging the vehicle's battery.
►
Start the vehicle’
s engine to increase the
charge of the battery.
The message "the audio system is
overheated" is displayed onscreen.
To protect the installation if the ambient
temperature is too high, the audio system
switches to an automatic thermal protection
mode, in which the volume may be decreased or
the CD player stopped.
►
Switch the audio system off for a few minutes
to allow the system to cool.
Radio
There is a difference in sound quality
between the different audio sources (radio,
CD, etc.).
For optimal listening quality, the audio settings
(Volume, Bass, Treble, Ambience and Loudness)
can be adjusted to different audio sources,
resulting in audible differences when switching
between sources (radio, CD, etc.).
►
Check that the audio settings (V
olume, Bass,
Treble, Ambience and Loudness) are appropriate
to the sources being listened to. We recommend
setting the audio functions (Bass, Treble, Fr-Re