towing Peugeot Partner 2020 Owner's Guide
[x] Cancel search | Manufacturer: PEUGEOT, Model Year: 2020, Model line: Partner, Model: Peugeot Partner 2020Pages: 260, PDF Size: 7.76 MB
Page 138 of 260
136
Practical information
Towing devices
Depending on equipment, the vehicle can be fitted with one of the following towing devices:
Approval No.: E1 R55 (reference 2)Mounting position then towing device reference
Type of towing device
Plate fixed at the bottom and
towing device fixed at the top
Plate fixed at the bottom and
towing device fixed at the bottom
Plate
+
G1 towball –
LCV std (standard) L1
– LCV std (standard) L2 –
LCV cross (worksite) L1
– LCV cross (heavy-duty) L2
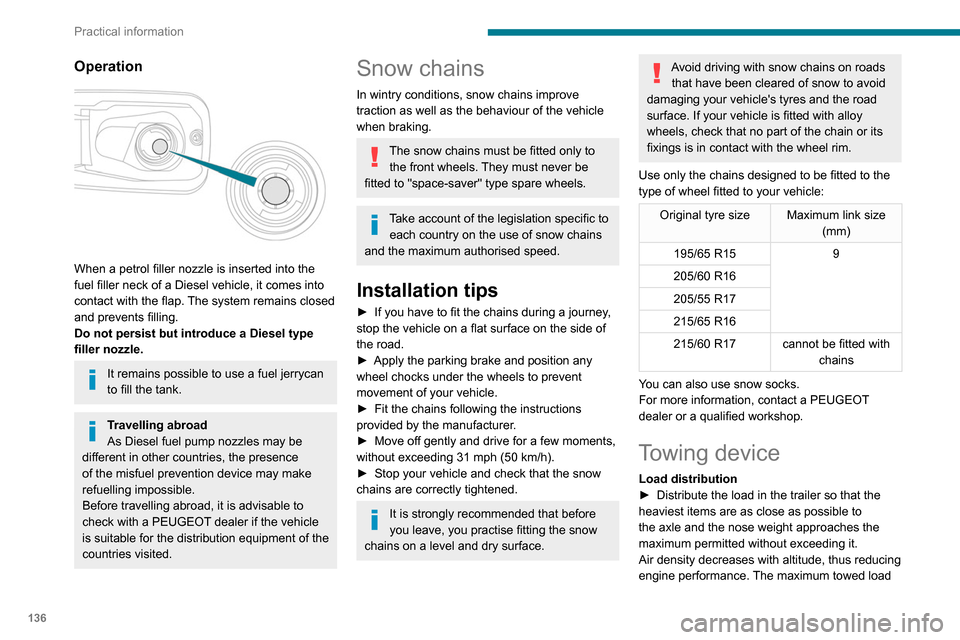
Operation
When a petrol filler nozzle is inserted into the
fuel filler neck of a Diesel vehicle, it comes into
contact with the flap. The system remains closed
and prevents filling.
Do not persist but introduce a Diesel type
filler nozzle.
It remains possible to use a fuel jerrycan
to fill the tank.
Travelling abroad
As Diesel fuel pump nozzles may be
different in other countries, the presence
of the misfuel prevention device may make
refuelling impossible.
Before travelling abroad, it is advisable to
check with a PEUGEOT dealer if the vehicle
is suitable for the distribution equipment of the
countries visited.
Snow chains
In wintry conditions, snow chains improve
traction as well as the behaviour of the vehicle
when braking.
The snow chains must be fitted only to the front wheels. They must never be
fitted to "space-saver" type spare wheels.
Take account of the legislation specific to each country on the use of snow chains
and the maximum authorised speed.
Installation tips
► If you have to fit the chains during a journey ,
stop the vehicle on a flat surface on the side of
the road.
►
Apply the parking brake and position any
wheel chocks under the wheels to prevent
movement of your vehicle.
►
Fit the chains following the instructions
provided by the manufacturer
.
►
Move off gently and drive for a few moments,
without exceeding 31 mph (50 km/h).
►
Stop your vehicle and check that the snow
chains are correctly tightened.
It is strongly recommended that before
you leave, you practise fitting the snow
chains on a level and dry surface.
Avoid driving with snow chains on roads that have been cleared of snow to avoid
damaging your vehicle's tyres and the road
surface. If your vehicle is fitted with alloy
wheels, check that no part of the chain or its
fixings is in contact with the wheel rim.
Use only the chains designed to be fitted to the
type of wheel fitted to your vehicle:
Original tyre size Maximum link size (mm)
195/65 R15 9
205/60 R16
205/55 R17
215/65 R16
215/60 R17 cannot be fitted with
chains
You can also use snow socks.
For more information, contact a PEUGEOT
dealer or a qualified workshop.
Towing device
Load distribution
► Distribute the load in the trailer so that the
heaviest items are as close as possible to
the axle and the nose weight approaches the
maximum permitted without exceeding it.
Air density decreases with altitude, thus reducing
engine performance.
The maximum towed load
Page 139 of 260

137
Practical information
7must be reduced by 10 % for every 1,000 metres
of altitude.
Use towing devices and their unmodified
harnesses approved by PEUGEOT. It is
recommended that the installation be
performed by a PEUGEOT dealer or a
qualified workshop.
If the towing device is not fitted by a
PEUGEOT dealer, it must still be fitted in
accordance with the vehicle manufacturer's
instructions.
Certain driving assistance or manoeuvring
assistance functions are automatically
disabled if an approved towbar is used.
Observe the maximum authorised
towable weight, indicated on your
vehicle's registration certificate, the
manufacturer's label as well as in the
Technical data section of this guide.
Complying with the maximum authorised
nose weight (towball) also includes the
use of accessories (bicycle carriers, tow
boxes, etc.).
Observe the legislation in force in the
country in which you are driving.
Towing devices
Depending on equipment, the vehicle can be fitted with one of the following towing devices:
Approval No.: E1 R55 (reference 2)
Mounting position then towing device reference
Type of towing device
Plate fixed at the bottom and
towing device fixed at the top
Plate fixed at the bottom and
towing device fixed at the bottom
Plate
+
G1 towball –
LCV std (standard) L1
– LCV std (standard) L2 –
LCV cross (worksite) L1
– LCV cross (heavy-duty) L2
Page 140 of 260
138
Practical information
Operation
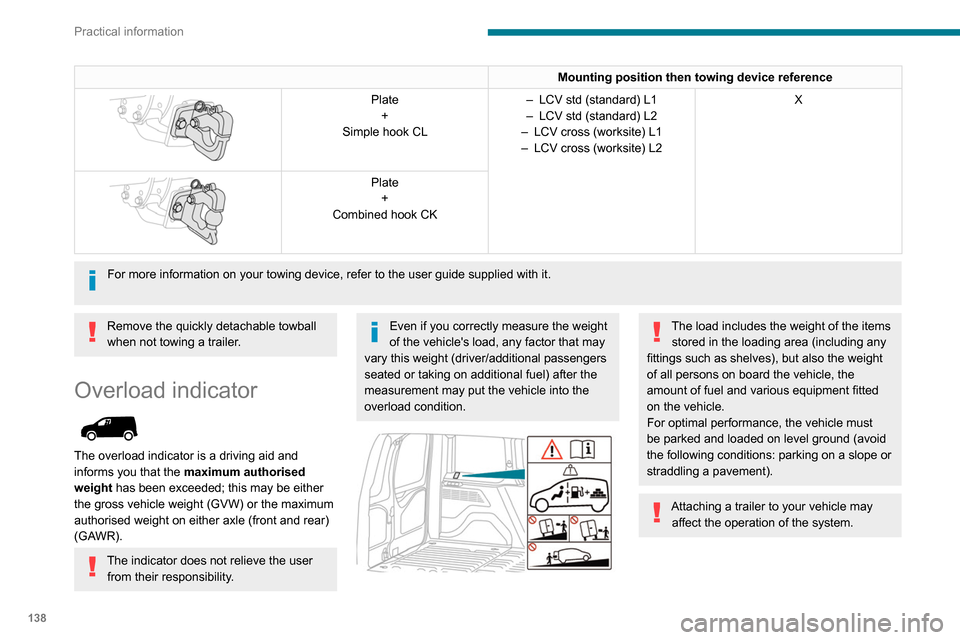
The measurement of the weight present on
board your vehicle is triggered:
► when starting the engine, automatically;
ON► when stationary, by pressing this
button located in the loading area. The
system is then active for 5 minutes.
Measurement display in the loading area
ON
If the mass on board the vehicle approaches
the maximum authorised weight , the indicator
lamps on these buttons come on.
ON
If the mass on board the vehicle exceeds the
maximum authorised weight , the indicator
lamps on these buttons come on.
Mounting position then towing device reference
Plate +
Simple hook CL –
LCV std (standard) L1
– LCV std (standard) L2
–
LCV cross (worksite) L1
–
LCV cross (worksite) L2 X
Plate
+
Combined hook CK
For more information on your towing device, refer to the user guide supp\
lied with it.
Remove the quickly detachable towball
when not towing a trailer.
Overload indicator
The overload indicator is a driving aid and
informs you that the maximum authorised
weight has been exceeded; this may be either
the gross vehicle weight (GVW) or the maximum
authorised weight on either axle (front and rear)
(GAWR).
The indicator does not relieve the user from their responsibility.
Even if you correctly measure the weight
of the vehicle's load, any factor that may
vary this weight (driver/additional passengers
seated or taking on additional fuel) after the
measurement may put the vehicle into the
overload condition.
The load includes the weight of the items stored in the loading area (including any
fittings such as shelves), but also the weight
of all persons on board the vehicle, the
amount of fuel and various equipment fitted
on the vehicle.
For optimal performance, the vehicle must
be parked and loaded on level ground (avoid
the following conditions: parking on a slope or
straddling a pavement).
Attaching a trailer to your vehicle may affect the operation of the system.
Page 152 of 260
150
In the event of a breakdown
Running out of fuel
(Diesel)
On vehicles fitted with Diesel engines, the fuel
system must be primed if you run out of fuel.
If the engine does not start first time, do not keep
trying, but start the procedure again from the
beginning.
For more information on Misfuel
prevention (Diesel), refer to the
corresponding section.
With 1.6 BlueHDi (Euro 6.1)
► Switch on the ignition (without starting the
engine).
►
W
ait around 6 seconds and switch off the
ignition.
►
Repeat the operation 10
times.
►
Operate the starter motor to start the engine.
If the engine does not start at the first attempt,
do not keep trying, but restart the procedure.
With 1.5 BlueHDi (Euro 6.2/6.3)
► Switch on the ignition (without starting the
engine).
►
W
ait around 1 minute and switch off the
ignition.
►
Operate the starter motor to start the engine.
If the engine does not start at the first attempt,
do not keep trying, but restart the procedure.
Non-BlueHDi engines
► Open the bonnet and then, if necessary ,
unclip the cover to access the priming pump.
► Operate the priming pump repeatedly
until resistance is felt (resistance may be
felt at the first press).
►
Operate the starter motor to start the engine
(if the engine does not start at the first attempt,
wait around 15 seconds before trying again).
►
If the engine does not start after a few
attempts, operate the priming pump again, then
the starter motor
.
►
Put the cover back in place and clip it in, then
close the bonnet.
Tool kit
► For easier access, move the seat(s) forward.
Accessing the tools
With a temporary puncture repair kit
The kit is located under the right-hand front seat.
With spare wheel
The jack is located under the right-hand front
seat.
The tools are located under the left-hand front
seat.
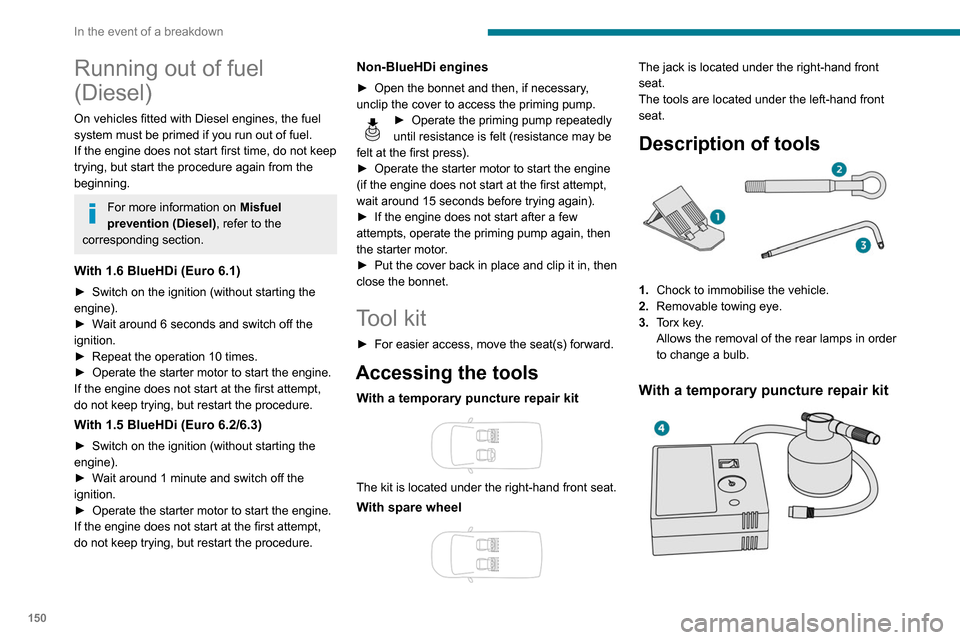
Description of tools
1. Chock to immobilise the vehicle.
2. Removable towing eye.
3. Torx key.
Allows the removal of the rear lamps in order
to change a bulb.
With a temporary puncture repair kit
4.12 V compressor with a cartridge of sealant
and a speed limit sticker
For temporary repair of a tyre and to adjust
the tyre pressure.
For more information about the Temporary
puncture repair kit, refer to the corresponding
section.
With spare wheel
5. Wheelbrace.
For removing the wheel bolts and raising/
lowering the jack.
6. Jack.
Used to raise the vehicle.
7. Wheel bolt cover/wheel trim removal tool
(depending on equipment).
If present on the vehicle, used to remove
the wheel bolt covers on alloy wheels or the
wheel trim on steel wheels.
Page 168 of 260
166
In the event of a breakdown
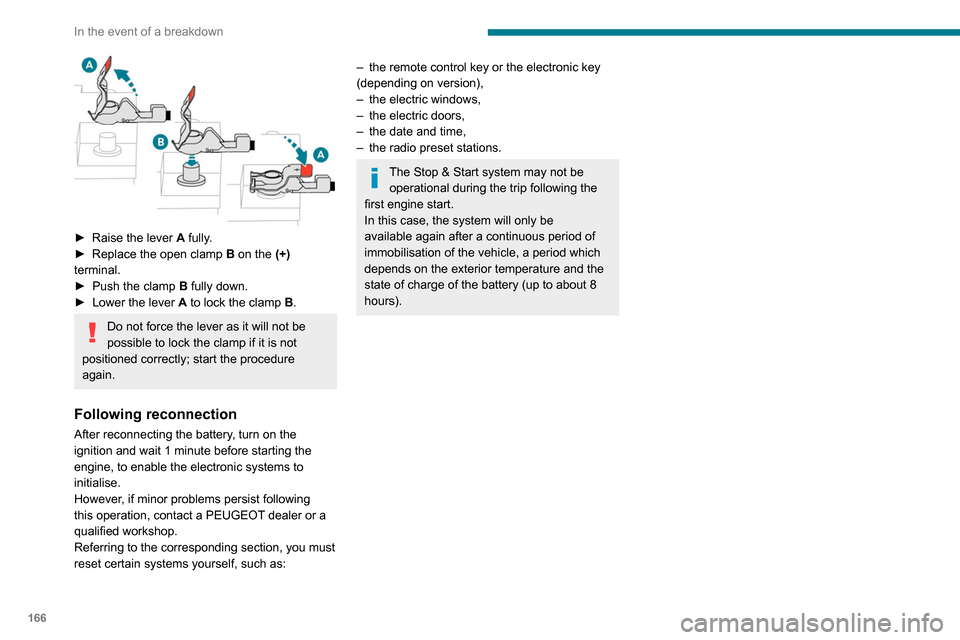
► Raise the lever A fully.
► Replace the open clamp B
on the (+)
terminal.
►
Push the clamp
B fully down.
►
Lower the lever A
to lock the clamp B.
Do not force the lever as it will not be
possible to lock the clamp if it is not
positioned correctly; start the procedure
again.
Following reconnection
After reconnecting the battery, turn on the
ignition and wait 1 minute before starting the
engine, to enable the electronic systems to
initialise.
However, if minor problems persist following
this operation, contact a PEUGEOT dealer or a
qualified workshop.
Referring to the corresponding section, you must
reset certain systems yourself, such as:
– the remote control key or the electronic key
(depending on version),
–
the electric windows,
–
the electric doors,
–
the date and time,
–
the radio preset stations.
The Stop & Start system may not be operational during the trip following the
first engine start.
In this case, the system will only be
available again after a continuous period of
immobilisation of the vehicle, a period which
depends on the exterior temperature and the
state of charge of the battery (up to about 8
hours).
Towing
Procedure for having your vehicle towed or for towing another vehicle us\
ing the towing eye.
General recommendations
Observe the legislation in force in the country where you are driving.
Ensure that the weight of the towing vehicle is higher than that of the \
towed vehicle.
The driver must remain at the wheel of the towed vehicle and must have a\
valid driving licence.
When towing a vehicle with all four wheels on the ground, always use an \
approved towbar; ropes and straps are prohibited.
The towing vehicle must move off gently.
When the vehicle is towed with its engine off, there is no longer braking and steering assistance.
A professional recovery service must be called if:
– broken down on a motorway or main road;
– not possible to put the gearbox into neutral, unlock the steering, or re\
lease the parking brake;
– not possible to tow a vehicle with an automatic gearbox, with the engine\
running;
– towing with only two wheels on the ground;
– four-wheel drive vehicle;
– no approved towbar available.
Towing constraints
Type of vehicle
(engine / gearbox)gearbox Font wheels on the
groundRear wheels on the
groundFlatbed
4 wheels on the ground
with towbar
Internal combustion /
Manual
Internal combustion /
Automatic
In case of battery or electric parking brake failure, it is essential to call a p
rofessional using flatbed recovery vehicles (excluding manual gearbox).
Page 169 of 260

167
In the event of a breakdown
8Towing
Procedure for having your vehicle towed or for towing another vehicle us\
ing the towing eye.
General recommendations
Observe the legislation in force in the country where you are driving.
Ensure that the weight of the towing vehicle is higher than that of the \
towed vehicle.
The driver must remain at the wheel of the towed vehicle and must have a\
valid driving licence.
When towing a vehicle with all four wheels on the ground, always use an \
approved towbar; ropes and straps are prohibited.
The towing vehicle must move off gently.
When the vehicle is towed with its engine off, there is no longer braking and steering assistance.
A professional recovery service must be called if:
– broken down on a motorway or main road;
–
not possible to put the gearbox into neutral, unlock the steering, or re\
lease the parking brake;
–
not possible to tow a vehicle with an automatic gearbox, with the engine\
running;
–
towing with only two wheels on the ground;
–
four-wheel drive vehicle;
–
no approved towbar available.
Towing constraints
Type of vehicle
(engine / gearbox)gearbox Font wheels on the
groundRear wheels on the
groundFlatbed
4 wheels on the ground
with towbar
Internal combustion /
Manual
Internal combustion /
Automatic
In case of battery or electric parking brake failure, it is essential to call a p
rofessional using flatbed recovery vehicles (excluding manual gearbox).
Page 170 of 260
168
In the event of a breakdown
Access to the eye
For more information on the Tool kit,
refer to the corresponding section.
With a manual gearbox, move the gear
lever into neutral.
With an automatic gearbox, place the gear
selector into position N.
Failure to adhere to this instruction may lead
to damage to braking system components
and the lack of braking assistance on
restarting the engine.
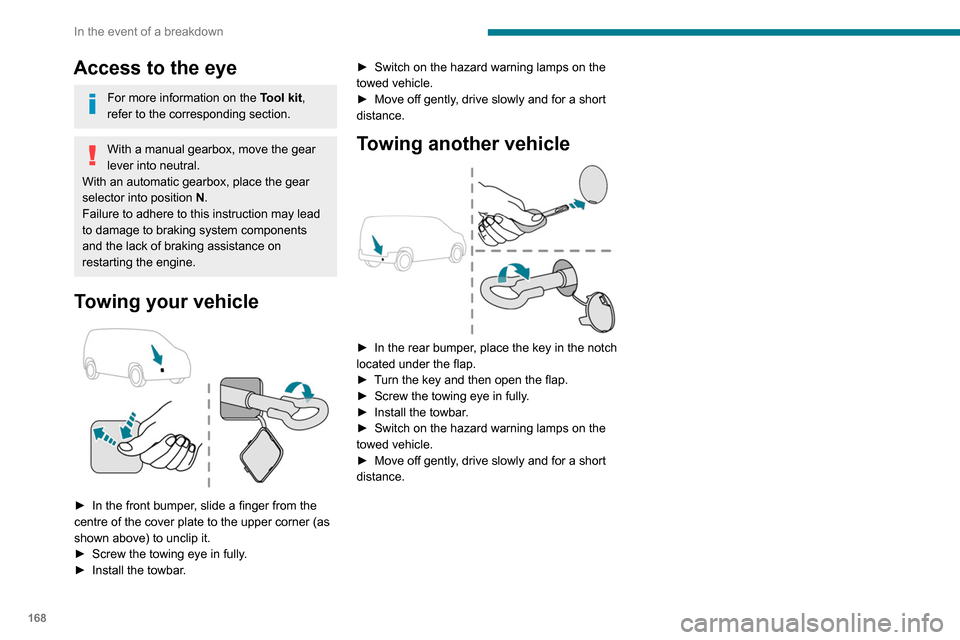
Towing your vehicle
► In the front bumper , slide a finger from the
centre of the cover plate to the upper corner (as
shown above) to unclip it.
►
Screw the towing eye in fully
.
►
Install the towbar
. ►
Switch on the hazard warning lamps on the
towed vehicle.
►
Move off gently
, drive slowly and for a short
distance.
Towing another vehicle
► In the rear bumper , place the key in the notch
located under the flap.
►
T
urn the key and then open the flap.
►
Screw the towing eye in fully
.
►
Install the towbar
.
►
Switch on the hazard warning lamps on the
towed vehicle.
►
Move off gently
, drive slowly and for a short
distance.
Page 175 of 260

173
Technical data
9Engine technical data and
towed loads
Engines
The engine characteristics are given in the
vehicle's registration document, as well as in
sales brochures.
The maximum power corresponds to the value type-approved on a test bed, under
conditions defined in European legislation
(Directive 1999/99/EC).
For more information, contact a PEUGEOT
dealer or a qualified workshop.
Weights and towed loads
The weights and towed loads relating to
your vehicle are indicated on the registration
document, as well as in sales brochures.
These values are also indicated on the
manufacturer's plate or label.
For more information, contact a PEUGEOT
dealer or a qualified workshop.
The GTW (Gross Train Weight) and towed load
values indicated are valid up to a maximum
altitude of 1,000 metres. The towed load value
must be reduced by 10% for each additional
1,000 metres of altitude.
The maximum authorised nose weight
corresponds to the weight permitted on the
towball.
When exterior temperatures are high, the
vehicle performance may be limited in
order to protect the engine. When the exterior
temperature is higher than 37°C, limit the
towed weight.
Towing even with a lightly loaded vehicle can adversely affect its road holding.
Braking distances are increased when towing
a trailer.
When using a vehicle to tow, never exceed
a speed of 62 mph (100
km/h) (observe the
local legislation in force).
If the exterior temperature is high, it is
recommended that the engine is allowed
to idle for 1 to 2 minutes after the vehicle
comes to a stop, to facilitate its cooling.
Engines and towed loads - PETROL EURO 6.3
Engine PureTech 110 S&S BVM6PureTech 130 S&S BVM6 PureTech 130 S&S EAT8
Gearbox Manual 6-speedManual 6-speedAutomatic 8-speed
Code EB2ADT STTd BVM6EB2ADTS STTd BVM6 EB2ADTS STTd EAT8
Model Code EUHNP2-LEUHNS2-LEUHNS3-L
Cubic capacity (cc) 1,1991,1991,199
Max. power: EC standard (kW) 819696
Page 234 of 260
232
Alphabetical index
Range, AdBlue 144
RDS
193, 218
Rear screen, demisting
59
Recharging the battery
164–165
Recirculation, air
56–57
Recovery
167
Reduction of electrical load
140
Regeneration of the particle filter
144
Reinitialisation of the under-inflation
detection system
105
Reinitialising the remote control
32
Reminder, key in ignition
94
Reminder, lighting on
63–64
Remote control
24–27, 29–30, 91
Removing a wheel
154, 156
Removing the mat
47
Replacing bulbs
156–157
Replacing fuses
161–163
Replacing the air filter
144
Replacing the oil filter
144
Replacing the passenger compartment
filter
144
Reservoir, screenwash
143
Reversing camera
106, 129
Reversing lamps
160
Roof bars
140
Running out of fuel (Diesel)
150
S
Safety, children 82, 84–87
Saturation of the particle filter (Diesel) 144
Screen menu map
196
Screen, multifunction (with audio system)
178
Screenwash, front
67
Screenwash, rear
68
SCR (Selective Catalytic Reduction)
146
Seat belts
79–81, 86
Seat, bench front, 2-seat
44–45, 79
Seat, rear bench
46
Seats, front
40–42, 44–45
Seats, front bench
44–45
Seats, heated
42
Seats, Multiflex ~ Extenso Cab
51
Seats, rear
40, 44, 46, 85
Sensors (warnings)
106
Serial number, vehicle
176
Service indicator
16
Servicing
16, 144
Settings, system
199, 223
Sidelamps
63, 65, 157–159
Side parking sensors
128
Side repeater
158
Sliding side door, electric
29, 35
Snow chains
104, 136
Snow chains, link
136
Socket, 12 V accessory
47
Socket, 220 V
48
Socket, auxiliary
182, 195, 219
Socket, Jack
182, 219
Speed limiter
109–111, 117–118
Speed limit recognition
107–108
Speedometer
107Stability control (ESC) 75–78
Starting a Diesel engine
134
Starting the engine
91
Starting the vehicle
92, 94, 99–101
Starting using another battery
164
Station, radio
179, 192, 217–218
Stay, bonnet
141
Steering mounted controls, audio
178–179, 190,
204
Steering wheel, adjustment
42
Stickers, customising ~ Stickers,
expressive
149
Stopping the vehicle
94, 99–101
Stop & Start
22, 55, 59, 102–104,
134, 141, 144, 163, 166
Storage
47
Stowing rings
49
Sunshine sensor
55
Surround Rear Vision
130
Switching off the engine
91, 93
Synchronising the remote control
32
T
Tables of fuses 161–163
Tank, fuel
134–135
Technical data
173–175
Telephone
48, 184–186, 197–198, 220–222
Telephone, Bluetooth with voice
recognition
186
Temperature, coolant
16
Page 235 of 260
233
Alphabetical index
Three flashes (direction indicators) 64
Time (setting)
200, 224
TMC (Traffic info)
2 11
Tools
150
Topping-up AdBlue®
147
Towbar
76, 136–137
Towed loads
173–175
Towing another vehicle
167–168
Towing device
137
Towing eye
168
Traction control (ASR)
75, 77
Traffic information (TA)
179
Traffic information (TMC)
2 11
Trailer
76, 136
Trailer stability assist (TSA)
76
Trajectory control systems
75–76
Trip computer
21–22
Type of bulbs
157
Tyres
145, 176
Tyre under-inflation detection
104, 153
U
Under-inflation (detection) 104
Unlocking
24, 26–28
Unlocking from the inside
33–34
Unlocking, selective
26–27
Unlocking, total
26–27
Updating the date
200, 224
Updating the time
200, 224
USB
181, 195, 214, 219
V
Ventilation 55–56, 60–61
Video
219
Voice commands
206–208
W
Warning and indicator lamps 11
Warning lamp, driver''s seat belt
not fastened
80
Warning lamps
11
Warning lamp, seat belts
80
Warnings and indicators
11
Washer jets, heated
59
Washing
106
Washing (advice)
148–149
Weights
173–175
Welcome lighting
25
Wheel,
spare
104, 145, 150–151, 153–154, 156
Windows, rear doors
39
Windscreen, heated
59
Windscreen wipers
67
Wiper blades (changing)
68–69
Wiper, rear
68
Wipers
67, 69
Wipers, automatic rain sensitive
67, 69