jacking Peugeot Partner 2020 Owner's Manual
[x] Cancel search | Manufacturer: PEUGEOT, Model Year: 2020, Model line: Partner, Model: Peugeot Partner 2020Pages: 260, PDF Size: 7.76 MB
Page 155 of 260

153
In the event of a breakdown
8With a tyre repaired using this type of kit,
do not exceed a speed of 50 mph
(80
km/h) and do not drive more than
125
miles (200 km).
Contact a PEUGEOT dealer or a qualified
workshop to have the tyre changed.
Checking / adjusting tyre
pressures
The compressor can be used, without injecting
sealant, to check and, if necessary, adjust the
tyre pressures.
►
Remove the valve cap from the tyre and keep
it in a clean place.
►
Uncoil
the pipe stowed under the compressor.
►
Screw the pipe onto the valve and tighten
firmly
.
►
Check that the compressor switch is in
position " O
".
►
Fully uncoil the electric cable stowed under
the compressor
.
►
Connect the compressor's electric plug to the
vehicle's 12
V socket.
►
Switch on the ignition.
Only the 12 V socket located at the front
of the vehicle can be used to power the
compressor .
The tyre inflation pressures are given on
this label.
► Start the compressor by placing the switch at
position " I
" and adjust the pressure to the value
shown on the vehicle's tyre pressure label. To
deflate: press the black button located on the
compressor pipe, near the valve connection.
If after 7 minutes the pressure of 2 bars
is not reached, this indicates that the tyre
is damaged; contact a PEUGEOT
dealer or a
qualified workshop for assistance.
►
Once the correct pressure is reached, put the
switch in position " O
".
►
Remove the kit and stow it.
Should the pressure of one or more tyres
be adjusted, it is necessary to reinitialise
the under-inflation detection system.
For more information on Tyre under-inflation
detection, refer to the corresponding section.
Spare wheel
Scan the QR code on page 3 to view
explanatory videos.
Procedure for changing a damaged wheel with
the spare wheel using the tools provided with the
vehicle.
For more information on the Tool kit,
refer to the corresponding section.
►
Park the vehicle, taking care to avoid
obstructing traffic, and apply the parking brake.
►
Follow the safety instructions (hazard
warning lamps, warning triangle, wearing high
visibility vest, etc.) according to the legislation in
force in the country where you are driving.
►
Switch off the ignition.
Access to the spare wheel
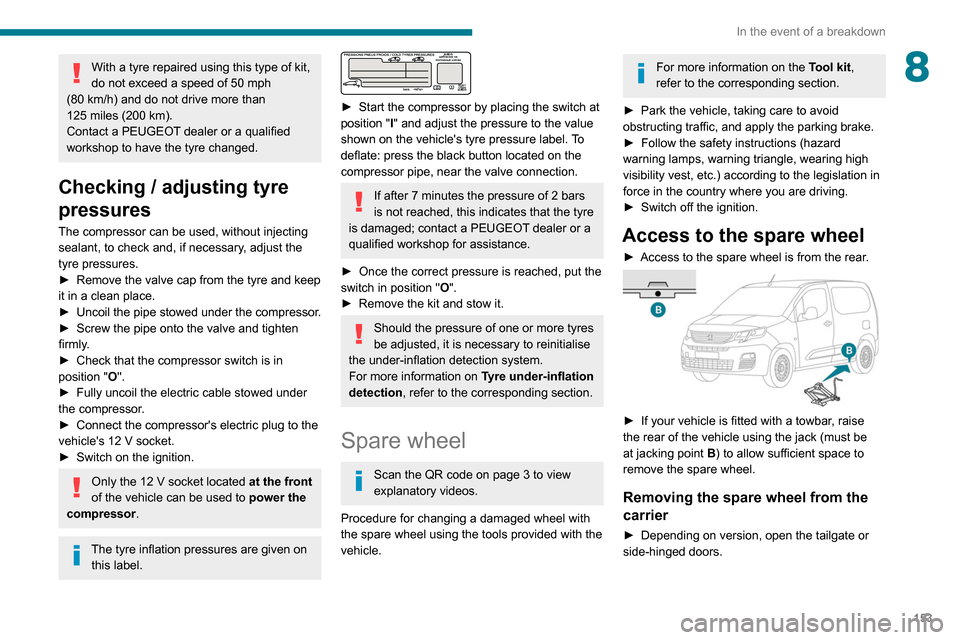
► Access to the spare wheel is from the rear .
► If your vehicle is fitted with a towbar, raise
the rear of the vehicle using the jack (must be
at jacking point B) to allow sufficient space to
remove the spare wheel.
Removing the spare wheel from the
carrier
► Depending on version, open the tailgate or
side-hinged doors.
Page 157 of 260

155
In the event of a breakdown
8► With a steel wheel, remove the wheel trim
using tool 7
.
►
With an alloy wheel, remove the cap from
each of the bolts using tool 7
.
►
If the vehicle is so equipped, fit security bolt
socket
8 to wheelbrace 5 to slacken the security
bolt.
►
Slacken
(without removing) the other wheel
bolts using just wheelbrace 5.
Wheel with wheel trim
When removing the wheel, first remove
the wheel trim by pulling at the valve aperture
using the wheelbrace.
► Place the foot of the jack on the ground and
ensure that it is directly below the A
or B jacking
point provided on the underbody, whichever is
closest to the wheel to be changed.
► Extend jack 6 until its head comes into
contact with jacking point A or B, whichever is
used; the contact surface A or B of the vehicle
must be correctly engaged with the central part
of the head of the jack.
►
Raise the vehicle until there is sufficient
space between the wheel and the ground to
admit the spare (not punctured) wheel easily
.
Risk of injury!
Ensure that the jack is stable. If the
ground is slippery or loose, the jack may slip
or collapse.
Ensure that the jack is positioned strictly at
one of the jacking points A or B under the
vehicle, making sure that the vehicle's contact
surface is correctly centred on the head of the
jack. Otherwise, there is a risk of damage to
the vehicle and/or of the jack collapsing.
► Remove the bolts and store them in a clean
place.
►
Remove the wheel.