cooling PEUGEOT PARTNER 2021 Owners Manual
[x] Cancel search | Manufacturer: PEUGEOT, Model Year: 2021, Model line: PARTNER, Model: PEUGEOT PARTNER 2021Pages: 260, PDF Size: 7.76 MB
Page 14 of 260
12
Instruments
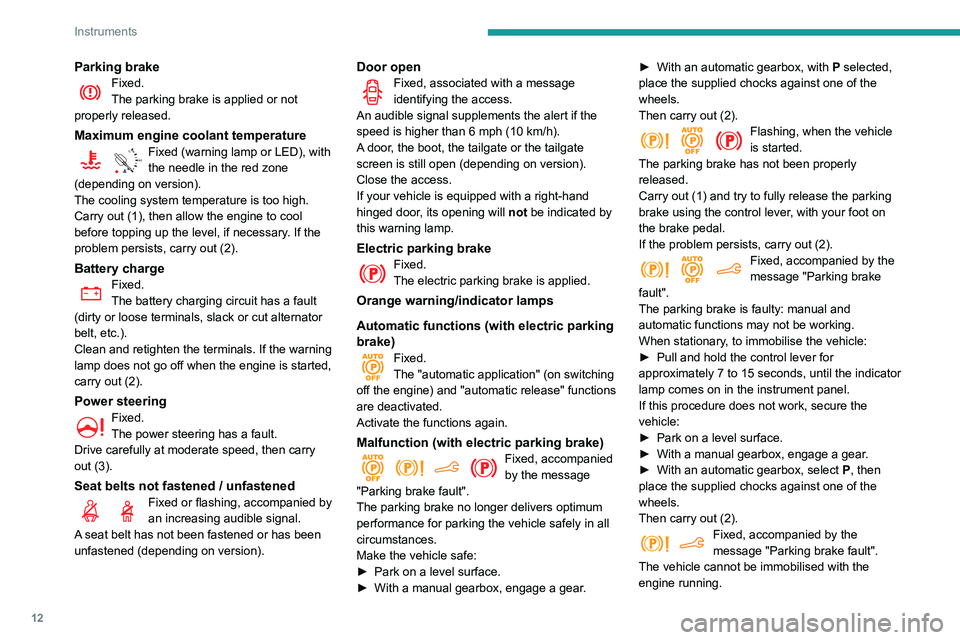
Parking brakeFixed.
The parking brake is applied or not
properly released.
Maximum engine coolant temperature
90° CFixed (warning lamp or LED), with
the needle in the red zone
(depending on version).
The cooling system temperature is too high.
Carry out (1), then allow the engine to cool
before topping up the level, if necessary. If the
problem persists, carry out (2).
Battery chargeFixed.
The battery charging circuit has a fault
(dirty or loose terminals, slack or cut alternator
belt, etc.).
Clean and retighten the terminals. If the warning
lamp does not go off when the engine is started,
carry out (2).
Power steeringFixed.
The power steering has a fault.
Drive carefully at moderate speed, then carry
out (3).
Seat belts not fastened / unfastenedFixed or flashing, accompanied by
an increasing audible signal.
A seat belt has not been fastened or has been
unfastened (depending on version).
Door openFixed, associated with a message
identifying the access.
An audible signal supplements the alert if the
speed is higher than 6 mph (10 km/h).
A door, the boot, the tailgate or the tailgate
screen is still open (depending on version).
Close the access.
If your vehicle is equipped with a right-hand
hinged door, its opening will not be indicated by
this warning lamp.
Electric parking brakeFixed.
The electric parking brake is applied.
Orange warning/indicator lamps
Automatic functions (with electric parking
brake)
Fixed.
The "automatic application" (on switching
off the engine) and "automatic release" functions
are deactivated.
Activate the functions again.
Malfunction (with electric parking brake)Fixed, accompanied
by the message
"Parking brake fault".
The parking brake no longer delivers optimum
performance for parking the vehicle safely in all
circumstances.
Make the vehicle safe:
►
Park on a level surface.
►
With a manual gearbox, engage a gear
.►
With an automatic gearbox, with
P
selected,
place the supplied chocks against one of the
wheels.
Then carry out (2).
Flashing, when the vehicle
is started.
The parking brake has not been properly
released.
Carry out (1) and try to fully release the parking
brake using the control lever, with your foot on
the brake pedal.
If the problem persists, carry out (2).
Fixed, accompanied by the
message "Parking brake
fault".
The parking brake is faulty: manual and
automatic functions may not be working.
When stationary, to immobilise the vehicle:
►
Pull and hold the control lever for
approximately 7 to 15 seconds, until the indicator
lamp comes on in the instrument panel.
If this procedure does not work, secure the
vehicle:
►
Park on a level surface.
►
With a manual gearbox, engage a gear
.
►
With an automatic gearbox, select
P
, then
place the supplied chocks against one of the
wheels.
Then carry out (2).
Fixed, accompanied by the
message "Parking brake fault".
The vehicle cannot be immobilised with the
engine running.
Page 20 of 260
18
Instruments
Distance recorders
The total and trip distances are displayed for
thirty seconds when the ignition is switched off,
when the driver's door is opened and when the
vehicle is locked or unlocked.
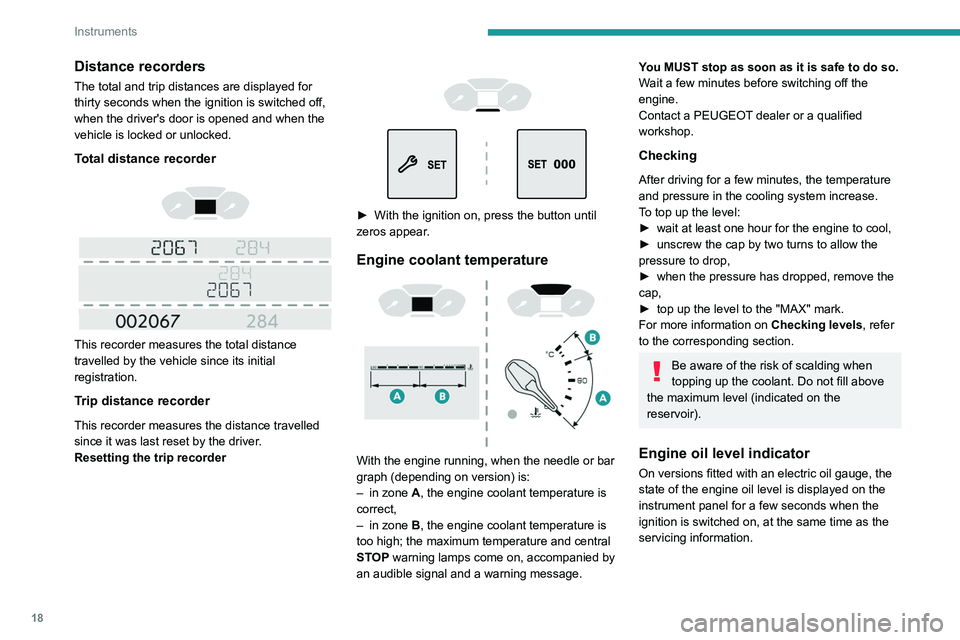
Total distance recorder
This recorder measures the total distance
travelled by the vehicle since its initial
registration.
Trip distance recorder
This recorder measures the distance travelled
since it was last reset by the driver.
Resetting the trip recorder
► With the ignition on, press the button until
zeros appear .
Engine coolant temperature
With the engine running, when the needle or bar
graph (depending on version) is:
–
in zone
A, the engine coolant temperature is
correct,
–
in zone
B, the engine coolant temperature is
too high; the maximum temperature and central
STOP warning lamps come on, accompanied by
an audible signal and a warning message.
You MUST stop as soon as it is safe to do so.
Wait a few minutes before switching off the
engine.
Contact a PEUGEOT dealer or a qualified
workshop.
Checking
After driving for a few minutes, the temperature
and pressure in the cooling system increase.
To top up the level:
►
wait at least one hour for the engine to cool,
►
unscrew the cap by two turns to allow the
pressure to drop,
►
when the pressure has dropped, remove the
cap,
►
top up the level to the "MAX" mark.
For more information on Checking levels
, refer
to the corresponding section.
Be aware of the risk of scalding when
topping up the coolant. Do not fill above
the maximum level (indicated on the
reservoir).
Engine oil level indicator
On versions fitted with an electric oil gauge, the
state of the engine oil level is displayed on the
instrument panel for a few seconds when the
ignition is switched on, at the same time as the
servicing information.
Page 59 of 260
57
Ease of use and comfort
3Offers the best compromise between a
comfortable temperature and quiet
operation.
Provides dynamic, effective air flow.
When the engine is cold, the air flow will
only increase to its optimum level
gradually, to avoid distributing too much cold
air.
In cold weather, it prioritises the distribution of
warm air to the windscreen, the side windows
and the footwells only.
Manual mode
If you wish, you can make a different choice from
that suggested by the system, by changing a
setting. The other functions will still be controlled
automatically.
The "AUTO" symbol disappears if you change
a setting.
Deactivating the system
► Press button 2 "-" until the fan symbol
disappears.
This disables all functions of the dual-zone
automatic air conditioning system.
The temperature is no longer regulated. A slight
flow of air can still be felt, due to the forward
movement of the vehicle.
►
Press button
2 "+" to switch the system on
again.
Temperature
The driver and front passenger can each set the
temperature to suit their preferences.
The value shown on the display is a level
of comfort, not a temperature in Celsius or
Fahrenheit.
►
Push button
1 down to decrease the value or
up to increase it.
A setting of around 21 provides optimum comfort. Depending on your
requirements, a setting between 18 and 24 is
normal.
In addition, we recommend avoiding left/right
setting differences of more than 3.
On entering the vehicle, if the interior
temperature is significantly colder or
warmer than the comfort value setting, there
is no need to alter the value displayed in
order to reach the required level of comfort.
The system compensates automatically and
corrects the temperature difference as quickly
as possible.
For maximum cooling or heating of the
passenger compartment, it is possible to
exceed the minimum value 14 or the
maximum value 28.
►
Push button
1 down until "LO" is
displayed or up until "HI" is displayed.
"Mono" function
The comfort setting for the passenger side
can be indexed to the driver's comfort setting
(mono-zone).
►
Press the corresponding button 8
to activate/
deactivate the function.
The indicator lamp in the button comes on when
the function is activated.
The function is deactivated automatically if a
passenger uses the temperature control.
Visibility programme
► Press the “ visibility” button 7 to demist or
defrost the windscreen and side windows as
quickly as possible.
The system automatically manages the air
conditioning, air flow and air intake, and provides
optimum distribution towards the windscreen and
side windows.
►
Press the “
visibility” button 8 again to stop
the programme.
Or
►
Press the “
AUTO” button 6 to return to the
automatic comfort programme.
Air conditioning
With the engine running, the air conditioning is
designed to operate effectively in all seasons,
with the windows closed.
It enables you to:
–
lower the temperature in summer
,
Page 60 of 260
58
Ease of use and comfort
– enhance the effectiveness of the demisting
function in winter , above 3°C.
On/Off
► Press button 5 to activate/deactivate the air
conditioning system.
When the air conditioning is in operation, to
cool the air more quickly, you can use interior
air recirculation for a few moments by pressing
button 4. Then restore the intake of exterior air.
The air conditioning does not operate when the air flow adjustment is set to off.
Switching the system off could result in
discomfort (humidity, misting).
Air distribution
► Pressing button 3 successively directs the air
flow towards:
–
windscreen, side windows and footwells,
–
footwells,
–
central vents, side vents and footwells,
–
windscreen, side windows, central vents, side
vents and footwells,
–
central and side vents,
–
windscreen and side windows (demisting or
defrosting).
Air flow
► Press the buttons 2 to increase/decrease the
air flow.
The air flow symbol (a fan) appears. It is filled in
or emptied gradually, according to the value set.
Recirculation of interior air
The intake of exterior air helps avoid and
eliminate misting of the windscreen and side
windows.
Recirculating the interior air isolates the
passenger compartment from exterior odours
and fumes.
When required, this function also allows
faster heating or cooling of the air in the
passenger compartment.
►
Press button
4 to recirculate the interior air or
allow the intake of exterior air.
Avoid prolonged use of interior air recirculation (due to the risk of misting
and deteriorating air quality).
Front demisting
- defrosting
These markings on the control panel indicate the positioning of the controls for
rapid demisting or defrosting of the windscreen
and side windows.
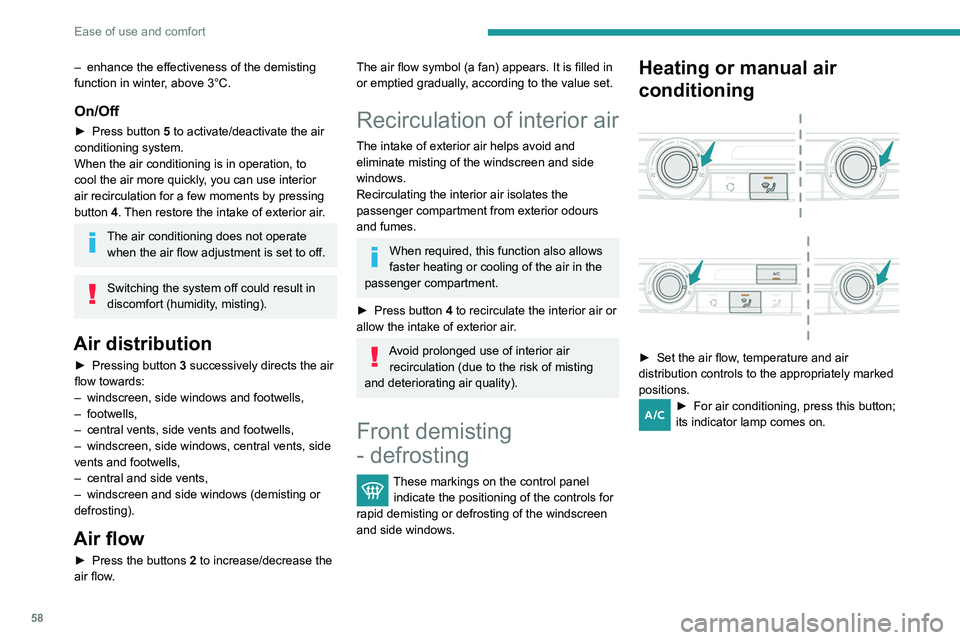
Heating or manual air
conditioning
► Set the air flow , temperature and air
distribution controls to the appropriately marked
positions.
► For air conditioning, press this button;
its indicator lamp comes on.
Dual-zone automatic air
conditioning
► Press this button to demist or defrost
the windscreen and side windows more
quickly.
The system automatically manages the air
conditioning, air flow and air intake, and provides
optimum distribution towards the windscreen and
side windows.
► To turn it off, press this button
again or press " AUTO".
The system restarts with the values in use before
it was deactivated.
Heated windscreen and washer jets
For more information on the Wiper
control stalk and in particular the heated
windscreen and washer jets, refer to the
corresponding section.
With Stop & Start, when demisting
- defrosting has been activated, STOP
mode is not available.
Page 92 of 260
90
Driving
Driving recommendations
► Observe the driving regulations and remain
vigilant whatever the traffic conditions.
►
Monitor your environment and keep your
hands on the wheel to be able to react to
anything that may happen any time.
►
Drive smoothly
, anticipate the need for
braking and maintain a longer safety distance,
especially in bad weather.
►
Stop the vehicle to carry out operations that
require close attention (such as adjustments).
►
During long trips, take a break every two
hours.
Important!
Never leave the engine running in a
closed space without sufficient
ventilation. Internal combustion engines emit
toxic exhaust gases such as carbon
monoxide. Danger of poisoning and death!
In severe wintry conditions (temperature
below -23°C), let the engine run for 4
minutes before moving off, to ensure the
correct operation and durability of the
mechanical components of your vehicle
(engine and gearbox).
Never drive with the parking brake
applied . Risk of overheating and
damage to the braking system!
Do not park the vehicle or leave the
engine running on a flammable
surface (dry grass, dead leaves, etc.). The
exhaust system of your vehicle is very hot,
even several minutes after the engine stops.
Risk of fire!
Never leave a vehicle unattended with
the engine running. If you have to leave
your vehicle with the engine running, apply
the parking brake and put the gearbox into
neutral or position N or P (depending on the
type of gearbox).
Never leave children inside the vehicle
unsupervised.
On flooded roads
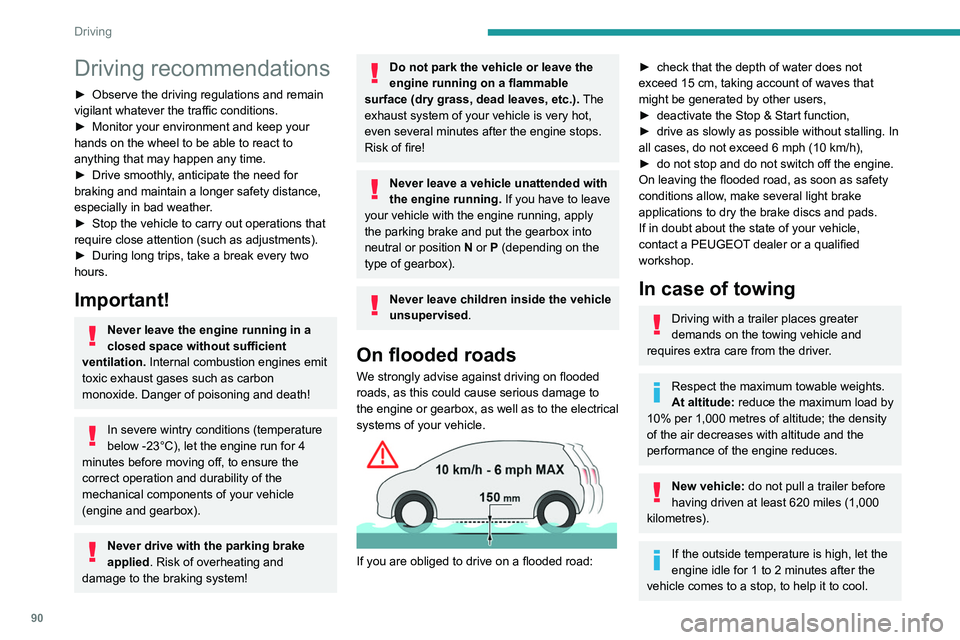
We strongly advise against driving on flooded
roads, as this could cause serious damage to
the engine or gearbox, as well as to the electrical
systems of your vehicle.
If you are obliged to drive on a flooded road:
► check that the depth of water does not
exceed 15 cm, taking account of waves that
might be generated by other users,
►
deactivate the Stop & Start function,
►
drive as slowly as possible without stalling. In
all cases, do not exceed 6 mph (10
km/h),
►
do not stop and do not switch off the engine.
On leaving the flooded road, as soon as safety
conditions allow
, make several light brake
applications to dry the brake discs and pads.
If in doubt about the state of your vehicle,
contact a PEUGEOT dealer or a qualified
workshop.
In case of towing
Driving with a trailer places greater
demands on the towing vehicle and
requires extra care from the driver.
Respect the maximum towable weights.
At altitude: reduce the maximum load by
10% per 1,000 metres of altitude; the density
of the air decreases with altitude and the
performance of the engine reduces.
New vehicle: do not pull a trailer before
having driven at least 620 miles (1,000
kilometres).
If the outside temperature is high, let the
engine idle for 1 to 2 minutes after the
vehicle comes to a stop, to help it to cool.
Before setting off
Nose weight
► Distribute the load in the trailer so that the
heaviest items are as close as possible to the
axle and the nose weight (at the point where it
joins your vehicle) approaches the maximum
permitted without exceeding it.
Tyres
► Check the tyre pressures of the towing
vehicle and of the trailer, observing the
recommended pressures.
Lighting
► Check the electrical signalling on the trailer
and the headlamp beam height of your vehicle.
If a genuine PEUGEOT towing device is
used, the rear parking sensors will be
deactivated automatically to avoid the audible
signal.
When driving
Cooling
Towing a trailer uphill increases the temperature
of the coolant. The maximum towable load
depends on the gradient and the exterior
temperature. The cooling capacity of the fan
does not increase with engine speed.
► Reduce speed and lower the engine speed,
so as to limit the heating-up.
Page 93 of 260
91
Driving
6Before setting off
Nose weight
► Distribute the load in the trailer so that the
heaviest items are as close as possible to the
axle and the nose weight (at the point where it
joins your vehicle) approaches the maximum
permitted without exceeding it.
Tyres
► Check the tyre pressures of the towing
vehicle and of the trailer , observing the
recommended pressures.
Lighting
► Check the electrical signalling on the trailer
and the headlamp beam height of your vehicle.
If a genuine PEUGEOT towing device is
used, the rear parking sensors will be
deactivated automatically to avoid the audible
signal.
When driving
Cooling
Towing a trailer uphill increases the temperature
of the coolant. The maximum towable load
depends on the gradient and the exterior
temperature. The cooling capacity of the fan
does not increase with engine speed.
►
Reduce speed and lower the engine speed,
so as to limit the heating-up. In all cases, pay attention to the coolant
temperature.
If this warning lamp and the
STOP
warning lamp come on, stop the vehicle
and switch off the engine as soon as possible.
Brakes
Braking distances are increased when towing a
trailer. To avoid overheating of the brakes, the
use of engine braking is recommended.
Side wind
Bear in mind the increased susceptibility to the
wind that the vehicle will have.
Anti-theft protection
Electronic immobiliser
The remote control contains an electronic chip
which has a special code. When the ignition is
switched on, this code must be recognised in
order for starting to be possible.
A few seconds after switching off the ignition,
this system locks the engine control system,
therefore preventing the engine from being
started in the event of a break-in.
In the event of a fault, you are informed
by illumination of this warning lamp, an
audible signal and a message on the screen.
The vehicle will not start; contact a PEUGEOT
dealer as soon as possible.
Starting/switching off the
engine
Starting
The parking brake must be applied.
►
With a manual gearbox, shift the gear lever
into neutral, press the clutch pedal to the floor
and keep the pedal down until the engine runs.
►
With
an automatic gearbox, place the selector
in position P then depress the brake pedal.
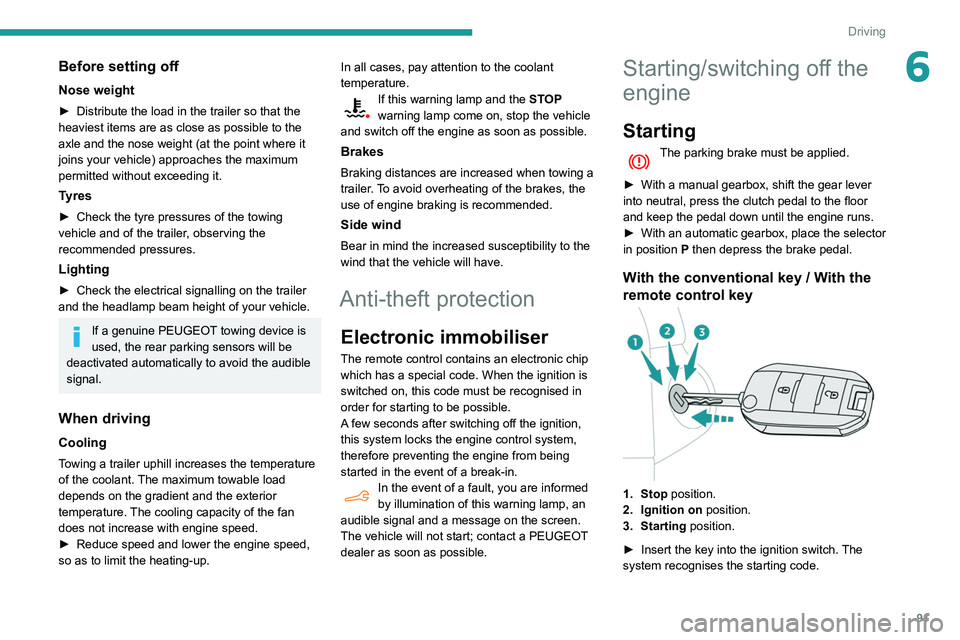
With the conventional key / With the
remote control key
1. Stop position.
2. Ignition on position.
3. Starting position.
►
Insert the key into the ignition switch.
The
system recognises the starting code.
Page 94 of 260
92
Driving
► Unlock the steering column by simultaneously
turning the steering wheel and the key.
In certain circumstances, you may have
to turn the steering wheel firmly to move
the wheels (if the wheels are against a kerb,
for example).
►
T
urn the key to position 2, Ignition On, to
activate the engine pre-heating system.
► Wait until this warning lamp goes off in
the instrument panel, then turn the key to
position 3 without pressing the accelerator pedal,
to operate the starter motor until the engine
starts. As soon as the engine starts, release the
key.
The warning lamp does not come on if the engine is already warm. In some
climatic conditions, the following
recommendations should be followed:
–
In mild conditions, do not leave the engine
at idle to warm up but move off straight away
and drive at moderate speed.
–
Depending on version, if the air
conditioning is activated and the exterior
temperature exceeds 35 °C, the engine’
s
idle speed may increase, up to 1,300 rpm,
depending on the cooling requirements.
–
In wintry conditions, the pre-heater warning
lamp will stay on for a longer period after
switching on the ignition; wait until it goes off
before starting.
– In very severe wintry
conditions (temperature below -23 °C), to
ensure correct operation and durability of your
vehicle’s mechanical components (engine
and gearbox), leave the engine running for
4 minutes before moving off.
Never leave the engine running in an
enclosed area without adequate ventilation:
internal combustion engines emit toxic
exhaust gases, such as carbon monoxide.
Danger of poisoning and death!
With petrol engines , after a cold start,
pre-heating the catalytic converter can
cause clearly-felt engine vibrations when
stationary, with the engine running, for
anything up to 2 minutes (accelerated idle
speed).
If the engine does not start straight away,
switch off the ignition.
Wait a few seconds before operating the
starter motor again. If the engine does not
start after several attempts, do not keep
trying: you risk damaging the starter motor
and the engine.
Contact a PEUGEOT dealer or a qualified
workshop.
To avoid any risk of jamming the pedals: – only use mats which are suited to the
fixings already present in the vehicle; these
fixings must be used,
–
never place one mat on top of another
.
The use of mats not approved by PEUGEOT
may interfere with access to the pedals and
hinder the operation of the cruise control /
speed limiter.
The mats approved by PEUGEOT have two
fixings located below the seat.
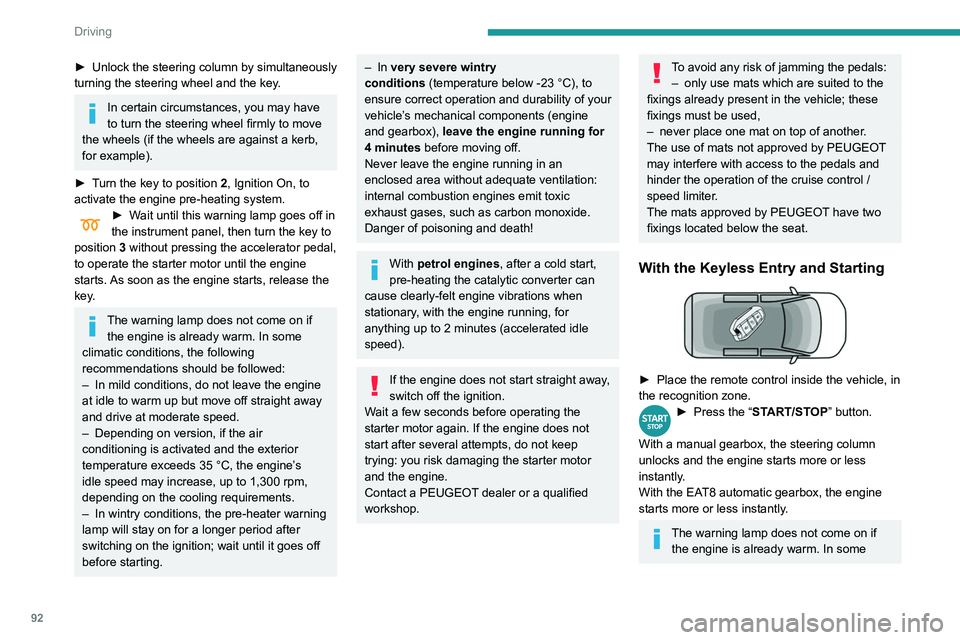
With the Keyless Entry and Starting
► Place the remote control inside the vehicle, in
the recognition zone.
► Press the “ START/STOP” button.
With a manual gearbox, the steering column
unlocks and the engine starts more or less
instantly.
With the EAT8 automatic gearbox, the engine
starts more or less instantly.
The warning lamp does not come on if the engine is already warm. In some
Page 143 of 260
141
Practical information
7► Put each fixing in place and lock them on the
roof one by one.
►
Ensure that the roof bars or the roof rack are
correctly fitted (by shaking them).
The bars are adaptable for each fixing point.
Bonnet
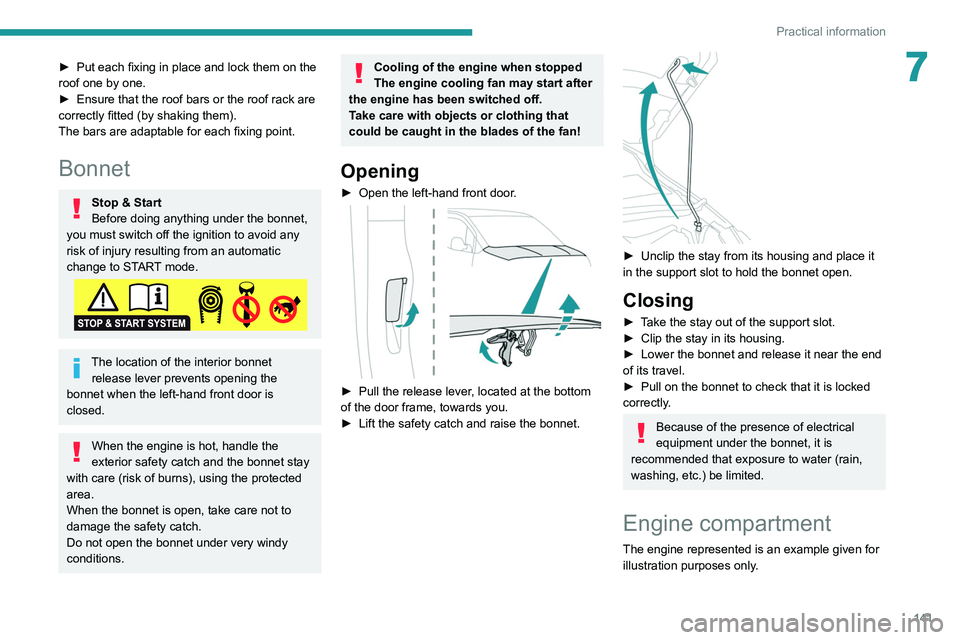
Stop & Start
Before doing anything under the bonnet,
you must switch off the ignition to avoid any
risk of injury resulting from an automatic
change to START mode.
The location of the interior bonnet release lever prevents opening the
bonnet when the left-hand front door is
closed.
When the engine is hot, handle the
exterior safety catch and the bonnet stay
with care (risk of burns), using the protected
area.
When the bonnet is open, take care not to
damage the safety catch.
Do not open the bonnet under very windy
conditions.
Cooling of the engine when stopped
The engine cooling fan may start after
the engine has been switched off.
Take care with objects or clothing that
could be caught in the blades of the fan!
Opening
► Open the left-hand front door .
► Pull the release lever, located at the bottom
of the door frame, towards you.
►
Lift the safety catch and raise the bonnet.
► Unclip the stay from its housing and place it
in the support slot to hold the bonnet open.
Closing
► Take the stay out of the support slot.
► Clip the stay in its housing.
►
Lower the bonnet and release it near the end
of its travel.
►
Pull on the bonnet to check that it is locked
correctly
.
Because of the presence of electrical
equipment under the bonnet, it is
recommended that exposure to water (rain,
washing, etc.) be limited.
Engine compartment
The engine represented is an example given for
illustration purposes only.
Page 144 of 260
142
Practical information
► Reinsert the dipstick and push fully down,
then pull it out again to visually check the oil
level: the correct level is between marks A (max)
and B (min).
Do not start the engine if the level is:
– above mark A: contact a PEUGEOT dealer or
a qualified workshop.
– below mark B: top up the engine oil
immediately.
Oil grade
Before topping up or changing the engine
oil, check that the oil is suitable for the engine
and complies with the recommendations in
the service schedule supplied with the vehicle
(or available from your PEUGEOT dealer and
qualified workshops).
Use of non-recommended oil may invalidate
the contractual warranty in the event of
engine failure.
Topping up the engine oil level
The location of the oil filler cap is shown in the
corresponding underbonnet layout view.
► Add oil in small quantities, avoiding any spills
on engine components (risk of fire).
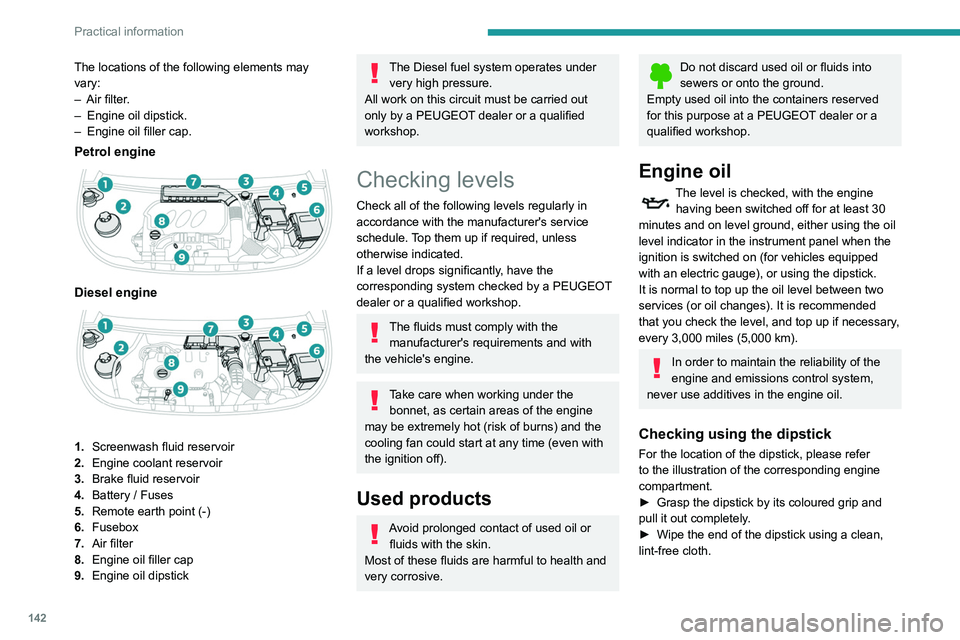
The locations of the following elements may
varyW
–
Air filter
.
–
Engine oil dipstick.
–
Engine oil filler cap.
Petrol engine
Diesel engine
1. Screenwash fluid reservoir
2. Engine coolant reservoir
3. Brake fluid reservoir
4. Battery / Fuses
5. Remote earth point (-)
6. Fusebox
7. Air filter
8. Engine oil filler cap
9. Engine oil dipstick
The Diesel fuel system operates under
very high pressure.
All work on this circuit must be carried out
only by a PEUGEOT dealer or a qualified
workshop.
Checking levels
Check all of the following levels regularly in
accordance with the manufacturer's service
schedule. Top them up if required, unless
otherwise indicated.
If a level drops significantly, have the
corresponding system checked by a PEUGEOT
dealer or a qualified workshop.
The fluids must comply with the manufacturer's requirements and with
the vehicle's engine.
Take care when working under the bonnet, as certain areas of the engine
may be extremely hot (risk of burns) and the
cooling fan could start at any time (even with
the ignition off).
Used products
Avoid prolonged contact of used oil or fluids with the skin.
Most of these fluids are harmful to health and
very corrosive.
Do not discard used oil or fluids into
sewers or onto the ground.
Empty used oil into the containers reserved
for this purpose at a PEUGEOT dealer or a
qualified workshop.
Engine oil
The level is checked, with the engine having been switched off for at least 30
minutes and on level ground, either using the oil
level indicator in the instrument panel when the
ignition is switched on (for vehicles equipped
with an electric gauge), or using the dipstick.
It is normal to top up the oil level between two
services (or oil changes). It is recommended
that you check the level, and top up if necessary,
every 3,000 miles (5,000 km).
In order to maintain the reliability of the
engine and emissions control system,
never use additives in the engine oil.
Checking using the dipstick
For the location of the dipstick, please refer
to the illustration of the corresponding engine
compartment.
►
Grasp the dipstick by its coloured grip and
pull it out completely
.
►
Wipe the end of the dipstick using a clean,
lint-free cloth.
Page 145 of 260
143
Practical information
7
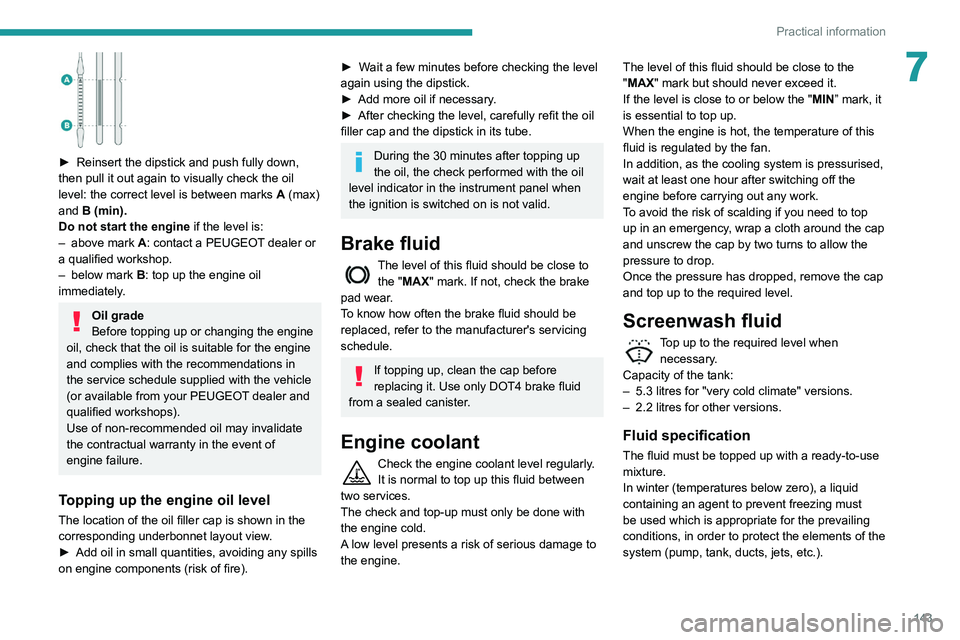
► Reinsert the dipstick and push fully down,
then pull it out again to visually check the oil
level: the correct level is between marks A
(max)
and B (min).
Do not start the engine if the level is:
–
above mark
A: contact a PEUGEOT dealer or
a qualified workshop.
–
below mark B
: top up the engine oil
immediately.
Oil grade
Before topping up or changing the engine
oil, check that the oil is suitable for the engine
and complies with the recommendations in
the service schedule supplied with the vehicle
(or available from your PEUGEOT dealer and
qualified workshops).
Use of non-recommended oil may invalidate
the contractual warranty in the event of
engine failure.
Topping up the engine oil level
The location of the oil filler cap is shown in the
corresponding underbonnet layout view.
►
Add oil in small quantities, avoiding any spills
on engine components (risk of fire).
► Wait a few minutes before checking the level
again using the dipstick.
►
Add more oil if necessary
.
►
After checking the level, carefully refit the oil
filler cap and the dipstick in its tube.
During the 30 minutes after topping up
the oil, the check performed with the oil
level indicator in the instrument panel when
the ignition is switched on is not valid.
Brake fluid
The level of this fluid should be close to the "MAX" mark. If not, check the brake
pad wear.
To know how often the brake fluid should be
replaced, refer to the manufacturer's servicing
schedule.
If topping up, clean the cap before
replacing it. Use only DOT4 brake fluid
from a sealed canister.
Engine coolant
Check the engine coolant level regularly.
It is normal to top up this fluid between
two services.
The check and top-up must only be done with
the engine cold.
A low level presents a risk of serious damage to
the engine. The level of this fluid should be close to the
"MAX" mark but should never exceed it.
If the level is close to or below the "
MIN” mark, it
is essential to top up.
When the engine is hot, the temperature of this
fluid is regulated by the fan.
In addition, as the cooling system is pressurised,
wait at least one hour after switching off the
engine before carrying out any work.
To avoid the risk of scalding if you need to top
up in an emergency, wrap a cloth around the cap
and unscrew the cap by two turns to allow the
pressure to drop.
Once the pressure has dropped, remove the cap
and top up to the required level.
Screenwash fluid
Top up to the required level when necessary.
Capacity of the tank:
–
5.3 litres for "very cold climate" versions.
–
2.2 litres for other versions.
Fluid specification
The fluid must be topped up with a ready-to-use
mixture.
In winter (temperatures below zero), a liquid
containing an agent to prevent freezing must
be used which is appropriate for the prevailing
conditions, in order to protect the elements of the
system (pump, tank, ducts, jets, etc.).