Parts PONTIAC GRAND PRIX 2004 Service Manual
[x] Cancel search | Manufacturer: PONTIAC, Model Year: 2004, Model line: GRAND PRIX, Model: PONTIAC GRAND PRIX 2004Pages: 432, PDF Size: 2.99 MB
Page 334 of 432
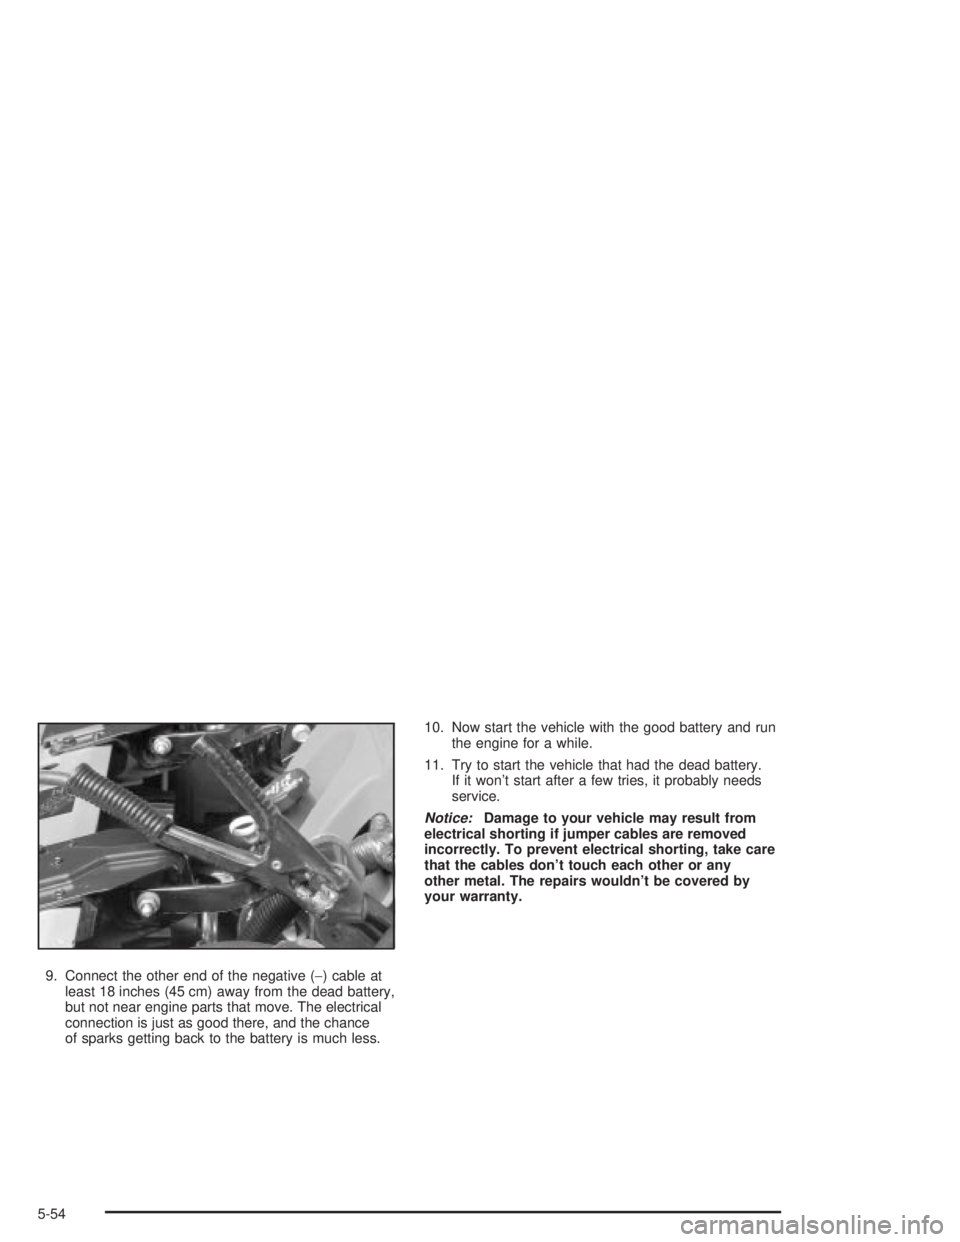
9. Connect the other end of the negative (-) cable at
least 18 inches (45 cm) away from the dead battery,
but not near engine parts that move. The electrical
connection is just as good there, and the chance
of sparks getting back to the battery is much less.10. Now start the vehicle with the good battery and run
the engine for a while.
11. Try to start the vehicle that had the dead battery.
If it won't start after a few tries, it probably needs
service.
Notice:Damage to your vehicle may result from
electrical shorting if jumper cables are removed
incorrectly. To prevent electrical shorting, take care
that the cables don't touch each other or any
other metal. The repairs wouldn't be covered by
your warranty.
5-54
Page 347 of 432
Windshield Wiper Blade
Replacement
Remove and replace a windshield wiper by following
these steps:
1. Put the ignition in ACCESSORY and turn the
windshield wipers on.
2. Stop the windshield wipers when they are in the
upright position by turning the key to the off position.
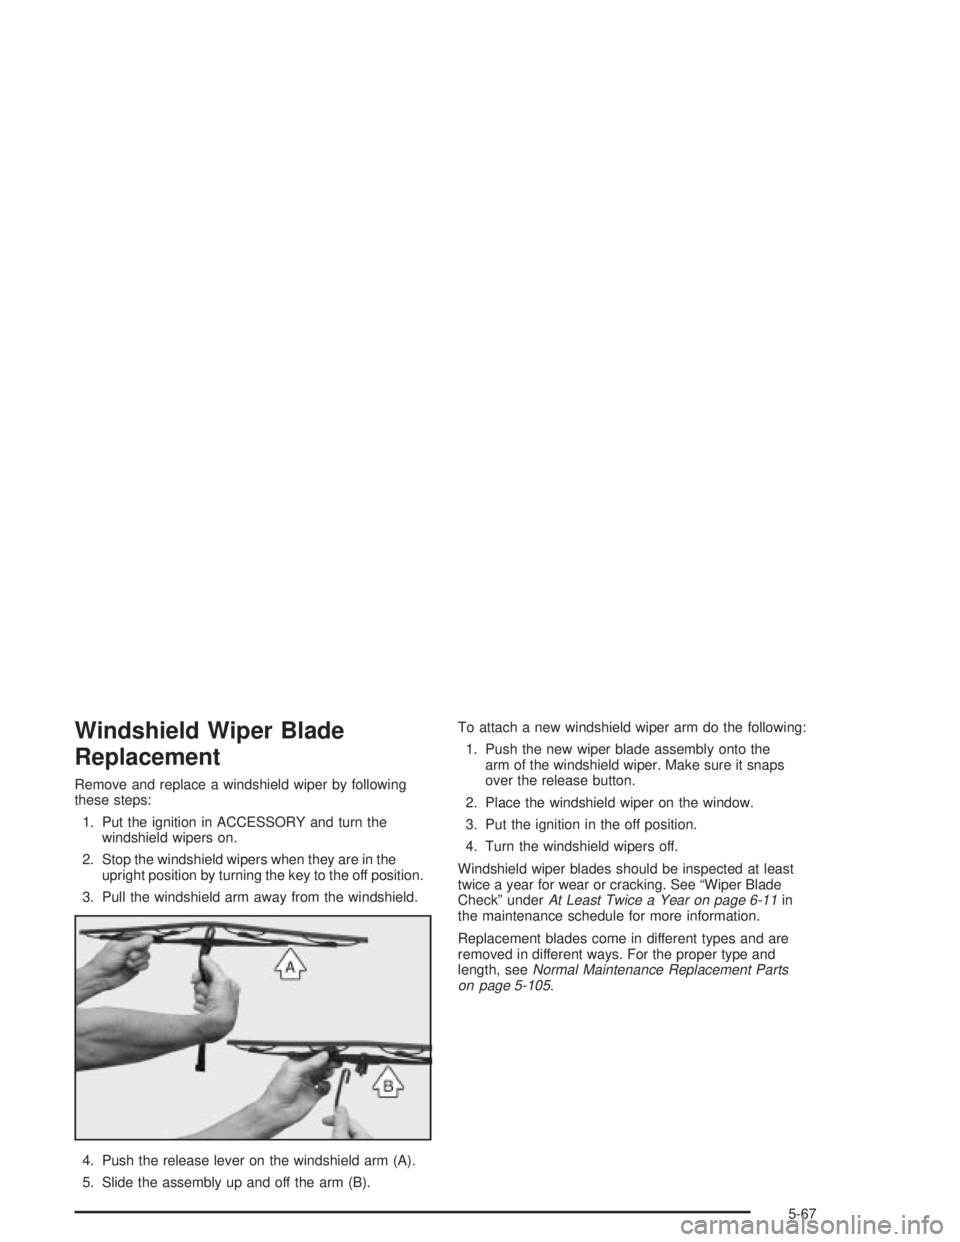
3. Pull the windshield arm away from the windshield.
4. Push the release lever on the windshield arm (A).
5. Slide the assembly up and off the arm (B).To attach a new windshield wiper arm do the following:
1. Push the new wiper blade assembly onto the
arm of the windshield wiper. Make sure it snaps
over the release button.
2. Place the windshield wiper on the window.
3. Put the ignition in the off position.
4. Turn the windshield wipers off.
Windshield wiper blades should be inspected at least
twice a year for wear or cracking. See ªWiper Blade
Checkº under
At Least Twice a Year on page 6-11in
the maintenance schedule for more information.
Replacement blades come in different types and are
removed in different ways. For the proper type and
length, see
Normal Maintenance Replacement Parts
on page 5-105.
5-67
Page 351 of 432
Tire Inspection and Rotation
Tires should be rotated every 7,500 miles (12 500 km).
Any time you notice unusual wear, rotate your tires
as soon as possible and check wheel alignment. Also
check for damaged tires or wheels. See
When It Is Time
for New Tires on page 5-72andWheel Replacement
on page 5-75for more information.
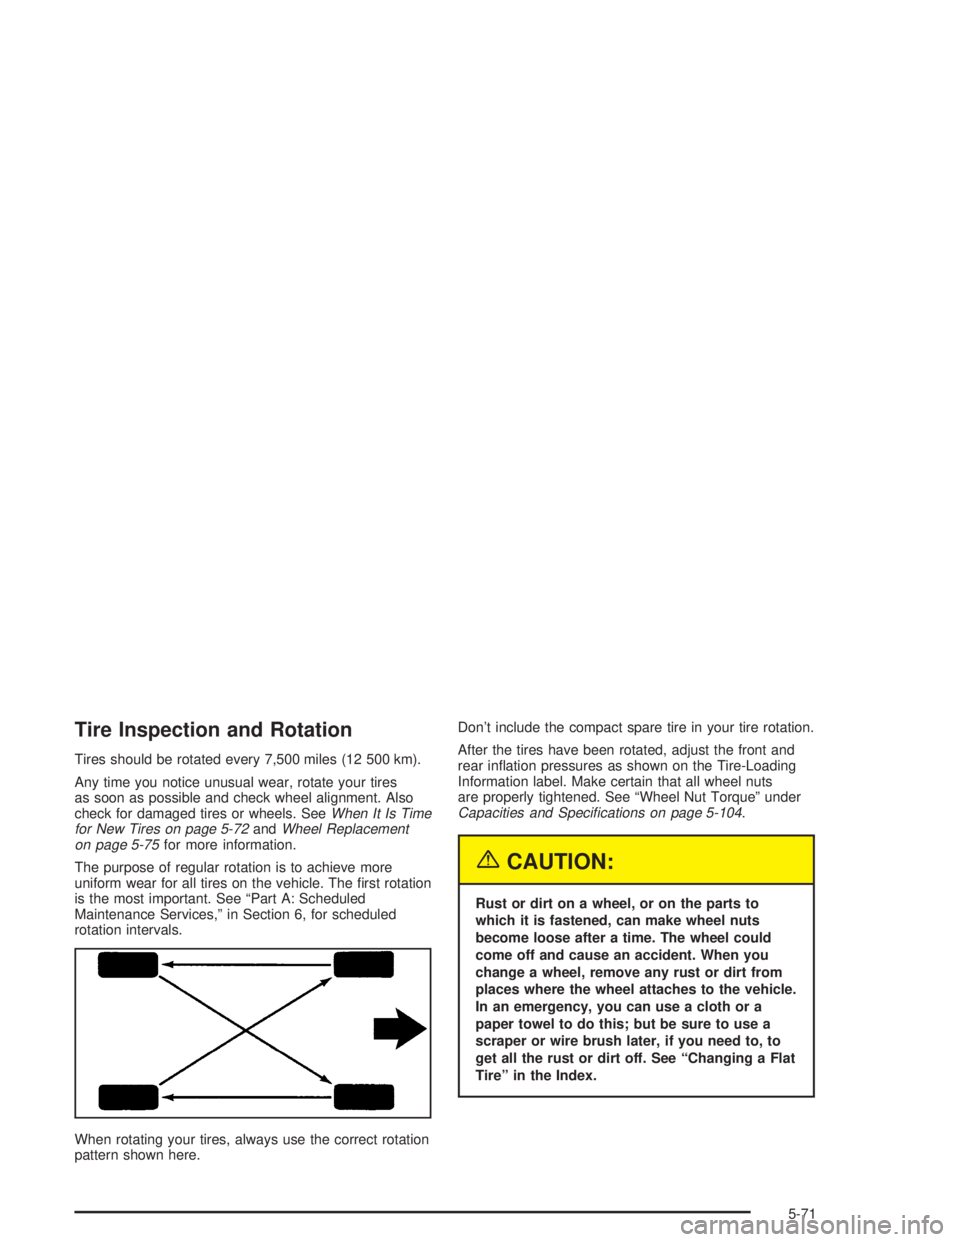
The purpose of regular rotation is to achieve more
uniform wear for all tires on the vehicle. The ®rst rotation
is the most important. See ªPart A: Scheduled
Maintenance Services,º in Section 6, for scheduled
rotation intervals.
When rotating your tires, always use the correct rotation
pattern shown here.Don't include the compact spare tire in your tire rotation.
After the tires have been rotated, adjust the front and
rear in¯ation pressures as shown on the Tire-Loading
Information label. Make certain that all wheel nuts
are properly tightened. See ªWheel Nut Torqueº under
Capacities and Speci®cations on page 5-104.
{CAUTION:
Rust or dirt on a wheel, or on the parts to
which it is fastened, can make wheel nuts
become loose after a time. The wheel could
come off and cause an accident. When you
change a wheel, remove any rust or dirt from
places where the wheel attaches to the vehicle.
In an emergency, you can use a cloth or a
paper towel to do this; but be sure to use a
scraper or wire brush later, if you need to, to
get all the rust or dirt off. See ªChanging a Flat
Tireº in the Index.
5-71
Page 356 of 432
Each new wheel should have the same load-carrying
capacity, diameter, width, offset and be mounted
the same way as the one it replaces.
If you need to replace any of your wheels, wheel bolts or
wheel nuts, replace them only with new GM original
equipment parts. This way, you will be sure to have the
right wheel, wheel bolts and wheel nuts for your vehicle.
{CAUTION:
Using the wrong replacement wheels, wheel
bolts or wheel nuts on your vehicle can be
dangerous. It could affect the braking and
handling of your vehicle, make your tires lose
air and make you lose control. You could have
a collision in which you or others could be
injured. Always use the correct wheel, wheel
bolts and wheel nuts for replacement.
Notice:The wrong wheel can also cause problems
with bearing life, brake cooling, speedometer or
odometer calibration, headlamp aim, bumper height,
vehicle ground clearance and tire or tire chain
clearance to the body and chassis.
See
Changing a Flat Tire on page 5-78for more
information.
Used Replacement Wheels
{CAUTION:
Putting a used wheel on your vehicle is
dangerous. You can't know how it's been
used or how far it's been driven. It could fail
suddenly and cause a crash. If you have to
replace a wheel, use a new GM original
equipment wheel.
5-76
Page 357 of 432
Tire Chains
{CAUTION:
If your vehicle has P225/55R17 size tires, don't
use tire chains, there's not enough clearance.
Tire chains used on a vehicle without the
proper amount of clearance can cause damage
to the brakes, suspension or other vehicle
parts. The area damaged by the tire chains
could cause you to lose control of your vehicle
and you or others may be injured in a crash.
Use another type of traction device only if its
manufacturer recommends it for use on your
vehicle and tire size combination and road
conditions. Follow that manufacturer's
instructions. To help avoid damage to your
CAUTION: (Continued)
CAUTION: (Continued)
vehicle, drive slowly, readjust or remove the
device if it's contacting your vehicle, and don't
spin your wheels.
If you do ®nd traction devices that will ®t,
install them on the front tires.
Notice:If your vehicle does not have P225/55R17
size tires, use tire chains only where legal and
only when you must. Use only SAE Class²S²type
chains that are the proper size for your tires.
Install them on the front tires and tighten them as
tightly as possible with the ends securely fastened.
Drive slowly and follow the chain manufacturer's
instructions. If you can hear the chains contacting
your vehicle, stop and retighten them. If the contact
continues, slow down until it stops. Driving too
fast or spinning the wheels with chains on will
damage your vehicle.
5-77
Page 364 of 432
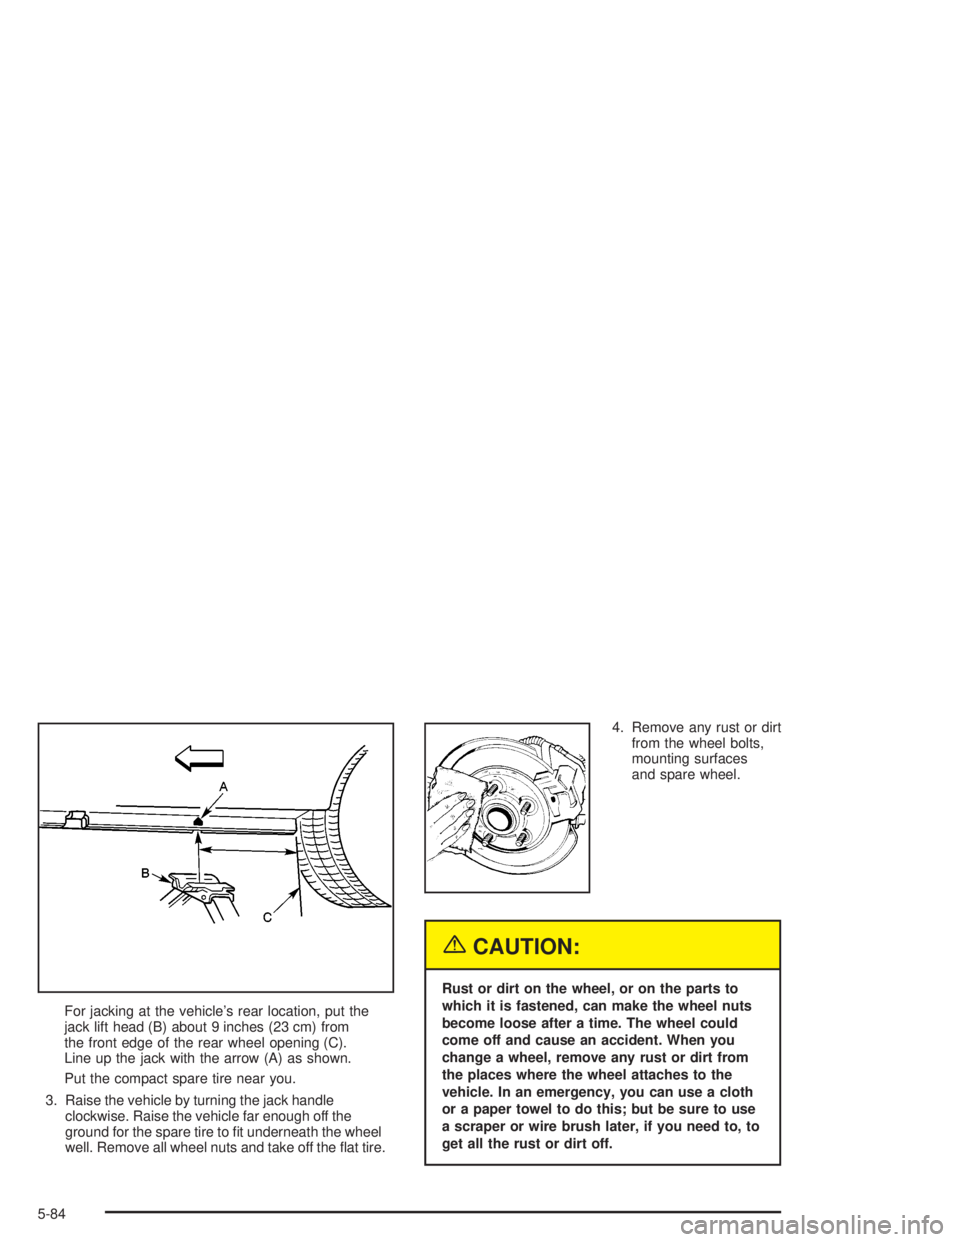
For jacking at the vehicle's rear location, put the
jack lift head (B) about 9 inches (23 cm) from
the front edge of the rear wheel opening (C).
Line up the jack with the arrow (A) as shown.
Put the compact spare tire near you.
3. Raise the vehicle by turning the jack handle
clockwise. Raise the vehicle far enough off the
ground for the spare tire to ®t underneath the wheel
well. Remove all wheel nuts and take off the ¯at tire.4. Remove any rust or dirt
from the wheel bolts,
mounting surfaces
and spare wheel.
{CAUTION:
Rust or dirt on the wheel, or on the parts to
which it is fastened, can make the wheel nuts
become loose after a time. The wheel could
come off and cause an accident. When you
change a wheel, remove any rust or dirt from
the places where the wheel attaches to the
vehicle. In an emergency, you can use a cloth
or a paper towel to do this; but be sure to use
a scraper or wire brush later, if you need to, to
get all the rust or dirt off.
5-84
Page 369 of 432
Compact Spare Tire
Although the compact spare tire was fully in¯ated when
your vehicle was new, it can lose air after a time.
Check the in¯ation pressure regularly. It should be
60 psi (420 kPa).
After installing the compact spare on your vehicle, you
should stop as soon as possible and make sure
your spare tire is correctly in¯ated. The compact spare
is made to perform well at speeds up to 65 mph
(105 km/h) for distances up to 3,000 miles (5 000 km),
so you can ®nish your trip and have your full-size
tire repaired or replaced where you want. Of course,
it's best to replace your spare with a full-size tire as soon
as you can. Your spare will last longer and be in good
shape in case you need it again.
Notice:When the compact spare is installed, don't
take your vehicle through an automatic car wash
with guide rails. The compact spare can get caught
on the rails. That can damage the tire and wheel,
and maybe other parts of your vehicle.
Don't use your compact spare on other vehicles.
And don't mix your compact spare tire or wheel with
other wheels or tires. They won't ®t. Keep your spare tire
and its wheel together.
Notice:Tire chains won't ®t your compact spare.
Using them can damage your vehicle and can
damage the chains too. Don't use tire chains on
your compact spare.
5-89
Page 375 of 432
Cleaning Aluminum Wheels
Keep your wheels clean using a soft clean cloth with
mild soap and water. Rinse with clean water. After
rinsing thoroughly, dry with a soft clean towel. A wax
may then be applied.
The surface of these wheels is similar to the painted
surface of your vehicle. Don't use strong soaps,
chemicals, abrasive polishes, abrasive cleaners,
cleaners with acid, or abrasive cleaning brushes on
them because you could damage the surface. Do not
use chrome polish on aluminum wheels.
Don't take your vehicle through an automatic car wash
that has silicone carbide tire cleaning brushes. These
brushes can also damage the surface of these wheels.
Cleaning Tires
To clean your tires, use a stiff brush with tire cleaner.
Notice:When applying a tire dressing, always take
care to wipe off any overspray or splash from all
painted surfaces on the body or wheels of the
vehicle. Petroleum-based products may damage the
paint ®nish and tires.
Sheet Metal Damage
If your vehicle is damaged and requires sheet metal
repair or replacement, make sure the body repair shop
applies anti-corrosion material to parts repaired or
replaced to restore corrosion protection.
Original manufacturer replacement parts will provide the
corrosion protection while maintaining the warranty.
Finish Damage
Any stone chips, fractures or deep scratches in the
®nish should be repaired right away. Bare metal
will corrode quickly and may develop into major repair
expense.
Minor chips and scratches can be repaired with touch-up
materials avaliable from your dealer. Larger areas of
®nish damage can be corrected in your dealer's
body and paint shop.
5-95
Page 376 of 432
Underbody Maintenance
Chemicals used for ice and snow removal and dust
control can collect on the underbody. If these are not
removed, accelerated corrosion (rust) can occur on
the underbody parts such as fuel lines, frame, ¯oor pan
and exhaust system even though they have corrosion
protection.
At least every spring, ¯ush these materials from the
underbody with plain water. Clean any areas where mud
and debris can collect. Dirt packed in close areas of
the frame should be loosened before being ¯ushed.
Your dealer or an underbody car washing system can
do this for you.
Chemical Paint Spotting
Some weather and atmospheric conditions can create a
chemical fallout. Airborne pollutants can fall upon and
attack painted surfaces on your vehicle. This damage can
take two forms: blotchy, ring-shaped discolorations, and
small, irregular dark spots etched into the paint surface.
Although no defect in the paint job causes this, GM will
repair, at no charge to the owner, the surfaces of
new vehicles damaged by this fallout condition within
12 months or 12,000 miles (20 000 km) of purchase,
whichever occurs ®rst.
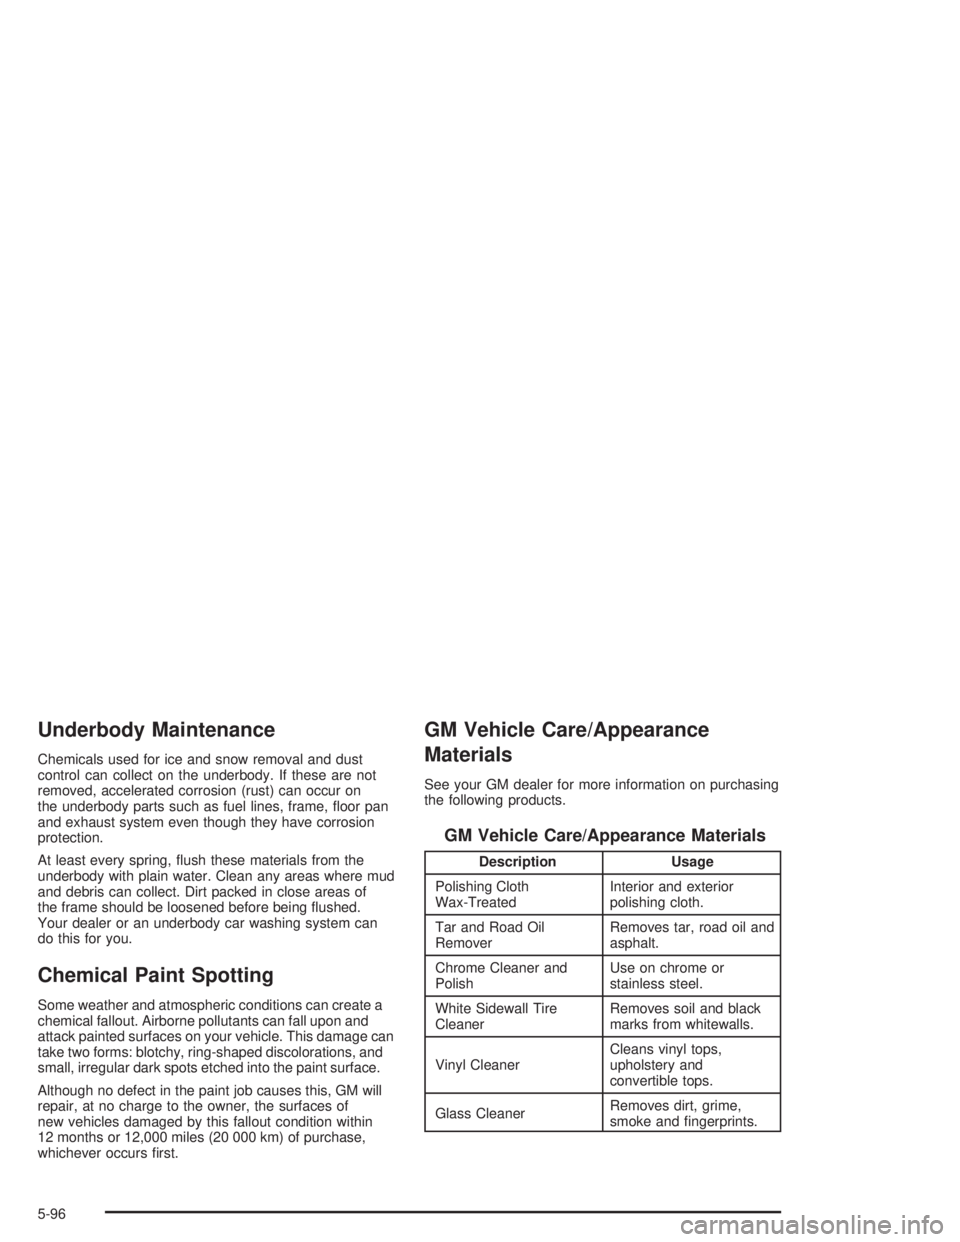
GM Vehicle Care/Appearance
Materials
See your GM dealer for more information on purchasing
the following products.
GM Vehicle Care/Appearance Materials
Description Usage
Polishing Cloth
Wax-TreatedInterior and exterior
polishing cloth.
Tar and Road Oil
RemoverRemoves tar, road oil and
asphalt.
Chrome Cleaner and
PolishUse on chrome or
stainless steel.
White Sidewall Tire
CleanerRemoves soil and black
marks from whitewalls.
Vinyl CleanerCleans vinyl tops,
upholstery and
convertible tops.
Glass CleanerRemoves dirt, grime,
smoke and ®ngerprints.
5-96
Page 377 of 432
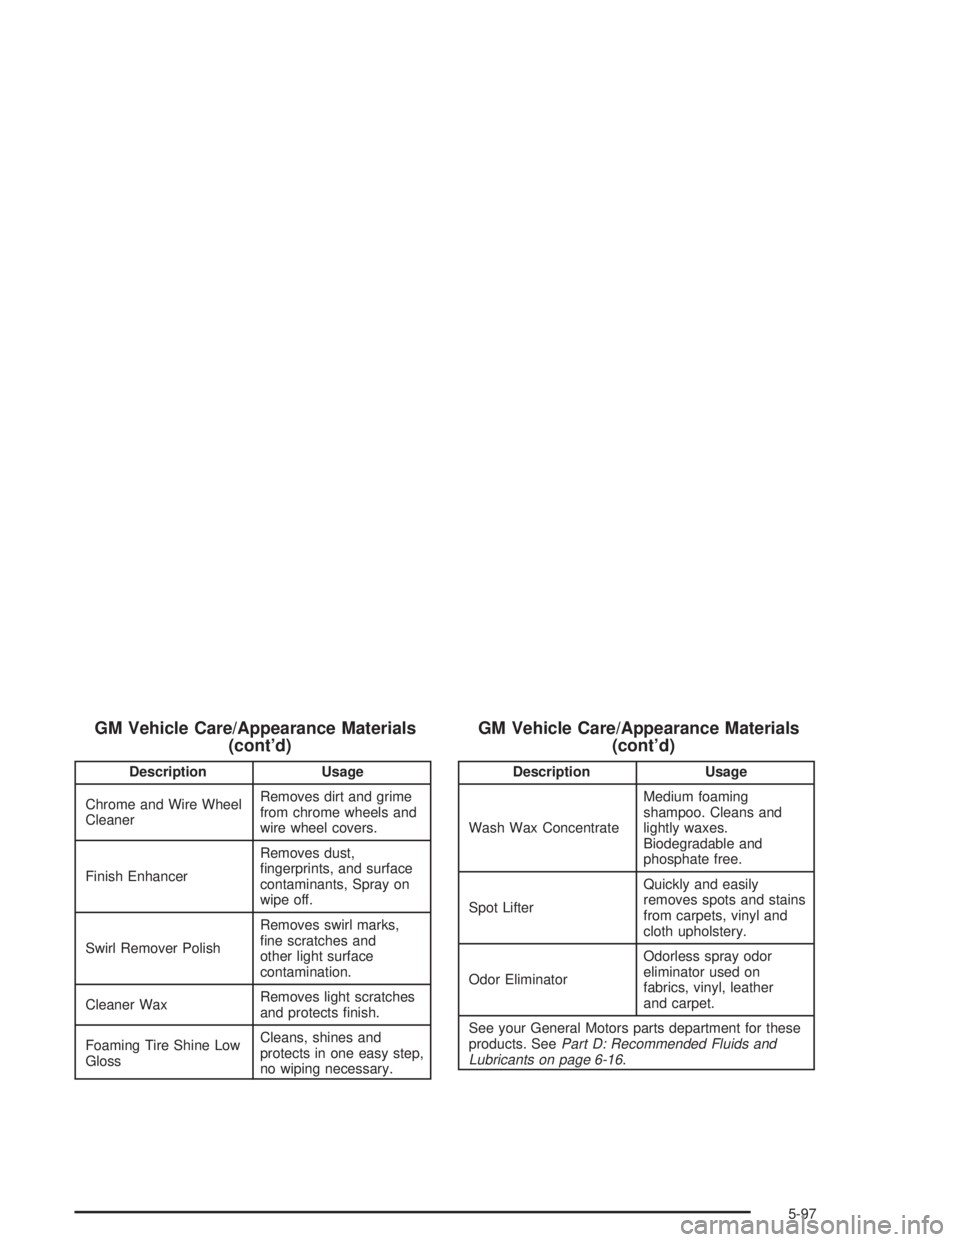
GM Vehicle Care/Appearance Materials
(cont'd)
Description Usage
Chrome and Wire Wheel
CleanerRemoves dirt and grime
from chrome wheels and
wire wheel covers.
Finish EnhancerRemoves dust,
®ngerprints, and surface
contaminants, Spray on
wipe off.
Swirl Remover PolishRemoves swirl marks,
®ne scratches and
other light surface
contamination.
Cleaner WaxRemoves light scratches
and protects ®nish.
Foaming Tire Shine Low
GlossCleans, shines and
protects in one easy step,
no wiping necessary.
GM Vehicle Care/Appearance Materials
(cont'd)
Description Usage
Wash Wax ConcentrateMedium foaming
shampoo. Cleans and
lightly waxes.
Biodegradable and
phosphate free.
Spot LifterQuickly and easily
removes spots and stains
from carpets, vinyl and
cloth upholstery.
Odor EliminatorOdorless spray odor
eliminator used on
fabrics, vinyl, leather
and carpet.
See your General Motors parts department for these
products. See
Part D: Recommended Fluids and
Lubricants on page 6-16.
5-97