ECU PONTIAC VIBE 2010 Service Manual
[x] Cancel search | Manufacturer: PONTIAC, Model Year: 2010, Model line: VIBE, Model: PONTIAC VIBE 2010Pages: 318, PDF Size: 1.7 MB
Page 105 of 318
OnStar System
OnStar®System
OnStar uses several innovative
technologies and live advisors to
provide a wide range of safety,
security, information, and
convenience services. If the airbags
deploy, the system is designed to
make an automatic call to OnStar
Emergency advisors who can
request emergency services be
sent to your location. If the keys
are locked in the vehicle, call OnStar
at 1-888-4-ONSTAR to have asignal sent to unlock the doors.
OnStar Hands-Free Calling,
including 30 trial minutes good
for 60 days, is available on most
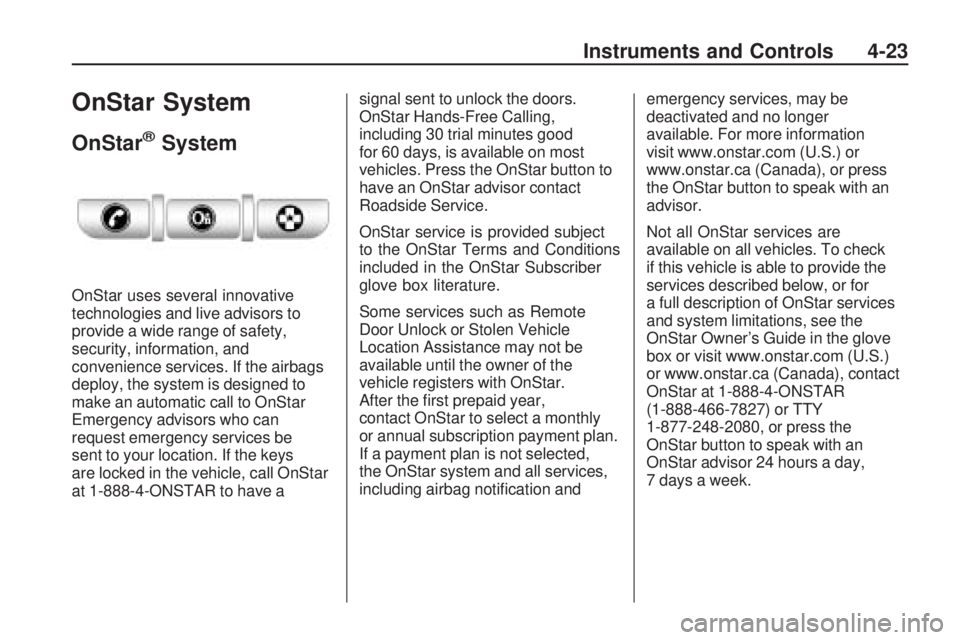
vehicles. Press the OnStar button to
have an OnStar advisor contact
Roadside Service.
OnStar service is provided subject
to the OnStar Terms and Conditions
included in the OnStar Subscriber
glove box literature.
Some services such as Remote
Door Unlock or Stolen Vehicle
Location Assistance may not be
available until the owner of the
vehicle registers with OnStar.
After the first prepaid year,
contact OnStar to select a monthly
or annual subscription payment plan.
If a payment plan is not selected,
the OnStar system and all services,
including airbag notification and
emergency services, may be
deactivated and no longer
available. For more information
visit www.onstar.com (U.S.) or
www.onstar.ca (Canada), or press
the OnStar button to speak with an
advisor.
Not all OnStar services are
available on all vehicles. To check
if this vehicle is able to provide the
services described below, or for
a full description of OnStar services
and system limitations, see the
OnStar Owner’s Guide in the glove
box or visit www.onstar.com (U.S.)
or www.onstar.ca (Canada), contact
OnStar at 1-888-4-ONSTAR
(1-888-466-7827) or TTY
1-877-248-2080, or press the
OnStar button to speak with an
OnStar advisor 24 hours a day,
7 days a week.
Instruments and Controls 4-23
Page 121 of 318

Scanning Categories (CAT)
To scan a desired category:
1. Press the CAT button to enterthe category select mode.
2. Turn the TUNE ADJ knob to select a category.
3. Press
yorzfor two seconds
to scan the stations in the
selected category.
4. Press
yorzagain to stop
scanning.
NOT FOUND displays if the desired
category cannot be found.
XM Radio Messages
xL (Explicit Language Channels):
These channels, or any others,
can be blocked by calling
1-800-852-XMXM (9696).
Updating: The encryption code in
the receiver is being updated, and
no action is required. This process
should take no longer than
30 seconds. No Signal:
The system is
functioning correctly, but the
vehicle is in a location that is blocking
the XM signal. When the vehicle is
moved into an open area, the signal
should return.
Loading XM: The audio system is
acquiring and processing audio and
text data. No action is needed. This
message should disappear shortly.
CH Off Air: This channel is not
currently in service. Tune in
to another channel.
CH Unauth: This channel is
blocked or cannot be received with
your XM Subscription package.
CH Unavail: This previously
assigned channel is no longer
assigned. Tune to another station.
If this station was one of the presets,
choose another station for that
preset button.
No Info: No artist, song title,
category, or text information is
available at this time on this
channel. The system is working
properly. Not Found:
There are no channels
available for the selected category.
The system is working properly.
XM Locked: The XM receiver in
the vehicle may have previously
been in another vehicle. For security
purposes, XM receivers cannot be
swapped between vehicles. If this
message is received after having the
vehicle serviced, check with your
dealer/retailer.
Radio ID: If tuned to channel 0,
this message will alternate with the
XM Radio 8 digit radio ID label.
This label is needed to activate
the service. Consult with your
dealer/retailer.
Unknown: If this message is
received when tuned to channel 0,
there could be a receiver fault.
Consult with your dealer/retailer.
Chk XMRcvr: If this message does
not clear within a short period of
time, the receiver may have a fault.
Consult with your dealer/retailer.
Infotainment System 6-7
Page 122 of 318
Radio Reception
Frequency interference and static
can occur during normal radio
reception if items such as cell phone
chargers, vehicle convenience
accessories, and external electronic
devices are plugged into the
accessory power outlet. If there is
interference or static, unplug the item
from the accessory power outlet.
FM
FM signals only reach about 10 to
40 miles (16 to 65 km). Although the
radio has a built-in electronic circuit
that automatically works to reduce
interference, some static can occur,
especially around tall buildings or
hills, causing the sound to fade in
and out.
AM
The range for most AM stations is
greater than for FM, especially at
night. The longer range can cause
station frequencies to interfere
with each other. For better radio
reception, most AM radio stations
boost the power levels during the
day, and then reduce these levels
during the night. Static can also
occur when things like storms and
power lines interfere with radio
reception. When this happens, try
reducing the treble on the radio.
XM™ Satellite Radio Service
XM Satellite Radio Service
gives digital radio reception from
coast-to-coast in the 48 contiguous
United States, and in Canada. Just
as with FM, tall buildings or hills can
interfere with satellite radio signals,
causing the sound to fade in and out.
In addition, traveling or standing
under heavy foliage, bridges,
garages, or tunnels may cause loss
of the XM signal for a period of time.
Cellular Phone Usage
Cellular phone usage may cause
interference with the vehicle’s radio.
This interference may occur when
making or receiving phone calls,
charging the phone’s battery,
or simply having the phone on.
This interference can cause an
increased level of static while
listening to the radio. If static is
received while listening to the radio,
unplug the cellular phone and turn
it off.
Fixed Mast Antenna
The fixed mast antenna can
withstand most car washes without
being damaged as long as it is
securely attached to the base.
If the mast becomes slightly bent,
straighten it out by hand. If the mast
is badly bent, replace it.
Occasionally check to make sure
the antenna is tightened to its base.
If tightening is required, tighten
by hand.
6-8 Infotainment System
Page 149 of 318
Never exceed the GVWR for the
vehicle, or the Gross Axle Weight
Rating (GAWR) for either the
front or rear axle.
And, if you do have a heavy load,
you should spread it out. See
“Steps for Determining Correct
Load Limit” earlier in this section.
{CAUTION
Do not load the vehicle any
heavier than the Gross Vehicle
Weight Rating (GVWR), or
either the maximum front or
rear Gross Axle Weight Rating
(GAWR). If you do, parts on
the vehicle can break, and it
can change the way your
vehicle handles. These could
cause you to lose control and
crash. Also, overloading can
shorten the life of the vehicle. Notice
:Overloading your
vehicle may cause damage.
Repairs would not be covered
by your warranty. Do not
overload your vehicle.
If you put things inside your
vehicle — like suitcases,
tools, packages, or anything
else — they will go as fast as the
vehicle goes. If you have to stop
or turn quickly, or if there is a
crash, they will keep going.
{CAUTION
Things you put inside your
vehicle can strike and injure
people in a sudden stop or
turn, or in a crash.
•Put things in the rear area
of your vehicle. Try to
spread the weight evenly.
If you have fold-down rear
seats, you will find four
(Continued)
CAUTION (Continued) anchors on the back wall
of your trunk. You can use
these anchors to tie down
lighter loads. They are not
strong enough for heavy
things, however, so put
them as far forward as
you can in the trunk or
rear area.
•Never stack heavier
things, like suitcases,
inside the vehicle so that
some of them are above
the tops of the seats.
•Do not leave an unsecured
child restraint in your
vehicle.
•When you carry something
inside the vehicle, secure it
whenever you can.
•Do not leave a seat folded
down unless you need to.
Driving and Operating 8-15
Page 179 of 318
•Vehicles with an automatic
transmission can tow in D (Drive).
Shift the transmission to a lower
gear if the transmission shifts too
often under heavy loads and/or
hilly conditions. For vehicles with
a manual transmission, it is better
not to use the highest gear.
•Use the Sport Shift mode and the
cruise control when towing.
•Obey speed limit restrictions
when towing a trailer. Do not drive
faster than the maximum posted
speed for trailers, or no more than
90 km/h (55 mph), to save wear
on the vehicle’s parts.
Driving with a Trailer
Towing a trailer requires a certain
amount of experience. Get to know
the rig before setting out for the open
road. Get acquainted with the feel of
handling and braking with the added
weight of the trailer. And always keep
in mind that the vehicle you are
driving is now longer and not as
responsive as the vehicle is by itself.Before starting, check all trailer
hitch parts and attachments, safety
chains, electrical connectors, lamps,
tires and mirror adjustments. If the
trailer has electric brakes, start the
vehicle and trailer moving and then
apply the trailer brake controller by
hand to be sure the brakes are
working. This checks the electrical
connection at the same time.
During the trip, check occasionally
to be sure that the load is secure,
and that the lamps and any
trailer brakes are still working.
Towing with StabiliTrak
When towing, the sound of the
StabiliTrak modulator might
be heard. StabiliTrak is reacting to
the vehicle movement caused
by the trailer, which mainly occurs
during cornering. This is normal
when towing heavier trailers.
Following Distance
Stay at least twice as far behind the
vehicle ahead as you would when
driving the vehicle without a trailer.
This can help to avoid situations that
require heavy braking and sudden
turns.
Passing
More passing distance is needed
when towing a trailer. Because the
rig is longer, it is necessary to go
much farther beyond the passed
vehicle before returning to the lane.
Backing Up
Hold the bottom of the steering wheel
with one hand. Then, to move the
trailer to the left, move that hand to
the left. To move the trailer to the
right, move your hand to the right.
Always back up slowly and, if
possible, have someone guide you.
Driving and Operating 8-45
Page 218 of 318
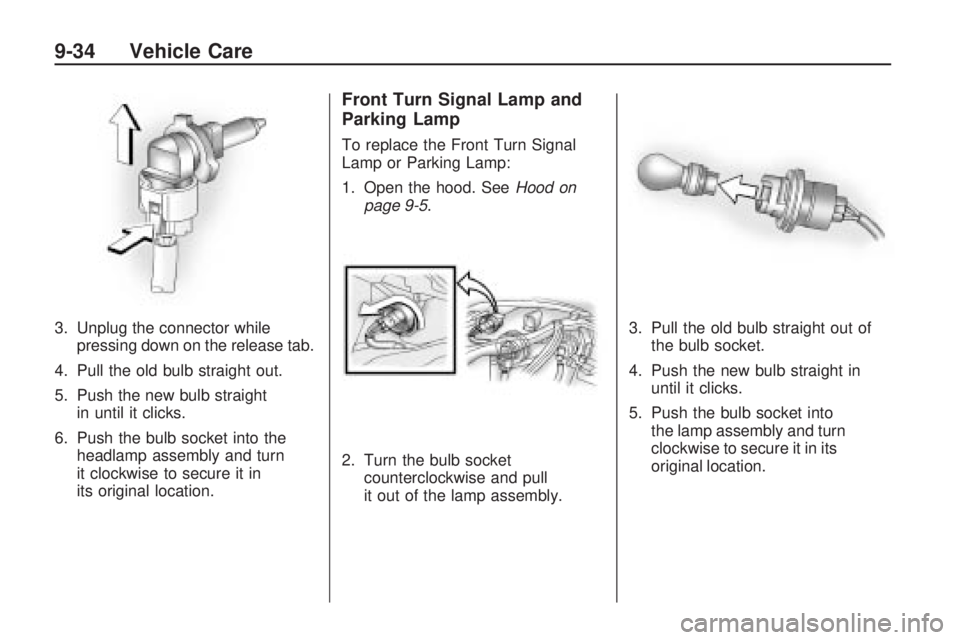
3. Unplug the connector whilepressing down on the release tab.
4. Pull the old bulb straight out.
5. Push the new bulb straight in until it clicks.
6. Push the bulb socket into the headlamp assembly and turn
it clockwise to secure it in
its original location.
Front Turn Signal Lamp and
Parking Lamp
To replace the Front Turn Signal
Lamp or Parking Lamp:
1. Open the hood. See Hood on
page 9-5.
2. Turn the bulb socket counterclockwise and pull
it out of the lamp assembly. 3. Pull the old bulb straight out of
the bulb socket.
4. Push the new bulb straight in until it clicks.
5. Push the bulb socket into the lamp assembly and turn
clockwise to secure it in its
original location.
9-34 Vehicle Care
Page 220 of 318

4. Pull the bulb straight out of thesocket.
5. Push the new bulb straight in until it clicks to secure.
6. Push the bulb socket in and turn it clockwise to secure.
7. Reinstall the cover.
License Plate Lamp
To replace the license plate
lamp bulb:
1. Press the tabs in to disengage them and remove the license
plate lamp assembly. 2. Turn the bulb socket
counterclockwise to remove it
from the license plate assembly.
3. Pull the bulb straight out of the bulb socket.
4. Push the new bulb straight in the bulb socket until it clicks.
5. Push the bulb socket straight into the license plate assembly and
turn it clockwise to secure it.
6. Reinstall the license plate assembly into its original location
making sure the tabs reengage.
9-36 Vehicle Care
Page 224 of 318
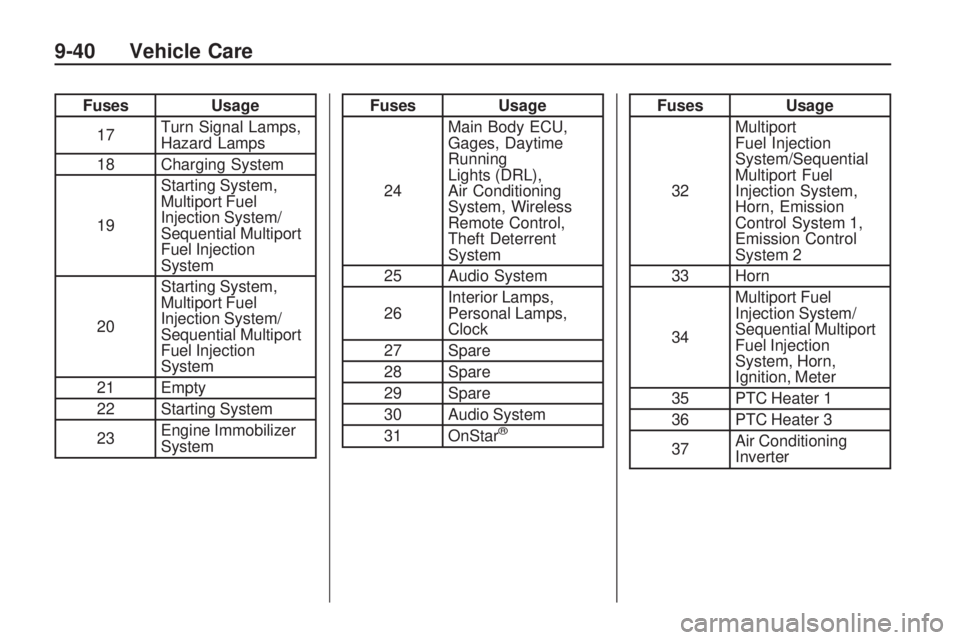
FusesUsage
17 Turn Signal Lamps,
Hazard Lamps
18 Charging System
19 Starting System,
Multiport Fuel
Injection System/
Sequential Multiport
Fuel Injection
System
20 Starting System,
Multiport Fuel
Injection System/
Sequential Multiport
Fuel Injection
System
21 Empty
22 Starting System
23 Engine Immobilizer
SystemFuses
Usage
24 Main Body ECU,
Gages, Daytime
Running
Lights (DRL),
Air Conditioning
System, Wireless
Remote Control,
Theft Deterrent
System
25 Audio System
26 Interior Lamps,
Personal Lamps,
Clock
27 Spare
28 Spare
29 Spare
30 Audio System
31 OnStar
®
Fuses Usage
32 Multiport
Fuel Injection
System/Sequential
Multiport Fuel
Injection System,
Horn, Emission
Control System 1,
Emission Control
System 2
33 Horn
34 Multiport Fuel
Injection System/
Sequential Multiport
Fuel Injection
System, Horn,
Ignition, Meter
35 PTC Heater 1
36 PTC Heater 3
37 Air Conditioning
Inverter
9-40 Vehicle Care
Page 226 of 318
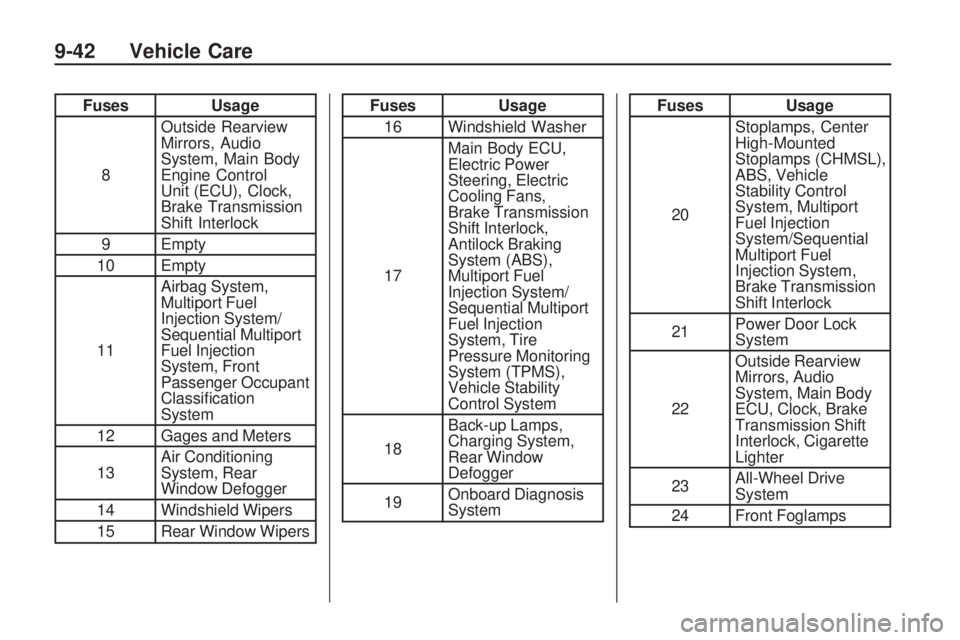
FusesUsage
8 Outside Rearview
Mirrors, Audio
System, Main Body
Engine Control
Unit (ECU), Clock,
Brake Transmission
Shift Interlock
9 Empty
10 Empty
11 Airbag System,
Multiport Fuel
Injection System/
Sequential Multiport
Fuel Injection
System, Front
Passenger Occupant
Classification
System
12 Gages and Meters
13 Air Conditioning
System, Rear
Window Defogger
14 Windshield Wipers
15 Rear Window WipersFuses Usage
16 Windshield Washer
17 Main Body ECU,
Electric Power
Steering, Electric
Cooling Fans,
Brake Transmission
Shift Interlock,
Antilock Braking
System (ABS),
Multiport Fuel
Injection System/
Sequential Multiport
Fuel Injection
System, Tire
Pressure Monitoring
System (TPMS),
Vehicle Stability
Control System
18 Back-up Lamps,
Charging System,
Rear Window
Defogger
19 Onboard Diagnosis
SystemFuses
Usage
20 Stoplamps, Center
High-Mounted
Stoplamps (CHMSL),
ABS, Vehicle
Stability Control
System, Multiport
Fuel Injection
System/Sequential
Multiport Fuel
Injection System,
Brake Transmission
Shift Interlock
21 Power Door Lock
System
22 Outside Rearview
Mirrors, Audio
System, Main Body
ECU, Clock, Brake
Transmission Shift
Interlock, Cigarette
Lighter
23 All-Wheel Drive
System
24 Front Foglamps
9-42 Vehicle Care
Page 227 of 318
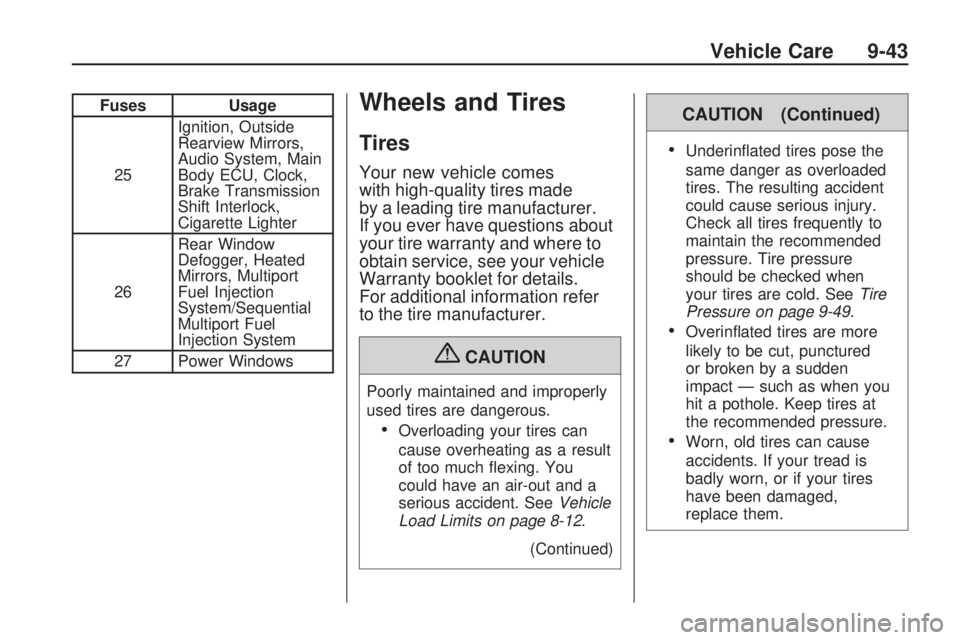
FusesUsage
25 Ignition, Outside
Rearview Mirrors,
Audio System, Main
Body ECU, Clock,
Brake Transmission
Shift Interlock,
Cigarette Lighter
26 Rear Window
Defogger, Heated
Mirrors, Multiport
Fuel Injection
System/Sequential
Multiport Fuel
Injection System
27 Power WindowsWheels and Tires
Tires
Your new vehicle comes
with high-quality tires made
by a leading tire manufacturer.
If you ever have questions about
your tire warranty and where to
obtain service, see your vehicle
Warranty booklet for details.
For additional information refer
to the tire manufacturer.
{CAUTION
Poorly maintained and improperly
used tires are dangerous.
•Overloading your tires can
cause overheating as a result
of too much flexing. You
could have an air-out and a
serious accident. See Vehicle
Load Limits on page 8-12 .
(Continued)
CAUTION (Continued)
•Underinflated tires pose the
same danger as overloaded
tires. The resulting accident
could cause serious injury.
Check all tires frequently to
maintain the recommended
pressure. Tire pressure
should be checked when
your tires are cold. See Tire
Pressure on page 9-49 .
•Overinflated tires are more
likely to be cut, punctured
or broken by a sudden
impact — such as when you
hit a pothole. Keep tires at
the recommended pressure.
•Worn, old tires can cause
accidents. If your tread is
badly worn, or if your tires
have been damaged,
replace them.
Vehicle Care 9-43