tow PONTIAC VIBE 2010 Service Manual
[x] Cancel search | Manufacturer: PONTIAC, Model Year: 2010, Model line: VIBE, Model: PONTIAC VIBE 2010Pages: 318, PDF Size: 1.7 MB
Page 183 of 318
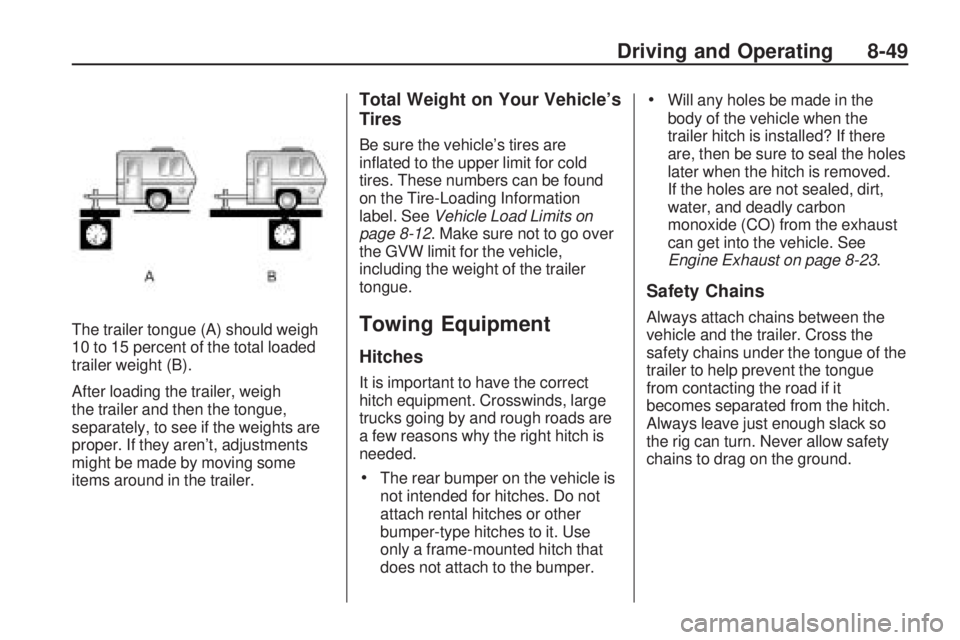
The trailer tongue (A) should weigh
10 to 15 percent of the total loaded
trailer weight (B).
After loading the trailer, weigh
the trailer and then the tongue,
separately, to see if the weights are
proper. If they aren’t, adjustments
might be made by moving some
items around in the trailer.
Total Weight on Your Vehicle’s
Tires
Be sure the vehicle’s tires are
inflated to the upper limit for cold
tires. These numbers can be found
on the Tire-Loading Information
label. SeeVehicle Load Limits on
page 8-12. Make sure not to go over
the GVW limit for the vehicle,
including the weight of the trailer
tongue.
Towing Equipment
Hitches
It is important to have the correct
hitch equipment. Crosswinds, large
trucks going by and rough roads are
a few reasons why the right hitch is
needed.
•The rear bumper on the vehicle is
not intended for hitches. Do not
attach rental hitches or other
bumper-type hitches to it. Use
only a frame-mounted hitch that
does not attach to the bumper.
•Will any holes be made in the
body of the vehicle when the
trailer hitch is installed? If there
are, then be sure to seal the holes
later when the hitch is removed.
If the holes are not sealed, dirt,
water, and deadly carbon
monoxide (CO) from the exhaust
can get into the vehicle. See
Engine Exhaust on page 8-23 .
Safety Chains
Always attach chains between the
vehicle and the trailer. Cross the
safety chains under the tongue of the
trailer to help prevent the tongue
from contacting the road if it
becomes separated from the hitch.
Always leave just enough slack so
the rig can turn. Never allow safety
chains to drag on the ground.
Driving and Operating 8-49
Page 186 of 318
Jump StartingJump Starting....................
.9-69
TowingTowing the Vehicle .............
.9-73
Recreational Vehicle Towing ............................
.9-73
Appearance CareExterior Care.....................
.9-75
Interior Care ......................
.9-80
Floor Mats .........................
.9-83
General Information
For service and parts needs, visit
your dealer/retailer. You will receive
genuine GM parts and GM-trained
and supported service people.
Genuine GM parts have one of
these marks:
California Proposition
65 Warning
Most motor vehicles, including this
one, contain and/or emit chemicals
known to the State of California to
cause cancer and birth defects
or other reproductive harm. Engine
exhaust, many parts and systems
(including some inside the vehicle),
many fluids, and some component
wear by-products contain and/or emit
these chemicals.
9-2 Vehicle Care
Page 189 of 318
This vehicle has an airbag system.
Before attempting to do your
own service work, seeAirbag
System Check on page 2-36 .
Keep a record with all parts receipts
and list the mileage and the date
of any service work performed.
See Maintenance Records on
page 10-18.Hood
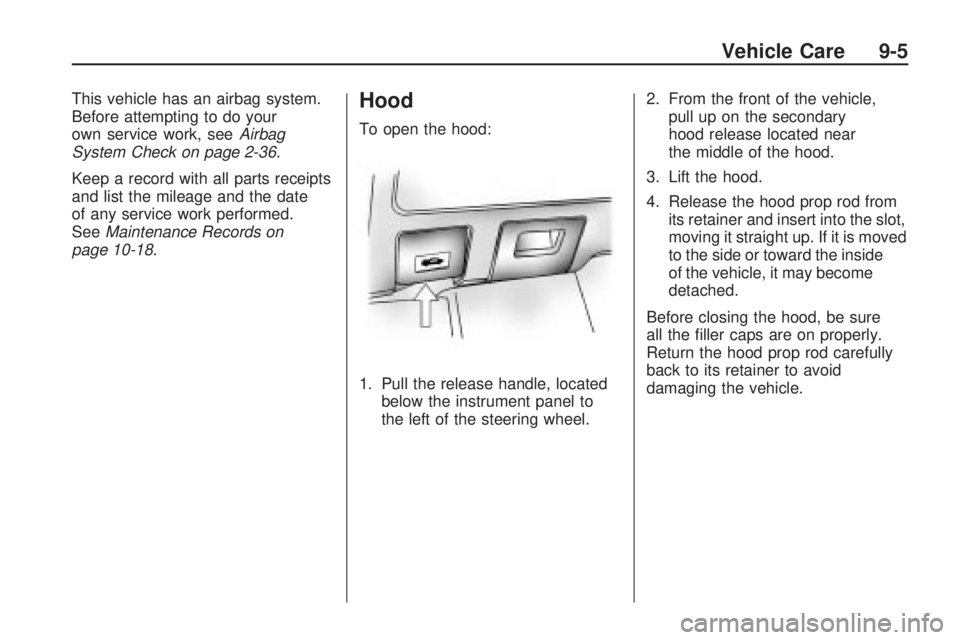
To open the hood:
1. Pull the release handle, located below the instrument panel to
the left of the steering wheel. 2. From the front of the vehicle,
pull up on the secondary
hood release located near
the middle of the hood.
3. Lift the hood.
4. Release the hood prop rod from its retainer and insert into the slot,
moving it straight up. If it is moved
to the side or toward the inside
of the vehicle, it may become
detached.
Before closing the hood, be sure
all the filler caps are on properly.
Return the hood prop rod carefully
back to its retainer to avoid
damaging the vehicle.
Vehicle Care 9-5
Page 193 of 318
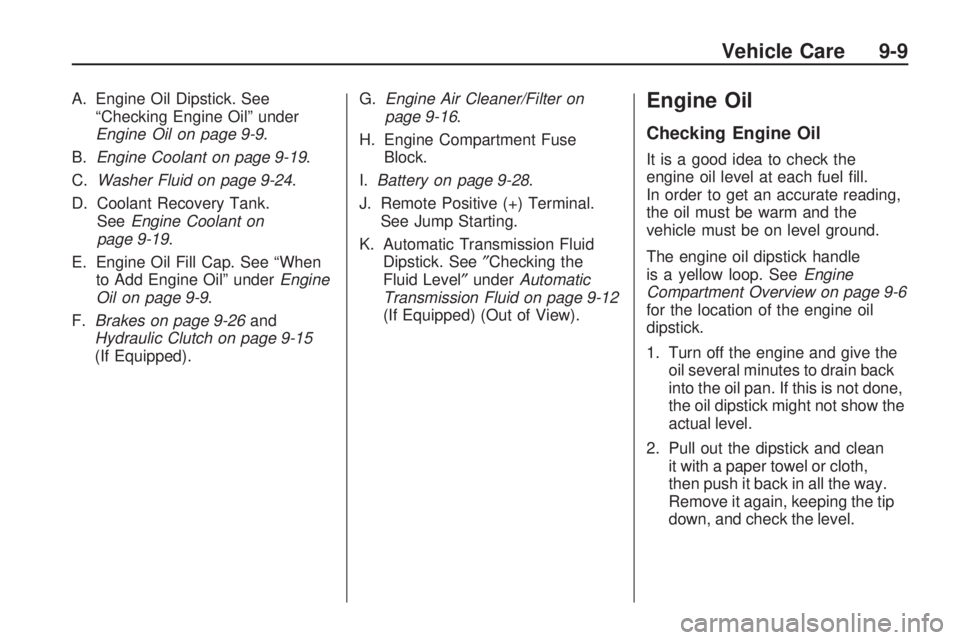
A. Engine Oil Dipstick. See“Checking Engine Oil” under
Engine Oil on page 9-9 .
B. Engine Coolant on page 9-19 .
C. Washer Fluid on page 9-24 .
D. Coolant Recovery Tank. See Engine Coolant on
page 9-19.
E. Engine Oil Fill Cap. See “When to Add Engine Oil” under Engine
Oil on page 9-9.
F. Brakes on page 9-26 and
Hydraulic Clutch on page 9-15
(If Equipped). G.
Engine Air Cleaner/Filter on
page 9-16.
H. Engine Compartment Fuse Block.
I. Battery on page 9-28 .
J. Remote Positive (+) Terminal. See Jump Starting.
K. Automatic Transmission Fluid Dipstick. See ″Checking the
Fluid Level″ underAutomatic
Transmission Fluid on page 9-12
(If Equipped) (Out of View).Engine Oil
Checking Engine Oil
It is a good idea to check the
engine oil level at each fuel fill.
In order to get an accurate reading,
the oil must be warm and the
vehicle must be on level ground.
The engine oil dipstick handle
is a yellow loop. See Engine
Compartment Overview on page 9-6
for the location of the engine oil
dipstick.
1. Turn off the engine and give the oil several minutes to drain back
into the oil pan. If this is not done,
the oil dipstick might not show the
actual level.
2. Pull out the dipstick and clean it with a paper towel or cloth,
then push it back in all the way.
Remove it again, keeping the tip
down, and check the level.
Vehicle Care 9-9
Page 197 of 318
Checking the Fluid Level
Prepare your vehicle as follows:
1. Park your vehicle on a levelplace. Keep the engine running.
2. With the parking brake applied, place the shift lever in P (Park).
3. With your foot on the brake pedal, move the shift lever
through each gear range,
pausing for about three seconds
in each range. Then, position
the shift lever in P (Park).
4. Let the engine run at idle for three to five minutes. Then, without shutting off the
engine, follow these steps:
The automatic transmission
dipstick has an orange handle
and is located near the front of the
engine compartment. See
Engine
Compartment Overview on page 9-6
for more information on location.
1. Release the tab and pull out the dipstick and wipe it with a clean
rag or paper towel.
2. Push it back in all the way, wait three seconds and then pull it
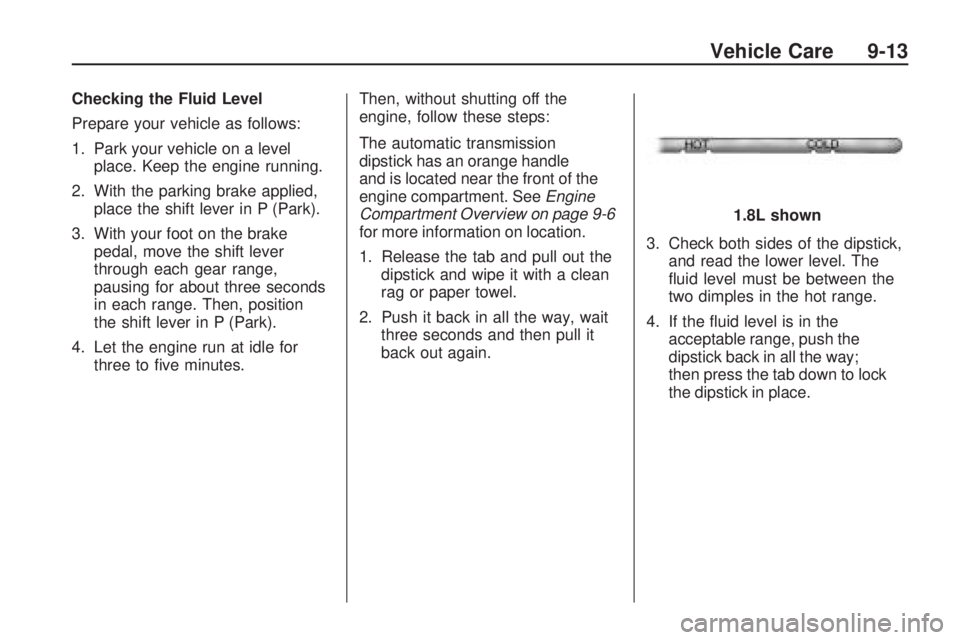
back out again. 3. Check both sides of the dipstick,
and read the lower level. The
fluid level must be between the
two dimples in the hot range.
4. If the fluid level is in the acceptable range, push the
dipstick back in all the way;
then press the tab down to lock
the dipstick in place. 1.8L shown
Vehicle Care 9-13
Page 208 of 318
If No Steam Is Coming From
Your Engine
If an engine overheat warning is
displayed but steam is not heard or
seen escaping, the problem may
not be too serious. Sometimes
the engine can get a little too
hot when the vehicle:
•Climbs a long hill on a hot day.
•Stops after high-speed driving.
•Idles for long periods in traffic.
•Tows a trailer.
If the overheat warning is displayed
with no sign of steam, try this for
a minute or so:
1. In heavy traffic, let the engine idle in N (Neutral) while stopped. If it
is safe to do so, pull off the road,
shift to P (Park) or N (Neutral)
and let the engine idle.
2. Turn on the heater to full hot at the highest fan speed and open
the windows as necessary. If the overheat warning is no longer
displayed, the vehicle can be driven.
Just to be safe, drive slower for about
10 minutes. If the warning does not
come back on, continue to drive.
If the warning continues, pull over,
stop, and park the vehicle right away.
If there is still no sign of steam, idle
the engine for three minutes while
the vehicle is parked. If the warning
is still displayed, turn off the engine
and get everyone out of the vehicle
until it cools down.
You may decide not to lift the hood
but to get service help right away.
Power Steering Fluid
The vehicle has electronic power
steering and does not use power
steering fluid. If you suspect a
problem, see your dealer/retailer.
Washer Fluid
What to Use
When you need windshield
washer fluid, be sure to read
the manufacturer’s instructions
before use. If you will be operating
your vehicle in an area where the
temperature may fall below freezing,
use a fluid that has sufficient
protection against freezing.
9-24 Vehicle Care
Page 215 of 318
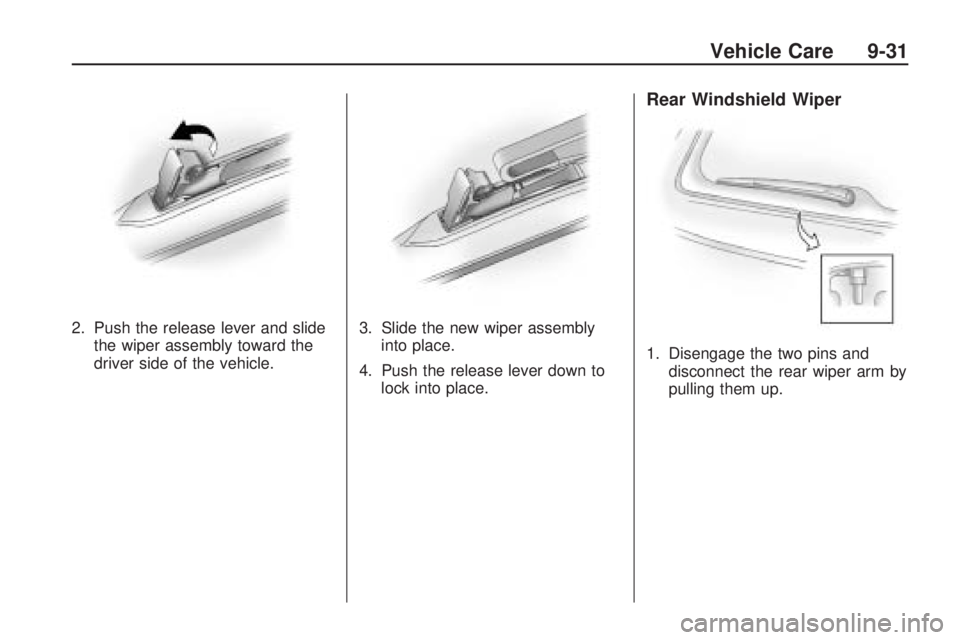
2. Push the release lever and slidethe wiper assembly toward the
driver side of the vehicle. 3. Slide the new wiper assembly
into place.
4. Push the release lever down to lock into place.
Rear Windshield Wiper
1. Disengage the two pins anddisconnect the rear wiper arm by
pulling them up.
Vehicle Care 9-31
Page 239 of 318
Tire Rotation
Tires should be rotated every
5,000 to 8,000 miles (8 000 to
13 000 km). SeeScheduled
Maintenance on page 10-3.
The purpose of a regular tire
rotation is to achieve a uniform
wear for all tires on the vehicle.
This will ensure that the vehicle
continues to perform most like it
did when the tires were new.
Any time you notice unusual
wear, rotate the tires as soon
as possible and check wheel
alignment. Also check for
damaged tires or wheels.
See When It Is Time for New
Tires on page 9-56 andWheel
Replacement on page 9-60 for
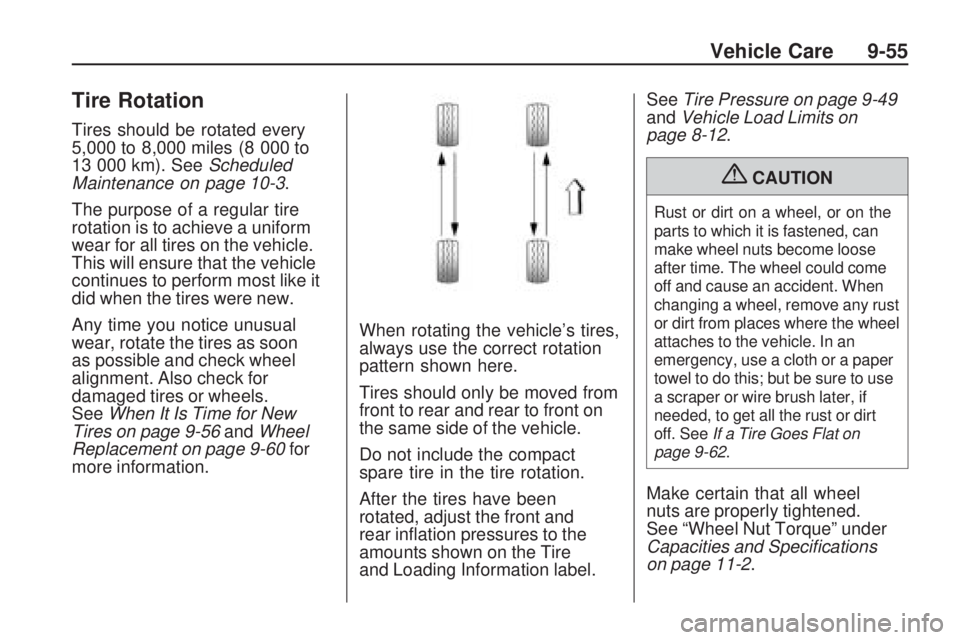
more information. When rotating the vehicle’s tires,
always use the correct rotation
pattern shown here.
Tires should only be moved from
front to rear and rear to front on
the same side of the vehicle.
Do not include the compact
spare tire in the tire rotation.
After the tires have been
rotated, adjust the front and
rear inflation pressures to the
amounts shown on the Tire
and Loading Information label.See
Tire Pressure on page 9-49
and Vehicle Load Limits on
page 8-12.
{CAUTION
Rust or dirt on a wheel, or on the
parts to which it is fastened, can
make wheel nuts become loose
after time. The wheel could come
off and cause an accident. When
changing a wheel, remove any rust
or dirt from places where the wheel
attaches to the vehicle. In an
emergency, use a cloth or a paper
towel to do this; but be sure to use
a scraper or wire brush later, if
needed, to get all the rust or dirt
off. See If a Tire Goes Flat on
page 9-62.
Make certain that all wheel
nuts are properly tightened.
See “Wheel Nut Torque” under
Capacities and Speci�cations
on page 11-2.
Vehicle Care 9-55
Page 246 of 318
If a Tire Goes Flat
It is unusual for a tire to blowout
while you are driving, especially if
you maintain your vehicle’s tires
properly. If air goes out of a tire,
it is much more likely to leak out
slowly. But if you should ever have
a blowout, here are a few tips about
what to expect and what to do:
If a front tire fails, the flat tire
creates a drag that pulls the vehicle
toward that side. Take your foot off
the accelerator pedal and grip the
steering wheel firmly. Steer to
maintain lane position, and then
gently brake to a stop well out of
the traffic lane.
A rear blowout, particularly on a
curve, acts much like a skid and
may require the same correction
you would use in a skid. In any rear
blowout remove your foot from the
accelerator pedal. Get the vehicle
under control by steering the way
you want the vehicle to go. It may bevery bumpy and noisy, but you can
still steer. Gently brake to a stop,
well off the road if possible.
{CAUTION
Lifting a vehicle and getting under
it to do maintenance or repairs is
dangerous without the appropriate
safety equipment and training. If a
jack is provided with the vehicle, it
is designed only for changing a
flat tire. If it is used for anything
else, you or others could be badly
injured or killed if the vehicle slips
off the jack. If a jack is provided
with the vehicle, only use it for
changing a flat tire.
If a tire goes flat, avoid further tire
and wheel damage by driving slowly
to a level place. Turn on the hazard
warning flashers. See Hazard
Warning Flashers on page 5-3 .
{CAUTION
Changing a tire can be dangerous.
The vehicle can slip off the jack
and roll over or fall on you or other
people. You and they could be
badly injured or even killed. Find
a level place to change your tire.
To help prevent the vehicle from
moving:
1. Set the parking brake firmly.
2. Put an automatic transmission shift lever in
P (Park), or shift a manual
transmission to 1 (First) or
R (Reverse).
3. Turn off the engine and do not restart while the vehicle
is raised.
4. Do not allow passengers to remain in the vehicle.
(Continued)
9-62 Vehicle Care
Page 250 of 318
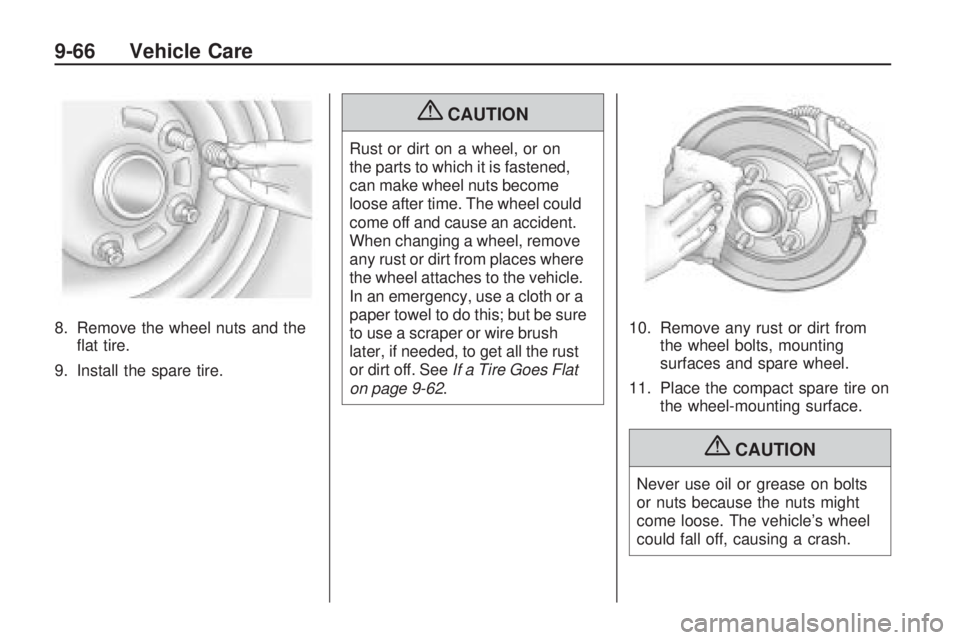
8. Remove the wheel nuts and theflat tire.
9. Install the spare tire.
{CAUTION
Rust or dirt on a wheel, or on
the parts to which it is fastened,
can make wheel nuts become
loose after time. The wheel could
come off and cause an accident.
When changing a wheel, remove
any rust or dirt from places where
the wheel attaches to the vehicle.
In an emergency, use a cloth or a
paper towel to do this; but be sure
to use a scraper or wire brush
later, if needed, to get all the rust
or dirt off. See If a Tire Goes Flat
on page 9-62. 10. Remove any rust or dirt from
the wheel bolts, mounting
surfaces and spare wheel.
11. Place the compact spare tire on the wheel-mounting surface.
{CAUTION
Never use oil or grease on bolts
or nuts because the nuts might
come loose. The vehicle’s wheel
could fall off, causing a crash.
9-66 Vehicle Care