PORSCHE 911 CARRERA 2003 4.G Owners Manual
911 CARRERA 2003 4.G
PORSCHE
PORSCHE
https://www.carmanualsonline.info/img/22/7743/w960_7743-0.png
PORSCHE 911 CARRERA 2003 4.G Owners Manual
Trending: remove seats, battery replacement, wipers, Engine oil, turn signal bulb, climate control, wheel
Page 231 of 263
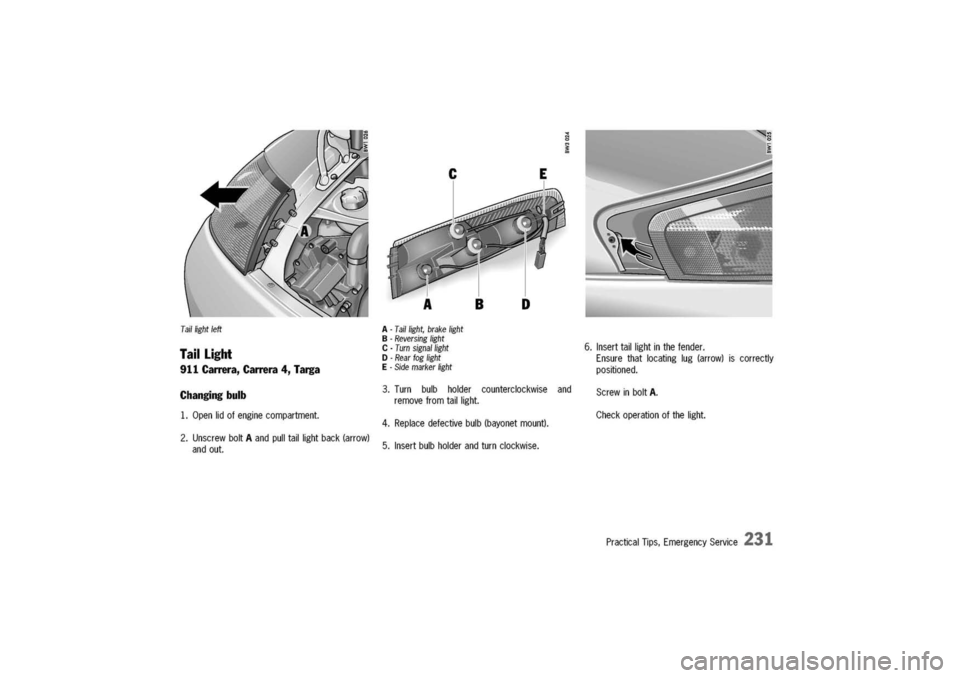
Tai/lightleft
TailLight
911Carrera,Carrera4,Targa
Changingbulb
1.Openlidofenginecompartment.
2.UnscrewboltAandpulltaillightback(arrow)
andout.
A-Tai/light,brakelight
B-Reversinglight
C-Turnsigna/light
D-Rearfoglight
E-Sidemarkerlight
3.Turnbulbholdercounterclockwiseand
removefromtaillight.
4.Replacedefectivebulb(bayonetmount).
5.Insertbulbholderandturnclockwise.
6.Inserttaillightinthefender.
Ensurethatlocatinglug(arrow)iscorrectly
positioned.
ScrewinboltA.
Checkoperationofthelight.
PracticalTips,EmergencyService
231
Page 232 of 263
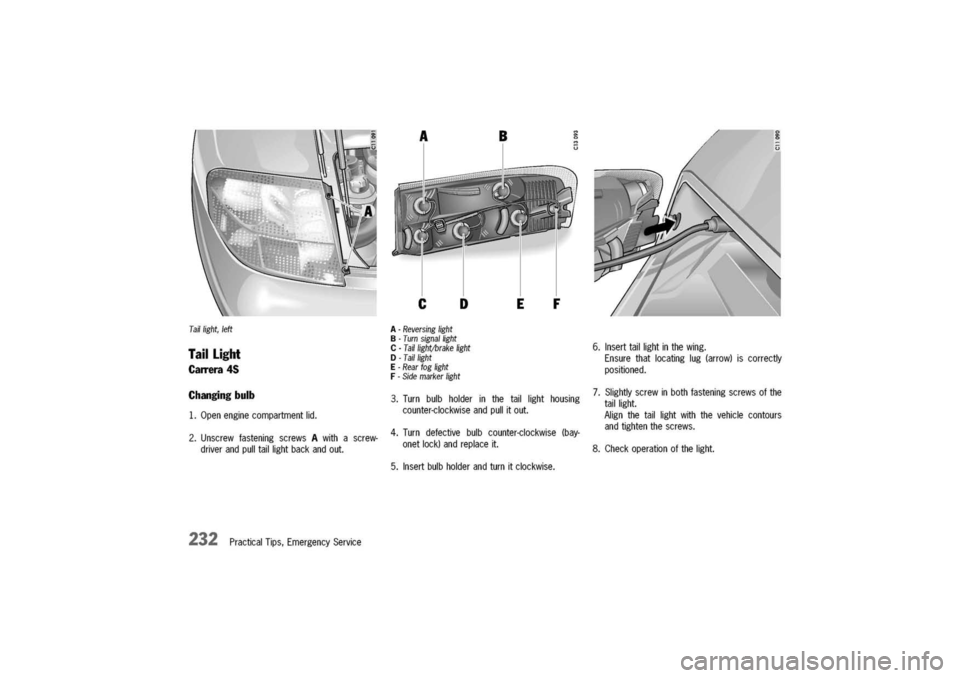
Taillight,left
TailLight
CalTera
45
Changingbulb
1.Openenginecompartmentlid.
2.UnscrewfasteningscrewsAwithascrew-
driverandpulltaillightbackandout.
232PracticalTips,EmergencyService
A-Reversinglight
B-Turnsigna/light
C-Taillight;brakelight
D-Taillight
E-Rearfoglight
F-Sidemarkerlight
3.Turnbulbholderinthetaillighthousing
counter-clockwiseandpullitout.
4.Turndefectivebulbcounter-clockwise(bay-
onetlock)andreplaceit.
5.Insertbulbholderandturnitclockwise.
6.Inserttaillightinthewing.
Ensurethatlocatinglug(arrow)iscorrectly
positioned.
7.Slightlyscrewinbothfasteningscrewsofthe
taillight.
Alignthetaillightwiththevehiclecontours
andtightenthescrews.
8.Checkoperationofthelight.
Page 233 of 263
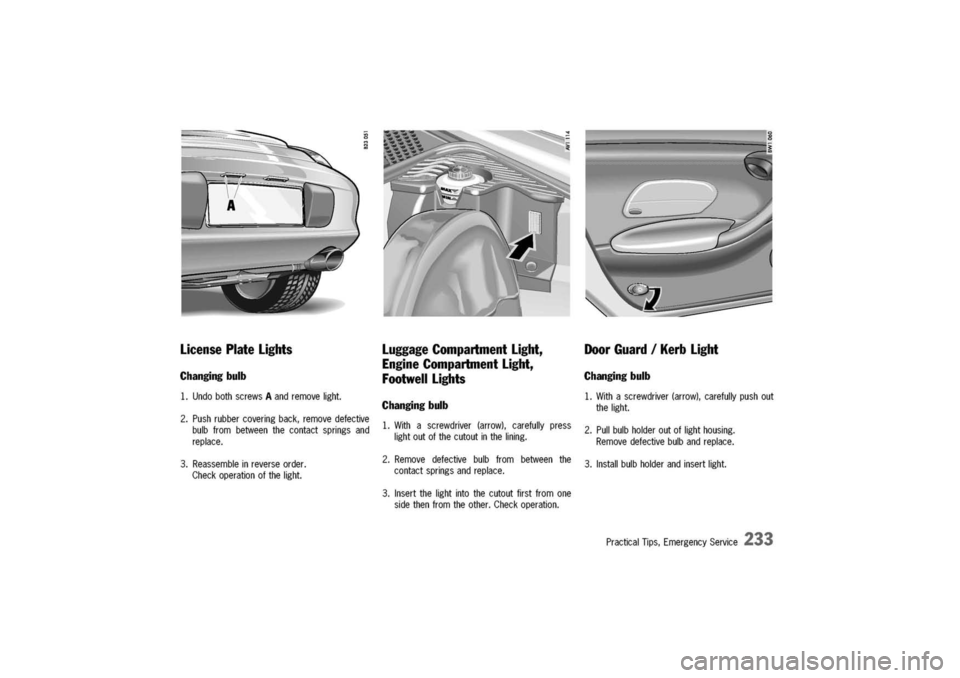
LicensePlateLights
Changingbulb
1.UndobothscrewsAandremovelight.
2.Pushrubbercoveringback,removedefective
bulbfrombetweenthecontactspringsand
replace.
3.Reassembleinreverseorder.
Checkoperationofthelight.
Luggage
CompartmentLight,
EngineCompartmentLight,
FootwellLights
Changingbulb
1.Withascrewdriver(arrow),carefullypress
lightoutofthecutoutinthelining.
2.Removedefectivebulbfrombetweenthe
contactspringsandreplace.
3.Insertthelightintothecutoutfirstfromone
sidethenfromtheother.Checkoperation.
DoorGuard/KerbLight
Changingbulb
1.Withascrewdriver(arrow),carefullypushout
thelight.
2.Pullbulbholderoutoflighthousing.
Removedefectivebulbandreplace.
3.Installbulbholderandinsertlight.
PracticalTips,EmergencyService
233
Page 234 of 263
L
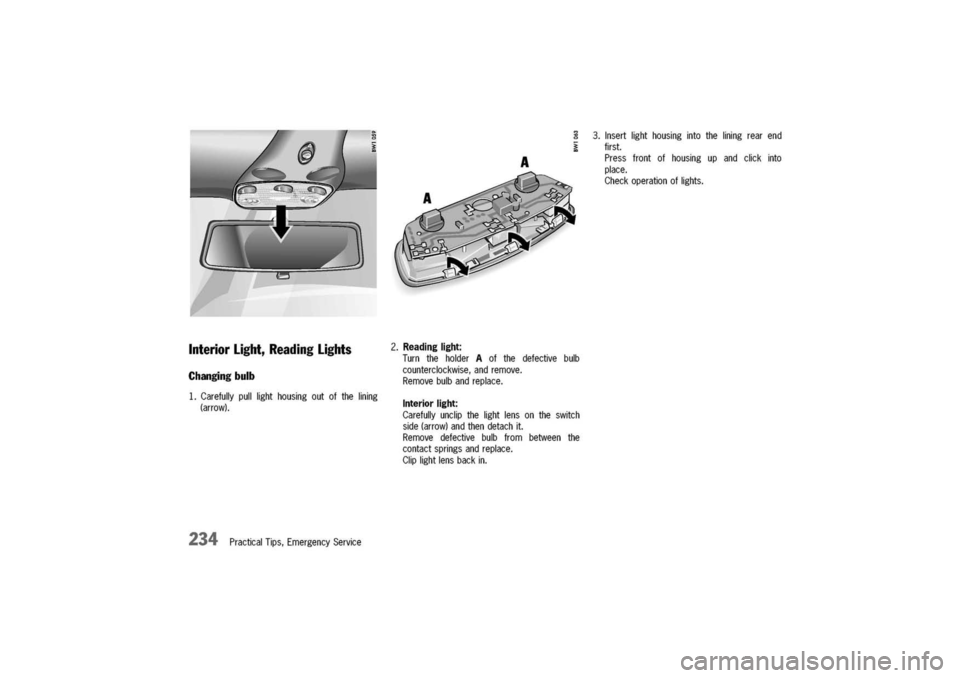
InteriorLight,ReadingLights
Changingbulb
1.Carefullypulllighthousingoutofthelining
(arrow).
234PracticalTips,EmergencyService
2.Readinglight:
TurntheholderAofthedefectivebulb
counterclockwise,andremove.
Removebulbandreplace.
Interiorlight:
Carefullyunclipthelightlensontheswitch
side(arrow)andthendetachit.
Removedefectivebulbfrombetweenthe
contactspringsandreplace.
Cliplightlensbackin.
3.Insertlighthousingintotheliningrearend
first.
Pressfrontofhousingupandclickinto
place.
Checkoperationoflights.
Page 235 of 263
~
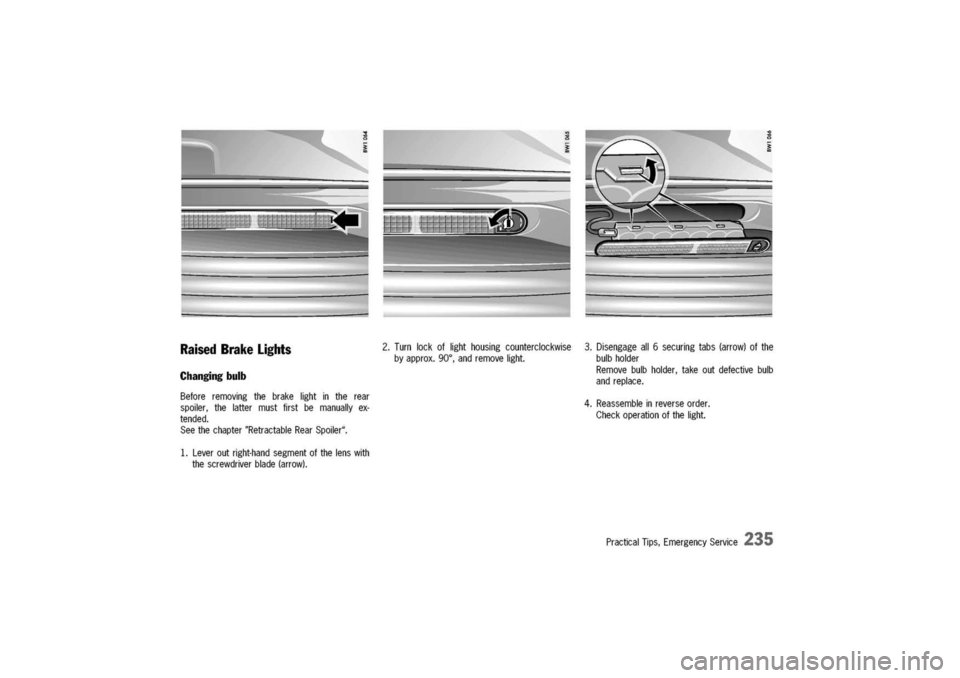
RaisedBrakeLights
Changingbulb
Beforeremovingthebrakelightintherear
spoiler,thelattermustfirstbemanuallyex-
tended.
Seethechapter"RetractableRearSpoiler".
1.Leveroutright-handsegmentofthelenswith
thescrewdriverblade(arrow).
2.Turnlockoflighthousingcounterclockwise
byapprox.90°,andremovelight.
3.Disengageall6securingtabs(arrow)ofthe
bulbholder
Removebulbholder,takeoutdefectivebulb
andreplace.
4.Reassembleinreverseorder.
Checkoperationofthelight.
PracticalTips,EmergencyService
235
Page 236 of 263
AdjustingHeadlights
Seecautionon"ReplacingBulbs..
Adjustment
Theadjustmentismadewiththevehicleready
todriveandthefueltankcompletelyfilled.
Thedriver'sseatmustbeloadedbyapersonor
a165Ibs.(75kg)weightandthetirepressures
mustmeettheprescribedvalues.
Afterbeingloaded,thecarmustberolledafew
meterssothatthesuspensioncansettle.
236PracticalTips,EmergencyService
Forcheckingtheheadlightadjustment,theverti-
calpositionofthecutoffofthelowbeam(see
fig.)hastobeprojectedonaverticalscreen
(wall)indistanceof7.5mfromthefrontlensof
theheadlamp.
Thecorrectpositionofthecutoffis5cmat
7.5m(0.4°)belowahorizontalline,xcmfrom
groundtothecenteroftheheadlamplens.
Lateraladjustmentoftheheadlightsshouldbe
carriedoutataspecialistworkshopwithanopti-
caladjustmentunit.
Distance
Visualaimshallbeperformedatnotlessthan
7.5m(thisvalueisaroundeddownconversion
fromthe25-footdistancetypicaloffieldaim
usingascreen).The7.5mdistanceis
measuredfromtheheadlamplenstotheviewing
screen.
Page 237 of 263
Floor
Thesurfaceuponwhichthevehiclerestsisflat
andapproximatelylevel.
Screen
Thescreenuponwhichheadlampbeamsare
projectedisperpendiculartothefloorandthe
vehicle'slongitudinalaxis,flat,uniformlylightin
color,unobstructed,andwideandhighenough
toaccommodatethevehiclebeampatternsto
beaimed.
Thescreenshouldbewideenoughtoprovideat
least1mofspaceoutboardofthevehicle's
headlampspacing.
Adjustmentscrews
I>Detachsidecarpetinginluggagecompart-
ment.
ThereforeunscrewplasticnutA.
Openthecoveroftheappropriateadjustment
screw.
Thesettingisadjustedbyturningthehexagon
socketscrewsrightorleft,asappropriate.
B-Headlightverticaladjustment
C-Foglightheightadjustment
Verticaladjustment(screw
B)
I>turnclockwise=beammovesdown
turncounterclockwise=beammovesup
Note
I>Donotalterthelateraladjustment.
Foglight
adjustment
Thefoglight
adjustmentCshouldonlybedone
ataspecialistworkshopwithanopticaladjust-
mentunit.
PracticalTips,EmergencyService
237
Page 238 of 263
~Neverusethetowingeyetotowthisorany
othervehicle.
Certainstatestatutesandlocalordinancespro-
hibittowingwithachain,ropeorevenatow
bar.
Inaddition,damagetoyourvehiclemayresult
fromimproperprocedures.
ConsultyourauthorizedPorschedealerforde-
tails.
Vehicletowing
Flatbedtowingisthepreferredtypeoftowing
tobeusedonPorschevehicles.
Undercertaincircumstances,wheelliftsmaybe
usedwhenthevehiclewillnotroll.
Thevehicle
must
betowedwithallfour
wheelsofftheground,otherwisedamageto
thevehiclemayresult.
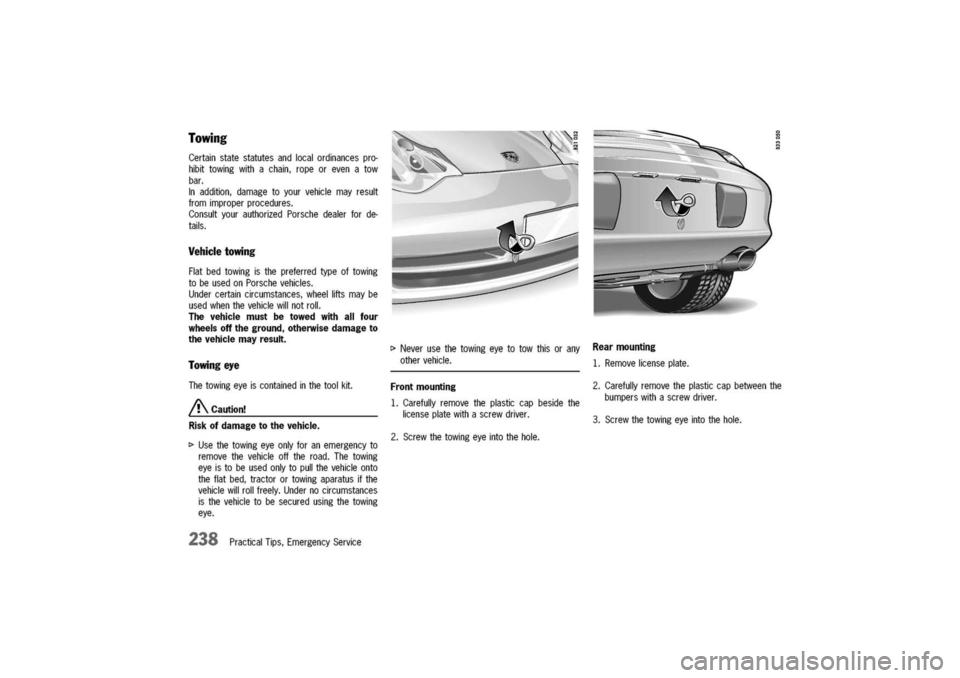
Towingeye
Thetowingeyeiscontainedinthetoolkit.
ACaution!
Riskofdamagetothevehicle.
~Usethetowingeyeonlyforanemergencyto
removethevehicleofftheroad.Thetowing
eyeistobeusedonlytopullthevehicleonto
theflatbed,tractorortowingaparatusifthe
vehiclewillrollfreely.Undernocircumstances
isthevehicletobesecuredusingthetowing
eye.
238PracticalTips,EmergencyService
Towing
Frontmounting
1.Carefullyremovetheplasticcapbesidethe
licenseplatewithascrewdriver.
2.Screwthetowingeyeintothehole.
Rearmounting
1.Removelicenseplate.
2.Carefullyremovetheplasticcapbetweenthe
bumperswithascrewdriver.
3.Screwthetowingeyeintothehole.
Page 239 of 263
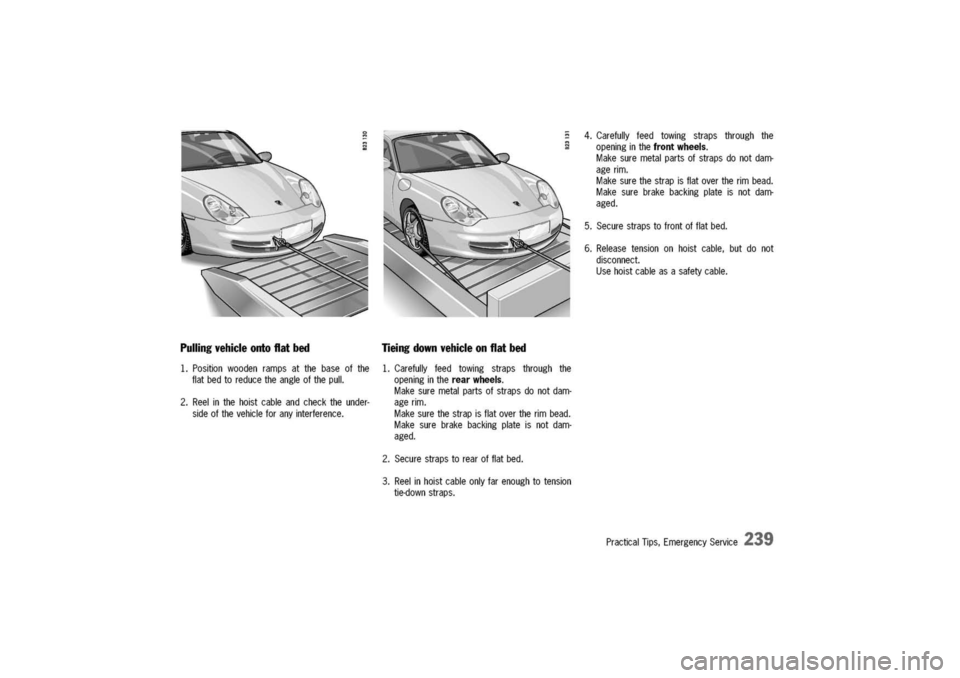
Pulling
vehicle
ontoflat
bed
1.Positionwoodenrampsatthebaseofthe
flatbedtoreducetheangleofthepull.
2.Reelinthehoistcableandchecktheunder-
sideofthevehicleforanyinterference.
Tieingdownvehicleonflatbed
1.Carefullyfeedtowingstrapsthroughthe
openingintherearwheels.
Makesuremetalpartsofstrapsdonotdam-
agerim.
Makesurethestrapisflatovertherimbead.
Makesurebrakebackingplateisnotdam-
aged.
2.Securestrapstorearofflatbed.
3.Reelinhoistcableonlyfarenoughtotension
tie-downstraps.
4.Carefullyfeedtowingstrapsthroughthe
openinginthefrontwheels.
Makesuremetalpartsofstrapsdonotdam-
agerim.
Makesurethestrapisflatovertherimbead.
Makesurebrakebackingplateisnotdam-
aged.
5.Securestrapstofrontofflatbed.
6.Releasetensiononhoistcable,butdonot
disconnect.
Usehoistcableasasafetycable.
PracticalTips,EmergencyService
239
Page 240 of 263
240PracticalTips,EmergencyService
Trending: tire size, change key battery, mirror, service indicator, charging, ECO mode, tow
