PORSCHE 911 TURBO 2014 6.G Owners Manual
Manufacturer: PORSCHE, Model Year: 2014, Model line: 911 TURBO, Model: PORSCHE 911 TURBO 2014 6.GPages: 300, PDF Size: 10.61 MB
Page 101 of 300
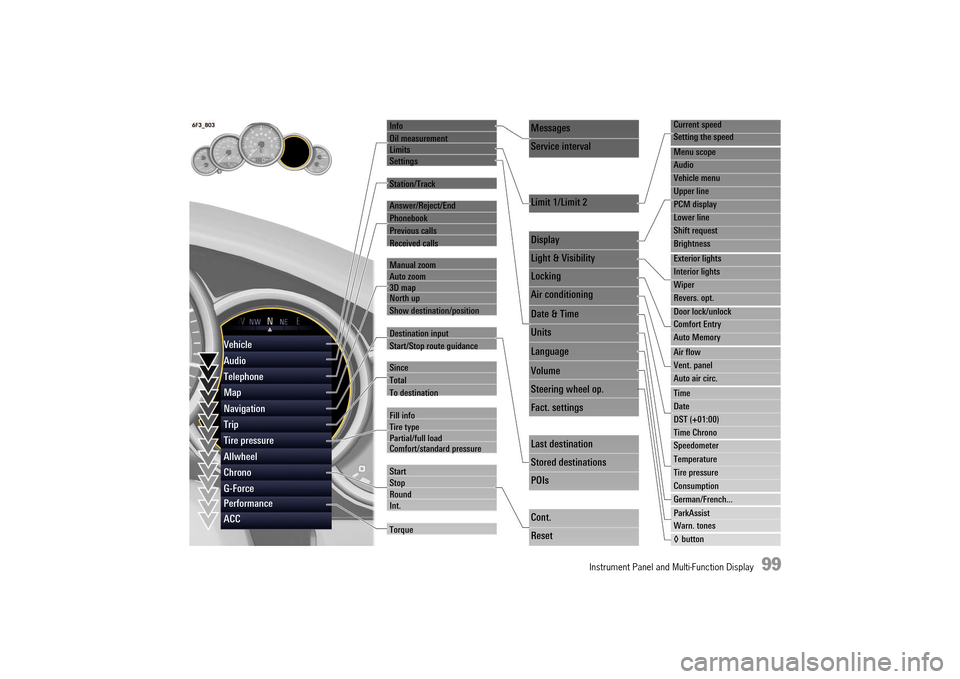
Instrument Panel and Multi-Function Display 99
Info
Oil measurement LimitsSettings
Station/Track
Answer/Reject/End
Phonebook
Previous calls
Received calls
Manual zoom Auto zoom3D map North up
Show destination/position
Destination input
Start/Stop route guidance
Since
Total
To destination
Fill info Tire typePartial/full load Comfort/standard pressure
Start StopRoundInt.
Torque
Current speed
Setting the speed
Menu scope
Audio
Vehicle menu
Upper line
PCM display
Lower line
Shift request
Brightness
Exterior lights
Interior lights
Wiper
Revers. opt.
Door lock/unlock
Comfort Entry
Auto Memory
Air flow
Vent. panel
Auto air circ.
Time
Date
DST (+01:00)
Time Chrono
Speedometer
Temperature
Tire pressure
Consumption
German/French...
ParkAssist
Warn. tones
◊ button
Messages
Service interval
Limit 1/Limit 2
Display
Light & Visibility
Locking
Air conditioning
Date & Time
Units
Language
Volume
Steering wheel op.
Fact. settings
Last destination
Stored destinations
POIs
Cont.
Reset
Vehicle
Audio
Telephone
Map
Navigation
Trip
Tire pressure
Allwheel
Chrono
G-Force
Performance
ACC
14_991_Turbo_21.book Seite 99 Mittwoch, 9. April 2014 2:19 14
Page 102 of 300
100 Instrument Panel and Multi-Function Display
Vehicle Menu
A large amount of vehicle information can be displayed and vehicle settings made in the “ Vehicle” main menu.
The vehicle information display can be adapted individually.
For information on adapting the vehicle menu:fPlease see the chapter “ADAPTING DISPLAY CONTENTS IN VEHICLE INFORMATION AREA” on page 118.
Displaying vehicle information
Pending warning messages, information on forthcoming service intervals and the average fuel consumption can be viewed in the “ Info” sub-menu of the “ Vehicle” main menu area.
Displaying messages
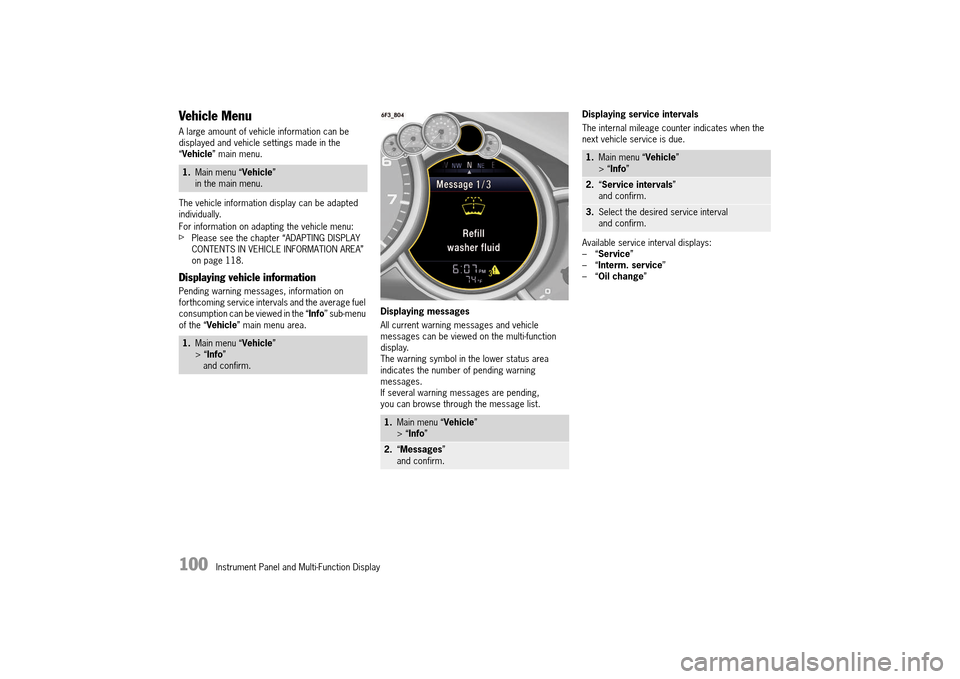
All current warning messages and vehicle messages can be viewed on the multi-function display.The warning symbol in the lower status area indicates the number of pending warning messages.If several warning messages are pending, you can browse through the message list.
Displaying service intervals
The internal mileage counter indicates when the next vehicle service is due.
Available service interval displays: –“ Service” –“ Interm. service” –“ Oil change”
1.Main menu “Vehicle” in the main menu.
1. Main menu “Vehicle” > “ Info” and confirm.
1. Main menu “Vehicle” > “ Info”
2.“Messages” and confirm.
1. Main menu “Vehicle” > “ Info”
2.“Service intervals” and confirm.
3. Select the desired service interval and confirm.
14_991_Turbo_21.book Seite 100 Mittwoch, 9. April 2014 2:19 14
Page 103 of 300
Instrument Panel and Multi-Function Display 101
Display and measurement of the engine oil level
Risk of engine damage due to inadequate lubrication.fRegularly check the oil level each time before refueling.fDo not allow the oil level to fall below the minimum mark.
Prerequisites for the oil-level gauge:
1. Park the vehicle on a level surface. 2. Switch off engine, which is at operating temperature.3. Wait for approx. 1 minute. 4. Select the “Oil measurement” function on the multi-function display.
Selecting the Oil measurement function on the multi-function display
fPlease see the chapter “OVERVIEW OF WARNING AND INFORMATION MESSAGES” on page 129.
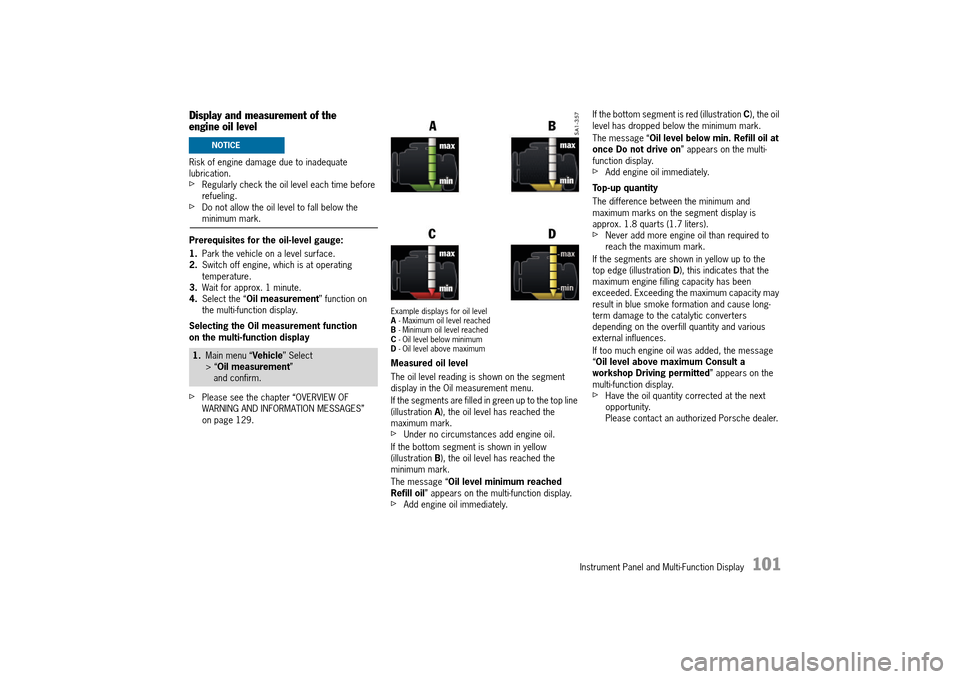
Example displays for oil level A - Maximum oil level reached B - Minimum oil level reached C - Oil level below minimum D - Oil level above maximum
Measured oil level
The oil level reading is shown on the segment display in the Oil measurement menu.
If the segments are filled in green up to the top line (illustration A), the oil level has reached the maximum mark.fUnder no circumstances add engine oil.
If the bottom segment is shown in yellow (illustration B), the oil level has reached the minimum mark.
The message “ Oil level minimum reached Refill oil ” appears on the multi-function display.fAdd engine oil immediately.
If the bottom segment is red (illustration C), the oil level has dropped below the minimum mark.
The message “ Oil level below min. Refill oil at once Do not drive on ” appears on the multi- function display.fAdd engine oil immediately.
Top-up quantity
The difference between the minimum and maximum marks on the segment display is approx. 1.8 quarts (1.7 liters).fNever add more engine oil than required to reach the maximum mark.
If the segments are shown in yellow up to the top edge (illustration D), this indicates that the maximum engine filling capacity has been exceeded. Exceeding the maximum capacity may result in blue smoke formation and cause long-term damage to the catalytic converters depending on the overfill quantity and various external influences.
If too much engine oil was added, the message “ Oil level above maximum Consult a workshop Driving permitted ” appears on the multi-function display.fHave the oil quantity corrected at the next opportunity.Please contact an authorized Porsche dealer.
1. Main menu “Vehicle” Select > “ Oil measurement” and confirm.
NOTICE
14_991_Turbo_21.book Seite 101 Mittwoch, 9. April 2014 2:19 14
Page 104 of 300
102 Instrument Panel and Multi-Function Display
Measuring the oil level after topping up engine oil or opening the engine compartment lid
The oil level can be checked after waiting for approx. 1 minute with the vehicle parked on a level surface and the engine at operating temperature.
If the engine compartment lid is opened when the engine is cold (e.g. in order to top up engine oil), the oil level cannot be displayed for a certain time.The message “ No information about oil level available at present ” appears on the multi- function display.fEngine oil should therefore only be topped up with the engine at operating temperature. This ensures short waiting times for the soonest possible oil level display.
Failure
If the oil-level indicator fails, the message “ Oil level measurement fault Consult a workshop Driving permitted ” appears on the multi-function display.
Setting speed limits
If a speed limit is preset and activated on the multi-function display, a warning message appears if the speed limit is exceeded.A speed limit can be used to remind the driver to keep to the maximum speed permitted for the tire type fitted to the vehicle, for example.
Setting a speed limit
You can either adopt the current speed of the vehicle or specify your own speed limit.
Activating and deactivating speed limits
Adjusting vehicle settings
Various vehicle settings can be modified in the “ Settings” submenu.
For information on modifying vehicle settings:fPlease see the chapter “VEHICLE SETTINGS ON THE MULTI-FUNCTION DISPLAY” on page 117.
Audio Menu
In the “ Audio” main menu, you can select a radio station either from the station list or the list of stored stations, depending on the settings, or a track from the active audio source, e.g. disk.
For information on adjusting audio menu settings:fPlease see the chapter “ADAPTING DISPLAY CONTENTS OF AUDIO MAIN MENU” on page 118.
1. Main menu “Vehicle” > “ Limits” and confirm.
1. Main menu “Vehicle” > “ Limits”
2.Select “Limit 1: ---” or “ Limit 2: ---“ and confirm.
3. Select “Current speed” or „ ---“ and confirm.
1. Main menu “Vehicle” > “ Limits”
2.Select “Limit 1: ---” or “ Limit 2: ---“ and confirm.
3. Select “Active”
4.Confirm your selection.
Limit is active.
Limit is not active.
1. Select “Audio” in the main menu and confirm.
2. Select the desired radio station or track and confirm.
14_991_Turbo_21.book Seite 102 Mittwoch, 9. April 2014 2:19 14
Page 105 of 300
Instrument Panel and Multi-Function Display 103
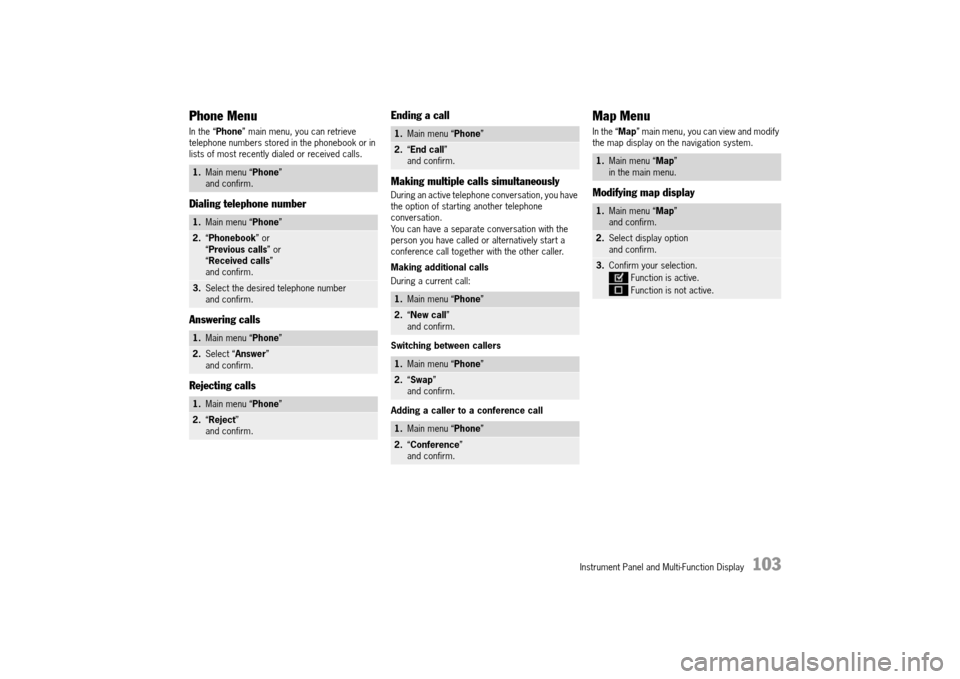
Phone Menu
In the “Phone” main menu, you can retrieve telephone numbers stored in the phonebook or in lists of most recently dialed or received calls.
Dialing telephone number
Answering calls
Rejecting calls
Ending a call
Making multiple calls simultaneously
During an active telephone conversation, you have the option of starting another telephone conversation.You can have a separate conversation with the person you have called or alternatively start a conference call together with the other caller.
Making additional calls
During a current call:
Switching between callers
Adding a caller to a conference call
Map Menu
In the “ Map” main menu, you can view and modify the map display on the navigation system.
Modifying map display
1. Main menu “Phone” and confirm.
1. Main menu “Phone”
2.“Phonebook” or “ Previous calls” or “ Received calls” and confirm.
3. Select the desired telephone number and confirm.
1. Main menu “Phone”
2.Select “Answer” and confirm.
1. Main menu “Phone”
2.“Reject” and confirm.
1. Main menu “Phone”
2.“End call” and confirm.
1. Main menu “Phone”
2.“New call” and confirm.
1. Main menu “Phone”
2.“Swap” and confirm.
1. Main menu “Phone”
2.“Conference” and confirm.
1. Main menu “Map” in the main menu.
1. Main menu “Map” and confirm.
2. Select display option and confirm.
3. Confirm your selection.
Function is active.
Function is not active.
14_991_Turbo_21.book Seite 103 Mittwoch, 9. April 2014 2:19 14
Page 106 of 300
104 Instrument Panel and Multi-Function Display
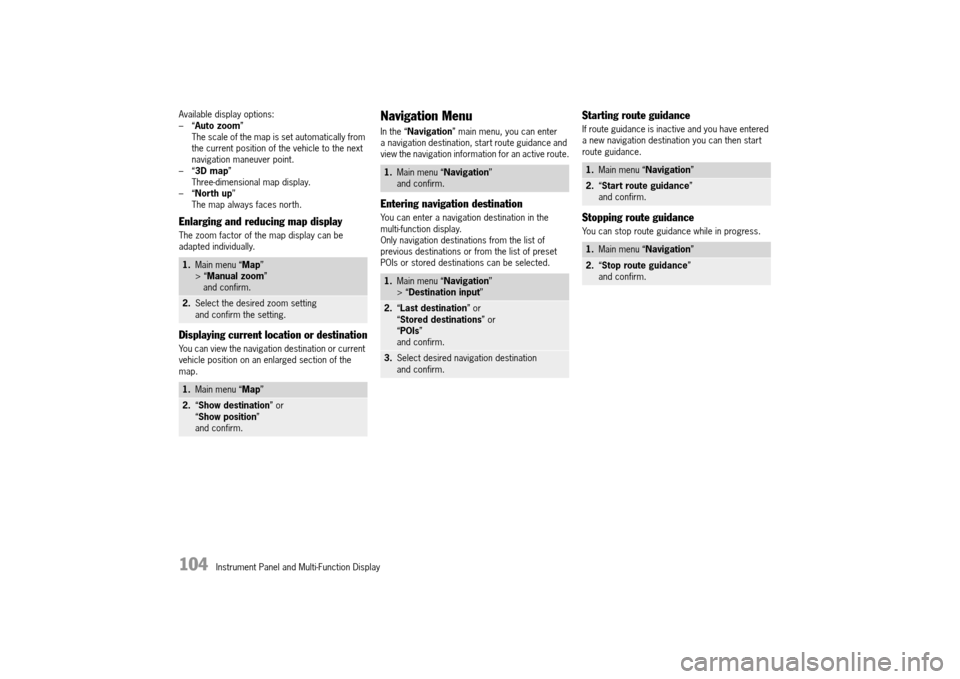
Available display options: –“ Auto zoom” The scale of the map is set automatically from the current position of the vehicle to the next navigation maneuver point.–“ 3D map” Three-dimensional map display.–“ North up” The map always faces north.
Enlarging and reducing map display
The zoom factor of the map display can be adapted individually.
Displaying current location or destination
You can view the navigation destination or current vehicle position on an enlarged section of the map.
Navigation Menu
In the “ Navigation” main menu, you can enter a navigation destination, start route guidance and view the navigation information for an active route.
Entering navigation destination
You can enter a navigation destination in the multi-function display.Only navigation destinations from the list of previous destinations or from the list of preset POIs or stored destinations can be selected.
Starting route guidance
If route guidance is inactive and you have entered a new navigation destination you can then start route guidance.
Stopping route guidance
You can stop route guidance while in progress.
1. Main menu “Map” > “ Manual zoom” and confirm.
2. Select the desired zoom setting and confirm the setting.
1. Main menu “Map”
2.“Show destination” or “ Show position” and confirm.
1. Main menu “Navigation” and confirm.
1. Main menu “Navigation” > “ Destination input”
2.“Last destination” or “ Stored destinations” or “ POIs” and confirm.
3. Select desired navigation destination and confirm.
1. Main menu “Navigation”
2.“Start route guidance” and confirm.
1. Main menu “Navigation”
2.“Stop route guidance” and confirm.
14_991_Turbo_21.book Seite 104 Mittwoch, 9. April 2014 2:19 14
Page 107 of 300
Instrument Panel and Multi-Function Display 105
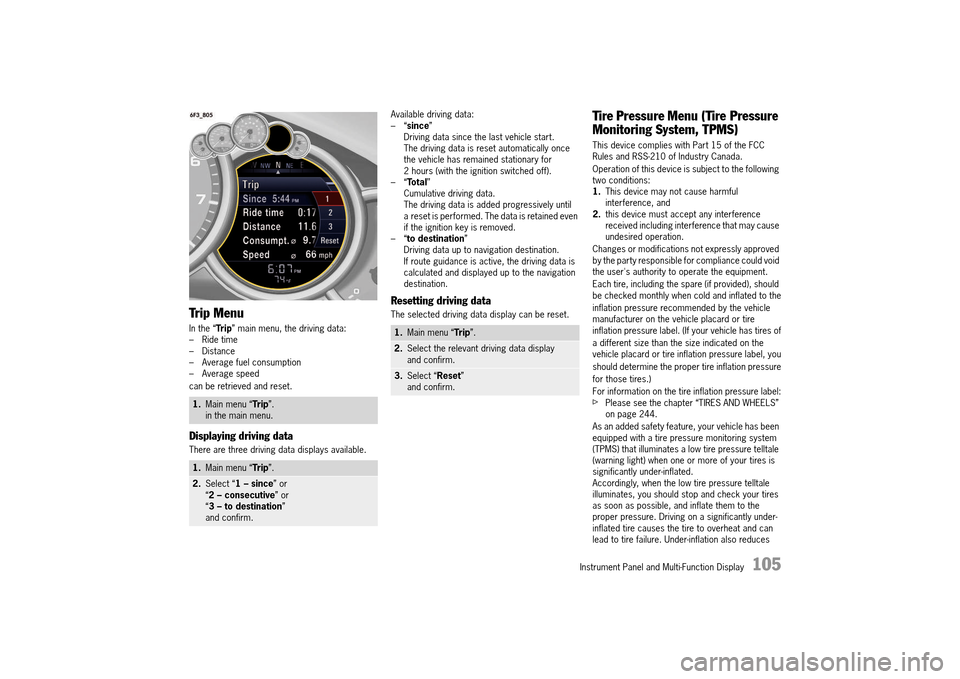
Trip Menu
In the “Trip” main menu, the driving data: – Ride time– Distance– Average fuel consumption– Average speed
can be retrieved and reset.
Displaying driving data
There are three driving data displays available.
Available driving data: –“ since” Driving data since the last vehicle start.The driving data is reset automatically once the vehicle has remained stationary for 2 hours (with the ignition switched off).–“ Total” Cumulative driving data.The driving data is added progressively until a reset is performed. The data is retained even if the ignition key is removed.–“ to destination” Driving data up to navigation destination.If route guidance is active, the driving data is calculated and displayed up to the navigation destination.
Resetting driving data
The selected driving data display can be reset.
Tire Pressure Menu (Tire Pressure
Monitoring System, TPMS)
This device complies with Part 15 of the FCC Rules and RSS-210 of Industry Canada.
Operation of this device is subject to the following two conditions:1. This device may not cause harmful interference, and2. this device must accept any interference received including interference that may cause undesired operation.
Changes or modifications not expressly approved by the party responsible for compliance could void the user's authority to operate the equipment.
Each tire, including the spare (if provided), should be checked monthly when cold and inflated to the
inflation pressure recommended by the vehicle manufacturer on the vehicle placard or tire inflation pressure label. (If your vehicle has tires of
a different size than the size indicated on the vehicle placard or tire inflation pressure label, you
should determine the proper tire inflation pressure
for those tires.)
For information on the tire inflation pressure label:fPlease see the chapter “TIRES AND WHEELS” on page 244.
As an added safety feature, your vehicle has been equipped with a tire pressure monitoring system (TPMS) that illuminates a low tire pressure telltale (warning light) when one or more of your tires is significantly under-inflated.Accordingly, when the low tire pressure telltale illuminates, you should stop and check your tires as soon as possible, and inflate them to the proper pressure. Driving on a significantly under-inflated tire causes the tire to overheat and can lead to tire failure. Under-inflation also reduces
1. Main menu “Trip”. in the main menu.
1. Main menu “Trip”.
2.Select “1 – since” or “ 2 – consecutive” or “ 3 – to destination” and confirm.
1. Main menu “Trip”.
2.Select the relevant driving data display and confirm.
3. Select “Reset” and confirm.
14_991_Turbo_21.book Seite 105 Mittwoch, 9. April 2014 2:19 14
Page 108 of 300
106 Instrument Panel and Multi-Function Display
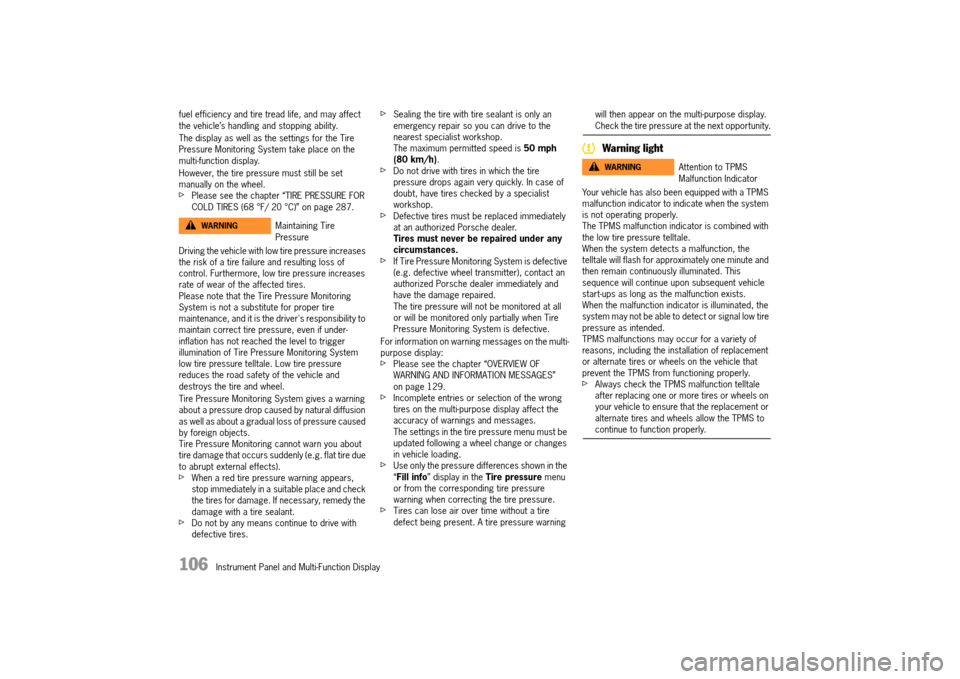
fuel efficiency and tire tread life, and may affect the vehicle’s handling and stopping ability.
The display as well as the settings for the Tire Pressure Monitoring System take place on the multi-function display.
However, the tire pressure must still be set manually on the wheel.fPlease see the chapter “TIRE PRESSURE FOR COLD TIRES (68 °F/ 20 °C)” on page 287.
Driving the vehicle with low tire pressure increases the risk of a tire failure and resulting loss of control. Furthermore, low tire pressure increases rate of wear of the affected tires.Please note that the Tire Pressure Monitoring System is not a substitute for proper tire maintenance, and it is the driver's responsibility to maintain correct tire pressure, even if under-inflation has not reached the level to trigger illumination of Tire Pressure Monitoring System low tire pressure telltale. Low tire pressure reduces the road safety of the vehicle and destroys the tire and wheel.
Tire Pressure Monitoring System gives a warning about a pressure drop caused by natural diffusion as well as about a gradual loss of pressure caused by foreign objects.Tire Pressure Monitoring cannot warn you about tire damage that occurs suddenly (e.g. flat tire due to abrupt external effects).fWhen a red tire pressure warning appears, stop immediately in a suitable place and check the tires for damage. If necessary, remedy the damage with a tire sealant.fDo not by any means continue to drive with defective tires.
fSealing the tire with tire sealant is only an emergency repair so you can drive to the nearest specialist workshop.The maximum permitted speed is 50 mph (80 km/h) .fDo not drive with tires in which the tire pressure drops again very quickly. In case of doubt, have tires checked by a specialist workshop.fDefective tires must be replaced immediately at an authorized Porsche dealer.Tires must never be repaired under any circumstances.fIf Tire Pressure Monitoring System is defective (e.g. defective wheel transmitter), contact an authorized Porsche dealer immediately and have the damage repaired. The tire pressure will not be monitored at all or will be monitored only partially when Tire Pressure Monitoring System is defective.
For information on warning messages on the multi- purpose display:fPlease see the chapter “OVERVIEW OF WARNING AND INFORMATION MESSAGES” on page 129.fIncomplete entries or selection of the wrong tires on the multi-purpose display affect the accuracy of warnings and messages.The settings in the tire pressure menu must be updated following a wheel change or changes in vehicle loading.fUse only the pressure differences shown in the “ Fill info” display in the Tire pressure menu or from the corresponding tire pressure warning when correcting the tire pressure.fTires can lose air over time without a tire defect being present. A tire pressure warning
will then appear on the multi-purpose display.Check the tire pressure at the next opportunity.
Warning light
Your vehicle has also been equipped with a TPMS malfunction indicator to indicate when the system is not operating properly.The TPMS malfunction indicator is combined with the low tire pressure telltale.When the system detects a malfunction, the telltale will flash for approximately one minute and then remain continuously illuminated. This sequence will continue upon subsequent vehicle start-ups as long as the malfunction exists.When the malfunction indicator is illuminated, the system may not be able to detect or signal low tire pressure as intended.TPMS malfunctions may occur for a variety of reasons, including the installation of replacement or alternate tires or wheels on the vehicle that prevent the TPMS from functioning properly.fAlways check the TPMS malfunction telltale after replacing one or more tires or wheels on your vehicle to ensure that the replacement or alternate tires and wheels allow the TPMS to continue to function properly.
Maintaining Tire Pressure
WARNINGh
Attention to TPMS Malfunction Indicator
WARNINGh
14_991_Turbo_21.book Seite 106 Mittwoch, 9. April 2014 2:19 14
Page 109 of 300
Instrument Panel and Multi-Function Display 107
The warning light in the instrument panel lights up: – When a loss in pressure has been detected.– In the event of a defect in Tire Pressure Monitoring or a temporary fault.– When learning new fitted wheels/wheel transmitters, as long as the vehicle’s own wheels have not yet been recognized.
The tire pressure warning light on the instrument panel goes out only when the cause of the fault has been rectified.
Overview of tire pressure monitoring functions
Tire Pressure Monitoring offers the following functions: – Display of the actual tire pressure when stationary and while the vehicle is in motion.– Tire pressure warnings in two stages (yellow and red warning).– In the “TPMS” menu, the settings “Fill info” (display of the deviation from the required pressure, refill pressure), “Tire type”, “Full load” and “Comfort press.” are available when the vehicle is stationary.
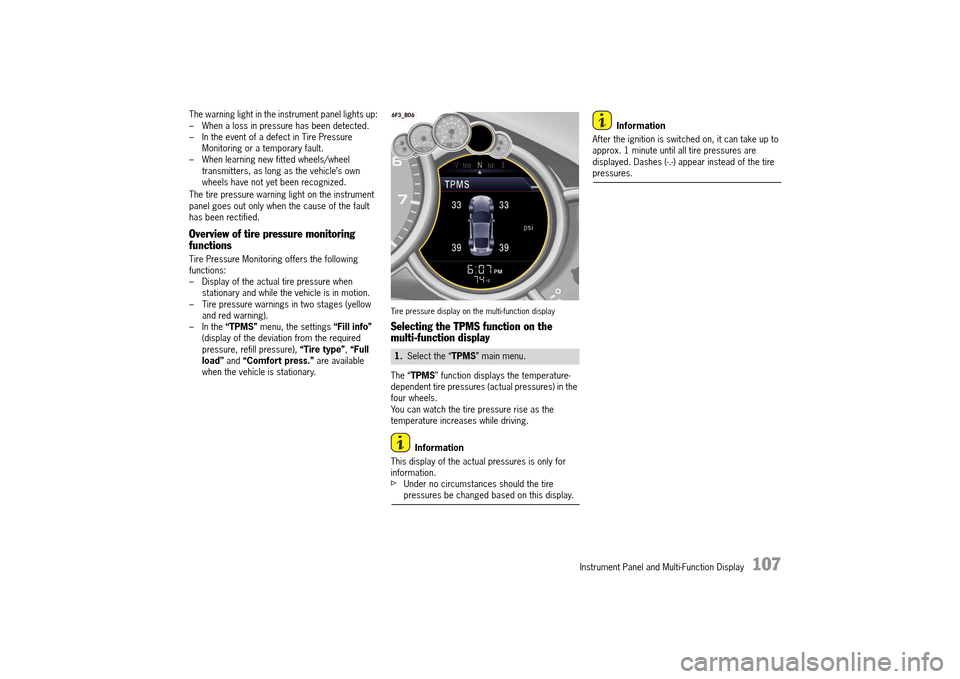
Tire pressure display on the multi-function display
Selecting the TPMS function on the multi-function display
The “ TPMS” function displays the temperature- dependent tire pressures (actual pressures) in the four wheels.You can watch the tire pressure rise as the temperature increases while driving.
Information
This display of the actual pressures is only for information.fUnder no circumstances should the tire pressures be changed based on this display.
Information
After the ignition is switched on, it can take up to approx. 1 minute until all tire pressures are displayed. Dashes (-.-) appear instead of the tire pressures.
1. Select the “TPMS” main menu.
14_991_Turbo_21.book Seite 107 Mittwoch, 9. April 2014 2:19 14
Page 110 of 300
108 Instrument Panel and Multi-Function Display
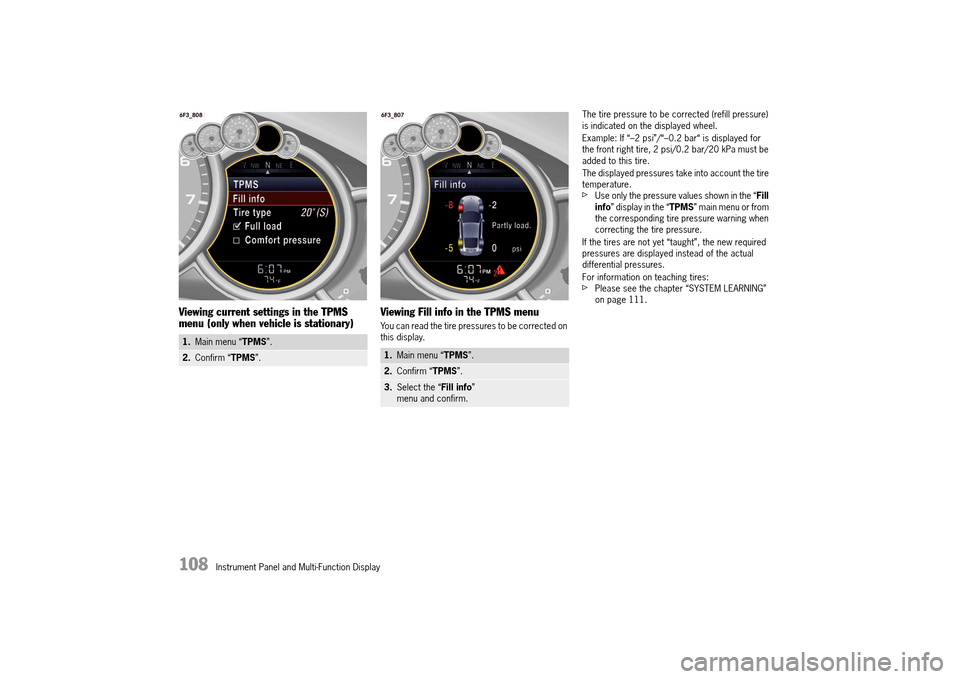
Viewing current settings in the TPMS menu (only when vehicle is stationary) Viewing Fill info in the TPMS menu
You can read the tire pressures to be corrected on this display.
The tire pressure to be corrected (refill pressure) is indicated on the displayed wheel.
Example: If “–2 psi”/“–0.2 bar“ is displayed for the front right tire, 2 psi/0.2 bar/20 kPa must be added to this tire.
The displayed pressures take into account the tire temperature.fUse only the pressure values shown in the “ Fill info ” display in the “TPMS” main menu or from the corresponding tire pressure warning when correcting the tire pressure.
If the tires are not yet “taught”, the new required pressures are displayed instead of the actual differential pressures.
For information on teaching tires:fPlease see the chapter “SYSTEM LEARNING” on page 111.
1. Main menu “TPMS”.
2.Confirm “TPMS”.1.Main menu “TPMS”.
2.Confirm “TPMS”.
3.Select the “Fill info” menu and confirm.
14_991_Turbo_21.book Seite 108 Mittwoch, 9. April 2014 2:19 14