PORSCHE CAYNNE S 2006 1.G Owners Manual
Manufacturer: PORSCHE, Model Year: 2006, Model line: CAYENNE S, Model: PORSCHE CAYENNE S 2006 1.GPages: 420, PDF Size: 3.81 MB
Page 191 of 420

Controls, Safety, Instruments
191
If aftermarket systems are installed by non-dealer-
ship technicians or outside the selling dealer,
problems may result. Installation of aftermarket
equipment is not covered under the New Car War-
ranty.
fConsult your authorized Porsche dealer about
the installation of non Porsche approved equip-
ment.
Reception quality
The reception quality of your car telephone will
change constantly when you are driving. Interfer-
ence caused by buildings, landscape and weather
is unavoidable. It may become particularly difficult
to hear when using the hands-free function due to
external noise such as engine and wind noise.
Automatic car-wash
fUnscrew external antennas before using an au-
tomatic car-wash.
Porsche Communication
Management (PCM)
Warning!
There is a danger of accident if you set or
operate the on-board computer, radio, navi-
gation system, telephone or other equipment
when driving.
This could distract you from the traffic and
cause you to lose control of the vehicle re-
sulting in serious personal injury or death.
fOperate the components while driving only if
the traffic situation allows you to do so safely.
fCarry out any complicated operating or setting
procedures only with the vehicle stationary.
fIf it is necessary to operate these components
while the vehicle is in motion, use the function keys on the multi-functional steering wheel.
fRefer to the separate operating instructions
before putting the PCM into operation.
When put into operation for the first time, a dis-
tance of approx. 3 miles (5 km) must be driven in
order for the navigation system to complete the
process of fine calibration. The same applies
when the tires are changed (e.g. summer/winter
tires) or new tires fitted. Full location accuracy is
not yet achieved during the fine-calibration proc-
ess.If the vehicle has been transported (e.g. ferry, car
train), the system may take a few minutes after be-
ing switched on before it determines the current
location.
Serious tire slip (e.g. spinning wheels on snow)
may result in temporarily inaccurate navigation.
When the battery has been disconnected, it may
take up to 15 minutes before the navigation
system is operational once more.
Satellite radioYou must have the satellite radio activated before
you can put it into operation. You will need a con-
tract with a provider in order to use this radio.
fRefer to the separate radio operating instruc-
tions before putting into operation.
Page 192 of 420
192
Controls, Safety, Instruments
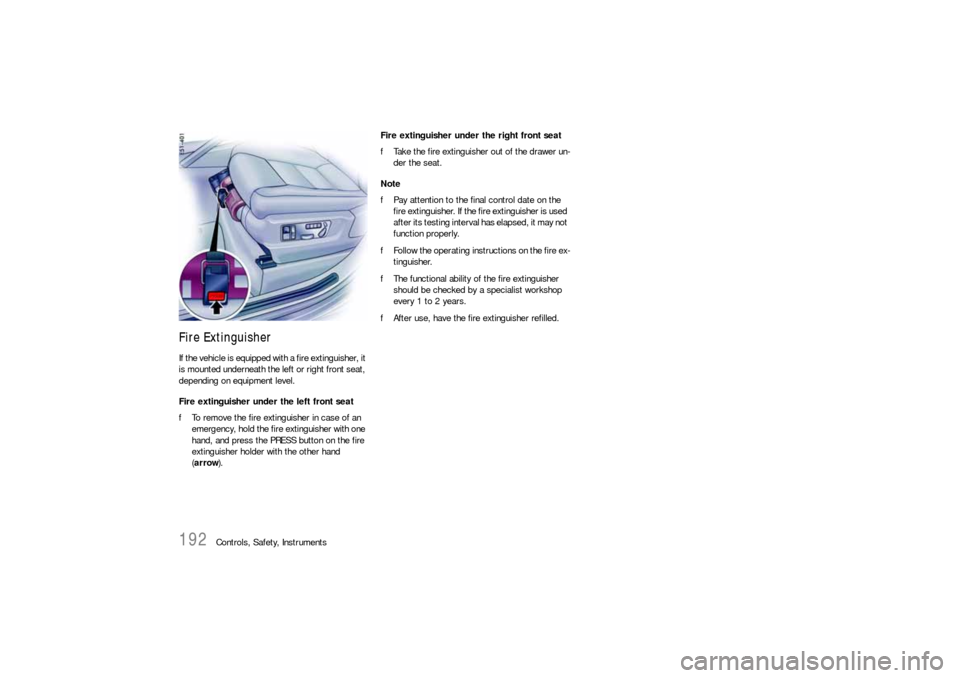
Fire ExtinguisherIf the vehicle is equipped with a fire extinguisher, it
is mounted underneath the left or right front seat,
depending on equipment level.
Fire extinguisher under the left front seat
fTo remove the fire extinguisher in case of an
emergency, hold the fire extinguisher with one
hand, and press the PRESS button on the fire
extinguisher holder with the other hand
(arrow).Fire extinguisher under the right front seat
fTake the fire extinguisher out of the drawer un-
der the seat.
Note
fPay attention to the final control date on the
fire extinguisher. If the fire extinguisher is used
after its testing interval has elapsed, it may not
function properly.
fFollow the operating instructions on the fire ex-
tinguisher.
fThe functional ability of the fire extinguisher
should be checked by a specialist workshop
every 1 to 2 years.
fAfter use, have the fire extinguisher refilled.
Page 193 of 420
Controls, Safety, Instruments
193
Storage
Warning!
Unsecured luggage and heavy objects may
come loose during braking, rapid directional
changes or in an accident and cause serious
personal injury or death.
fDo not carry items of luggage or objects in the
passenger compartment unsecured.
fDo not transport any heavy objects in open
storage trays.
fAlways keep the storage trays closed while
driving.
fAlways protect the passenger compartment
with a safety net and a luggage compartment cover.
Note on operation
An unsecured or incorrectly positioned load can
slip out of place or endanger the vehicle occu-
pants during braking, direction changes or in acci-
dents:
fPlease observe the chapter “LOADING INFOR-
MATION” on Page 213.
Storage options– In the glasses case in the roof console
– In the glove compartment, pen holder
– In the front and rear armrests
– In the drawer underneath the passenger’s seat
– In the storage compartments at the sides of
the luggage compartment
– In the door trim panel
– In the center console, front and rear
– On the back of the front seats
– Coat hook on the rear grab handles
– Under the load compartment floor
– In the front and rear cupholders
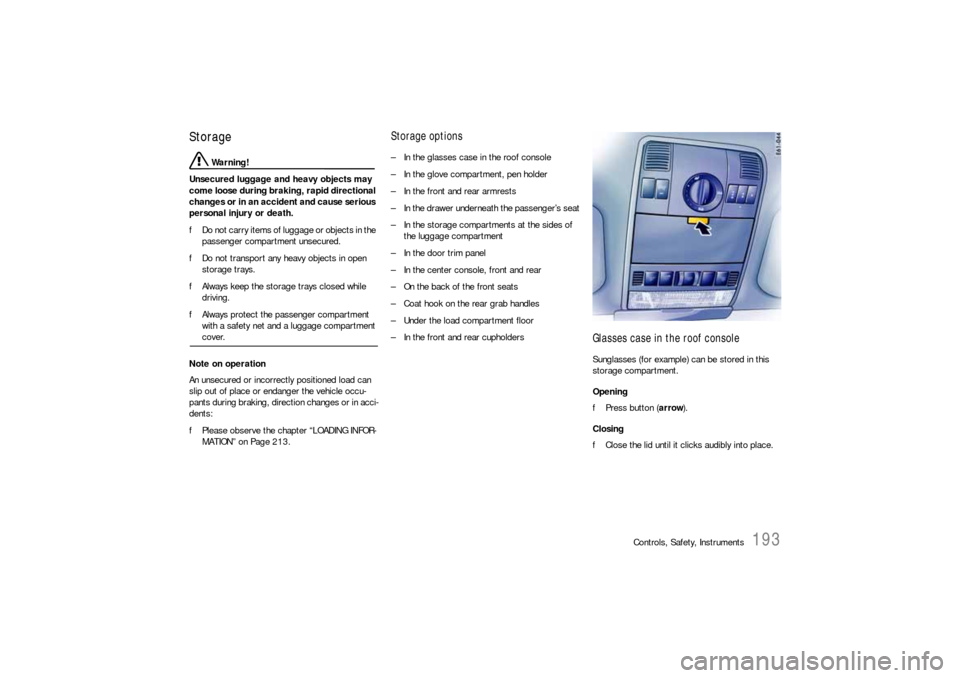
Glasses case in the roof consoleSunglasses (for example) can be stored in this
storage compartment.
Opening
fPress button (arrow).
Closing
fClose the lid until it clicks audibly into place.
Page 194 of 420
194
Controls, Safety, Instruments
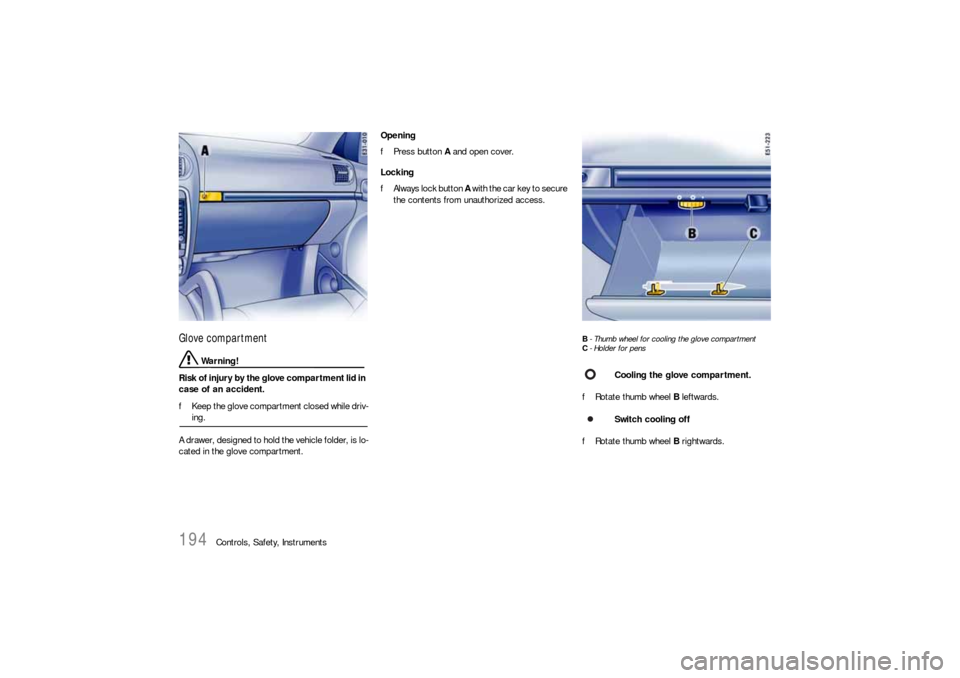
Glove compartment
Warning!
Risk of injury by the glove compartment lid in
case of an accident.
fKeep the glove compartment closed while driv-ing.
A drawer, designed to hold the vehicle folder, is lo-
cated in the glove compartment.Opening
fPress button A and open cover.
Locking
fAlways lock button A with the car key to secure
the contents from unauthorized access.
B- Thumb wheel for cooling the glove compartment
C- Holder for pensfRotate thumb wheel B leftwards.
fRotate thumb wheel B rightwards.
Cooling the glove compartment.
Switch cooling off
Page 195 of 420
Controls, Safety, Instruments
195
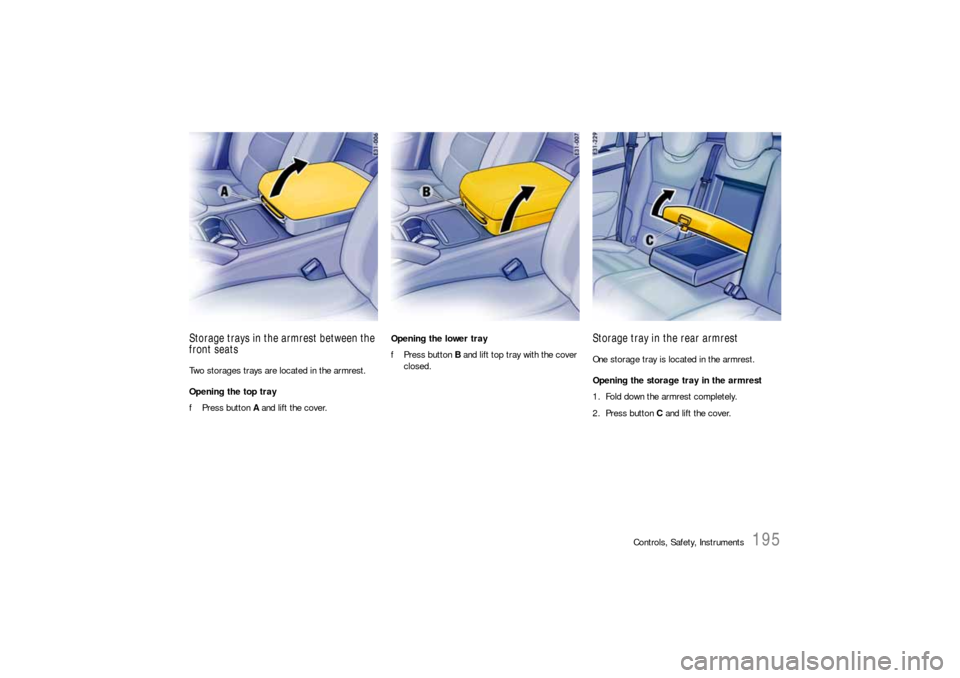
Storage trays in the armrest between the
front seatsTwo storages trays are located in the armrest.
Opening the top tray
fPress button A and lift the cover.Opening the lower tray
fPress button B and lift top tray with the cover
closed.
Storage tray in the rear armrestOne storage tray is located in the armrest.
Opening the storage tray in the armrest
1. Fold down the armrest completely.
2. Press button C and lift the cover.
Page 196 of 420
196
Controls, Safety, Instruments
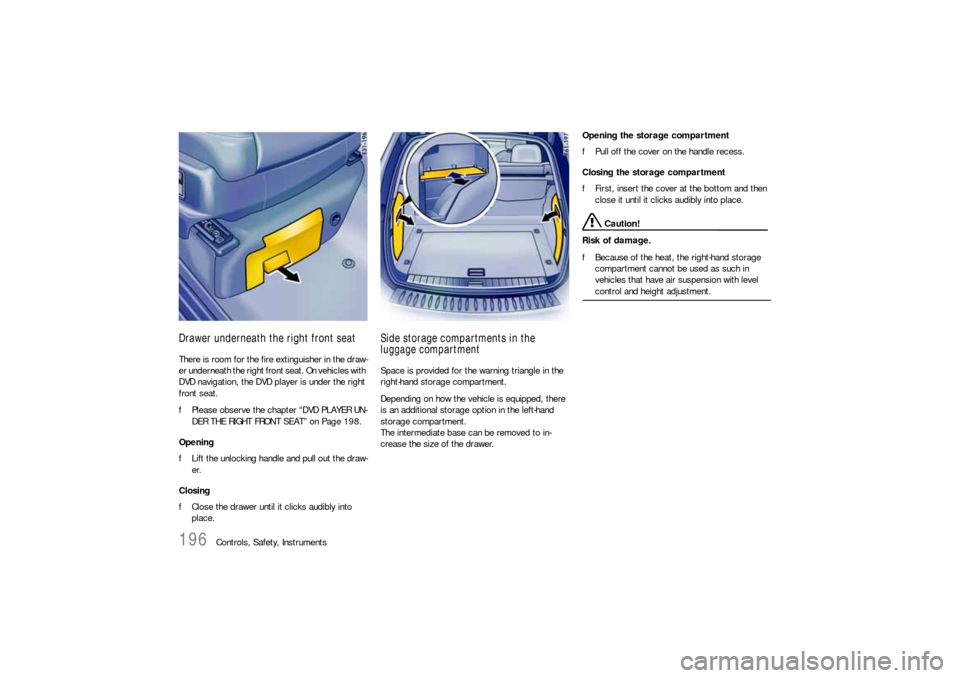
Drawer underneath the right front seatThere is room for the fire extinguisher in the draw-
er underneath the right front seat. On vehicles with
DVD navigation, the DVD player is under the right
front seat.
fPlease observe the chapter “DVD PLAYER UN-
DER THE RIGHT FRONT SEAT” on Page 198.
Opening
fLift the unlocking handle and pull out the draw-
er.
Closing
fClose the drawer until it clicks audibly into
place.
Side storage compartments in the
luggage compartmentSpace is provided for the warning triangle in the
right-hand storage compartment.
Depending on how the vehicle is equipped, there
is an additional storage option in the left-hand
storage compartment.
The intermediate base can be removed to in-
crease the size of the drawer.Opening the storage compartment
fPull off the cover on the handle recess.
Closing the storage compartment
fFirst, insert the cover at the bottom and then
close it until it clicks audibly into place.
Caution!
Risk of damage.
fBecause of the heat, the right-hand storage
compartment cannot be used as such in
vehicles that have air suspension with level control and height adjustment.
Page 197 of 420
Controls, Safety, Instruments
197
CupholderYou can place drinks cans and cups in the cup-
holder.
fKeep the cupholder closed while driving.
Warning!
Risk of accident, scalding or damage due to
spilling drinks.
fOnly use cupholder when safe to do so it is.
fOnly use containers which fit.
fNever put overfull containers in the cupholder.
fNever use hot drinks.
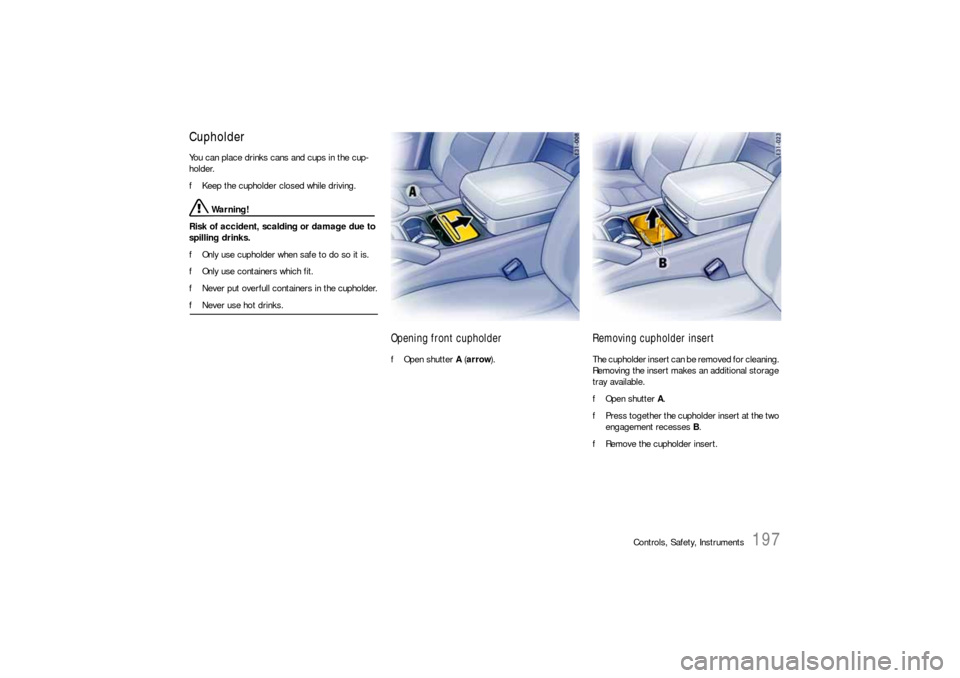
Opening front cupholderfOpen shutter A (arrow).
Removing cupholder insertThe cupholder insert can be removed for cleaning.
Removing the insert makes an additional storage
tray available.
fOpen shutter A.
fPress together the cupholder insert at the two
engagement recesses B.
fRemove the cupholder insert.
Page 198 of 420
198
Controls, Safety, Instruments
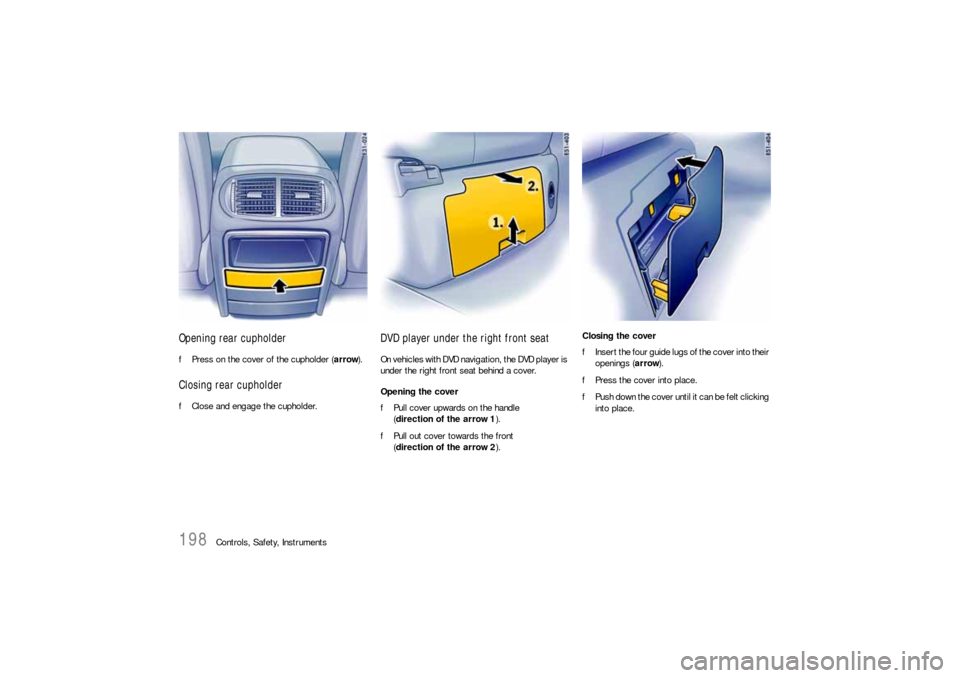
Opening rear cupholderfPress on the cover of the cupholder (arrow).Closing rear cupholderfClose and engage the cupholder.
DVD player under the right front seatOn vehicles with DVD navigation, the DVD player is
under the right front seat behind a cover.
Opening the cover
fPull cover upwards on the handle
(direction of the arrow 1).
fPull out cover towards the front
(direction of the arrow 2).Closing the cover
fInsert the four guide lugs of the cover into their
openings (arrow).
fPress the cover into place.
fPush down the cover until it can be felt clicking
into place.
Page 199 of 420
Controls, Safety, Instruments
199
Rear LidThe equipment features “Porsche Entry & Drive”
and “spare wheel bracket” affect operation of the
rear lid.
fPlease observe the chapter “UNLOCKING VE-
HICLE DOORS” on Page 22.
fPlease observe the chapter “SPARE WHEEL”
on Page 331.
Danger!
Risk of poisoning. Exhaust gases can enter
the passenger compartment when the rear
lid is open.
fAlways keep the rear lid closed when the
engine is running.
fAlways keep the rear lid closed while driving.
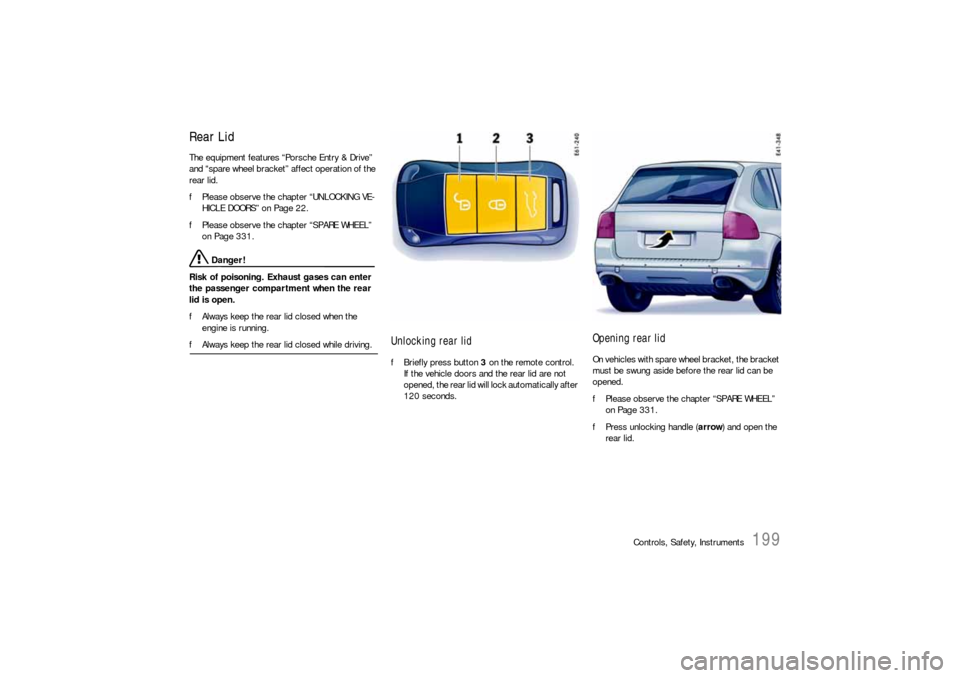
Unlocking rear lidfBriefly press button 3 on the remote control.
If the vehicle doors and the rear lid are not
opened, the rear lid will lock automatically after
120 seconds.
Opening rear lidOn vehicles with spare wheel bracket, the bracket
must be swung aside before the rear lid can be
opened.
fPlease observe the chapter “SPARE WHEEL”
on Page 331.
fPress unlocking handle (arrow) and open the
rear lid.
Page 200 of 420
200
Controls, Safety, Instruments
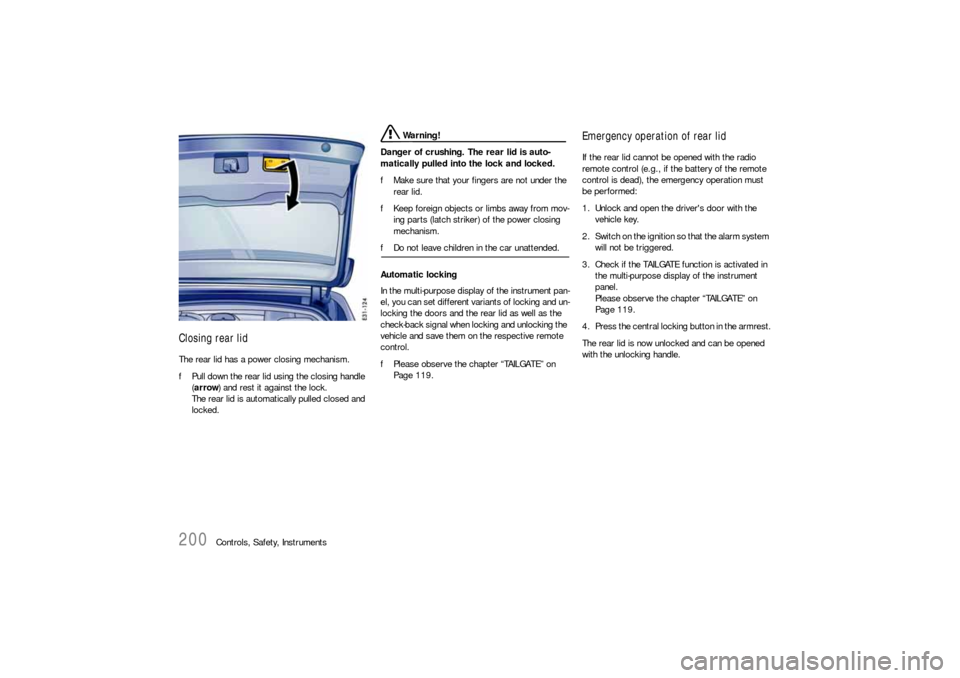
Closing rear lidThe rear lid has a power closing mechanism.
fPull down the rear lid using the closing handle
(arrow) and rest it against the lock.
The rear lid is automatically pulled closed and
locked.
Warning!
Danger of crushing. The rear lid is auto-
matically pulled into the lock and locked.
fMake sure that your fingers are not under the
rear lid.
fKeep foreign objects or limbs away from mov-
ing parts (latch striker) of the power closing
mechanism.
fDo not leave children in the car unattended.
Automatic locking
In the multi-purpose display of the instrument pan-
el, you can set different variants of locking and un-
locking the doors and the rear lid as well as the
check-back signal when locking and unlocking the
vehicle and save them on the respective remote
control.
fPlease observe the chapter “TAILGATE” on
Page 119.
Emergency operation of rear lidIf the rear lid cannot be opened with the radio
remote control (e.g., if the battery of the remote
control is dead), the emergency operation must
be performed:
1. Unlock and open the driver's door with the
vehicle key.
2. Switch on the ignition so that the alarm system
will not be triggered.
3. Check if the TAILGATE function is activated in
the multi-purpose display of the instrument
panel.
Please observe the chapter “TAILGATE” on
Page 119.
4. Press the central locking button in the armrest.
The rear lid is now unlocked and can be opened
with the unlocking handle.