ECO mode Ram 1500 2020 Owner's Guide
[x] Cancel search | Manufacturer: RAM, Model Year: 2020, Model line: 1500, Model: Ram 1500 2020Pages: 674, PDF Size: 32.69 MB
Page 207 of 674

SAFETY 205
The “ESC Activation/Malfunction Indicator Light” (located
in the instrument cluster) starts to flash as soon as the tires
lose traction and the ESC system becomes active. The “ESC
Activation/Malfunction Indicator Light” also flashes when
TCS is active. If the “ESC Activation/Malfunction Indicator
Light” begins to flash during acceleration, ease up on the
accelerator and apply as little throttle as possible. Be sure to
adapt your speed and driving to the prevailing road condi-
tions.
NOTE:
• The “ESC Activation/Malfunction Indicator Light” and the “ESC OFF Indicator Light” come on momentarily each
time the ignition is placed in the ON/RUN mode.
• Each time the ignition is placed in the ON/RUN mode, the ESC system will be on even if it was turned off previously.
• The ESC system will make buzzing or clicking sounds when it is active. This is normal; the sounds will stop when
ESC becomes inactive following the maneuver that caused
the ESC activation.
The “ESC OFF Indicator Light” indicates the
customer has elected to have the Electronic Stability
Control (ESC) in a reduced mode. Hill Descent Control (HDC) — If Equipped
Hill Descent Control (HDC) is intended for low speed
off-road driving while in 4L Range. HDC maintains vehicle
speed while descending hills during various driving situa
-
tions. HDC controls vehicle speed by actively controlling the
brakes.
HDC Has Three States:
1. Off (feature is not enabled and will not activate).
2. Enabled (feature is enabled and ready but activation conditions are not met, or driver is actively overriding
with brake or throttle application).
3. Active (feature is enabled and actively controlling vehicle speed).
Enabling HDC
HDC is enabled by pushing the HDC switch, but the
following conditions must also be met to enable HDC:
• Driveline is in 4L Range
• Vehicle speed is below 5 mph (8 km/h)
• Park brake is released
• Driver door is closed
4
2020_DT_1500_OM_US.book Page 205
Page 212 of 674
210 SAFETY
6. Push the “ESC Off” button located in the lower switch bankbelow the climate control four times within 20 seconds. The
“ESC Off Indicator Light” should turn on and turn off two
times.
7. Rotate the steering wheel back to center and then an addi -
tional slightly more than one-half turn to the right.
8. Turn the ignition to the OFF mode and then back to ON. If the sequence was completed properly, the “ESC Off
Indicator Light” will blink several times to confirm HSA
is disabled.
9. Repeat these steps if you want to return this feature to its previous setting.
Traction Control System (TCS)
The Traction Control System (TCS) monitors the amount of
wheel spin of each of the driven wheels. If wheel spin is
detected, the TCS may apply brake pressure to the spinning
wheel(s) and/or reduce engine power to provide enhanced
acceleration and stability. A feature of the TCS, Brake
Limited Differential (BLD), functions similar to a limited slip
differential and controls the wheel spin across a driven axle.
If one wheel on a driven axle is spinning faster than the other,
the system will apply the brake of the spinning wheel. This will allow more engine torque to be applied to the wheel that
is not spinning. BLD may remain enabled even if TCS and
ESC are in a reduced mode.
Trailer Sway Control (TSC)
Trailer Sway Control (TSC) uses sensors in the vehicle to
recognize an excessively swaying trailer and will take the
appropriate actions to attempt to stop the sway. TSC will
become active automatically once an excessively swaying
trailer is recognized.
NOTE:
TSC cannot stop all trailers from swaying. Always use
caution when towing a trailer and follow the trailer tongue
weight recommendations. Refer to “Trailer Towing” in
“Starting And Operating” for further information.
When TSC is functioning, the “ESC Activation/Malfunction
Indicator Light” will flash, the engine power may be reduced
and you may feel the brakes being applied to individual
wheels to attempt to stop the trailer from swaying. TSC is
disabled when the ESC system is in the “Partial Off” or “Full
Off” modes.
WARNING!
If TSC activates while driving, slow the vehicle down,
stop at the nearest safe location, and adjust the trailer
load to eliminate trailer sway.
2020_DT_1500_OM_US.book Page 210
Page 213 of 674
SAFETY 211
AUXILIARY DRIVING SYSTEMS
Blind Spot Monitoring (BSM) — If Equipped
The Blind Spot Monitoring (BSM) system uses two
radar-based sensors, located inside the taillights, to detect
highway licensable vehicles (automobiles, trucks, motorcy-
cles, etc.) that enter the blind spot zones from the rear/front/
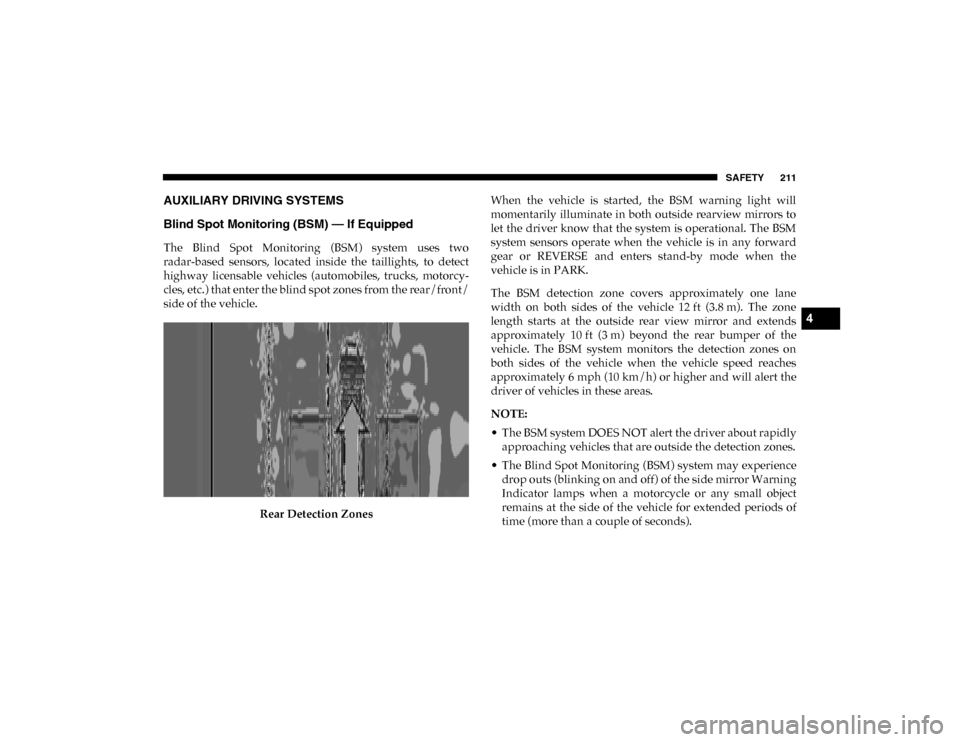
side of the vehicle.
Rear Detection Zones When the vehicle is started, the BSM warning light will
momentarily illuminate in both outside rearview mirrors to
let the driver know that the system is operational. The BSM
system sensors operate when the vehicle is in any forward
gear or REVERSE and enters stand-by mode when the
vehicle is in PARK.
The BSM detection zone covers approximately one lane
width on both sides of the vehicle 12 ft (3.8 m). The zone
length starts at the outside rear view mirror and extends
approximately 10 ft (3 m) beyond the rear bumper of the
vehicle. The BSM system monitors the detection zones on
both sides of the vehicle when the vehicle speed reaches
approximately 6 mph (10 km/h) or higher and will alert the
driver of vehicles in these areas.
NOTE:
• The BSM system DOES NOT alert the driver about rapidly
approaching vehicles that are outside the detection zones.
• The Blind Spot Monitoring (BSM) system may experience drop outs (blinking on and off) of the side mirror Warning
Indicator lamps when a motorcycle or any small object
remains at the side of the vehicle for extended periods of
time (more than a couple of seconds).
4
2020_DT_1500_OM_US.book Page 211
Page 220 of 674

218 SAFETY
Blind Spot Alert Off
When the BSM system is turned off there will be no visual or
audible alerts from either the BSM, RCP, or Trailer Merge
Assist systems.
NOTE:
The BSM system will store the current operating mode when
the vehicle is shut off. Each time the vehicle is started the
previously stored mode will be recalled and used.
Trailer Merge Assist
NOTE:
When Trailer Merge Assist is activated, Rear Cross Path is
disabled.
Trailer Merge Assist is a function of the Blind Spot Moni-
toring (BSM) system that extends the blind spot zone to work
while pulling a trailer. Trailer Merge Assist consists of three
sub functions:
• Automatic Trailer Detection
• Trailer Length Detection
• Trailer Merge Warning Blind Spot Zones With Trailer Merge Assist
Automatic Trailer Detection
There are two modes of operation for the detection of the
trailer length:
• Automatic Mode — When “Auto Mode” is selected, the
system will use the blind spot sensors to automatically
determine the presence and length of a trailer. The pres -
ence of a trailer will be detected using the blind spot radar
within 90 seconds of forward movement of the vehicle.
1 — Vehicle
2 — Trailer
2020_DT_1500_OM_US.book Page 218
Page 221 of 674
SAFETY 219
The vehicle must be moving above 6 mph (10 km/h) to
activate the feature. Once the trailer has been detected, the
system will default to the maximum blind spot zone until
the length has been verified. You will see “Auto” in the
instrument panel cluster .
• Max Mode — When “Max Mode” is selected, the system
will default to the maximum blind spot zone regardless of
what size trailer is attached
NOTE:
Selected setting is stored when the ignition is cycled OFF. To
change this setting, it must be selected through the Uconnect
Settings. Refer to “Uconnect Settings” in “Multimedia” for
further information.
Trailer Length Detection
Once the trailer presence has been established. The trailer
length will be established (by making a 90 degree turn) and
then the trailer length category (example 10-20 ft (3 m to
6 m)) will be displayed. This can take up to 30 seconds after
completing the turn. NOTE:
During the same ignition cycle, if the vehicle is at a standstill
for a minimum of 90 seconds, a new “trailer detection
request” is enabled by the system once the vehicle resumes
motion.
Maximum length supported by the Trailer Merge Assist
feature is 39.5 ft (12 m). Trailer length is considered the
forward most portion of the trailer hitch to the rearward
most portion of the body, bumper, or ramp of the trailer.
Maximum width supported by the Trailer Merge Assist
feature is 8.5 ft (2.59 m). Trailer width is measured at the
widest portion of the trailer and may include wheels, tires,
finders, or rails.
NOTE:
Fifth wheel or gooseneck trailers are not supported by
Trailer Merge Assist.
4
2020_DT_1500_OM_US.book Page 219
Page 234 of 674

232 SAFETY
cluster will display a "SERVICE TPM SYSTEM" message
for a minimum of five seconds and then display dashes (--)
in place of the pressure value.
• For each subsequent ignition switch cycle, a chime will sound, the Tire Pressure Monitoring System (TPMS)
Warning Light will flash on and off for 75 seconds and
then remain on solid, and the instrument cluster will
display a "SERVICE TPM SYSTEM" message for a
minimum of five seconds and then display dashes (--) in
place of the pressure value.
• Once you repair or replace the original road tire and rein -
stall it on the vehicle in place of the non matching full size
spare or compact spare, the TPMS will update automati -
cally. In addition, the Tire Pressure Monitoring System
(TPMS) Warning Light will turn OFF and the graphic in
the instrument cluster will display a new pressure value
instead of dashes (--), as long as no tire pressure is below
the low-pressure warning limit in any of the four active
road tires. The vehicle may need to be driven for up to
20 minutes above 15 mph (24 km/h) in order for the TPMS
to receive this information. Tire Fill Alert
This feature notifies the user when the placard tire pressure
is attained while inflating or deflating the tire.
The customer may choose to disable or enable the Tire Fill
Alert feature through use of the customer settings in the
radio.
NOTE:
• Only one tire can be filled at a time when using the Tire Fill
Alert system.
• The Tire Fill Alert feature cannot be entered if an existing TPM system fault is set to “active” or if the system is in
deactivation mode (if equipped).
The system will be activated when a positive increase in tire
pressure is detected by the TPM system while inflating the
tire. The ignition must be in the RUN mode, with the trans -
mission in PARK (P).
NOTE:
It is not required to have the engine running to enter Tire Fill
Alert mode.
2020_DT_1500_OM_US.book Page 232
Page 235 of 674
SAFETY 233
The hazard lamps will come on to confirm the vehicle is in
Tire Fill Alert mode.
When Tire Fill Alert Mode is entered, the tire pressure
display screen will be displayed in the instrument cluster.
If the hazard lamps do not come on while inflating the tire,
the TPM sensor may be in a null spot preventing the TPM
sensor signal from being received. In this case, the vehicle
may need to be moved either forward or backward slightly
to exit the null spot.
Operation:
• The horn will chirp to let the user know when to stopfilling the tire, when it reaches recommended pressure.
• The horn will chirp three times if the tire is over filled and will continue to chirp every five seconds if the user
continues to inflate the tire. • The horn will chirp once again when enough air is let out
to reach proper inflation level.
• The horn will also chirp three times if the tire is then under-inflated and will continue to chirp every five
seconds if the user continues to deflate the tire.
General Information
The following regulatory statement applies to all Radio
Frequency (RF) devices equipped in this vehicle:
This device complies with Part 15 of the FCC Rules and with
Innovation, Science and Economic Development Canada
license-exempt RSS standard(s). Operation is subject to the
following two conditions:
1. This device may not cause harmful interference, and
2. This device must accept any interference received, including interference that may cause undesired opera -
tion.
4
2020_DT_1500_OM_US.book Page 233
Page 236 of 674

234 SAFETY
Le présent appareil est conforme aux CNR d`Innovation,
Science and Economic Development applicables aux appar-
eils radio exempts de licence. L'exploitation est autorisée aux
deux conditions suivantes:
1. l'appareil ne doit pas produire de brouillage, et
2. l'utilisateur de l'appareil doit accepter tout brouillage radioélectrique subi, même si le brouillage est susceptible
d'en compromettre le fonctionnement.
La operación de este equipo está sujeta a las siguientes dos
condiciones:
1. es posible que este equipo o dispositivo no cause interfer -
encia perjudicial y
2. este equipo o dispositivo debe aceptar cualquier interfer- encia, incluyendo la que pueda causar su operación no
deseada. NOTE:
Changes or modifications not expressly approved by the
party responsible for compliance could void the user’s
authority to operate the equipment.
OCCUPANT RESTRAINT SYSTEMS
Some of the most important safety features in your vehicle
are the restraint systems:
Occupant Restraint Systems Features
• Seat Belt Systems
• Supplemental Restraint Systems (SRS) Air Bags
• Child Restraints
Some of the safety features described in this section may be
standard equipment on some models, or may be optional
equipment on others. If you are not sure, ask an authorized
dealer.
2020_DT_1500_OM_US.book Page 234
Page 282 of 674

280 SAFETY
Installing A Child Restraint With A Switchable Automatic
Locking Retractor (ALR):
Child restraint systems are designed to be secured in vehicle
seats by lap belts or the lap belt portion of a lap/shoulder
belt.
1. Place the child seat in the center of the seating position.For some second row seats, you may need to recline the
seat and/or raise the head restraint (if adjustable) to get a
better fit. If the rear seat can be moved forward and rear -
ward in the vehicle, you may wish to move it to its
rear-most position to make room for the child seat. You
may also move the front seat forward to allow more room
for the child seat.
2. Pull enough of the seat belt webbing from the retractor to pass it through the belt path of the child restraint. Do not
twist the belt webbing in the belt path. 3. Slide the latch plate into the buckle until you hear a
“click.”
4. Pull on the webbing to make the lap portion tight against the child seat.
5. To lock the seat belt, pull down on the shoulder part of the belt until you have pulled all the seat belt webbing out
of the retractor. Then, allow the webbing to retract back
into the retractor. As the webbing retracts, you will hear
a clicking sound. This means the seat belt is now in the
Automatic Locking mode.
6. Try to pull the webbing out of the retractor. If it is locked, you should not be able to pull out any webbing. If the
retractor is not
locked, repeat step 5.
7. Finally, pull up on any excess webbing to tighten the lap portion around the child restraint while you push the
child restraint rearward and downward into the vehicle
seat.
8. If the child restraint has a top tether strap and the seating position has a top tether anchorage, connect the tether
strap to the anchorage and tighten the tether strap. Refer
to “Installing Child Restraints Using the Top Tether
Anchorage” in this section for directions to attach a tether
anchor.
WARNING!
• Improper installation or failure to properly secure a child restraint can lead to failure of the restraint. The
child could be badly injured or killed.
• Follow the child restraint manufacturer’s directions exactly when installing an infant or child restraint.
2020_DT_1500_OM_US.book Page 280
Page 289 of 674
SAFETY 287
(Continued)
Air Bag Warning Light
The Air Bag warning light will turn on for four to eight
seconds as a bulb check when the ignition switch is first
turned to ON/RUN. If the light is either not on during
starting, stays on, or turns on while driving, have the system
inspected at an authorized dealer as soon as possible. After
the bulb check, this light will illuminate with a single chime
when a fault with the Air Bag System has been detected. It
will stay on until the fault is removed. If the light comes on
intermittently or remains on while driving, have an autho-
rized dealer service the vehicle immediately.
Refer to “Occupant Restraint Systems” in “Safety” for
further information.
Defroster
Check operation by selecting the defrost mode and place the
blower control on high speed. You should be able to feel the
air directed against the windshield. See an authorized dealer
for service if your defroster is inoperable.
Floor Mat Safety Information
Always use floor mats designed to fit your vehicle. Only use
a floor mat that does not interfere with the operation of the
accelerator, brake or clutch pedals. Only use a floor mat that is securely attached using the floor mat fasteners so it cannot
slip out of position and interfere with the accelerator, brake
or clutch pedals or impair safe operation of your vehicle in
other ways.
WARNING!
An improperly attached, damaged, folded, or stacked
floor mat, or damaged floor mat fasteners may cause
your floor mat to interfere with the accelerator, brake, or
clutch pedals and cause a loss of vehicle control. To
prevent SERIOUS INJURY or DEATH:
• ALWAYS securely attach your floor mat using the floor mat fasteners. DO NOT install your floor mat
upside down or turn your floor mat over. Lightly pull to
confirm mat is secured using the floor mat fasteners on
a regular basis.
• ALWAYS REMOVE THE EXISTING FLOOR MAT FROM THE VEHICLE before installing any other
floor mat. NEVER install or stack an additional floor
mat on top of an existing floor mat.
4
2020_DT_1500_OM_US.book Page 287