ESP RAM 1500 2023 Repair Manual
[x] Cancel search | Manufacturer: RAM, Model Year: 2023, Model line: 1500, Model: RAM 1500 2023Pages: 416, PDF Size: 20.59 MB
Page 352 of 416

350SERVICING AND MAINTENANCE
Selection Of Coolant
For further information Úpage 396.
NOTE:
Mixing of engine coolant (antifreeze) other than
specified Organic Additive Technology (OAT) engine
coolant, may result in engine damage and may
decrease corrosion protection. OAT engine coolant is
different and should not be mixed with Hybrid Organic
Additive Technology (HOAT) engine coolant or any
“globally compatible” coolant. If a non-OAT engine
coolant is introduced into the cooling system in an
emergency, the cooling system will need to be drained,
flushed, and refilled with fresh OAT coolant
(conforming to MS.90032), by an authorized dealer as
soon as possible.
Do not use water alone or alcohol-based engine
coolant products. Do not use additional rust inhibitors
or anti-rust products, as they may not be compatible
with the radiator engine coolant and may plug the
radiator.
This vehicle has not been designed for use with
propylene glycol-based engine coolant. Use of
propylene glycol-based engine coolant is not recom -
mended.
Some vehicles require special tools to add coolant
properly. Failure to fill these systems properly could
lead to severe internal engine damage. If any coolant is
needed to be added to the system please contact an
authorized dealer.
Adding Coolant
Your vehicle has been built with an improved engine
coolant (OAT coolant conforming to MS.90032) that
allows extended maintenance intervals. This engine
coolant (antifreeze) can be used up to 10 years or
150,000 miles (240,000 km) before replacement.
To prevent reducing this extended maintenance period, it
is important that you use the same engine coolant
(OAT coolant conforming to MS.90032) throughout the life
of your vehicle.
Please review these recommendations for using Organic
Additive Technology (OAT) engine coolant that meets the
requirements of the manufacturer Material Standard
MS.90032. When adding engine coolant:
We recommend using Mopar® Antifreeze/Coolant
10 Year/150,000 Mile (240,000 km) Formula OAT
that meets the requirements of the manufacturer
Material Standard MS.90032.
Mix a minimum solution of 50% OAT engine coolant
that meets the requirements of the manufacturer
Material Standard MS.90032 and distilled water.
Use higher concentrations (not to exceed 70%) if
temperatures below −34°F (−37°C) are anticipated.
Please contact an authorized dealer for assistance.
Use only high purity water such as distilled or deionized
water when mixing the water/engine coolant solution.
The use of lower quality water will reduce the amount
of corrosion protection in the engine cooling system.
NOTE:
It is the owner's responsibility to maintain the proper
level of protection against freezing according to the
temperatures occurring in the area where the vehicle is
operated.
Some vehicles require special tools to add coolant
properly. Failure to fill these systems properly could
lead to severe internal engine damage. If any coolant is
needed to be added to the system, please contact an
authorized dealer.
Mixing engine coolant types is not recommended and
can result in cooling system damage. If HOAT and OAT
coolant are mixed in an emergency, have an authorized
dealer drain, flush, and refill with OAT coolant
(conforming to MS.90032) as soon as possible.
Cooling System Pressure Cap
The cap must be fully tightened to prevent loss of engine
coolant (antifreeze), and to ensure that engine coolant
will return to the radiator from the coolant expansion
bottle/recovery tank (if equipped).
The cap should be inspected and cleaned if there is any
accumulation of foreign material on the sealing surfaces.
23_DT_OM_EN_USC_t.book Page 350
Page 357 of 416

SERVICING AND MAINTENANCE355
The fuses protect electrical systems against excessive
current.
When a device does not work, you must check the fuse
element inside the blade fuse for a break/melt.
Also, please be aware that using power outlets for
extended periods of time with the engine off may result in
vehicle battery discharge.
Blade Fuses
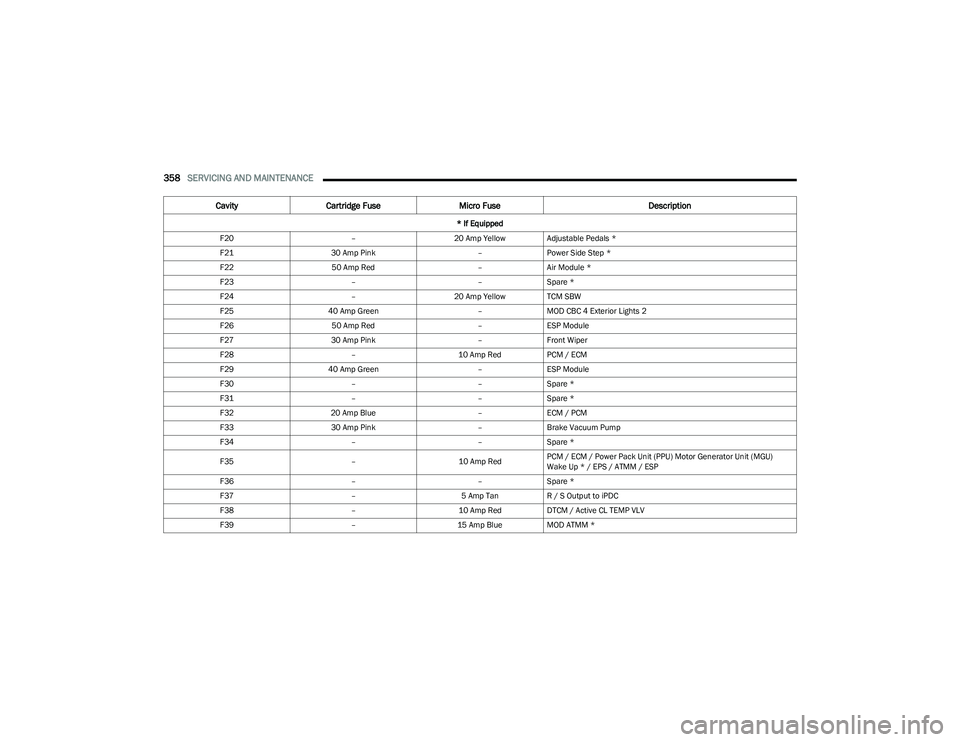
Underhood Power Distribution Center
The Power Distribution Center is located in the engine
compartment near the battery. This center contains
cartridge fuses, micro fuses, relays, and circuit breakers.
A description of each fuse and component may be
stamped on the inside cover, otherwise the cavity number
of each fuse is stamped on the inside cover that
corresponds to the following chart.CAUTION!
If it is necessary to wash the engine compartment, take
care not to directly hit the fuse box, and the windshield
wiper motors with water.
1 — Fuse Element
2 — Blade Fuse with a good/functional fuse element
3 — Blade Fuse with a bad/not functional fuse element
(blown fuse)
CAUTION!
When installing the power distribution center cover, it is
important to ensure the cover is properly positioned
and fully latched. Failure to do so may allow water to get
into the power distribution center and possibly result in
an electrical system failure.
8
23_DT_OM_EN_USC_t.book Page 355
Page 360 of 416
358SERVICING AND MAINTENANCE
F20 –20 Amp Yellow Adjustable Pedals *
F21 30 Amp Pink –Power Side Step *
F22 50 Amp Red –Air Module *
F23 ––Spare *
F24 –20 Amp Yellow TCM SBW
F25 40 Amp Green –MOD CBC 4 Exterior Lights 2
F26 50 Amp Red –ESP Module
F27 30 Amp Pink –Front Wiper
F28 –10 Amp RedPCM / ECM
F29 40 Amp Green –ESP Module
F30 ––Spare *
F31 ––Spare *
F32 20 Amp Blue –ECM / PCM
F33 30 Amp Pink –Brake Vacuum Pump
F34 ––Spare *
F35 –10 Amp RedPCM / ECM / Power Pack Unit (PPU) Motor Generator Unit (MGU)
Wake Up * / EPS / ATMM / ESP
F36 ––Spare *
F37 –5 Amp TanR / S Output to iPDC
F38 –10 Amp RedDTCM / Active CL TEMP VLV
F39 –15 Amp BlueMOD ATMM *
Cavity Cartridge Fuse Micro Fuse Description
* If Equipped
23_DT_OM_EN_USC_t.book Page 358
Page 373 of 416
SERVICING AND MAINTENANCE371
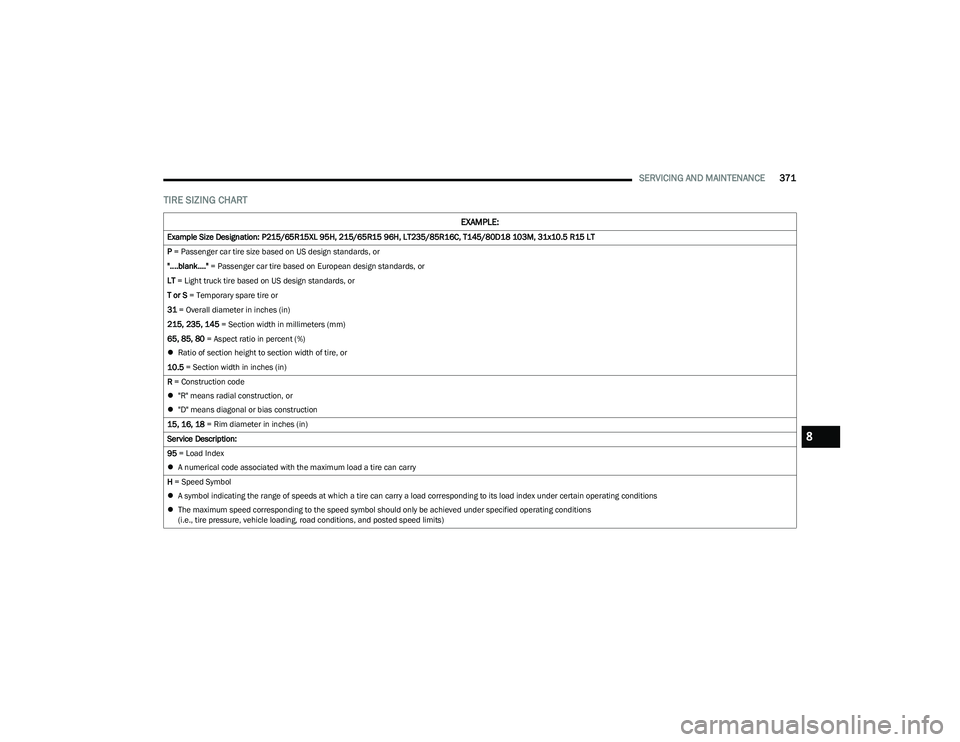
TIRE SIZING CHART
EXAMPLE:
Example Size Designation: P215/65R15XL 95H, 215/65R15 96H, LT235/85R16C, T145/80D18 103M, 31x10.5 R15 LT
P = Passenger car tire size based on US design standards, or
"....blank...." = Passenger car tire based on European design standards, or
LT = Light truck tire based on US design standards, or
T or S = Temporary spare tire or
31 = Overall diameter in inches (in)
215, 235, 145 = Section width in millimeters (mm)
65, 85, 80 = Aspect ratio in percent (%)
Ratio of section height to section width of tire, or
10.5 = Section width in inches (in)
R = Construction code
"R" means radial construction, or
"D" means diagonal or bias construction
15, 16, 18 = Rim diameter in inches (in)
Service Description:
95 = Load Index
A numerical code associated with the maximum load a tire can carry
H = Speed Symbol
A symbol indicating the range of speeds at which a tire can carry a load corresponding to its load index under certain operating conditions
The maximum speed corresponding to the speed symbol should only be achieved under specified operating conditions
(i.e., tire pressure, vehicle loading, road conditions, and posted speed limits)
8
23_DT_OM_EN_USC_t.book Page 371
Page 379 of 416

SERVICING AND MAINTENANCE377
(Continued)
TIRES — GENERAL INFORMATION
Tire Pressure
Proper tire inflation pressure is essential to the safe and
satisfactory operation of your vehicle. Four primary areas
are affected by improper tire pressure:
Safety
Fuel Economy
Tread Wear
Ride Comfort and Vehicle Stability
Safety Both underinflation and overinflation affect the stability of
the vehicle and can produce a feeling of sluggish response
or over responsiveness in the steering.
NOTE:
Unequal tire pressures from side to side may cause
erratic and unpredictable steering response.
Unequal tire pressure from side to side may cause the
vehicle to drift left or right.
Fuel Economy
Underinflated tires will increase tire rolling resistance
resulting in higher fuel consumption.
Tread Wear
Improper cold tire inflation pressures can cause abnormal
wear patterns and reduced tread life, resulting in the need
for earlier tire replacement. Ride Comfort And Vehicle Stability
Proper tire inflation contributes to a comfortable ride.
Overinflation produces a jarring and uncomfortable ride.
Tire Inflation Pressures
The proper cold tire inflation pressure is listed on the
driver's side B-pillar or rear edge of the driver's side door.
At least once a month:
Check and adjust tire pressure with a good quality
pocket-type pressure gauge. Do not make a visual
judgment when determining proper inflation.
Tires may look properly inflated even when they are
underinflated.
Inspect tires for signs of tire wear or visible damage.
Inflation pressures specified on the placard are always
“cold tire inflation pressure”. Cold tire inflation pressure is
defined as the tire pressure after the vehicle has not been
driven for at least three hours, or driven less than 1 mile
(1.6 km) after sitting for a minimum of three hours. The
cold tire inflation pressure must not exceed the maximum
inflation pressure molded into the tire sidewall.
WARNING!
Overloading of your tires is dangerous. Overloading can
cause tire failure, affect vehicle handling, and increase
your stopping distance. Use tires of the recommended
load capacity for your vehicle. Never overload them.
WARNING!
Improperly inflated tires are dangerous and can
cause collisions.
Underinflation increases tire flexing and can result in
overheating and tire failure.
Overinflation reduces a tire's ability to cushion shock.
Objects on the road and chuckholes can cause
damage that result in tire failure.
Overinflated or underinflated tires can affect vehicle
handling and can fail suddenly, resulting in loss of
vehicle control.
Unequal tire pressures can cause steering problems.
You could lose control of your vehicle.
Unequal tire pressures from one side of the vehicle
to the other can cause the vehicle to drift to the right
or left.
Always drive with each tire inflated to the recom -
mended cold tire inflation pressure.
WARNING!
CAUTION!
After inspecting or adjusting the tire pressure, always
reinstall the valve stem cap. This will prevent moisture
and dirt from entering the valve stem, which could
damage the valve stem.
8
23_DT_OM_EN_USC_t.book Page 377
Page 380 of 416
378SERVICING AND MAINTENANCE
Check tire pressures more often if subject to a wide range
of outdoor temperatures, as tire pressures vary with
temperature changes.
Tire pressures change by approximately 1 psi (7 kPa) per
12°F (7°C) of air temperature change. Keep this in mind
when checking tire pressure inside a garage, especially in
the Winter.
Example: If garage temperature = 68°F (20°C) and the
outside temperature = 32°F (0°C) then the cold tire
inflation pressure should be increased by 3 psi (21 kPa),
which equals 1 psi (7 kPa) for every 12°F (7°C) for this
outside temperature condition.
Tire pressure may increase from 2 to 6 psi (13 to 40 kPa)
during operation. DO NOT reduce this normal pressure
build up or your tire pressure will be too low.
Tire Pressures For High Speed Operation
The manufacturer advocates driving at safe speeds and
within posted speed limits. Where speed limits or
conditions are such that the vehicle can be driven at high
speeds, maintaining correct tire inflation pressure is very
important. Increased tire pressure and reduced vehicle
loading may be required for high-speed vehicle operation.
Refer to an authorized tire dealer or original equipment
vehicle dealer for recommended safe operating speeds,
loading and cold tire inflation pressures.
Radial Ply Tires
Tire Repair
If your tire becomes damaged, it may be repaired if it
meets the following criteria:
The tire has not been driven on when flat
The damage is only on the tread section of your tire
(sidewall damage is not repairable)
The puncture is no greater than ¼ of an inch (6 mm)
Consult an authorized tire dealer for tire repairs and
additional information. Damaged Run Flat tires, or Run Flat tires that have
experienced a loss of pressure should be replaced
immediately with another Run Flat tire of identical size and
service description (Load Index and Speed Symbol).
Replace the tire pressure sensor as well as it is not
designed to be reused.
Run Flat Tires — If Equipped
Run Flat tires allow you the capability to drive 50 miles
(80 km) at 50 mph (80 km/h) after a rapid loss of inflation
pressure. This rapid loss of inflation is referred to as the
Run Flat mode. A Run Flat mode occurs when the tire
inflation pressure is of/or below 14 psi (96 kPa).
Once a Run Flat tire reaches the Run Flat mode it has
limited driving capabilities and needs to be replaced
immediately. A Run Flat tire is not repairable. When a Run
Flat tire is changed after being driven in a Run Flat mode
14 psi (96 kPa) condition, please replace the TPMS sensor
as it is not designed to be reused.
NOTE:The TPMS Sensor must be replaced after driving the
vehicle on a flat tire condition.
It is not recommended driving a vehicle loaded at full
capacity or to tow a trailer while a tire is in the
Run Flat mode.
For more information
Úpage 277.
WARNING!
High speed driving with your vehicle under maximum
load is dangerous. The added strain on your tires could
cause them to fail. You could have a serious collision.
Do not drive a vehicle loaded to the maximum capacity
at continuous speeds above 75 mph (120 km/h).
WARNING!
Combining radial ply tires with other types of tires on
your vehicle will cause your vehicle to handle poorly.
The instability could cause a collision. Always use radial
ply tires in sets of four. Never combine them with other
types of tires.
23_DT_OM_EN_USC_t.book Page 378
Page 385 of 416
SERVICING AND MAINTENANCE383
WHEEL AND WHEEL TRIM CARE
All wheels and wheel trim, especially aluminum and
chrome plated wheels, should be cleaned regularly using
mild (neutral Ph) soap and water to maintain their luster
and to prevent corrosion. Wash wheels with the same
soap solution recommended for the body of the vehicle
and remember to always wash when the surfaces are not
hot to the touch.
Your wheels are susceptible to deterioration caused by
salt, sodium chloride, magnesium chloride, calcium
chloride, etc., and other road chemicals used to melt ice
or control dust on dirt roads. Use a soft cloth or sponge
and mild soap to wipe away promptly. Do not use harsh
chemicals or a stiff brush. They can damage the wheel’s
protective coating that helps keep them from corroding
and tarnishing. When cleaning extremely dirty wheels including excessive
brake dust, care must be taken in the selection of tire and
wheel cleaning chemicals and equipment to prevent
damage to the wheels. Mopar® Wheel Treatment or
Mopar® Chrome Cleaner or their equivalent is
recommended or select a non-abrasive, non-acidic
cleaner for aluminum or chrome wheels.
NOTE:If you intend parking or storing your vehicle for an
extended period after cleaning the wheels with wheel
cleaner, drive your vehicle and apply the brakes to remove
the water droplets from the brake components. This
activity will remove the red rust on the brake rotors and
prevent vehicle vibration when braking.
Dark Vapor Chrome, Black Satin Chrome, or Low Gloss
Clear Coat WheelsCAUTION!
Avoid products or automatic car washes that use acidic
solutions or strong alkaline additives or harsh brushes.
Many aftermarket wheel cleaners and automatic car
washes may damage the wheel's protective finish. Such
damage is not covered by the New Vehicle Limited
Warranty. Only car wash soap, Mopar® Wheel Cleaner
or equivalent is recommended.
CAUTION!
Do not use scouring pads, steel wool, a bristle brush,
metal polishes or oven cleaner. These products may
damage the wheel's protective finish. Such damage is
not covered by the New Vehicle Limited Warranty. Only
car wash soap, Mopar® Wheel Cleaner or equivalent is
recommended.
CAUTION!
If your vehicle is equipped with these specialty wheels,
DO NOT USE wheel cleaners, abrasives, or polishing
compounds. They will permanently damage this finish
and such damage is not covered by the New Vehicle
Limited Warranty. HAND WASH ONLY USING MILD SOAP
AND WATER WITH A SOFT CLOTH. Used on a regular
basis; this is all that is required to maintain this finish.
8
23_DT_OM_EN_USC_t.book Page 383
Page 388 of 416
386SERVICING AND MAINTENANCE
TIRE ROTATION RECOMMENDATIONS
Tires on the front and rear axles of vehicles operate at
different loads and perform different steering, driving, and
braking functions. For these reasons, they wear at
unequal rates.
These effects can be reduced by timely rotation of tires.
The benefits of rotation are especially worthwhile with
aggressive tread designs such as those on all season type
tires. Rotation will increase tread life, help to maintain
mud, snow and wet traction levels and contribute to a
smooth, quiet ride.
For the proper maintenance intervals
Úpage 334. More
frequent rotation is permissible if desired. The reasons for
any rapid or unusual wear should be corrected prior to
rotation being performed.
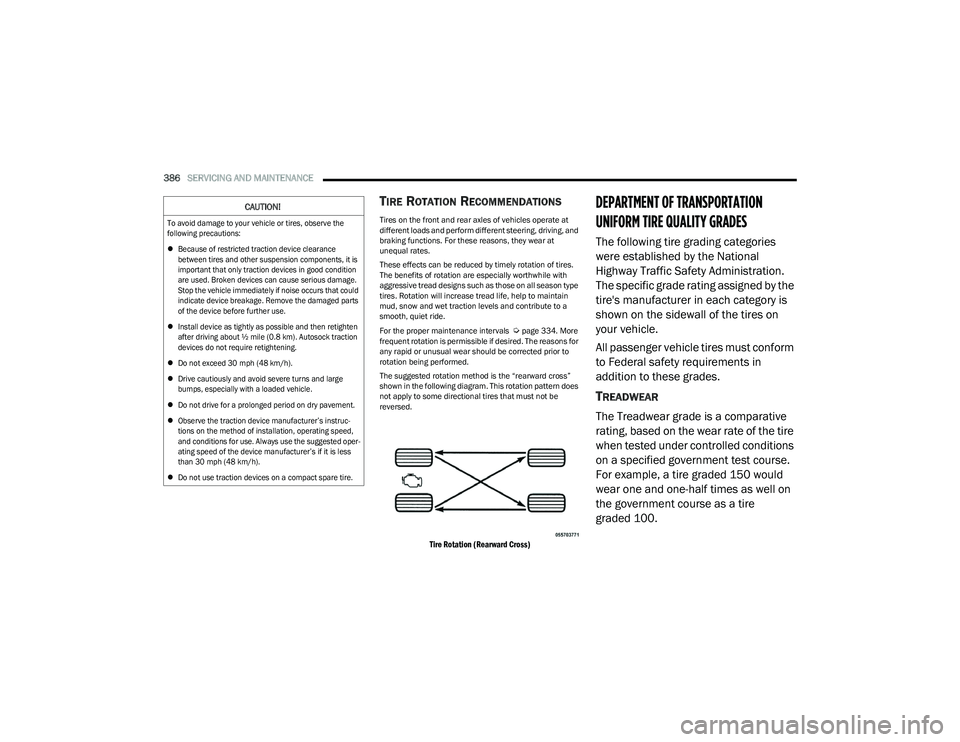
The suggested rotation method is the “rearward cross”
shown in the following diagram. This rotation pattern does
not apply to some directional tires that must not be
reversed.
Tire Rotation (Rearward Cross)
DEPARTMENT OF TRANSPORTATION
UNIFORM TIRE QUALITY GRADES
The following tire grading categories
were established by the National
Highway Traffic Safety Administration.
The specific grade rating assigned by the
tire's manufacturer in each category is
shown on the sidewall of the tires on
your vehicle.
All passenger vehicle tires must conform
to Federal safety requirements in
addition to these grades.
TREADWEAR
The Treadwear grade is a comparative
rating, based on the wear rate of the tire
when tested under controlled conditions
on a specified government test course.
For example, a tire graded 150 would
wear one and one-half times as well on
the government course as a tire
graded 100.
CAUTION!
To avoid damage to your vehicle or tires, observe the
following precautions:
Because of restricted traction device clearance
between tires and other suspension components, it is
important that only traction devices in good condition
are used. Broken devices can cause serious damage.
Stop the vehicle immediately if noise occurs that could
indicate device breakage. Remove the damaged parts
of the device before further use.
Install device as tightly as possible and then retighten
after driving about ½ mile (0.8 km). Autosock traction
devices do not require retightening.
Do not exceed 30 mph (48 km/h).
Drive cautiously and avoid severe turns and large
bumps, especially with a loaded vehicle.
Do not drive for a prolonged period on dry pavement.
Observe the traction device manufacturer’s instruc -
tions on the method of installation, operating speed,
and conditions for use. Always use the suggested oper -
ating speed of the device manufacturer’s if it is less
than 30 mph (48 km/h).
Do not use traction devices on a compact spare tire.
23_DT_OM_EN_USC_t.book Page 386
Page 389 of 416
SERVICING AND MAINTENANCE387
The relative performance of tires
depends upon the actual conditions of
their use, however, and may depart
significantly from the norm due to
variations in driving habits, service
practices, and differences in road
characteristics and climate.
TRACTION GRADES
The Traction grades, from highest to
lowest, are AA, A, B, and C. These grades
represent the tire's ability to stop on wet
pavement, as measured under
controlled conditions on specified
government test surfaces of asphalt and
concrete. A tire marked C may have poor
traction performance.
TEMPERATURE GRADES
The Temperature grades are A (the
highest), B, and C, representing the tire's
resistance to the generation of heat and
its ability to dissipate heat, when tested
under controlled conditions on a
specified indoor laboratory test wheel.
Sustained high temperature can cause
the material of the tire to degenerate
and reduce tire life, and excessive
temperature can lead to sudden tire
failure. The grade C corresponds to a
level of performance, which all
passenger vehicle tires must meet
under the Federal Motor Vehicle Safety
Standard No. 109. Grades B and A
represent higher levels of performance
on the laboratory test wheel, than the
minimum required by law.
STORING THE VEHICLE
If you are storing your vehicle for more than three weeks,
we recommend that you take the following steps to
minimize the drain on your vehicle's battery:
Disconnect the negative cable from battery.
Any time you store your vehicle or keep it out of service
(i.e., vacation) for two weeks or more, run the air condi -
tioning system at idle for about five minutes in the
fresh air and high blower setting. This will ensure
adequate system lubrication to minimize the
possibility of compressor damage when the system
is started again.
WARNING!
The traction grade assigned to this tire is based on
straight-ahead braking traction tests, and does not
include acceleration, cornering, hydroplaning, or peak
traction characteristics.
WARNING!
The temperature grade for this tire is established for a
tire that is properly inflated and not overloaded.
Excessive speed, underinflation, or excessive loading,
either separately or in combination, can cause heat
buildup and possible tire failure.
8
23_DT_OM_EN_USC_t.book Page 387
Page 390 of 416
388SERVICING AND MAINTENANCE
BODYWORK
PROTECTION FROM ATMOSPHERIC
A
GENTS
Vehicle body care requirements vary according to
geographic locations and usage. Chemicals that make
roads passable in snow and ice and those that are
sprayed on trees and road surfaces during other seasons
are highly corrosive to the metal in your vehicle. Outside
parking, which exposes your vehicle to airborne
contaminants, road surfaces on which the vehicle is
operated, extreme hot or cold weather and other extreme
conditions will have an adverse effect on paint, metal trim,
and underbody protection.
The following maintenance recommendations will enable
you to obtain maximum benefit from the corrosion
resistance built into your vehicle.
What Causes Corrosion?
Corrosion is the result of deterioration or removal of paint
and protective coatings from your vehicle.
The most common causes are:
Road salt, dirt and moisture accumulation.
Stone and gravel impact.
Insects, tree sap and tar.
Salt in the air near seacoast localities.
Atmospheric fallout/industrial pollutants.
BODY AND UNDERBODY MAINTENANCE
Cleaning Headlights
Your vehicle is equipped with plastic headlights and fog
lights that are lighter and less susceptible to stone
breakage than glass headlights.
Plastic is not as scratch resistant as glass and therefore
different lens cleaning procedures must be followed.
To minimize the possibility of scratching the lenses and
reducing light output, avoid wiping with a dry cloth.
To remove road dirt, wash with a mild soap solution
followed by rinsing.
Do not use abrasive cleaning components, solvents, steel
wool or other aggressive material to clean the lenses.
Tri-Fold Soft Tonneau Cover Care
For cleaning and protecting the vinyl Tri-Fold Tonneau
cover, use Mopar® Whitewall & Vinyl Top Cleaner and
Mopar® Leather and Vinyl Conditioner/Protectant.
PRESERVING THE BODYWORK
Washing
Wash your vehicle regularly. Always wash your vehicle
in the shade using Mopar® Car Wash, or a mild car
wash soap, and rinse the panels completely with water.
If insects, tar, or other similar deposits have accumu -
lated on your vehicle, use Mopar® Super Kleen Bug
and Tar Remover to remove.
Use a high quality cleaner wax, such as Mopar®
Cleaner Wax to remove road film, stains and to protect
your paint finish. Use precautions to not scratch the
paint.
Avoid using abrasive compounds and power buffing
that may diminish the gloss or thin out the paint finish.
Fascia/Bumper Care
The customer is responsible to clean and maintain
the chrome components of the vehicle. Wash away
road debris and salt using an automotive soap.
Fascia/bumpers should be cleaned regularly using mild
(neutral Ph) soap and water to maintain their luster and to
prevent corrosion.
Your fascia/bumpers are susceptible to deterioration
caused by salt, sodium chloride, magnesium chloride,
calcium chloride, etc., and other road chemicals used to
melt ice or control dust on dirt roads. Do not use harsh
chemicals or a stiff brush. They can stain or damage the
protective coating that helps keep them from corroding
and tarnishing.
CAUTION!
Do not use abrasive or strong cleaning materials
such as steel wool or scouring powder that will
scratch metal and painted surfaces.
Use of power washers exceeding 1,200 psi
(8,274 kPa) can result in damage or removal of paint
and decals.
23_DT_OM_EN_USC_t.book Page 388