lock Ram 2500 2020 Owner's Manual
[x] Cancel search | Manufacturer: RAM, Model Year: 2020, Model line: 2500, Model: Ram 2500 2020Pages: 553, PDF Size: 21.99 MB
Page 461 of 553
MULTIMEDIA459
NOTE:
FCA US LLC or your dealer may contact you
directly regarding software updates.
To help further improve vehicle security and
minimize the potential risk of a security
breach, vehicle owners should:
Routinely check www.driveuconnect.com
(US Residents) or www.driveuconnect.ca
(Canadian Residents) to learn about
available Uconnect software updates.
Only connect and use trusted media devices (e.g. personal mobile phones,
USBs, CDs).
Privacy of any wireless and wired communica -
tions cannot be assured. Third parties may
unlawfully intercept information and private
communications without your consent. For
further information, refer to “Data Collection &
Privacy” in your Uconnect Owner’s Manual
Supplement or “Onboard Diagnostic System
(OBD II) Cybersecurity” in “Getting To Know Your
Instrument Panel”.
UCONNECT SETTINGS
The Uconnect system uses a combination of
buttons on the touchscreen and buttons on the
faceplate located on the center of the instru -
ment panel. These buttons allow you to access
and change the customer programmable
features. Many features can vary by vehicle.
Buttons on the faceplate are located below
and/or beside the Uconnect system in the
center of the instrument panel. In addition,
there is a Scroll/Enter control knob located on
the right side. Turn the control knob to scroll
through menus and change settings. Push the
center of the control knob one or more times to
select or change a setting.
Your Uconnect system may also have Screen
Off and Mute buttons on the faceplate.
Push the Screen Off button on the faceplate to
turn off the Uconnect screen. Push the button
again or tap the screen to turn the screen on.
Push the Back Arrow button to exit out of a
Menu or certain option on the Uconnect system.
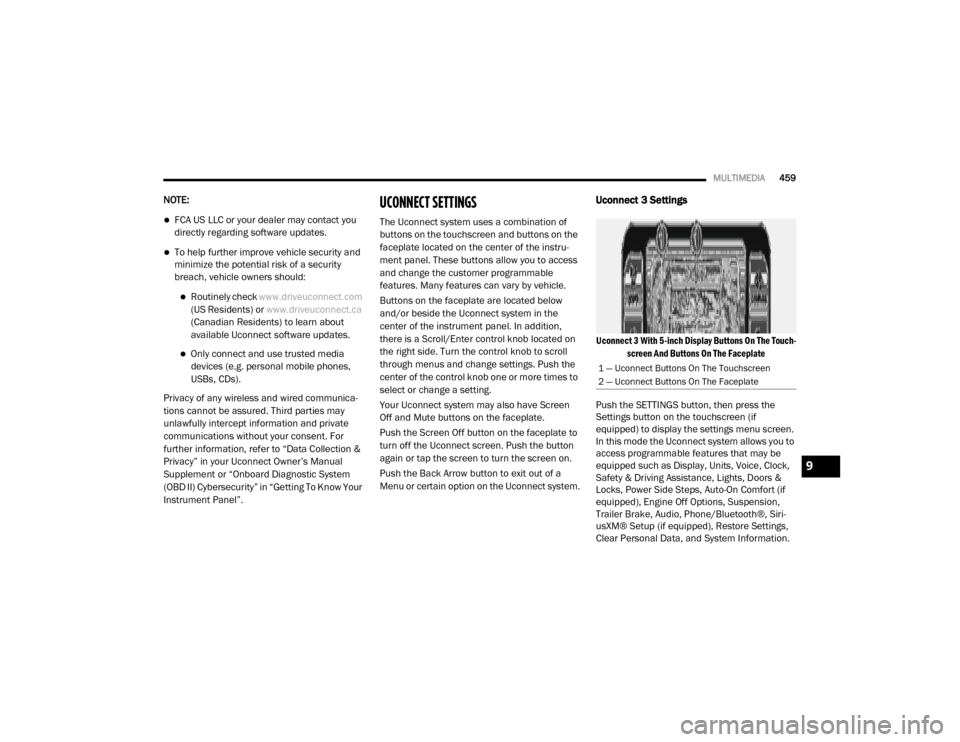
Uconnect 3 Settings
Uconnect 3 With 5-inch Display Buttons On The Touch -
screen And Buttons On The Faceplate
Push the SETTINGS button, then press the
Settings button on the touchscreen (if
equipped) to display the settings menu screen.
In this mode the Uconnect system allows you to
access programmable features that may be
equipped such as Display, Units, Voice, Clock,
Safety & Driving Assistance, Lights, Doors &
Locks, Power Side Steps, Auto-On Comfort (if
equipped), Engine Off Options, Suspension,
Trailer Brake, Audio, Phone/Bluetooth®, Siri -
usXM® Setup (if equipped), Restore Settings,
Clear Personal Data, and System Information.
1 — Uconnect Buttons On The Touchscreen
2 — Uconnect Buttons On The Faceplate
9
20_DJD2_OM_EN_USC_t.book Page 459
Page 463 of 553
MULTIMEDIA461
Voice
After pressing the Voice button on the touchscreen, the following settings will be available:
Clock
After pressing the Clock button on the touchscreen, the following settings will be available:Fuel Consumption
MPG (UG)MPG (UK)L/100 km km/L
Pressure psikPa bar
Power — If Equipped HP (US)HP (UK) Kw
Temperature °C °F
Torque — If Equipped lb-ft Nm
Setting Name Selectable Options
Setting NameSelectable Options
Voice Response LengthBrief Detailed
Show Command List AlwaysWith Help Never
Setting Name Selectable Options
Set Time12 hour24 hour
NOTE:
Within the “Set Time” feature, press the corresponding arrow above and below the current time to adjust, then select “AM” or “PM”.9
20_DJD2_OM_EN_USC_t.book Page 461
Page 467 of 553

MULTIMEDIA465
Lights
After pressing the Lights button on the touchscreen, the following settings will be available:
Setting Name Selectable Options
Headlight Off Delay0 sec
30 sec
60 sec 90 sec
Headlight Illumination On Approach 0 sec
30 sec
60 sec 90 sec
NOTE:
When the “Headlight Illumination On Approach” feature is selected, it allows the adjustment of the amount of time the headlights remain on when
the doors are unlocked with the key fob. Headlights With Wipers — If Equipped OnOff
Auto Dim High Beams — If Equipped OnOff
Flash Lights With Lock OnOff
NOTE:
When the “Flash Lights With Lock” feature is selected, the exterior lights flash when the doors are locked or unlocked with the key fob. This feature
may be selected with or without the Sound Horn On Lock feature selected. Steering Directed Lights - If Equipped OnOff
NOTE:
When the “Steering Directed Lights” feature is selected, the headlights turn with the direction of the steering wheel. Rear Cargo Guidance Lights — If Equipped OnOff
NOTE:
When the “Rear Cargo Guidance Lights” feature is selected, the lights in the cargo and bed of the truck will come on either when the headlight switch
is pressed, or the button on the back bed of the truck is pressed.
9
20_DJD2_OM_EN_USC_t.book Page 465
Page 468 of 553
466MULTIMEDIA
Doors & Locks
After pressing the Doors & Locks button on the touchscreen, the following settings will be available:
Setting Name Selectable Options
Auto Door Locks — If EquippedOn Off
NOTE:
When the “Auto Door Locks” feature is selected, all doors lock automatically when the vehicle reaches a speed of 15 mph (24 km/h). Auto Unlock On Exit On Off
NOTE:
When the “Auto Unlock On Exit” feature is selected, all doors unlock when the vehicle is stopped, the transmission is in the PARK or NEUTRAL position
and the driver's door is opened. Sound Horn With Lock Off1st Press 2nd Press
Remote Door Unlock All Driver
NOTE:
The “Remote Door Unlock” feature allows you to program your remote door locks to open “All doors” or only the “Driver door” with the first push of
the key fob or grabbing the Passive Entry door handle. Sound Horn With Remote Start On Off
NOTE:
When the “Sound Horn With Remote Start” feature is selected, the horn sounds when the remote start is activated. Memory Linked To Fob — If Equipped On
Off
NOTE:
The “Memory Linked To Fob” feature provides automatic driver seat positioning to enhance driver mobility when entering and exiting the vehicle.
The seat returns to the memorized seat location if “Memory Linked To Fob” is set to On when the key fob is used to unlock the door.
20_DJD2_OM_EN_USC_t.book Page 466
Page 469 of 553

MULTIMEDIA467
Power Side Steps — If Equipped
After pressing the Power Side Steps button on the touchscreen, the following settings will be available:
Auto-On Comfort Systems — If Equipped
After pressing the Auto-On Comfort Systems button on the touchscreen, the following settings will be available:Passive Entry — If Equipped
On Off
NOTE:
The “Passive Entry” feature allows you to lock and unlock the vehicle’s door(s) without having to push the key fob lock or unlock buttons. It automat -
ically unlocks the doors when the outside door handle is grabbed.
Flash Lights With Lock On Off
NOTE:
When the “Flash Lights With Lock” feature is selected, the exterior lights flash when the doors are locked or unlocked with the key fob. This feature
may be selected with or without the “Sound Horn With Lock” feature selected.
Setting Name Selectable Options
Setting NameSelectable Options
Power Side StepsAutomaticStow
Setting Name Selectable Options
Auto-On Driver Heated/Ventilated
Seat & Steering Wheel With Vehicle Start — If Equipped Off
Remote Start Only All Starts9
20_DJD2_OM_EN_USC_t.book Page 467
Page 474 of 553
472MULTIMEDIA
Restore Default Settings
After pressing the Restore Default Settings button on the touchscreen, the following settings will be available:
Clear Personal Data
After pressing the Clear Personal Data Settings button on the touchscreen, the following settings will be available:
Setting Name Selectable Options
Restore Default SettingsYesCancel
NOTE:
When the “Restore Default Settings” feature is selected it will reset the Display, Clock, Audio, and Radio Settings to their default settings. If “Yes” is
selected a pop-up will appear asking "Are you sure you want to reset your settings to default?” select “Yes” to restore, or “Cancel” to exit.
Setting Name Selectable Options
Clear Personal DataYesCancel
NOTE:
When this feature is selected it will remove all personal data including Bluetooth® devices and presets. If “Yes” is selected a pop-up will appear asking
"Are you sure you want to clear all personal data?” select “Yes” to Clear, or “Cancel” to exit.
20_DJD2_OM_EN_USC_t.book Page 472
Page 475 of 553
MULTIMEDIA473
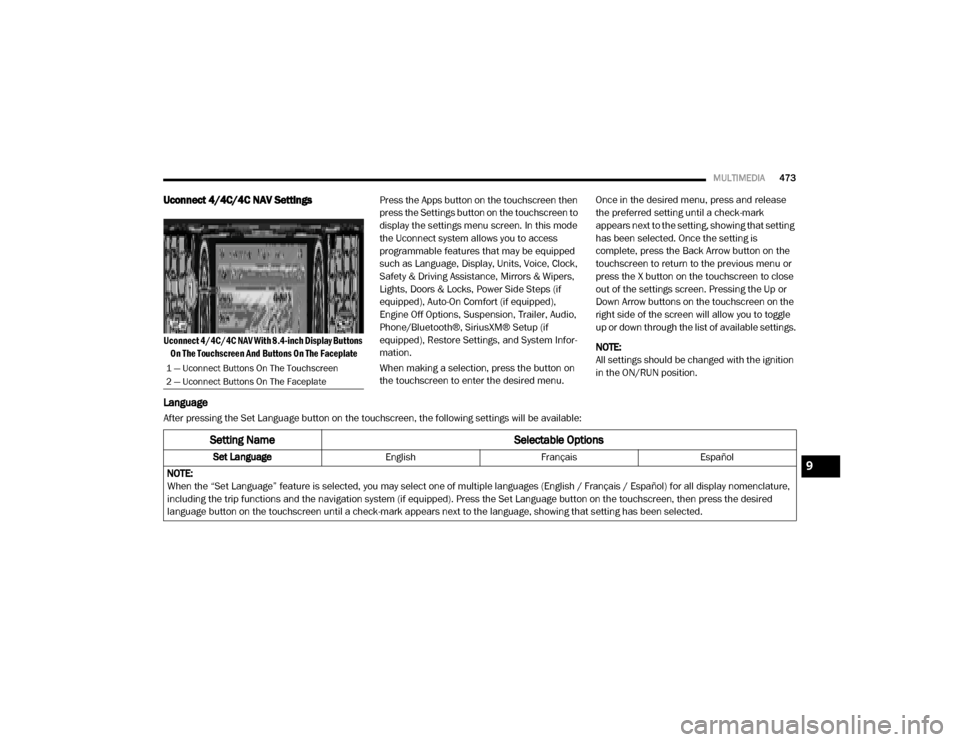
Uconnect 4/4C/4C NAV Settings
Uconnect 4/4C/4C NAV With 8.4-inch Display Buttons
On The Touchscreen And Buttons On The Faceplate
Press the Apps button on the touchscreen then
press the Settings button on the touchscreen to
display the settings menu screen. In this mode
the Uconnect system allows you to access
programmable features that may be equipped
such as Language, Display, Units, Voice, Clock,
Safety & Driving Assistance, Mirrors & Wipers,
Lights, Doors & Locks, Power Side Steps (if
equipped), Auto-On Comfort (if equipped),
Engine Off Options, Suspension, Trailer, Audio,
Phone/Bluetooth®, SiriusXM® Setup (if
equipped), Restore Settings, and System Infor
-
mation.
When making a selection, press the button on
the touchscreen to enter the desired menu. Once in the desired menu, press and release
the preferred setting until a check-mark
appears next to the setting, showing that setting
has been selected. Once the setting is
complete, press the Back Arrow button on the
touchscreen to return to the previous menu or
press the X button on the touchscreen to close
out of the settings screen. Pressing the Up or
Down Arrow buttons on the touchscreen on the
right side of the screen will allow you to toggle
up or down through the list of available settings.
NOTE:
All settings should be changed with the ignition
in the ON/RUN position.
Language
After pressing the Set Language button on the touchscreen, the following settings will be available:
1 — Uconnect Buttons On The Touchscreen
2 — Uconnect Buttons On The Faceplate
Setting Name
Selectable Options
Set LanguageEnglishFrançais Español
NOTE:
When the “Set Language” feature is selected, you may select one of multiple languages (English / Français / Español) for all display nomenclature,
including the trip functions and the navigation system (if equipped). Press the Set Language button on the touchscreen, then press the desired
language button on the touchscreen until a check-mark appears next to the language, showing that setting has been selected.9
20_DJD2_OM_EN_USC_t.book Page 473
Page 478 of 553
476MULTIMEDIA
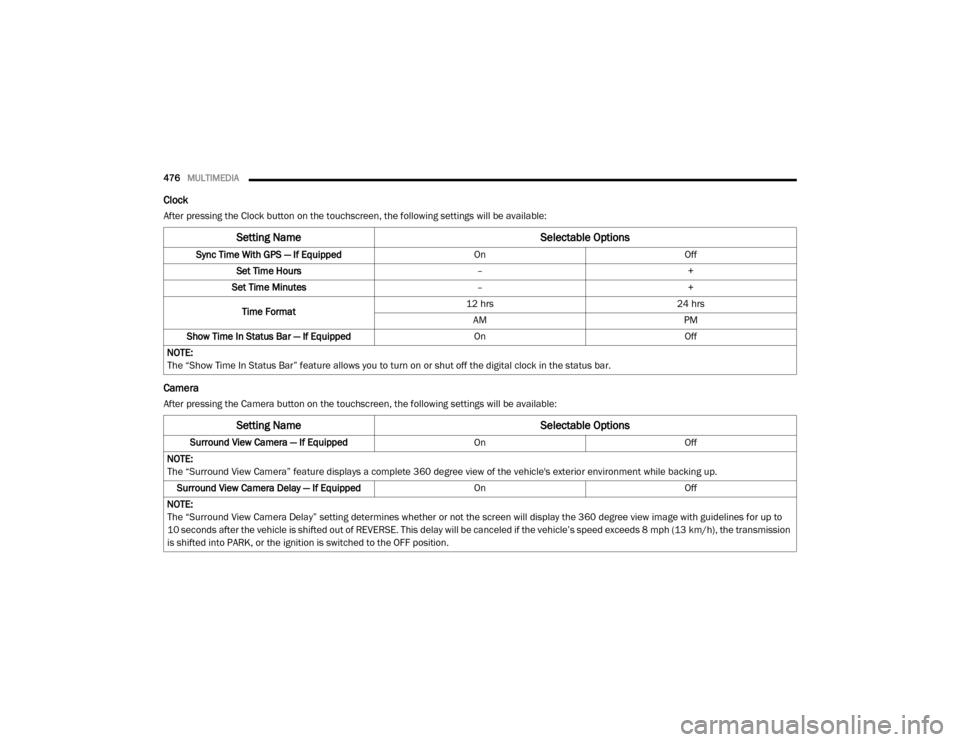
Clock
After pressing the Clock button on the touchscreen, the following settings will be available:
Camera
After pressing the Camera button on the touchscreen, the following settings will be available:
Setting Name Selectable Options
Sync Time With GPS — If Equipped OnOff
Set Time Hours –+
Set Time Minutes –+
Time Format 12 hrs
24 hrs
AM PM
Show Time In Status Bar — If Equipped OnOff
NOTE:
The “Show Time In Status Bar” feature allows you to turn on or shut off the digital clock in the status bar.
Setting Name Selectable Options
Surround View Camera — If Equipped OnOff
NOTE:
The “Surround View Camera” feature displays a complete 360 degree view of the vehicle's exterior environment while backing up. Surround View Camera Delay — If Equipped OnOff
NOTE:
The “Surround View Camera Delay” setting determines whether or not the screen will display the 360 degree view image with guidelines for up to
10 seconds after the vehicle is shifted out of REVERSE. This delay will be canceled if the vehicle’s speed exceeds 8 mph (13 km/h), the transmission
is shifted into PARK, or the ignition is switched to the OFF position.
20_DJD2_OM_EN_USC_t.book Page 476
Page 483 of 553
MULTIMEDIA481
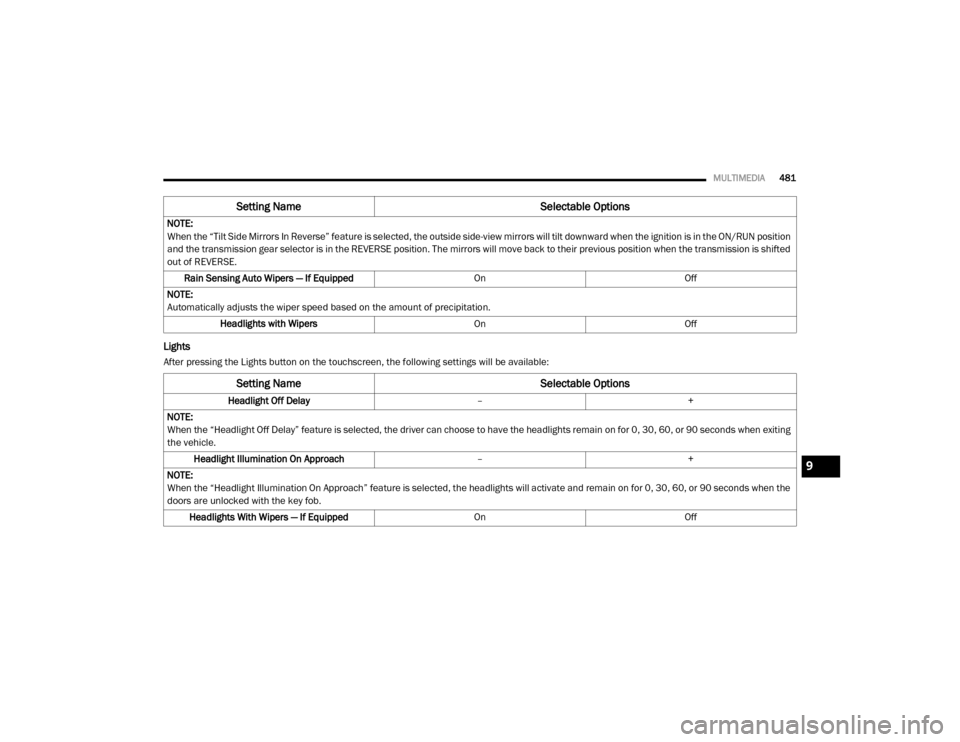
Lights
After pressing the Lights button on the touchscreen, the following settings will be available:NOTE:
When the “Tilt Side Mirrors In Reverse” feature is selected, the outside side-view mirrors will tilt downward when the ignition is in the ON/RUN position
and the transmission gear selector is in the REVERSE position. The mirrors will move back to their previous position when the transmission is shifted
out of REVERSE.
Rain Sensing Auto Wipers — If Equipped OnOff
NOTE:
Automatically adjusts the wiper speed based on the amount of precipitation. Headlights with Wipers OnOff
Setting Name Selectable Options
Setting NameSelectable Options
Headlight Off Delay–+
NOTE:
When the “Headlight Off Delay” feature is selected, the driver can choose to have the headlights remain on for 0, 30, 60, or 90 seconds when exiting
the vehicle. Headlight Illumination On Approach –+
NOTE:
When the “Headlight Illumination On Approach” feature is selected, the headlights will activate and remain on for 0, 30, 60, or 90 seconds when the
doors are unlocked with the key fob. Headlights With Wipers — If Equipped OnOff
9
20_DJD2_OM_EN_USC_t.book Page 481
Page 484 of 553
482MULTIMEDIA
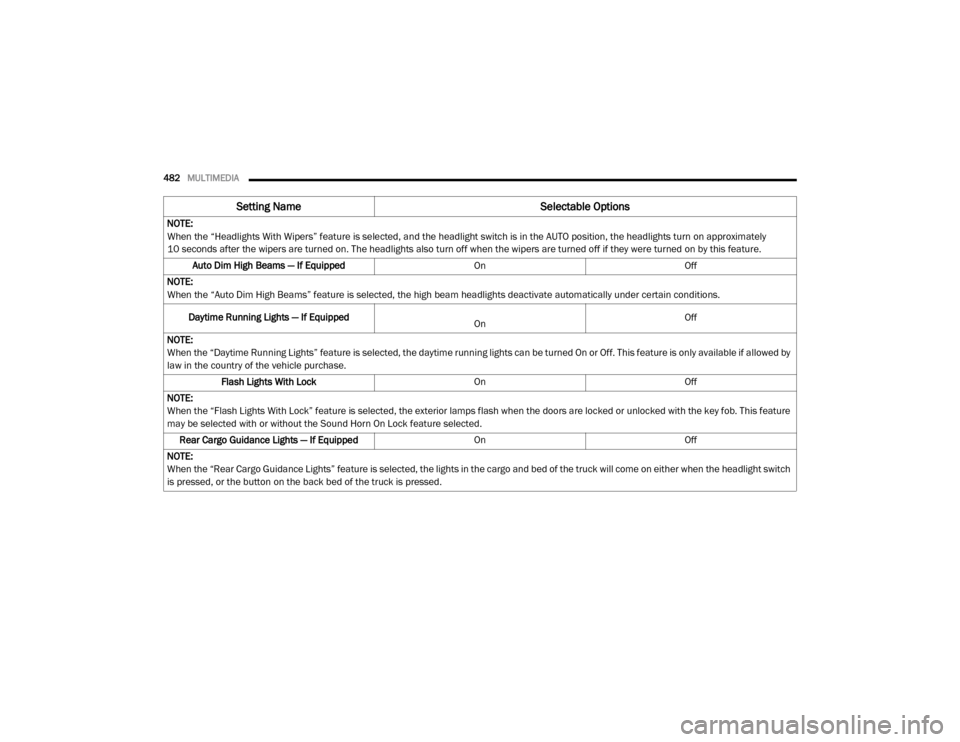
NOTE:
When the “Headlights With Wipers” feature is selected, and the headlight switch is in the AUTO position, the headlights turn on approximately
10 seconds after the wipers are turned on. The headlights also turn off when the wipers are turned off if they were turned on by this feature.
Auto Dim High Beams — If Equipped OnOff
NOTE:
When the “Auto Dim High Beams” feature is selected, the high beam headlights deactivate automatically under certain conditions.
Daytime Running Lights — If Equipped
On Off
NOTE:
When the “Daytime Running Lights” feature is selected, the daytime running lights can be turned On or Off. This feature is only available if allowed by
law in the country of the vehicle purchase. Flash Lights With Lock OnOff
NOTE:
When the “Flash Lights With Lock” feature is selected, the exterior lamps flash when the doors are locked or unlocked with the key fob. This feature
may be selected with or without the Sound Horn On Lock feature selected. Rear Cargo Guidance Lights — If Equipped OnOff
NOTE:
When the “Rear Cargo Guidance Lights” feature is selected, the lights in the cargo and bed of the truck will come on either when the headlight switch
is pressed, or the button on the back bed of the truck is pressed.
Setting Name Selectable Options
20_DJD2_OM_EN_USC_t.book Page 482