torque Ram 2500 2020 User Guide
[x] Cancel search | Manufacturer: RAM, Model Year: 2020, Model line: 2500, Model: Ram 2500 2020Pages: 553, PDF Size: 21.99 MB
Page 247 of 553

STARTING AND OPERATING245
This electronically shifted transfer case is
designed to be driven in the two–wheel drive
position (2WD) for normal street and highway
conditions on dry hard surfaced roads. Driving
the vehicle in 2WD will have greater fuel
economy benefits as the front axle is not
engaged in 2WD.
When additional traction is required, the
transfer case 4WD HIGH and 4WD LOW posi -
tions can be used to maximize torque to the
front driveshaft, forcing the front and rear
wheels to rotate at the same speed. This is
accomplished by pushing the desired position
on the 4WD control switch.
Refer to “Shifting Procedure” in this section for
specific shifting instructions. The 4WD HIGH and 4WD LOW positions are
designed for loose, slippery road surfaces only.
Driving in the 4WD HIGH and 4WD LOW posi
-
tions on dry hard surfaced roads may cause
increased tire wear and damage to the driveline
components.
NOTE:
The transfer case NEUTRAL button is located in
the center of the 4WD Control Switch and is
pushed by using a ballpoint pen or similar
object. The transfer case NEUTRAL position is to
be used for recreational towing only. Refer to
“Recreational Towing” in “Starting And Oper -
ating” for further information.
Transfer Case Position Indicator Lights
The Transfer Case Position Indicator Lights
(4WD HIGH and 4WD LOW) are located in the
instrument cluster and indicate the current and
desired transfer case selection. When you
select a different transfer case position, the
indicator lights will do the following:
If All Of The Following Shift Conditions Are Met:
1. The current position indicator light will turn off.
2. The selected position indicator light will
flash until the transfer case completes the
shift.
3. When the shift is complete, the indicator light for the selected position will stop
flashing and remain on.
If One Or More Of The Following Shift Conditions
Are Not Met:
1. The indicator light for the current position will remain on.
2. The newly selected position indicator light will continue to flash.
3. The transfer case will not shift.
NOTE:
Before retrying a selection, make certain that all
the necessary requirements for selecting a new
transfer case position have been met. To retry
the selection, push the current position, wait
five seconds, and retry selection. To find the
shift requirements, refer to the “Shifting Proce-
dure” for your transfer case, located in this
section.
The transmission may not engage PARK if
the vehicle is moving. Always bring the
vehicle to a complete stop before shifting to
PARK, and verify that the transmission gear
position indicator solidly indicates PARK (P)
without blinking. Ensure that the vehicle is
completely stopped, and the PARK position
is properly indicated, before exiting the
vehicle.
WARNING! (Continued)
5
20_DJD2_OM_EN_USC_t.book Page 245
Page 255 of 553

STARTING AND OPERATING253
The locking axles are controlled by the axle
locker switch.
Under normal driving conditions, the switch
should be left in the AXLE UNLOCK position.
NOTE:
Even when the axles are in the AXLE UNLOCK
position, the limited slip differential in the rear
axle still provides torque biasing capability for
moderate low traction environments.
During the command to lock the axle, the indi -
cator light will flash until the axle is locked. After
the lock command has been successfully
executed, the light will remain on solid.
To lock the rear axle, place the vehicle in 4WD
LOW, 4WD HIGH or 2WD. Refer to “Four Wheel
Drive Operation” in “Starting And Operating” for
further information. Push the REAR LOCK
button while traveling less than 10 mph (16 km/h). The RR indicator light will remain on
when the rear axle is locked.
NOTE:
Left to right wheel speed difference may be
necessary to allow the axle to fully lock. If the
indicator light is flashing after placing the switch
in the REAR LOCK or FRONT/REAR LOCK posi
-
tion, drive the vehicle in a turn or on loose gravel
to expedite the locking action.
To lock the front axle, push the FRONT/REAR
LOCK button while traveling less than 10 mph
(16 km/h) in 4WD LOW. The indicator light will
be solid when the front axle is locked.
NOTE:
The rear axle must be locked before the front
axle will lock. When both the axles are locked, to unlock the
front axle, push the REAR LOCK button while in
4WD LOW. The FRONT/REAR LOCK indicator
light will go out when the axle is unlocked.
NOTE:
The axle lockers could be torque locked due to
side to side loads on the axle. Driving slowly
while turning the steering wheel from a left
hand turn to a right hand turn or driving in
REVERSE for a short distance may be required
to release the torque lock and unlock the axles.
To unlock the rear axle, push the AXLE UNLOCK
button. The REAR LOCK indicator light will go
out when the rear axle is unlocked.
STABILIZER/SWAY BAR SYSTEM — POWER
WAGON ONLY
Your vehicle is equipped with an electronic
disconnecting stabilizer/sway bar. This system
allows greater front suspension travel in
off-road situations.
Due to the use of taller springs, this vehicle has
an increased ride height of approximately
1.9 inches (48.3 mm) in the front and
1.5 inches (38.1 mm) in the rear. A major
Do not try to lock the rear axle if the vehicle
is stuck and the tires are spinning. You can
damage drivetrain components. Lock the
rear axle before attempting situations or
navigating terrain, which could possibly
cause the vehicle to become stuck.
CAUTION! (Continued)
WARNING!
Do not use the locked axle position for normal
driving. A locked front axle is intended for
off-road driving only. Locking the front axle
during on-road driving will reduce the steering
ability. This could cause a collision and you
may be seriously injured.5
20_DJD2_OM_EN_USC_t.book Page 253
Page 256 of 553

254STARTING AND OPERATING
advantage to increasing ride height is the posi -
tive effect it has on approach/departure and
break over angles.
This system is controlled by the electronic
control sway bar switch located below the
instrument panel.
Sway Bar Disconnect Button
Push the SWAY BAR switch to activate the
system. Push the switch again to deactivate the
system. The “Sway Bar Indicator Light” (located
in the instrument cluster) will illuminate when
the bar is disconnected. The “Sway Bar Indi -
cator Light” will flash during activation transi -
tion, or when activation conditions are not met.
The stabilizer/sway bar should remain in
on-road mode during normal driving conditions. To disconnect the stabilizer/sway bar, shift to
either 4WD HIGH or 4WD LOW and push the
SWAY BAR button to obtain the Off-Road posi
-
tion. Refer to “Four Wheel Drive Operation” in
“Starting And Operating” for further informa -
tion. The “Sway Bar Indicator Light” will flash
until the stabilizer/sway bar has been fully
disconnected. NOTE:
The stabilizer/sway bar may be torque locked
due to left and right suspension height differ
-
ences. This condition is due to driving surface
differences or vehicle loading. In order for the
stabilizer/sway bar to disconnect/reconnect,
the right and left halves of the bar must be
aligned. This alignment may require that the
vehicle be driven onto level ground or rocked
from side to side.
To return to the On-Road mode, push the SWAY
BAR button again.WARNING!
Do not disconnect the stabilizer bar and drive
on hard surfaced roads or at speeds above
18 mph (29 km/h), you may lose control of
the vehicle, which could result in serious
injury or death. The front stabilizer bar
enhances vehicle stability and assists in
maintaining control of the vehicle. The system
monitors vehicle speed and will attempt to
reconnect the stabilizer bar at speeds over
18 mph (29 km/h). This is indicated by a
flashing off road light and solid on road light.
Once vehicle speed is reduced below 14 mph
(22 km/h), the system will attempt to return
to the Off-Road mode.
WARNING!
If the stabilizer/sway bar will not return to
On-Road mode, vehicle stability is reduced.
Do not attempt to drive the vehicle over
18 mph (29 km/h). Driving faster than
18 mph (29 km/h) may cause loss of control
of the vehicle, which could result in serious
injury or death. Contact your local service
center for assistance.
20_DJD2_OM_EN_USC_t.book Page 254
Page 266 of 553
264STARTING AND OPERATING
Check threaded fasteners for looseness,
particularly on the chassis, drivetrain compo -
nents, steering, and suspension. Retighten
them, if required, and torque to the values
specified in the Service Manual.
Check for accumulations of plants or brush.
These things could be a fire hazard. They
might hide damage to fuel lines, brake hoses,
axle pinion seals, and propeller shafts.
After extended operation in mud, sand,
water, or similar dirty conditions, have the
radiator, fan, brake rotors, wheels, brake
linings, and axle yokes inspected and
cleaned as soon as possible.
If you experience unusual vibration after
driving in mud, slush or similar conditions,
check the wheels for impacted material.
Impacted material can cause a wheel imbal-
ance and freeing the wheels of it will correct
the situation.
LIMITED-SLIP DIFFERENTIAL
The limited-slip differential provides additional
traction on snow, ice, mud, sand and gravel,
particularly when there is a difference between
the traction characteristics of the surface under
the right and left rear wheels. During normal
driving and cornering, the limited-slip unit
performs similarly to a conventional differential.
On slippery surfaces, however, the differential
delivers more of the driving effort to the rear
wheel having the better traction.
The limited-slip differential is especially helpful
during slippery driving conditions. With both
rear wheels on a slippery surface, a slight appli -
cation of the accelerator will supply maximum
traction. When starting with only one rear wheel
on an excessively slippery surface, slight
momentary application of the parking brake
may be necessary to gain maximum traction. Care should be taken to avoid sudden accelera-
tions when both rear wheels are on a slippery
surface. This could cause both rear wheels to
spin, and allow the vehicle to slide sideways on
the crowned surface of a road or in a turn.
WINCH USAGE — POWER WAGON ONLY (IF
EQUIPPED)
Things To Know Before Using Your Winch
General Winch Information
Your vehicle is equipped with an electric vehicle
recovery winch. This winch uses the electrical
power from the vehicle charging system to
power a motor that winds the winch rope onto
the winch drum via planetary gear reduction. By
nature, a winch is capable of generating very
high forces and should be used with care. Do
WARNING!
Abrasive material in any part of the brakes
may cause excessive wear or unpredictable
braking. You might not have full braking
power when you need it to prevent a collision.
If you have been operating your vehicle in
dirty conditions, get your brakes checked and
cleaned as necessary.
WARNING!
On vehicles equipped with a limited-slip
differential never run the engine with one rear
wheel off the ground since the vehicle may
drive through the rear wheel remaining on the
ground. You could lose control of the vehicle.
20_DJD2_OM_EN_USC_t.book Page 264
Page 301 of 553
STARTING AND OPERATING299
LANESENSE — IF EQUIPPED
LaneSense Operation
The LaneSense system is operational at speeds
above 37 mph (60 km/h) and below 112 mph
(180 km/h). It uses a forward looking camera to
detect lane markings and measure vehicle posi -
tion within the lane boundaries.
When both lane markings are detected and the
driver unintentionally drifts out of the lane while
no turn signal has been applied OR the driver
departs the lane on the opposite side of the
applied turn signal (if the left turn signal is applied and the vehicle departs to the right), the
LaneSense system provides a haptic warning in
the form of torque applied to the steering wheel
to prompt the driver to remain within the lane
boundaries. The LaneSense system will also
provide a visual warning through the instrument
cluster display to prompt the driver to remain
within the lane boundaries.
The driver may manually override the haptic
warning by applying torque into the steering
wheel at any time.
When only a single lane marking is detected
and the driver unintentionally drifts across that
lane marking (no turn signal applied), the Lane
-
Sense system provides a visual warning
through the instrument cluster display to
prompt the driver to remain within the lane.
When only a single lane marking is detected, a
haptic (torque) warning will not be provided.
NOTE:
When operating conditions have been met, the
LaneSense system will monitor if the driver’s
hands are on the steering wheel and provides
an audible and visual warning to the driver
when the driver’s hands are not detected on the
steering wheel. The system will cancel if the
driver does not return their hands to the wheel.
WARNING!
Drivers must be careful when backing up
even when using ParkSense. Always check
carefully behind your vehicle, look behind
you, and be sure to check for pedestrians,
animals, other vehicles, obstructions, and
blind spots before backing up. You are
responsible for safety and must continue to
pay attention to your surroundings. Failure
to do so can result in serious injury or
death.
Before using ParkSense, it is strongly
recommended that the ball mount and
hitch ball assembly is disconnected from
the vehicle when the vehicle is not used for
towing. Failure to do so can result in injury
or damage to vehicles or obstacles
because the hitch ball will be much closer
to the obstacle than the rear fascia when
the loudspeaker sounds the continuous
tone. Also, the sensors could detect the ball
mount and hitch ball assembly, depending
on its size and shape, giving a false indica -
tion that an obstacle is behind the vehicle.
CAUTION!
ParkSense is only a parking aid and it is
unable to recognize every obstacle,
including small obstacles. Parking curbs
might be temporarily detected or not
detected at all. Obstacles located above or
below the sensors will not be detected
when they are in close proximity.
The vehicle must be driven slowly when
using ParkSense in order to be able to stop
in time when an obstacle is detected. It is
recommended that the driver looks over
his/her shoulder when using ParkSense.
5
20_DJD2_OM_EN_USC_t.book Page 299
Page 303 of 553
STARTING AND OPERATING301
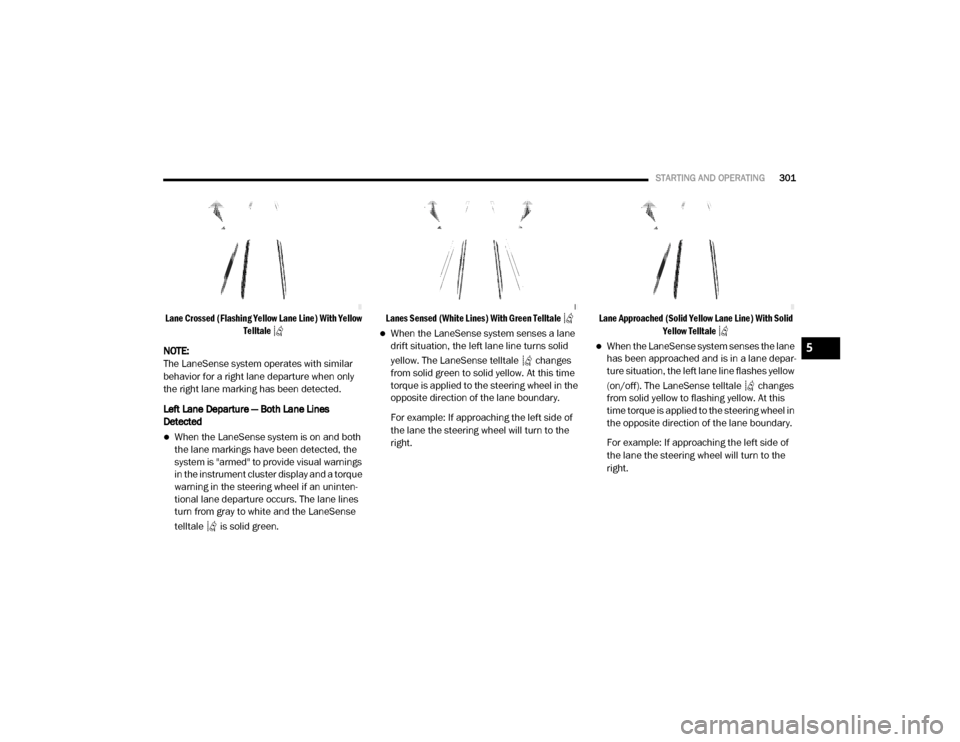
Lane Crossed (Flashing Yellow Lane Line) With Yellow
Telltale
NOTE:
The LaneSense system operates with similar
behavior for a right lane departure when only
the right lane marking has been detected.
Left Lane Departure — Both Lane Lines
Detected
When the LaneSense system is on and both
the lane markings have been detected, the
system is "armed" to provide visual warnings
in the instrument cluster display and a torque
warning in the steering wheel if an uninten -
tional lane departure occurs. The lane lines
turn from gray to white and the LaneSense
telltale is solid green.
Lanes Sensed (White Lines) With Green Telltale
When the LaneSense system senses a lane
drift situation, the left lane line turns solid
yellow. The LaneSense telltale changes
from solid green to solid yellow. At this time
torque is applied to the steering wheel in the
opposite direction of the lane boundary.
For example: If approaching the left side of
the lane the steering wheel will turn to the
right.
Lane Approached (Solid Yellow Lane Line) With Solid
Yellow Telltale
When the LaneSense system senses the lane
has been approached and is in a lane depar -
ture situation, the left lane line flashes yellow
(on/off). The LaneSense telltale changes
from solid yellow to flashing yellow. At this
time torque is applied to the steering wheel in
the opposite direction of the lane boundary.
For example: If approaching the left side of
the lane the steering wheel will turn to the
right.5
20_DJD2_OM_EN_USC_t.book Page 301
Page 304 of 553
302STARTING AND OPERATING
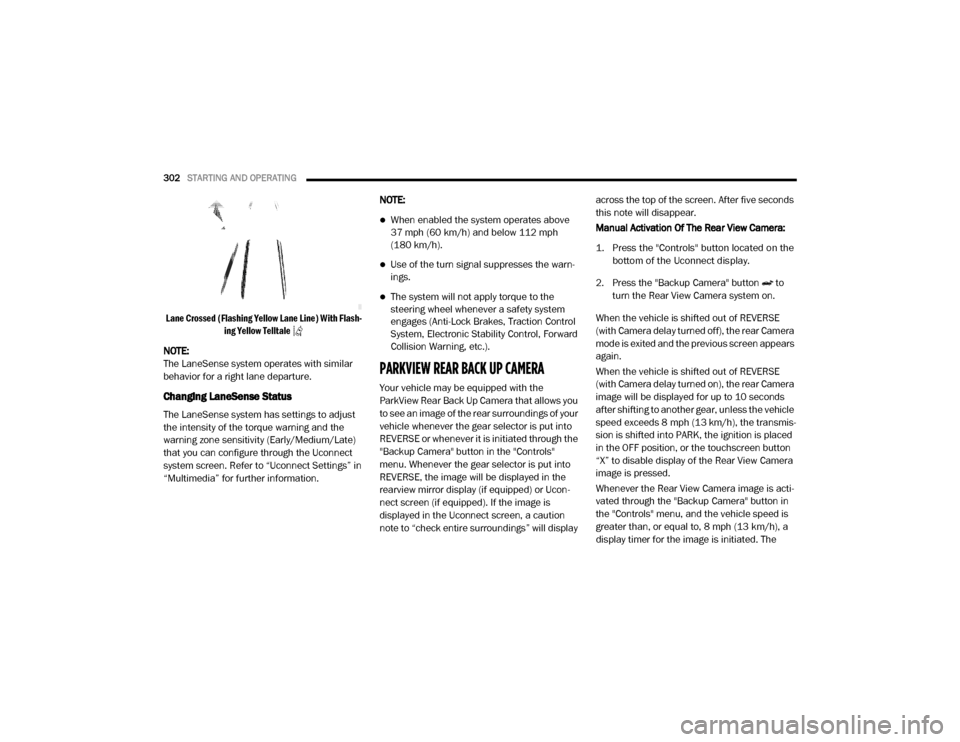
Lane Crossed (Flashing Yellow Lane Line) With Flash -
ing Yellow Telltale
NOTE:
The LaneSense system operates with similar
behavior for a right lane departure.
Changing LaneSense Status
The LaneSense system has settings to adjust
the intensity of the torque warning and the
warning zone sensitivity (Early/Medium/Late)
that you can configure through the Uconnect
system screen. Refer to “Uconnect Settings” in
“Multimedia” for further information. NOTE:
When enabled the system operates above
37 mph (60 km/h) and below 112 mph
(180 km/h).
Use of the turn signal suppresses the warn
-
ings.
The system will not apply torque to the
steering wheel whenever a safety system
engages (Anti-Lock Brakes, Traction Control
System, Electronic Stability Control, Forward
Collision Warning, etc.).
PARKVIEW REAR BACK UP CAMERA
Your vehicle may be equipped with the
ParkView Rear Back Up Camera that allows you
to see an image of the rear surroundings of your
vehicle whenever the gear selector is put into
REVERSE or whenever it is initiated through the
"Backup Camera" button in the "Controls"
menu. Whenever the gear selector is put into
REVERSE, the image will be displayed in the
rearview mirror display (if equipped) or Ucon -
nect screen (if equipped). If the image is
displayed in the Uconnect screen, a caution
note to “check entire surroundings” will display across the top of the screen. After five seconds
this note will disappear.
Manual Activation Of The Rear View Camera:
1. Press the "Controls" button located on the
bottom of the Uconnect display.
2. Press the "Backup Camera" button to turn the Rear View Camera system on.
When the vehicle is shifted out of REVERSE
(with Camera delay turned off), the rear Camera
mode is exited and the previous screen appears
again.
When the vehicle is shifted out of REVERSE
(with Camera delay turned on), the rear Camera
image will be displayed for up to 10 seconds
after shifting to another gear, unless the vehicle
speed exceeds 8 mph (13 km/h), the transmis- sion is shifted into PARK, the ignition is placed
in the OFF position, or the touchscreen button
“X” to disable display of the Rear View Camera
image is pressed.
Whenever the Rear View Camera image is acti -
vated through the "Backup Camera" button in
the "Controls" menu, and the vehicle speed is
greater than, or equal to, 8 mph (13 km/h), a display timer for the image is initiated. The
20_DJD2_OM_EN_USC_t.book Page 302
Page 339 of 553
STARTING AND OPERATING337
Check threaded fasteners for looseness,
particularly on the chassis, drivetrain compo -
nents, steering, and suspension. Retighten
them, if required, and torque to the values
specified in the Service Manual.
Check for accumulations of plants or brush.
These things could be a fire hazard. They
might hide damage to fuel lines, brake hoses,
axle pinion seals, and propeller shafts.
After extended operation in mud, sand,
water, or similar dirty conditions, have the
radiator, fan, brake rotors, wheels, brake
linings, and axle yokes inspected and
cleaned as soon as possible.If you experience unusual vibration after
driving in mud, slush or similar conditions,
check the wheels for impacted material.
Impacted material can cause a wheel imbal-
ance and freeing the wheels of it will correct
the situation.
WARNING!
Abrasive material in any part of the brakes
may cause excessive wear or unpredictable
braking. You might not have full braking
power when you need it to prevent a collision.
If you have been operating your vehicle in
dirty conditions, get your brakes checked and
cleaned as necessary.
5
20_DJD2_OM_EN_USC_t.book Page 337
Page 352 of 553

350IN CASE OF EMERGENCY
Dual Rear Wheel Jack Placement
6. Finish tightening the lug nuts. Push down on the lug wrench while at the end of the handle
for increased leverage. Tighten the lug nuts in
a star pattern until each nut has been tight -
ened twice. For the correct lug nut torque refer
to “Wheel And Tire Torque Specifications” in
“Technical Specifications”. If in doubt about
the correct tightness, have them checked with
a torque wrench by an authorized dealer or
service station. 7. Install the wheel center cap and remove the
wheel blocks. Do not install chrome or
aluminum wheel center caps on the spare
wheel. This may result in cap damage.
8. Lower the jack to its fully closed position. Stow the replaced tire, jack, and tools as
previously described.
NOTE:
The bottle jack will not lower by turning the dial
(thumbwheel) by hand, it may be necessary to
use the jack driver in order to lower the jack.
9. Adjust the tire pressure when possible.
NOTE:
Do not oil wheel studs. For chrome wheels, do
not substitute with chrome plated lug nuts.
To Stow The Flat Or Spare
NOTE:
Have the flat tire repaired or replaced immedi -
ately.
1. Turn the wheel so that the valve stem is facing the ground and toward the rear of
the vehicle for convenience in checking the
spare tire inflation. Slide the wheel retainer
through the center of the wheel.
Reinstalling The Retainer
WARNING!
A loose tire or jack thrown forward in a
collision or hard stop, could endanger the
occupants of the vehicle. Always stow the jack
parts and the spare tire in the places
provided.
WARNING!
A loose tire or jack thrown forward in a
collision or hard stop could endanger the
occupants of the vehicle. Always stow the jack
parts and the spare tire in the places
provided. Have the deflated (flat) tire repaired
or replaced immediately.
20_DJD2_OM_EN_USC_t.book Page 350
Page 356 of 553
354IN CASE OF EMERGENCY
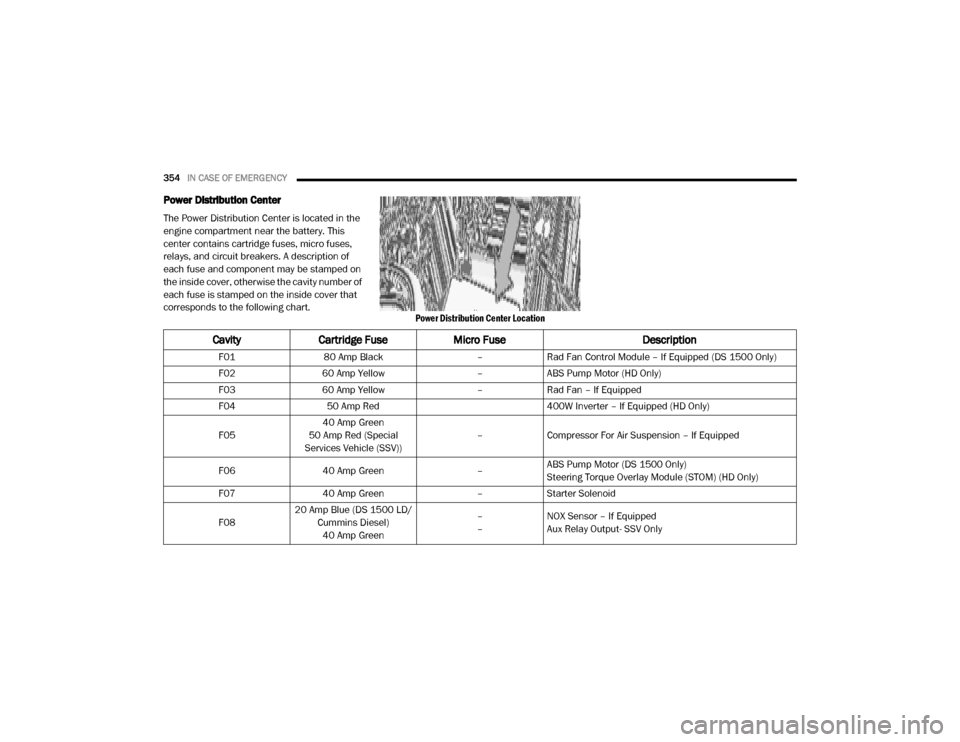
Power Distribution Center
The Power Distribution Center is located in the
engine compartment near the battery. This
center contains cartridge fuses, micro fuses,
relays, and circuit breakers. A description of
each fuse and component may be stamped on
the inside cover, otherwise the cavity number of
each fuse is stamped on the inside cover that
corresponds to the following chart.
Power Distribution Center Location
CavityCartridge Fuse Micro Fuse Description
F0180 Amp Black –Rad Fan Control Module – If Equipped (DS 1500 Only)
F02 60 Amp Yellow –ABS Pump Motor (HD Only)
F03 60 Amp Yellow –Rad Fan – If Equipped
F04 50 Amp Red 400W Inverter – If Equipped (HD Only)
F05 40 Amp Green
50 Amp Red (Special
Services Vehicle (SSV)) –
Compressor For Air Suspension – If Equipped
F06 40 Amp Green –ABS Pump Motor (DS 1500 Only)
Steering Torque Overlay Module (STOM) (HD Only)
F07 40 Amp Green –Starter Solenoid
F08 20 Amp Blue (DS 1500 LD/
Cummins Diesel)40 Amp Green –
–
NOX Sensor – If Equipped
Aux Relay Output- SSV Only
20_DJD2_OM_EN_USC_t.book Page 354