coolant Ram 2500 2020 Owner's Guide
[x] Cancel search | Manufacturer: RAM, Model Year: 2020, Model line: 2500, Model: Ram 2500 2020Pages: 553, PDF Size: 21.99 MB
Page 233 of 553

STARTING AND OPERATING231
(Continued)
(Continued)
NOTE:
For optimum braking power it is recommended
to use the exhaust brake while in TOW/HAUL
mode.
The exhaust brake feature can also be used to
reduce the engine warm up time. To use the
exhaust brake as a warm-up device, the vehicle
must be stopped or moving less than 5 mph
(8 km/h), the "Exhaust Brake Indicator" must be
on, and the coolant temperature must be below
180°F (82°C) and ambient temperature below
60°F (16°C).
Automatic “Smart” Exhaust Brake
Automatic “Smart” Exhaust Brake technology
delivers smoother, less aggressive exhaust
braking characteristics during downhill
descents. Although it can apply full exhaust
braking force if needed, Automatic “Smart”
Exhaust Brake may not apply obvious braking if
the vehicle speed is not increasing. Automatic
“Smart” Exhaust Brake is intended to maintain
vehicle speed, while Full Exhaust Brake is
intended to reduce vehicle speed. Automatic “Smart” Exhaust Brake can be
enabled by pushing the exhaust brake button
(on the center stack) again anytime after the
normal Full Exhaust Brake has been turned on.
The “Exhaust Brake Indicator” in the instrument
cluster display will change from Yellow to Green
when Automatic “Smart” Exhaust Brake is
enabled. Pushing the exhaust brake button
again will toggle the exhaust brake mode to off.
AUTOMATIC TRANSMISSION
WARNING!
Never use the PARK position as a substi
-
tute for the parking brake. Always apply the
parking brake fully when exiting the vehicle
to guard against vehicle movement and
possible injury or damage.
Your vehicle could move and injure you and
others if it is not in PARK. Check by trying to
move the transmission gear selector out of
PARK with the brake pedal released. Make
sure the transmission is in PARK before
exiting the vehicle.
The transmission may not engage PARK if
the vehicle is moving. Always bring the
vehicle to a complete stop before shifting to
PARK, and verify that the transmission gear
position indicator solidly indicates PARK (P)
without blinking. Ensure that the vehicle is
completely stopped, and the PARK position
is properly indicated, before exiting the
vehicle.
It is dangerous to shift out of PARK or
NEUTRAL if the engine speed is higher than
idle speed. If your foot is not firmly pressing
the brake pedal, the vehicle could accel -
erate quickly forward or in reverse. You
could lose control of the vehicle and hit
someone or something. Only shift into gear
when the engine is idling normally and your
foot is firmly pressing the brake pedal.
WARNING! (Continued)
5
20_DJD2_OM_EN_USC_t.book Page 231
Page 244 of 553

242STARTING AND OPERATING
To exit ERS mode, simply push and hold the ERS
(+) switch until the gear limit display disappears
from the instrument cluster.
NOTE:
To select the proper gear position for maximum
deceleration (engine braking), simply push and
hold the ERS (-) switch. The transmission will
shift to the range from which the vehicle can
best be slowed down.
Overdrive Operation
The automatic transmission includes an elec -
tronically controlled Overdrive (fifth and sixth
gears). The transmission will automatically shift
into Overdrive if the following conditions are
present:
The gear selector is in the DRIVE position.
The transmission fluid has reached an
adequate temperature.
The engine coolant has reached an adequate
temperature.
The vehicle speed is sufficiently high.
The driver is not heavily pressing the acceler -
ator.
When To Use TOW/HAUL Mode
When driving in hilly areas, towing a trailer,
carrying a heavy load, etc., and frequent trans -
mission shifting occurs, push the TOW/HAUL switch to activate TOW/HAUL mode. This will
improve performance and reduce the potential
for transmission overheating or failure due to
excessive shifting. When operating in TOW/
HAUL mode, transmission upshifts are delayed,
and the transmission will automatically down
-
shift (for engine braking) when the throttle is
closed and/or during steady braking maneu -
vers.
TOW/HAUL Switch
The “TOW/HAUL Indicator Light” will illuminate
in the instrument cluster to indicate that TOW/
HAUL mode has been activated. Pushing the
switch a second time restores normal opera -
tion. Normal operation is always the default at
engine start-up. If TOW/HAUL mode is desired,
the switch must be pushed each time the
engine is started.
WARNING!
Do not downshift for additional engine
braking on a slippery surface. The drive
wheels could lose their grip and the vehicle
could skid, causing a collision or personal
injury.
Transmis -
sion Gear
Limit Dis -
play 1 2 3 4 5 6 D
Actual
Gear(s)
Allowed
1 1-2 1-3 1-4 1-5 1-6 1-6
CAUTION!
When using ERS for engine braking while
descending steep grades, be careful not to
overspeed the engine. Apply the brakes as
needed to prevent engine overspeed.
20_DJD2_OM_EN_USC_t.book Page 242
Page 245 of 553
STARTING AND OPERATING243
Torque Converter Clutch
A feature designed to improve fuel economy
has been included in the automatic transmis -
sion on your vehicle. A clutch within the torque
converter engages automatically at calibrated
speeds. This may result in a slightly different
feeling or response during normal operation in
the upper gears. When the vehicle speed drops
or during some accelerations, the clutch auto -
matically disengages.
NOTE:
The torque converter clutch will not engage,
until the transmission fluid and engine
coolant are warm [usually after 1 to 3 miles
(2 to 5 km) of driving]. Because engine speed
is higher when the torque converter clutch is
not engaged, it may seem as if the transmis -
sion is not shifting properly when cold. This is normal. Using the Electronic Range Select
(ERS) shift control, when the transmission is
sufficiently warm, will demonstrate that the
transmission is able to shift into and out of
Overdrive.
If the vehicle has not been driven for several
days, the first few seconds of operation after
shifting the transmission into gear may seem
sluggish. This is due to the fluid partially
draining from the torque converter into the
transmission. This condition is normal and
will not cause damage to the transmission.
The torque converter will refill within five
seconds after starting the engine.
AUXILIARY SWITCHES — IF EQUIPPED
There can be up to six auxiliary switches located
in the lower switch bank of the instrument panel
which can be used to power various electronic
devices and PTO (Power Take Off) – If Equipped.
If Power Take Off is equipped, it will take the
place of the sixth Auxiliary switch. Connections
to the switches are found under the hood in the
connectors attached to the auxiliary Power
Distribution Center.
You have the ability to configure the function
-
ality of the auxiliary switches via the instrument cluster display. All switches can now be config
-
ured for setting the switch type operation to
latching or momentary, power source of either
battery or ignition, and ability to hold last state
across key cycles.
NOTE:
Holding last state conditions are met when
switch type is set to latching and power source
is set to ignition.
For further information on using the auxiliary
switches, please refer to the Ram Body Builders
Guide by accessing www.rambodybuilder.com
and choosing the appropriate links.
ACTIVE NOISE CANCELLATION
Your vehicle is equipped with an Active Noise
Cancellation system that cannot be turned off.
This system is designed to address exhaust and
engine noise. The system relies on four micro -
phones embedded in the headliner, which
monitor exhaust and engine noise, and assists
an onboard frequency generator, which creates
counteracting sound waves in the audio
system’s speakers. This helps keep the vehicle
quiet at idle and during drive. The system is
deactivated when the windows are rolled down.
WARNING!
Do not use the “TOW/HAUL” feature when
driving in icy or slippery conditions. The
increased engine braking can cause the rear
wheels to slide, and the vehicle to swing
around with the possible loss of vehicle
control, which may cause an accident
possibly resulting in personal injury or death.
5
20_DJD2_OM_EN_USC_t.book Page 243
Page 361 of 553
IN CASE OF EMERGENCY359
F68 –10 Amp Red AEB RACAM HTR – If Equipped (HD Only)
F69 –15 Amp Blue SCR Module – If Equipped (HD Only)
F70 –30 Amp GreenFuel Pump Motor / K09 RLY Coil Feed (Cummins Diesel) –
If Equipped
F71 –25 Amp ClearAmplifier / Active Noise Cancelation – If Equipped (HD
Only)
F72 –10 Amp RedPCM / DC/DC Converter Voltage– If Equipped (DS 1500
Only)
F73 –20 Amp Yellow Fuel Transfer Pump (Rear Tank) – If Equipped (HD Only)
F74 –20 Amp Yellow Brake Vacuum Pump Gas/Diesel – If Equipped (DS 1500
Only)
F74 –10 Amp Red Backup Alarm – If Equipped (HD Only)
F75 –10 Amp RedATMM / Coil-SCR Module RLY– If Equipped (HD Only)
Coolant Temperature Valve – If Equipped (DS 1500 Only)
F76 –10 Amp RedElectronic Stability Control (HD Only)
Brake System Module / Stop Lamp Switch / Electric Park
Brake / Clutch Pedal Switch (DS 1500 Only)
F77 –10 Amp RedDrivetrain Control Module / Front Axle Disconnect Module
/ TCM/ STOM (HD Only)
Drivetrain Control Module / ELSD / Front Axle Disconnect
Module / Transmission Control Relay / RDM / Power Take
Off Unit – If Equipped (DS 1500 Only)
Cavity
Cartridge Fuse Micro Fuse Description
6
20_DJD2_OM_EN_USC_t.book Page 359
Page 369 of 553
IN CASE OF EMERGENCY367
To Reset The Manual Park Release:
1. Push the locking tab to the right, to unlock
the lever.
2. Rotate the Manual Park Release lever forward to its original position, until the
locking tab snaps into place to secure the
lever.
3. Pull gently on the tether strap to confirm that the lever is locked in its stowed posi-
tion.
4. Re-install the access cover.
IF YOUR ENGINE OVERHEATS
In any of the following situations, you can
reduce the potential for overheating by taking
the appropriate action.
On the highways — slow down.
In city traffic — while stopped, place the trans -
mission in NEUTRAL, but do not increase the
engine idle speed while preventing vehicle
motion with the brakes. NOTE:
There are steps that you can take to slow down
an impending overheat condition:
If your Air Conditioner (A/C) is on, turn it off.
The A/C system adds heat to the engine
cooling system and turning the A/C off can
help remove this heat.
You can also turn the temperature control to
maximum heat, the mode control to floor and
the blower control to high. This allows the
heater core to act as a supplement to the
radiator and aids in removing heat from the
engine cooling system.
FREEING A STUCK VEHICLE
If your vehicle becomes stuck in mud, sand, or
snow, it can often be moved using a rocking
motion. Turn the steering wheel right and left to
clear the area around the front wheels. Then
shift back and forth between DRIVE (D) and
REVERSE (R), while gently pressing the acceler
-
ator. Use the least amount of accelerator pedal
pressure that will maintain the rocking motion,
without spinning the wheels or racing the
engine.
WARNING!
You or others can be badly burned by hot
engine coolant (antifreeze) or steam from
your radiator. If you see or hear steam coming
from under the hood, do not open the hood
until the radiator has had time to cool. Never
try to open a cooling system pressure cap
when the radiator or coolant bottle is hot.
CAUTION!
Driving with a hot cooling system could
damage your vehicle. If the temperature
gauge reads HOT (H), pull over and stop the
vehicle. Idle the vehicle with the air
conditioner turned off until the pointer drops
back into the normal range. If the pointer
remains on HOT (H), and you hear continuous
chimes, turn the engine off immediately and
call for service.
6
20_DJD2_OM_EN_USC_t.book Page 367
Page 382 of 553
380
SERVICING AND MAINTENANCE
SCHEDULED SERVICING — GAS ENGINE
Your vehicle is equipped with an automatic oil
change indicator system. The oil change indi-
cator system will remind you that it is time to
take your vehicle in for scheduled maintenance.
Based on engine operation conditions, the oil
change indicator message will illuminate. This
means that service is required for your vehicle.
Operating conditions such as frequent
short-trips, trailer tow, extremely hot or cold
ambient temperatures, and E85 fuel usage will
influence when the “Oil Change Required”
message is displayed. Severe Operating Condi-
tions can cause the change oil message to illu -
minate as early as 3,500 miles (5,600 km)
since last reset. Have your vehicle serviced as
soon as possible, within the next 500 miles
(805 km).
Your authorized dealer will reset the oil change
indicator message after completing the sched -
uled oil change.
If a scheduled oil change is performed by
someone other than your authorized dealer, the
message can be reset by referring to the steps described under “Instrument Cluster Display” in
“Getting To Know Your Instrument Panel”.
NOTE:
Under no circumstances should oil change
intervals exceed 8,000 miles (13,000 km),
12 months or 350 hours of engine run time,
whichever comes first. The 350 hours of engine
run or idle time is generally only a concern for
fleet customers.
Severe Duty All Models
NOTE:
Change Engine Oil at 4,000 miles (6,500 km) or
350 hours of engine run time if the vehicle is
operated in a dusty and off road environment or
is operated predominantly at idle, or only very
low engine RPM. This type of vehicle use is
considered Severe Duty.
Once A Month Or Before A Long Trip:
Check engine oil level
Check windshield washer fluid level
Check tire pressure and look for unusual
wear or damage. Rotate tires at the first sign
of irregular wear, even if it occurs before the
oil indicator system turns on.
Check the fluid levels of the coolant reservoir,
brake master cylinder, power steering and
automatic transmission (six-speed only) and
fill as needed
Check function of all interior and exterior
lights
Maintenance Plan — Gasoline Engine
Required Maintenance
Refer to the Maintenance Plan on the following
pages for required maintenance. More frequent
maintenance may be needed in severe condi
-
tions, such as dusty areas and very short trip
driving. In some extreme conditions, additional
maintenance not specified in the maintenance
schedule may be required.
20_DJD2_OM_EN_USC_t.book Page 380
Page 385 of 553

SERVICING AND MAINTENANCE383
Additional Maintenance
Replace cabin air filter. XX X XX XX
Replace engine air filter. XX XXX
Replace spark plugs.
1X
Flush and replace the engine coolant
at 10 years or 150,000 miles
(240,000 km) whichever comes first. X
X
Inspect the transfer case fluid, change
for any of the following: police, taxi,
fleet, or frequent trailer towing. X
X
Change the transfer case fluid. X
Inspect and replace PCV valve if
necessary. X
1. The spark plug change interval is mileage based only, yearly intervals do not apply.
Mileage or time passed (whichever
comes first)
20,000
30,000
40,000
50,000
60,000
70,000
80,000
90,000
100,000
110,000
120,000
130,000
140,000
150,000
Or Years: 2 3 4 5 6 7 8 9 10 11 12 13 14 15
Or Kilometers:
32,000
48,000
64,000
80,000
96,000
112,000
128,000
144,000
160,000
176,000
192,000
208,000
224,000
240,000
7
20_DJD2_OM_EN_USC_t.book Page 383
Page 386 of 553

384SERVICING AND MAINTENANCE
Heavy Duty Use Of The Vehicle
Change engine oil at 4,000 miles (6,500 km) or
350 hours of engine run time if the vehicle is
operated in a dusty and off road environment or
is operated predominately at idle or only very
low engine RPM. This type of vehicle use is
considered Severe Duty.
SCHEDULED SERVICING— DIESEL ENGINE
Required Maintenance Intervals
Refer to the maintenance plan on the following
pages for the required maintenance intervals.
More frequent maintenance may be needed in
severe conditions, such as dusty areas and very
short trip driving. In some extreme conditions,
additional maintenance not specified in the
maintenance schedule may be required.
At Each Stop For Fuel
Check the engine oil level at least 30 minutes
after a fully warmed engine is shut off. Checking
the oil level while the vehicle is on level ground
will improve the accuracy of the oil level
reading. Add oil only when the level is at or
below the ADD or MIN mark. Once A Month
Inspect the batteries, and clean and tighten
the terminals as required.
Check the fluid levels of the coolant reservoir,
brake master cylinder, and automatic trans-
mission, and add as needed.
At Each Oil Change
Change the engine oil filter.
Inspect the exhaust system.
Inspect engine air filter. Replace the engine
air filter cleaner, if necessary.
Inspect the CV/Universal joints.
Check the coolant level, hoses, and clamps.
Inspect front end, and lubricate — If equipped
with serviceable fittings.
Inspect and replace the Evaporative System
Fresh Air Filter as necessary, replacement
may be more frequent if vehicle is operated
in extreme dusty conditions.
WARNING!
You can be badly injured working on or
around a motor vehicle. Do only service
work for which you have the knowledge and
the right equipment. If you have any doubt
about your ability to perform a service job,
take your vehicle to a competent mechanic.
Failure to properly inspect and maintain
your vehicle could result in a component
malfunction and effect vehicle handling
and performance. This could cause an acci -
dent.
CAUTION!
Failure to perform the required maintenance
items may result in damage to the vehicle.
20_DJD2_OM_EN_USC_t.book Page 384
Page 392 of 553
390SERVICING AND MAINTENANCE
(Continued)
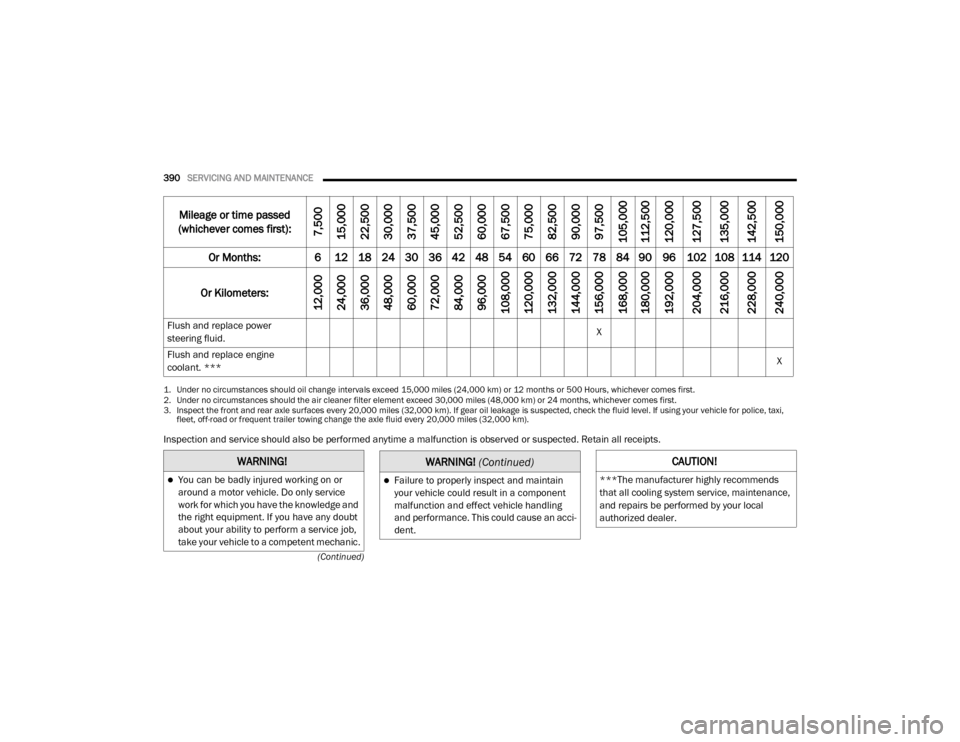
Inspection and service should also be performed anytime a malfunction is observed or suspected. Retain all receipts. Flush and replace power
steering fluid.
X
Flush and replace engine
coolant. *** X
1. Under no circumstances should oil change intervals exceed 15,000 miles (24,000 km) or 12 months or 500 Hours, whichever comes first.
2. Under no circumstances should the air cleaner filter element exceed 30,000 miles (48,000 km) or 24 months, whichever comes first.
3. Inspect the front and rear axle surfaces every 20,000 miles (32,000 km). If gear oil leakage is suspected, check the fluid level. If using your vehicle for police, taxi,
fleet, off-road or frequent trailer towing change the axle fluid every 20,000 miles (32,000 km).
Mileage or time passed
(whichever comes first):
7,500
15,000
22,500
30,000
37,500
45,000
52,500
60,000
67,500
75,000
82,500
90,000
97,500
105,000
112,500
120,000
127,500
135,000
142,500
150,000
Or Months: 6 12 18 24 30 36 42 48 54 60 66 72 78 84 90 96 102 108 114 120
Or Kilometers:
12,000
24,000
36,000
48,000
60,000
72,000
84,000
96,000
108,000
120,000
132,000
144,000
156,000
168,000
180,000
192,000
204,000
216,000
228,000
240,000
WARNING!
You can be badly injured working on or
around a motor vehicle. Do only service
work for which you have the knowledge and
the right equipment. If you have any doubt
about your ability to perform a service job,
take your vehicle to a competent mechanic.Failure to properly inspect and maintain
your vehicle could result in a component
malfunction and effect vehicle handling
and performance. This could cause an acci -
dent.
WARNING! (Continued)CAUTION!
***The manufacturer highly recommends
that all cooling system service, maintenance,
and repairs be performed by your local
authorized dealer.
20_DJD2_OM_EN_USC_t.book Page 390
Page 393 of 553
SERVICING AND MAINTENANCE391
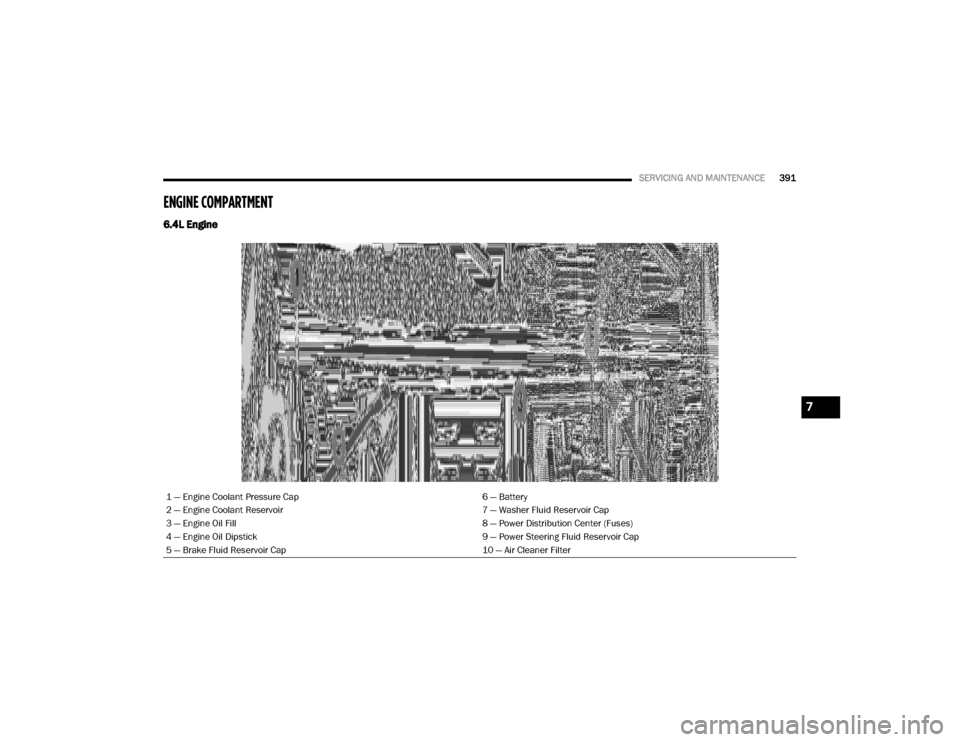
ENGINE COMPARTMENT
6.4L Engine
1 — Engine Coolant Pressure Cap 6 — Battery
2 — Engine Coolant Reservoir 7 — Washer Fluid Reservoir Cap
3 — Engine Oil Fill 8 — Power Distribution Center (Fuses)
4 — Engine Oil Dipstick 9 — Power Steering Fluid Reservoir Cap
5 — Brake Fluid Reservoir Cap 10 — Air Cleaner Filter
7
20_DJD2_OM_EN_USC_t.book Page 391