tow bar Ram 2500 2020 Owner's Manual
[x] Cancel search | Manufacturer: RAM, Model Year: 2020, Model line: 2500, Model: Ram 2500 2020Pages: 553, PDF Size: 21.99 MB
Page 67 of 553
GETTING TO KNOW YOUR VEHICLE65
Faceplate Temperature
Knobs
Touchscreen
Temperature Buttons Driver and Passenger Temperature Up and Down Buttons
Provides the driver and passenger with independent temperature control. Push the red button (or rotate knob if equipped)
on the faceplate or touchscreen, or press and slide the temperature bar towards the red arrow button on the touchscreen
for warmer temperature settings. Push the blue button (or rotate knob if equipped) on the faceplate or touchscreen, or
press and slide the temperature bar towards the blue arrow button on the touchscreen for cooler temperature settings.
NOTE:
The numbers within the temperature display will only appear if the system is equipped with an automatic climate control
system.
Up and down buttons are only available on vehicles equipped with a 12-inch display.
SYNC
Press the SYNC button on the touchscreen to toggle the SYNC feature on/off. The SYNC indicator illuminates when SYNC is
on. SYNC synchronizes the passenger temperature setting with the driver temperature setting. Changing the passenger’s
temperature setting while in SYNC will automatically exit this feature.
NOTE:
The SYNC button is only available on the touchscreen.
Icon Description
2
20_DJD2_OM_EN_USC_t.book Page 65
Page 103 of 553
GETTING TO KNOW YOUR VEHICLE101
Removing The Tailgate
1. Disconnect the wiring harness for the rear
camera and or power locks (if equipped).
NOTE:
Refer to “Disconnecting The Rear Camera And
Remote Keyless Entry” in this section.
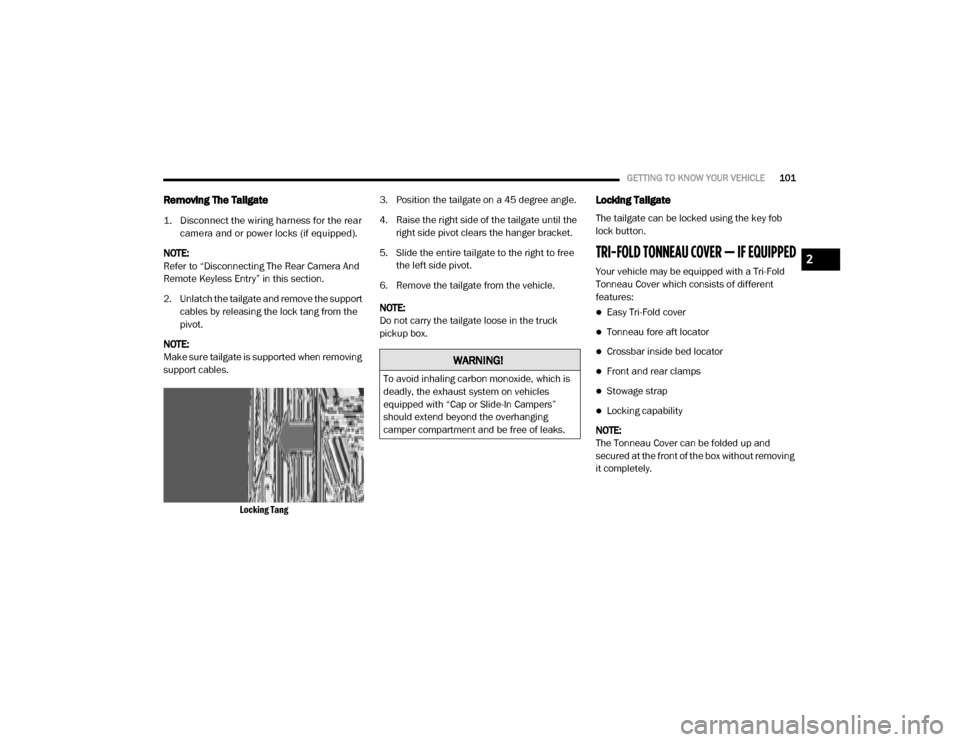
2. Unlatch the tailgate and remove the support cables by releasing the lock tang from the
pivot.
NOTE:
Make sure tailgate is supported when removing
support cables.
Locking Tang
3. Position the tailgate on a 45 degree angle.
4. Raise the right side of the tailgate until the
right side pivot clears the hanger bracket.
5. Slide the entire tailgate to the right to free the left side pivot.
6. Remove the tailgate from the vehicle.
NOTE:
Do not carry the tailgate loose in the truck
pickup box.
Locking Tailgate
The tailgate can be locked using the key fob
lock button.
TRI-FOLD TONNEAU COVER — IF EQUIPPED
Your vehicle may be equipped with a Tri-Fold
Tonneau Cover which consists of different
features:
Easy Tri-Fold cover
Tonneau fore aft locator
Crossbar inside bed locator
Front and rear clamps
Stowage strap
Locking capability
NOTE:
The Tonneau Cover can be folded up and
secured at the front of the box without removing
it completely.
WARNING!
To avoid inhaling carbon monoxide, which is
deadly, the exhaust system on vehicles
equipped with “Cap or Slide-In Campers”
should extend beyond the overhanging
camper compartment and be free of leaks.
2
20_DJD2_OM_EN_USC_t.book Page 101
Page 139 of 553
GETTING TO KNOW YOUR INSTRUMENT PANEL137
Service Forward Collision Warning (FCW)
Light — If Equipped
This warning light will illuminate to
indicate a fault in the Forward Colli-
sion Warning System. Contact an
authorized dealer for service.
Refer to "Forward Collision Warning (FCW)" in
"Safety" for further information.
Service 4WD Warning Light — If Equipped
This warning light will illuminate to
signal a fault with the 4WD system. If
the light stays on or comes on during
driving, it means that the 4WD system
is not functioning properly and that service is
required. We recommend you drive to the
nearest service center and have the vehicle
serviced immediately.
Speed Control Fault Warning Light
This warning light will illuminate to
indicate the Speed Control System is
not functioning properly and service is
required. Contact an authorized
dealer.
Sway Bar Fault Warning Light
This light will illuminate when there is
a fault in the sway bar disconnect
system.
Refer to “Stabilizer/Sway Bar System — Power
Wagon Only” in “Starting And Operating” for
further information.
Yellow Indicator Lights
Forward Collision Warning Off Indicator Light
— If Equipped
This indicator light illuminates to indi -
cate that Forward Collision Warning is
off.
Refer to “Auxiliary Driving Systems” in “Safety”
for further information.
Air Suspension Payload Protection Indicator
Light — If Equipped
This indicator light will illuminate to
indicate that the maximum payload
may have been exceeded or load
leveling cannot be achieved at its
current ride height. Protection Mode will auto -
matically be selected in order to “protect” the air suspension system, air suspension adjust
-
ment is limited due to payload.
TOW/HAUL Indicator Light
This indicator light will illuminate
when TOW/HAUL mode is selected.
Refer to “Trailer Towing” in “Starting
And Operating” for further informa -
tion.
Cargo Light — If Equipped
This indicator light will illuminate
when the cargo light is activated by
pushing the cargo light button on the
headlight switch.
Cold Ambient Derate Mode Indicator Light —
If Equipped
This indicator light will illuminate
when a derate (engine power reduc -
tion) is activated for protection of the
turbocharger in cold ambient
temperatures.
For further information, refer to “Instrument
Cluster Display” in “Getting To Know Your
Instrument Panel”.
3
20_DJD2_OM_EN_USC_t.book Page 137
Page 287 of 553
STARTING AND OPERATING285
NOTE:
Aftermarket add-ons such as snow plows, lift
kits, and brush/grille bars can hinder module
performance. Ensure the radar/camera has
no obstructions in the field of view.
Height modifications can limit module perfor -
mance and functionality.
Do not put stickers or easy passes over the
camera/radar field of view.
Any modifications to the vehicle that may
obstruct the field of view of the radar/camera
are not recommended.
Cleaning Instructions
Dust and dirt can accumulate on the cover and
block the camera lens. Clean the camera lens
with a soft microfiber cloth, being careful not to
damage or scratch the module.
Towing A Trailer
ACC while towing a trailer is recommended only
with an Integrated Trailer Brake Controller.
Aftermarket trailer brake controllers will not
activate the trailer brakes when ACC is braking.
Offset Driving
ACC may not detect a vehicle in the same lane
that is offset from your direct line of travel, or a
vehicle merging in from a side lane. There may
not be sufficient distance to the vehicle ahead.
The offset vehicle may move in and out of the
line of travel, which can cause your vehicle to
brake or accelerate unexpectedly.
Offset Driving Condition Example
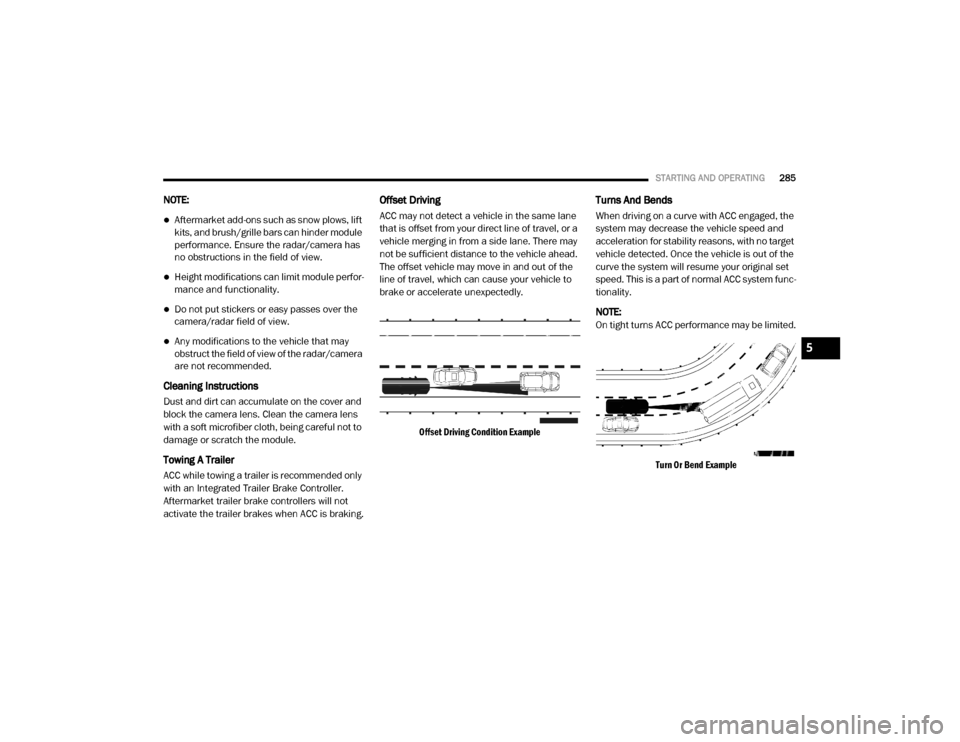
Turns And Bends
When driving on a curve with ACC engaged, the
system may decrease the vehicle speed and
acceleration for stability reasons, with no target
vehicle detected. Once the vehicle is out of the
curve the system will resume your original set
speed. This is a part of normal ACC system func -
tionality.
NOTE:
On tight turns ACC performance may be limited.
Turn Or Bend Example
5
20_DJD2_OM_EN_USC_t.book Page 285
Page 321 of 553
STARTING AND OPERATING319
The recommended way to measure GTW is to
put your fully loaded trailer on a vehicle scale.
The entire weight of the trailer must be
supported by the scale.
Gross Combination Weight Rating (GCWR)
The GCWR is the total allowable weight of your
vehicle and trailer when weighed in combina -
tion.
Gross Axle Weight Rating (GAWR)
The GAWR is the maximum capacity of the front
and rear axles. Distribute the load over the front
and rear axles evenly. Make sure that you do
not exceed either front or rear GAWR. Refer to
“Vehicle Loading/Vehicle Certification Label” in
“Starting And Operating” for further informa -
tion.
Tongue Weight (TW)
The tongue weight is the downward force
exerted on the hitch ball by the trailer. You must
consider this as part of the load on your vehicle.
Trailer Frontal Area
The frontal area is the maximum height multi -
plied by the maximum width of the front of a
trailer.
Trailer Sway Control
The trailer sway control can be a mechanical
telescoping link that can be installed between
the hitch receiver and the trailer tongue that
typically provides adjustable friction associated
with the telescoping motion to dampen any
unwanted trailer swaying motions while trav -
eling. If equipped, the electronic Trailer Sway Control
(TSC) recognizes a swaying trailer and automat
-
ically applies individual wheel brakes and/or
reduces engine power to attempt to eliminate
the trailer sway.
Weight-Carrying Hitch
A weight-carrying hitch supports the trailer
tongue weight, just as if it were luggage located
at a hitch ball or some other connecting point of
the vehicle. These kinds of hitches are the most
popular on the market today and they are
commonly used to tow small and medium sized
trailers.
Weight-Distributing Hitch
A weight-distributing system works by applying
leverage through spring (load) bars. They are
typically used for heavier loads to distribute
trailer tongue weight to the tow vehicle's front
axle and the trailer axle(s). When used in accor -
dance with the manufacturer's directions, it
provides for a more level ride, offering more
consistent steering and brake control, thereby
enhancing towing safety. The addition of a fric -
tion/hydraulic sway control also dampens sway
caused by traffic and crosswinds and contrib -
utes positively to tow vehicle and trailer
stability. Trailer Sway Control (TSC) and a weight
WARNING!
If the gross trailer weight is 5,000 lbs (2,267 kg)
or more, it is recommended to use a
weight-distributing hitch to ensure stable
handling of your vehicle. If you use a standard
weight-carrying hitch, you could lose control of
your vehicle and cause a collision.
WARNING!
It is important that you do not exceed the
maximum front or rear GAWR. A dangerous
driving condition can result if either rating is
exceeded. You could lose control of the
vehicle and have a collision.
5
20_DJD2_OM_EN_USC_t.book Page 319
Page 322 of 553
320STARTING AND OPERATING
distributing (load equalizing) hitch are recom -
mended for heavier Tongue Weights (TW) and
may be required depending on vehicle and
trailer configuration/loading to comply with
GAWR requirements.
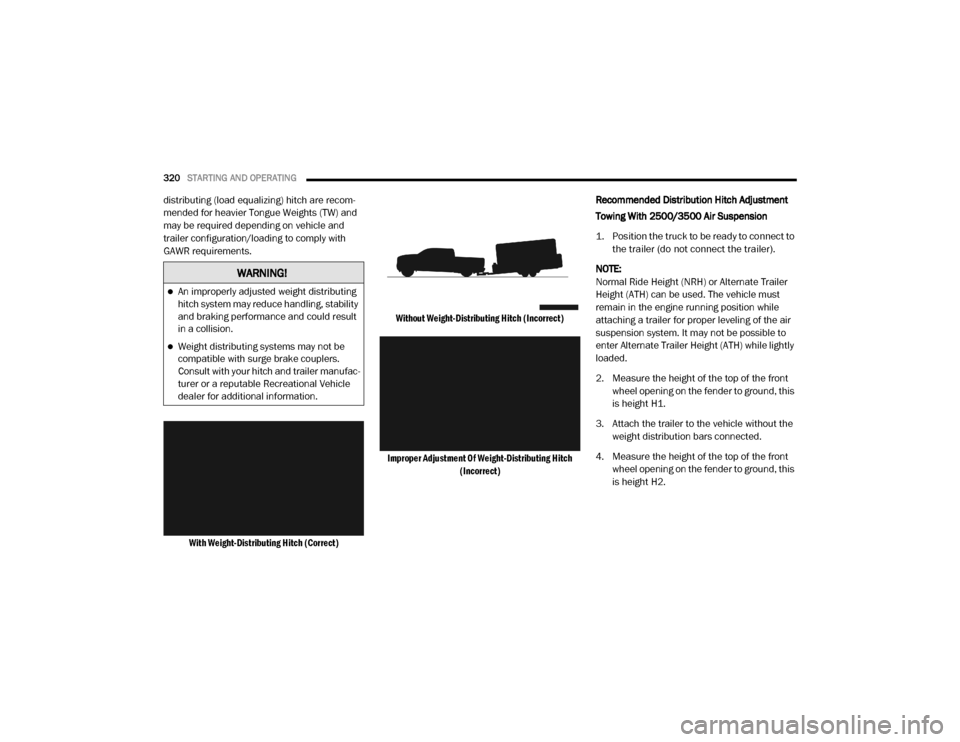
With Weight-Distributing Hitch (Correct) Without Weight-Distributing Hitch (Incorrect)
Improper Adjustment Of Weight-Distributing Hitch (Incorrect)
Recommended Distribution Hitch Adjustment
Towing With 2500/3500 Air Suspension
1. Position the truck to be ready to connect to
the trailer (do not connect the trailer).
NOTE:
Normal Ride Height (NRH) or Alternate Trailer
Height (ATH) can be used. The vehicle must
remain in the engine running position while
attaching a trailer for proper leveling of the air
suspension system. It may not be possible to
enter Alternate Trailer Height (ATH) while lightly
loaded.
2. Measure the height of the top of the front wheel opening on the fender to ground, this
is height H1.
3. Attach the trailer to the vehicle without the weight distribution bars connected.
4. Measure the height of the top of the front wheel opening on the fender to ground, this
is height H2.
WARNING!
An improperly adjusted weight distributing
hitch system may reduce handling, stability
and braking performance and could result
in a collision.
Weight distributing systems may not be
compatible with surge brake couplers.
Consult with your hitch and trailer manufac -
turer or a reputable Recreational Vehicle
dealer for additional information.
20_DJD2_OM_EN_USC_t.book Page 320
Page 323 of 553
STARTING AND OPERATING321
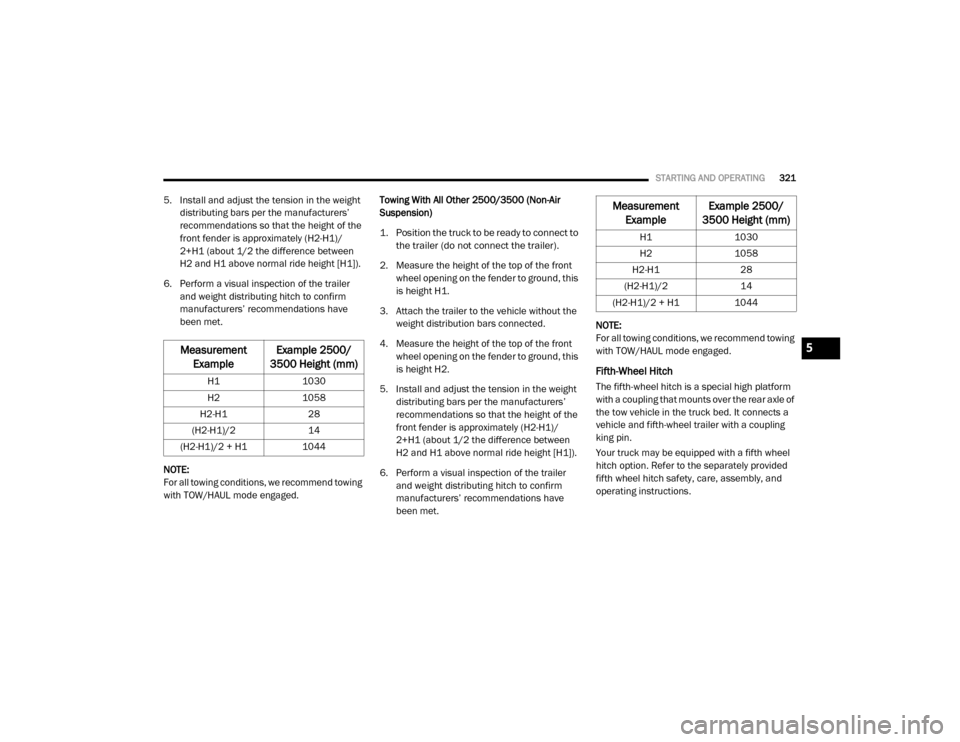
5. Install and adjust the tension in the weight
distributing bars per the manufacturers’
recommendations so that the height of the
front fender is approximately (H2-H1)/
2+H1 (about 1/2 the difference between
H2 and H1 above normal ride height [H1]).
6. Perform a visual inspection of the trailer and weight distributing hitch to confirm
manufacturers’ recommendations have
been met.
NOTE:
For all towing conditions, we recommend towing
with TOW/HAUL mode engaged. Towing With All Other 2500/3500 (Non-Air
Suspension)
1. Position the truck to be ready to connect to
the trailer (do not connect the trailer).
2. Measure the height of the top of the front wheel opening on the fender to ground, this
is height H1.
3. Attach the trailer to the vehicle without the weight distribution bars connected.
4. Measure the height of the top of the front wheel opening on the fender to ground, this
is height H2.
5. Install and adjust the tension in the weight distributing bars per the manufacturers’
recommendations so that the height of the
front fender is approximately (H2-H1)/
2+H1 (about 1/2 the difference between
H2 and H1 above normal ride height [H1]).
6. Perform a visual inspection of the trailer and weight distributing hitch to confirm
manufacturers’ recommendations have
been met. NOTE:
For all towing conditions, we recommend towing
with TOW/HAUL mode engaged.
Fifth-Wheel Hitch
The fifth-wheel hitch is a special high platform
with a coupling that mounts over the rear axle of
the tow vehicle in the truck bed. It connects a
vehicle and fifth-wheel trailer with a coupling
king pin.
Your truck may be equipped with a fifth wheel
hitch option. Refer to the separately provided
fifth wheel hitch safety, care, assembly, and
operating instructions.
Measurement
Example Example 2500/
3500 Height (mm)
H1 1030
H2 1058
H2-H1 28
(H2-H1)/2 14
(H2-H1)/2 + H1 1044
Measurement
Example Example 2500/
3500 Height (mm)
H1 1030
H2 1058
H2-H1 28
(H2-H1)/2 14
(H2-H1)/2 + H1 1044
5
20_DJD2_OM_EN_USC_t.book Page 321
Page 334 of 553
332STARTING AND OPERATING
(Continued)
3. Firmly apply the parking brake. Place auto-
matic transmission in PARK.
4. Properly secure the rear wheels to the dolly, following the dolly manufacturer's instruc -
tions.
5. Turn the ignition OFF and remove the key fob.
6. Install a suitable clamping device, designed for towing, to secure the front wheels in the
straight position.Recreational Towing — Four-Wheel Drive
Models
NOTE:
Both the manual shift and electronic shift
transfer cases must be shifted into NEUTRAL
(N) for recreational towing. Automatic transmis -
sions must be shifted into PARK for recreational
towing. Refer to the following for the proper
transfer case NEUTRAL (N) shifting procedure
for your vehicle.
CAUTION!
Towing with the rear wheels on the ground
will cause severe transmission damage.
Damage from improper towing is not
covered under the New Vehicle Limited
Warranty.
Do not disconnect the driveshaft because
fluid may leak from the transmission,
causing damage to internal parts.
CAUTION!
DO NOT dolly tow any 4WD vehicle. Towing
with only one set of wheels on the ground
(front or rear) will cause severe transmis -
sion and/or transfer case damage. Tow
with all four wheels either ON the ground, or
OFF the ground (using a vehicle trailer).
Tow only in the forward direction. Towing
this vehicle backwards can cause severe
damage to the transfer case.
Before recreational towing, the transfer
case must be in NEUTRAL. To be certain the
transfer case is fully in NEUTRAL, perform
the procedure outlined under “Shifting Into
NEUTRAL”. Internal transmission damage
will result, if the transfer case is not in
NEUTRAL during towing.
The transmission must be placed in PARK
for recreational towing.
Towing this vehicle in violation of the above
requirements can cause severe transmis -
sion and/or transfer case damage.
Damage from improper towing is not
covered under the New Vehicle Limited
Warranty.
Do not disconnect the rear driveshaft
because fluid will leak from the transfer
case, causing damage to internal parts.
Do not use a bumper-mounted clamp-on
tow bar on your vehicle. The bumper face
bar will be damaged.
CAUTION! (Continued)
20_DJD2_OM_EN_USC_t.book Page 332
Page 335 of 553
STARTING AND OPERATING333
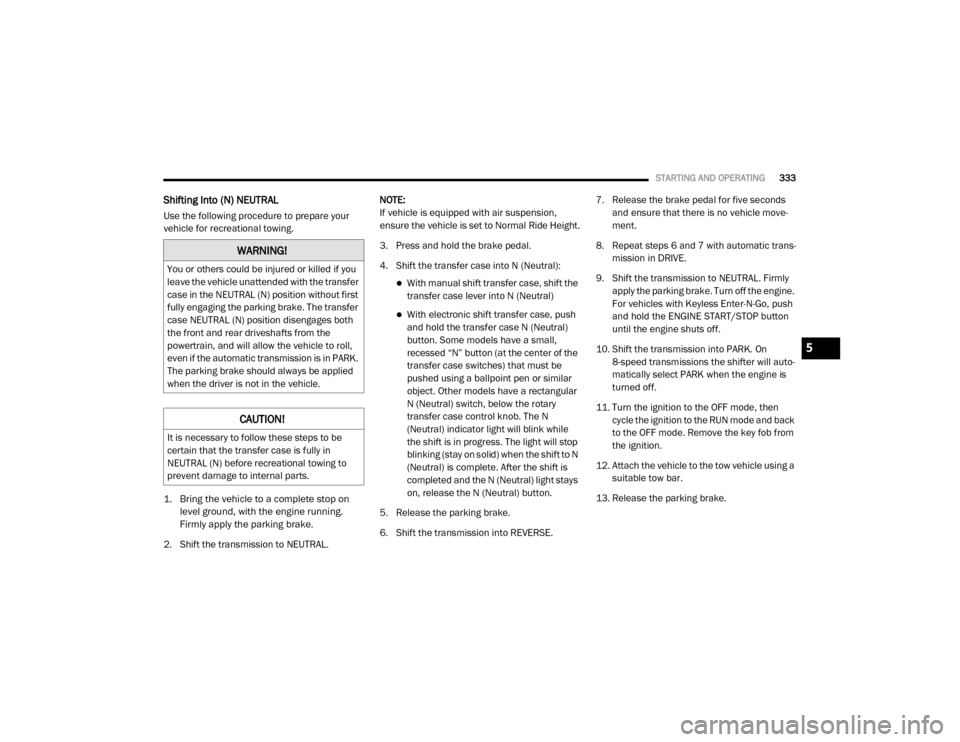
Shifting Into (N) NEUTRAL
Use the following procedure to prepare your
vehicle for recreational towing.
1. Bring the vehicle to a complete stop on
level ground, with the engine running.
Firmly apply the parking brake.
2. Shift the transmission to NEUTRAL. NOTE:
If vehicle is equipped with air suspension,
ensure the vehicle is set to Normal Ride Height.
3. Press and hold the brake pedal.
4. Shift the transfer case into N (Neutral):
With manual shift transfer case, shift the
transfer case lever into N (Neutral)
With electronic shift transfer case, push and hold the transfer case N (Neutral)
button. Some models have a small,
recessed “N” button (at the center of the
transfer case switches) that must be
pushed using a ballpoint pen or similar
object. Other models have a rectangular
N (Neutral) switch, below the rotary
transfer case control knob. The N
(Neutral) indicator light will blink while
the shift is in progress. The light will stop
blinking (stay on solid) when the shift to N
(Neutral) is complete. After the shift is
completed and the N (Neutral) light stays
on, release the N (Neutral) button.
5. Release the parking brake.
6. Shift the transmission into REVERSE. 7. Release the brake pedal for five seconds
and ensure that there is no vehicle move-
ment.
8. Repeat steps 6 and 7 with automatic trans -
mission in DRIVE.
9. Shift the transmission to NEUTRAL. Firmly apply the parking brake. Turn off the engine.
For vehicles with Keyless Enter-N-Go, push
and hold the ENGINE START/STOP button
until the engine shuts off.
10. Shift the transmission into PARK. On 8-speed transmissions the shifter will auto -
matically select PARK when the engine is
turned off.
11. Turn the ignition to the OFF mode, then cycle the ignition to the RUN mode and back
to the OFF mode. Remove the key fob from
the ignition.
12. Attach the vehicle to the tow vehicle using a suitable tow bar.
13. Release the parking brake.
WARNING!
You or others could be injured or killed if you
leave the vehicle unattended with the transfer
case in the NEUTRAL (N) position without first
fully engaging the parking brake. The transfer
case NEUTRAL (N) position disengages both
the front and rear driveshafts from the
powertrain, and will allow the vehicle to roll,
even if the automatic transmission is in PARK.
The parking brake should always be applied
when the driver is not in the vehicle.
CAUTION!
It is necessary to follow these steps to be
certain that the transfer case is fully in
NEUTRAL (N) before recreational towing to
prevent damage to internal parts.
5
20_DJD2_OM_EN_USC_t.book Page 333
Page 357 of 553
IN CASE OF EMERGENCY355
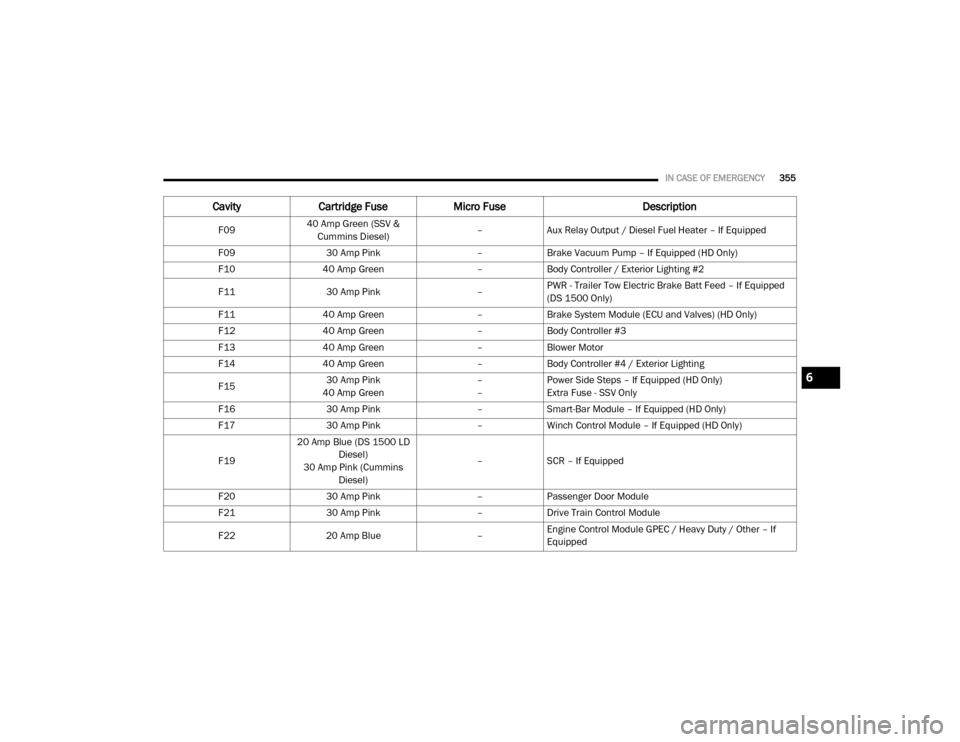
F0940 Amp Green (SSV &
Cummins Diesel) –
Aux Relay Output / Diesel Fuel Heater – If Equipped
F09 30 Amp Pink –Brake Vacuum Pump – If Equipped (HD Only)
F10 40 Amp Green –Body Controller / Exterior Lighting #2
F11 30 Amp Pink –PWR - Trailer Tow Electric Brake Batt Feed – If Equipped
(DS 1500 Only)
F11 40 Amp Green –Brake System Module (ECU and Valves) (HD Only)
F12 40 Amp Green –Body Controller #3
F13 40 Amp Green –Blower Motor
F14 40 Amp Green –Body Controller #4 / Exterior Lighting
F15 30 Amp Pink
40 Amp Green –
–Power Side Steps – If Equipped (HD Only)
Extra Fuse - SSV Only
F16 30 Amp Pink –Smart-Bar Module – If Equipped (HD Only)
F17 30 Amp Pink –Winch Control Module – If Equipped (HD Only)
F19 20 Amp Blue (DS 1500 LD
Diesel)
30 Amp Pink (Cummins Diesel) –
SCR – If Equipped
F20 30 Amp Pink –Passenger Door Module
F21 30 Amp Pink –Drive Train Control Module
F22 20 Amp Blue –Engine Control Module GPEC / Heavy Duty / Other – If
Equipped
Cavity
Cartridge Fuse Micro Fuse Description
6
20_DJD2_OM_EN_USC_t.book Page 355