suspension Ram 3500 2018 User Guide
[x] Cancel search | Manufacturer: RAM, Model Year: 2018, Model line: 3500, Model: Ram 3500 2018Pages: 372, PDF Size: 7.1 MB
Page 17 of 372
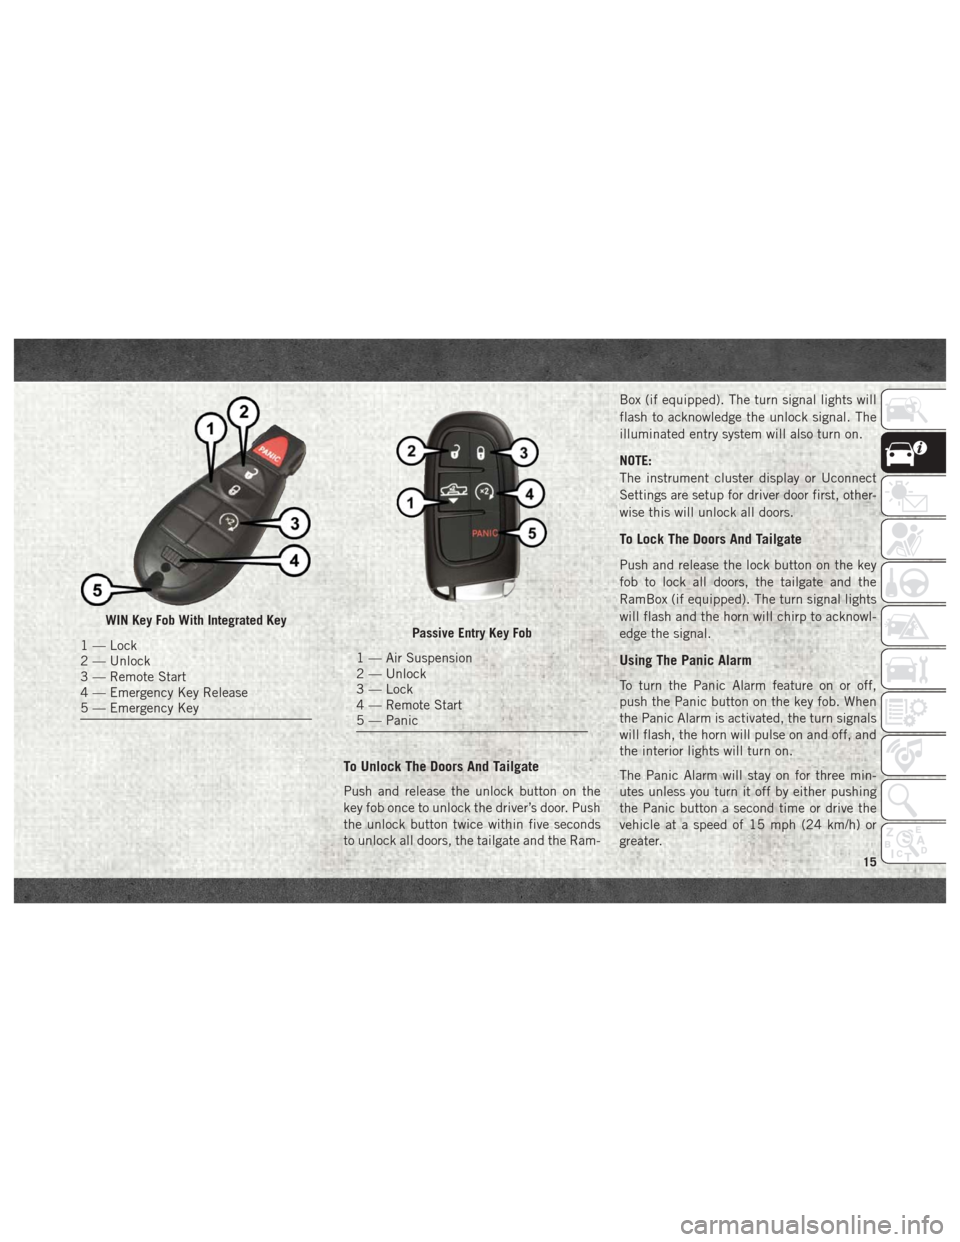
To Unlock The Doors And Tailgate
Push and release the unlock button on the
key fob once to unlock the driver’s door. Push
the unlock button twice within five seconds
to unlock all doors, the tailgate and the Ram-Box (if equipped). The turn signal lights will
flash to acknowledge the unlock signal. The
illuminated entry system will also turn on.
NOTE:
The instrument cluster display or Uconnect
Settings are setup for driver door first, other-
wise this will unlock all doors.
To Lock The Doors And Tailgate
Push and release the lock button on the key
fob to lock all doors, the tailgate and the
RamBox (if equipped). The turn signal lights
will flash and the horn will chirp to acknowl-
edge the signal.
Using The Panic Alarm
To turn the Panic Alarm feature on or off,
push the Panic button on the key fob. When
the Panic Alarm is activated, the turn signals
will flash, the horn will pulse on and off, and
the interior lights will turn on.
The Panic Alarm will stay on for three min-
utes unless you turn it off by either pushing
the Panic button a second time or drive the
vehicle at a speed of 15 mph (24 km/h) or
greater.
WIN Key Fob With Integrated Key
1 — Lock
2 — Unlock
3 — Remote Start
4 — Emergency Key Release
5 — Emergency KeyPassive Entry Key Fob
1 — Air Suspension
2 — Unlock
3 — Lock
4 — Remote Start
5 — Panic
15
Page 18 of 372
NOTE:
• The interior lights will turn off if you placethe ignition in the ACC or ON/RUN position
while the Panic Alarm is activated. How-
ever, the exterior lights and horn will remain
on.
• You may need to be less than 35 ft (11 m) from the vehicle when using the key fob to
turn off the Panic Alarm due to the radio
frequency noises emitted by the system.
Air Suspension (Remote Lowering Of The
Vehicle) — If Equipped
For easy entry and loading, your
vehicle can be lowered by push-
ing the key fob air suspension
lowering button two times. When
key fob lowering is requested,
the vehicle will send a series of chirps and
flashes to alert the customer that the opera-
tion has begun and will continue these alerts
until it successfully lowers. The following conditions must be met for the
vehicle to lower remotely:
• The vehicle must not already be in Entry/
Exit (Park) ride height.
• The vehicle battery must be fully charged.
• All doors must be closed.
• The key fob must be out of the vehicle.
Canceling Remote Lowering
Vehicle lowering can be cancelled at any-
time. When vehicle lowering is canceled, the
vehicle will raise up to the next defined level
and lock out the remote lowering feature until
the ignition has been cycled ON/OFF.
To cancel vehicle lowering, push the key fob
air suspension lowering button one time dur-
ing the lowering process. When vehicle low-
ering is canceled, the horn will chirp two
times and the turn signal lamps will flash four
times. Once raising is completed, the horn
will chirp one time.
NOTE:
Refer to “Air Suspension System” in “Start-
ing And Operating” for further information.
General Information
The following regulatory statement applies to
all radio frequency (RF) devices equipped in
this vehicle:
This device complies with Part 15 of the FCC
Rules and with Industry Canada license-
exempt RSS standard(s). Operation is sub-
ject to the following two conditions:
1. This device may not cause harmful inter- ference, and
2. This device must accept any interference received, including interference that may
cause undesired operation.
NOTE:
Changes or modifications not expressly ap-
proved by the party responsible for compli-
ance could void the user’s authority to oper-
ate the equipment.
GETTING TO KNOW YOUR VEHICLE
16
Page 77 of 372
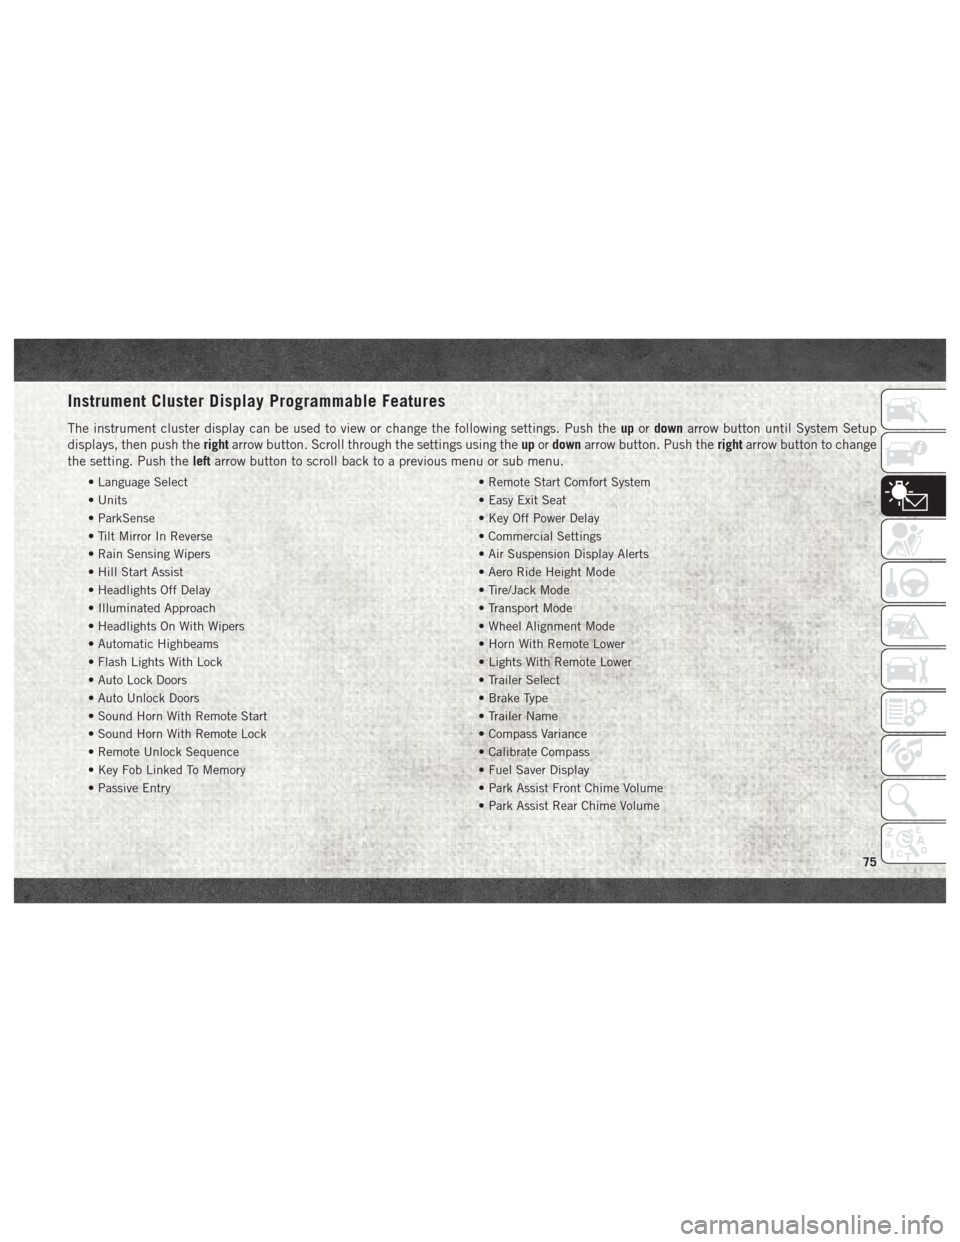
Instrument Cluster Display Programmable Features
The instrument cluster display can be used to view or change the following settings. Push theupordown arrow button until System Setup
displays, then push the rightarrow button. Scroll through the settings using the upordown arrow button. Push the rightarrow button to change
the setting. Push the leftarrow button to scroll back to a previous menu or sub menu.
• Language Select • Remote Start Comfort System
• Units • Easy Exit Seat
• ParkSense • Key Off Power Delay
• Tilt Mirror In Reverse • Commercial Settings
• Rain Sensing Wipers • Air Suspension Display Alerts
• Hill Start Assist • Aero Ride Height Mode
• Headlights Off Delay • Tire/Jack Mode
• Illuminated Approach • Transport Mode
• Headlights On With Wipers • Wheel Alignment Mode
• Automatic Highbeams • Horn With Remote Lower
• Flash Lights With Lock • Lights With Remote Lower
• Auto Lock Doors • Trailer Select
• Auto Unlock Doors • Brake Type
• Sound Horn With Remote Start • Trailer Name
• Sound Horn With Remote Lock • Compass Variance
• Remote Unlock Sequence • Calibrate Compass
• Key Fob Linked To Memory • Fuel Saver Display
• Passive Entry • Park Assist Front Chime Volume
• Park Assist Rear Chime Volume
75
Page 84 of 372

CAUTION!
Continuous driving with the Transmission
Temperature Warning Light illuminated
will eventually cause severe transmission
damage or transmission failure.
Yellow Indicator Lights
— Rear Fog Indicator — If Equipped
This indicator will illuminate when the rear
fog lights are on.
— Air Suspension Payload Protection
Indicator Light — If Equipped
This telltale will turn on to indicate that the
maximum payload may have been exceeded
or load leveling cannot be achieved at its
current ride height. Protection Mode will au-
tomatically be selected in order to “protect”
the air suspension system, air suspension
adjustment is limited due to payload.
— TOW/HAUL Indicator Light
This light will illuminate when TOW/HAUL
mode is selected.
— Cargo Light — If Equipped
The cargo light will illuminate when the cargo
light is activated by pushing the cargo light
button on the headlight switch.
— Air Suspension Off-Road 1 Indicator
Light — If Equipped
This light will illuminate when the air suspen-
sion system is set to the Off-Road 1 setting.
For further information, refer to “Air Suspen-
sion System” in “Starting And Operating.”
— Air Suspension Off-Road 2 Indicator
Light — If Equipped
This light will illuminate when the air suspen-
sion system is set to the Off-Road 2 setting.
For further information, refer to “Air Suspen-
sion System” in “Starting And Operating”.
— Air Suspension Ride Height Raising
Indicator Light— If Equipped
This light will blink and alert the driver that
the vehicle is changing to a higher ride
height.
— Air Suspension Ride Height Lower-
ing Indicator Light— If Equipped
This light will blink and alert the driver that
the vehicle is changing to a lower ride height.
— Air Suspension Entry/Exit Indicator
Light— If Equipped
This light comes on when the vehicle is
automatically lowered from ride height posi-
tion downward for easy entry and exit of the
vehicle.
– 4WD Indicator Light — If
Equipped
This light alerts the driver that the vehicle is
in the four-wheel drive mode, and the front
and rear driveshafts are mechanically locked
together forcing the front and rear wheels to
rotate at the same speed.
— 4WD Low Indicator Light — If
Equipped
This light alerts the driver that the vehicle is
in the four-wheel drive LOW mode. The front
and rear driveshafts are mechanically locked
together forcing the front and rear wheels toGETTING TO KNOW YOUR INSTRUMENT PANEL
82
Page 139 of 372

STARTING AND OPERATING
STARTING THE ENGINE —
GASOLINE ENGINE.............139
Normal Starting Using ENGINE
START/STOP Button ............139
STARTING THE ENGINE —
3.0L DIESEL ENGINE............142
Normal Starting Using ENGINE
STOP/START Button ............142
Extreme Cold Weather ...........145
STARTING THE ENGINE — 6.7L DIESEL
ENGINE................... .146
Keyless Enter-N-Go — Ignition ......146
Extreme Cold Weather ...........148
NORMAL OPERATION — 3.0L DIESEL
ENGINE................... .149
Cold Weather Precautions.........149
Stopping The Engine ............150
NORMAL OPERATION — 6.7L DIESEL
ENGINE................... .151
Cold Weather Precautions.........151
Engine Idling ................151
Stopping The Engine ............152
ENGINE BREAK-IN RECOMMENDATIONS —
GASOLINE ENGINE.............153
ENGINE BREAK-IN RECOMMENDATIONS —
3.0L DIESEL ................ .154
ENGINE BREAK-IN RECOMMENDATIONS —
6.7L DIESEL ................ .154
AUTOMATIC TRANSMISSION ......155
Key Ignition Park Interlock........156
Brake/Transmission Shift Interlock
System ....................156
Eight-Speed Automatic Transmission —
If Equipped .................156
Six-Speed Automatic Transmission —
1500 Models Only (If Equipped) .....158
Six-Speed Automatic Transmission —
2500/3500 Models Only .........160
FOUR-WHEEL DRIVE OPERATION —
IF EQUIPPED............... .162
Electronically Shifted Transfer Case
(Four-Position Switch) — If Equipped .162
Electronically Shifted Transfer Case
(Five-Position Switch) — If Equipped .164 Four-Position Electronically Shifted Transfer
Case (Eight Speed Transmission Only) —
If Equipped
..................166
Five-Position Electronically Shifted Transfer
Case (Eight Speed Transmission Only) —
If Equipped ..................168
AIR SUSPENSION SYSTEM
(1500 MODELS) — IF EQUIPPED . . . .170
Description..................170
Air Suspension Modes ...........171
AIR SUSPENSION SYSTEM (REBEL
MODELS ONLY) — IF EQUIPPED . . . .172
Description..................172
Air Suspension Modes ...........173
AIR SUSPENSION SYSTEM (2500/
3500 MODELS) — IF EQUIPPED .....174
Description..................174
Air Suspension Modes ...........175
SPEED CONTROL..............176
To Activate..................177
To Set A Desired Speed ..........177
To Vary The Speed Setting .........177
STARTING AND OPERATING
137
Page 172 of 372

AIR SUSPENSION SYSTEM
(1500 MODELS) — IF EQUIPPED
Description
The air suspension system provides full time
load leveling capability along with the benefit
of being able to adjust vehicle height by the
push of a button.Automatic height changes will occur based
on vehicle speed and the current vehicle
height. The indicator lamps and instrument
cluster messages will operate the same for
automatic changes and user requested
changes.
•
Normal Ride Height (NRH) – This is the stan-
dard position of the suspension and is
meant for normal driving.
• Off-Road 1 (OR1) (Raises the vehicle approxi-
mately 1 in (26 mm)) - This position should
be the primary position for all off-road driv-
ing until Off Road 2 (OR2) is needed. A
smoother and more comfortable ride will
result. To enter OR1, push the “Up” button
once from the NRH position while the ve-
hicle speed is below 35 mph (56 km/h).
When in the OR1 position, if the vehicle
speed remains between 40 mph (64 km/h)
and 50 mph (80 km/h) for greater than
20 seconds or if the vehicle speed exceeds
50 mph (80 km/h), the vehicle will be
automatically lowered to NRH. Off-Road
1 may not be available due to vehicle pay-
load, an instrument cluster message will be
displayed when this occurs. Refer to “In- strument Cluster Display” in “Getting To
Know Your Instrument Panel” in the Own-
er’s Manual for further information.
• Off-Road 2 (OR2) (Raises the vehicle approxi-
mately 2 in (51 mm)) - This position is
intended for off-roading use only where
maximum ground clearance is required. To
enter OR2, push the “Up” button twice
from the NRH position or once from the
OR1 position while vehicle speed is below
20 mph (32 km/h). While in OR2, if the
vehicle speed exceeds 25 mph (40 km/h)
the vehicle height will be automatically
lowered to OR1. Off-Road 2 may not be
available due to vehicle payload, an instru-
ment cluster message will be displayed
when this occurs. Refer to “Instrument
Cluster Display” in “Getting To Know Your
Instrument Panel” in the Owner’s Manual
for further information.
• Aero Mode (Lowers the vehicle approximately
.6 in [15 mm]) – This position provides
improved aerodynamics by lowering the ve-
hicle. The vehicle will automatically enter
Aero Mode when the vehicle speed remains
between 62 mph (100 km/h) and 66 mph
(106 km/h) for greater than 20 seconds or
1500 Air Suspension Controls
1 — Off-Road 1 Indicator
2 — Off-Road 2 Indicator
3 — Up Button
4 — Down Button
5 — Entry/Exit Mode Indicator
6 — Normal Ride Height Indicator
STARTING AND OPERATING
170
Page 173 of 372
if the vehicle speed exceeds 66 mph
(106 km/h). The vehicle will return to NRH
from Aero Mode if the vehicle speed re-
mains between 30 mph (48 km/h) and
35 mph (56 km/h) for greater than 20 sec-
onds or if the vehicle speed falls below
30 mph (48 km/h).
NOTE:
Automatic Aero Mode may be disabled
through vehicle settings in the instrument
cluster when equipped with Uconnect 3.0, or
your Uconnect Radio when equipped with
Uconnect 5.0, 8.4A, or 8.4AN.
• Entry/Exit Mode (Lowers the vehicle approxi-
mately 2 in (51 mm)) - This position lowers
the vehicle for easier passenger entry and
exit as well as lowering the rear of the
vehicle for easier loading and unloading of
cargo. To enter Entry/Exit Mode, push the
“Down” button once from the NHR while
the vehicle speed is below 33 mph (53 km/
h). Once the vehicle speed goes below
15 mph (24 km/h) the vehicle height will
begin to lower. If the vehicle speed remains
between 15 mph (24 km/h) and 25 mph
(40 km/h) for greater than 60 seconds, or the vehicle speed exceeds 25 mph
(40 km/h) the Entry/Exit change will be
cancelled. To return to Normal Height
Mode, push the “Up” button once while in
Entry/Exit or drive the vehicle over 15 mph
(24 km/h). Entry/Exit mode may not be
available due to vehicle payload, an instru-
ment cluster message will be displayed
when this occurs. Refer to “Instrument
Cluster Display” in “Getting To Know Your
Instrument Panel” in the Owner’s Manual
for further information.
Air Suspension Modes
The Air Suspension system has multiple
modes to protect the system in unique situa-
tions:
AERO Mode
To improve aerodynamics, the air suspension
system has a feature which will put the ve-
hicle into AERO height automatically. Refer
to “Instrument Cluster Display” in “Getting
To Know Your Instrument Panel” in the Own-
er’s Manual for further information.
NOTE:
This mode is intended to be enabled with
engine running.
Tire/Jack Mode
To assist with changing a tire, the air suspen-
sion system has a feature which allows the
automatic leveling to be disabled. Refer to
“Instrument Cluster Display” in “Getting To
Know Your Instrument Panel” in the Owner’s
Manual for further information.
NOTE:
This mode is intended to be enabled with
engine running.
Transport Mode
For towing your vehicle with four wheels off
the ground, the air suspension system has a
feature which will put the vehicle into Entry/
Exit height and disable the automatic load
leveling system. Refer to “Instrument Cluster
Display” in “Getting To Know Your Instru-
ment Panel” in the Owner’s Manual for fur-
ther information.
171
Page 174 of 372

NOTE:
This mode is intended to be enabled with
engine running.
Wheel Alignment Mode
Before performing a wheel alignment, this
mode must be enabled. Refer to “Instrument
Cluster Display” in “Getting To Know Your
Instrument Panel” in the Owner’s Manual for
further information.
NOTE:
This mode is intended to be enabled with
engine running.
Protection Strategy
In order to “protect” the air suspension sys-
tem, the vehicle will disable load leveling as
required (suspension overloaded, battery
charge low, etc.). Load leveling will automati-
cally resume as soon as system operation
requirements are met. See your authorized
dealer if system does not resume.
NOTE:
If towing with air suspension refer to “Trailer
Towing” in “Starting And Operating” for fur-
ther information.AIR SUSPENSION SYSTEM (REBEL
MODELS ONLY) — IF EQUIPPED
Description
The air suspension system provides full time
load leveling capability along with the benefit
of being able to adjust vehicle height by the
push of a button.
Automatic height changes will occur based
on vehicle speed and the current vehicle
height. The indicator lamps and instrument
cluster messages will operate the same for
automatic changes and user requested
changes.NOTE:
The vehicle will automatically enter Aero Mode
when the vehicle speed remains between
62 mph (100 km/h) and 66 mph (106 km/h)
for greater than 20 seconds or if the vehicle
speed exceeds 66 mph (106 km/h).
Rebel Air Suspension Controls
1 — Normal Ride Height Indicator
Lamp
2 — Off-Road Indicator Lamp
3 — Up Button
4 — Down Button
5 — Entry/Exit Mode Indicator Lamp
6 — Aero Mode Indicator Lamp
STARTING AND OPERATING
172
Page 175 of 372
•Normal Ride Height (NRH) – This is the stan-
dard position of the suspension and is
meant for normal driving.
• Off-Road (OR) (Raises the vehicle approxi-
mately 1 in (26 mm)) – This position is
intended for off-roading use only where
maximum ground clearance is required. To
enter OR, push the “Up” button once from
the NRH position while vehicle speed is
below 20 mph (32 km/h). While in OR, if
the vehicle speed exceeds 25 mph
(40 km/h) the vehicle height will be auto-
matically lowered to NRH. Off-Road may
not be available due to vehicle payload, an
instrument cluster display message will be
shown when this occurs. Refer to “Instru-
ment Cluster Display” in “Getting To Know
Your Instrument Panel” in your Owner’s
Manual for further information.
• Aero Mode (Lowers the vehicle approximately
.6 in (15 mm)) – This position provides
improved aerodynamics by lowering the ve-
hicle. The vehicle will automatically enter
Aero Mode when the vehicle speed remains
between 62 mph (100 km/h) and 66 mph
(106 km/h) for greater than 20 seconds or
if the vehicle speed exceeds 66 mph (106 km/h). The vehicle will return to NRH
from Aero Mode if the vehicle speed re-
mains between 30 mph (48 km/h) and
35 mph (56 km/h) for greater than 20 sec-
onds or if the vehicle speed falls below
30 mph (48 km/h).
To enter Aero Mode manually push the down
button once from NRH at any vehicle speed.
To return to NRH push the up button once
while vehicle speed is less than 56 mph
(90 km/h).
NOTE:
Automatic Aero Mode may be disabled
through vehicle settings on your Uconnect
Radio when equipped with UConnect 5.0,
8.4A, or 8.4AN. Refer to “Uconnect Set-
tings” in “Multimedia” in your Owner’s
Manual for further information.
• Entry/Exit Mode (Lowers the vehicle approxi-
mately 3 in (73 mm)) – This position lowers
the vehicle for easier passenger entry and
exit as well as lowering the rear of the
vehicle for easier loading and unloading of
cargo. To enter Entry/Exit Mode, push the
“Down” button twice from the NRH while
the vehicle speed is below 33 mph (53 km/ h). Once the vehicle speed goes below
15 mph (24 km/h) the vehicle height will
begin to lower. If the vehicle speed remains
between 15 mph (24 km/h) and 25 mph
(40 km/h) for greater than 60 seconds, or
the vehicle speed exceeds 25 mph
(40 km/h) the Entry/Exit change will be
cancelled. To return to Normal Height
Mode, push the “Up” button twice while in
Entry/Exit or drive the vehicle over 15 mph
(24 km/h). Entry/Exit mode may not be
available due to vehicle payload, an instru-
ment cluster display message will be shown
when this occurs. Refer to “Instrument
Cluster Display” in “Getting To Know Your
Instrument Panel” in your Owner’s Manual
for further information.
Air Suspension Modes
The Air Suspension system has multiple
modes to protect the system in unique situa-
tions:
AERO Mode
To improve aerodynamics, the air suspension
system has a feature which will put the ve-
hicle into AERO height automatically. Refer
173
Page 176 of 372

to “Instrument Cluster Display” in “Getting
To Know Your Instrument Panel” in the Own-
er’s Manual for further information.
NOTE:
This mode is intended to be enabled with
engine running.
Tire/Jack Mode
To assist with changing a tire, the air suspen-
sion system has a feature which allows the
automatic leveling to be disabled. Refer to
“Instrument Cluster Display” in “Getting To
Know Your Instrument Panel” in the Owner’s
Manual for further information.
NOTE:
This mode is intended to be enabled with
engine running.
Transport Mode
For towing your vehicle with four wheels off
the ground, the air suspension system has a
feature which will put the vehicle into Entry/
Exit height and disable the automatic loadleveling system. Refer to “Instrument Cluster
Display” in “Getting To Know Your Instru-
ment Panel” in the Owner’s Manual for fur-
ther information.
NOTE:
This mode is intended to be enabled with
engine running.
Wheel Alignment Mode
Before performing a wheel alignment, this
mode must be enabled. Refer to “Instrument
Cluster Display” in “Getting To Know Your
Instrument Panel” in the Owner’s Manual for
further information.
NOTE:
This mode is intended to be enabled with
engine running.
Protection Strategy
In order to “protect” the air suspension sys-
tem, the vehicle will disable load leveling as
required (suspension overloaded, battery
charge low, etc.). Load leveling will automati-
cally resume as soon as system operation
requirements are met. See your authorized
dealer if system does not resume. NOTE:
If towing with air suspension refer to “Trailer
Towing” in “Starting And Operating” for fur-
ther information.
AIR SUSPENSION SYSTEM
(2500/3500 MODELS) — IF
EQUIPPED
Description
This air suspension system is a rear leveling
ride height system. The main purpose of this
system is to maintain the truck’s rear ride
height level. There are two selectable heights
that can be chosen based on your operating
conditions.
The system requires that the ignition be in
ON/RUN position or the engine running with
zero vehicle speed for all user requested
changes and load leveling.
STARTING AND OPERATING
174