warning Ram 4500 Chassis Cab 2018 User Guide
[x] Cancel search | Manufacturer: RAM, Model Year: 2018, Model line: 4500 Chassis Cab, Model: Ram 4500 Chassis Cab 2018Pages: 298, PDF Size: 5.88 MB
Page 203 of 298

Radial Ply Tires
WARNING!
Combining radial ply tires with other types
of tires on your vehicle will cause your
vehicle to handle poorly. The instability
could cause a collision. Always use radial
ply tires in sets of four. Never combine
them with other types of tires.
Tire Repair
If your tire becomes damaged, it may be
repaired if it meets the following criteria:
• The tire has not been driven on when flat.
• The damage is only on the tread section of your tire (sidewall damage is not repair-
able).
• The puncture is no greater thana¼ofan inch (6 mm).
Consult an authorized tire dealer for tire re-
pairs and additional information. Damaged Run Flat tires, or Run Flat tires that
have experienced a loss of pressure should be
replaced immediately with another Run Flat
tire of identical size and service description
(Load Index and Speed Symbol).
Run Flat Tires — If Equipped
Run Flat tires allow you the capability to drive
50 miles (80 km) at 50 mph (80 km/h) after
a rapid loss of inflation pressure. This rapid
loss of inflation is referred to as the Run Flat
mode. A Run Flat mode occurs when the tire
inflation pressure is of/or below 14 psi
(96 kPa). Once a Run Flat tire reaches the
run flat mode it has limited driving capabili-
ties and needs to be replaced immediately. A
Run Flat tire is not repairable.
It is not recommended driving a vehicle
loaded at full capacity or to tow a trailer while
a tire is in the run flat mode.
See the tire pressure monitoring section for
more information.
Tire Spinning
When stuck in mud, sand, snow, or ice con-
ditions, do not spin your vehicle's wheels
above 30 mph (48 km/h) or for longer than
30 seconds continuously without stopping.
Refer to “Freeing A Stuck Vehicle” in “In
Case Of Emergency” for further information.
WARNING!
Fast spinning tires can be dangerous.
Forces generated by excessive wheel
speeds may cause tire damage or failure. A
tire could explode and injure someone. Do
not spin your vehicle's wheels faster than
30 mph (48 km/h) for more than 30 sec-
onds continuously when you are stuck, and
do not let anyone near a spinning wheel,
no matter what the speed.
201
Page 204 of 298
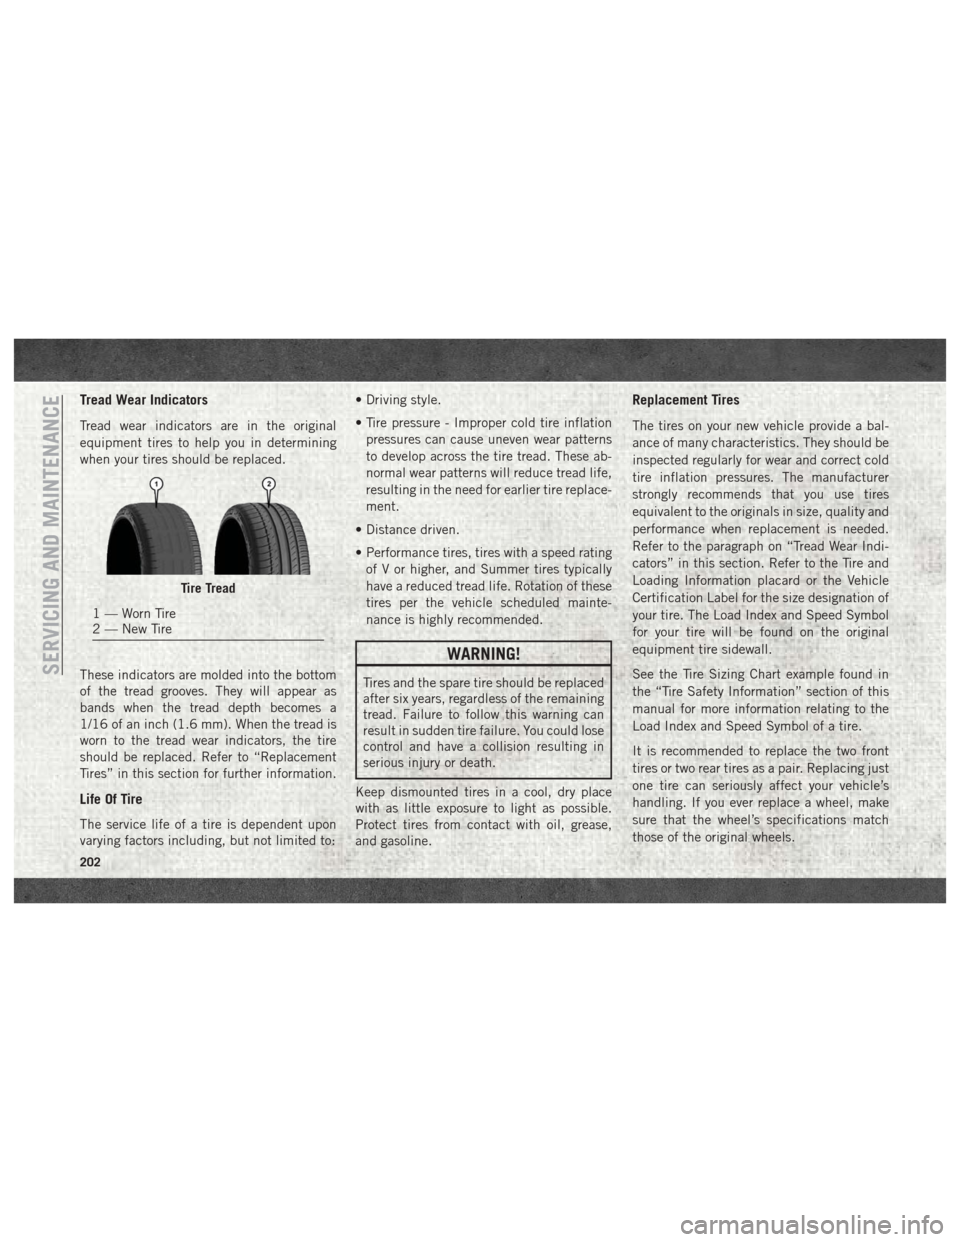
Tread Wear Indicators
Tread wear indicators are in the original
equipment tires to help you in determining
when your tires should be replaced.
These indicators are molded into the bottom
of the tread grooves. They will appear as
bands when the tread depth becomes a
1/16 of an inch (1.6 mm). When the tread is
worn to the tread wear indicators, the tire
should be replaced. Refer to “Replacement
Tires” in this section for further information.
Life Of Tire
The service life of a tire is dependent upon
varying factors including, but not limited to:• Driving style.
• Tire pressure - Improper cold tire inflation
pressures can cause uneven wear patterns
to develop across the tire tread. These ab-
normal wear patterns will reduce tread life,
resulting in the need for earlier tire replace-
ment.
• Distance driven.
• Performance tires, tires with a speed rating of V or higher, and Summer tires typically
have a reduced tread life. Rotation of these
tires per the vehicle scheduled mainte-
nance is highly recommended.
WARNING!
Tires and the spare tire should be replaced
after six years, regardless of the remaining
tread. Failure to follow this warning can
result in sudden tire failure. You could lose
control and have a collision resulting in
serious injury or death.
Keep dismounted tires in a cool, dry place
with as little exposure to light as possible.
Protect tires from contact with oil, grease,
and gasoline.
Replacement Tires
The tires on your new vehicle provide a bal-
ance of many characteristics. They should be
inspected regularly for wear and correct cold
tire inflation pressures. The manufacturer
strongly recommends that you use tires
equivalent to the originals in size, quality and
performance when replacement is needed.
Refer to the paragraph on “Tread Wear Indi-
cators” in this section. Refer to the Tire and
Loading Information placard or the Vehicle
Certification Label for the size designation of
your tire. The Load Index and Speed Symbol
for your tire will be found on the original
equipment tire sidewall.
See the Tire Sizing Chart example found in
the “Tire Safety Information” section of this
manual for more information relating to the
Load Index and Speed Symbol of a tire.
It is recommended to replace the two front
tires or two rear tires as a pair. Replacing just
one tire can seriously affect your vehicle’s
handling. If you ever replace a wheel, make
sure that the wheel’s specifications match
those of the original wheels.
Tire Tread
1 — Worn Tire
2 — New Tire
SERVICING AND MAINTENANCE
202
Page 205 of 298

It is recommended you contact your autho-
rized tire dealer or original equipment dealer
with any questions you may have on tire
specifications or capability. Failure to use
equivalent replacement tires may adversely
affect the safety, handling, and ride of your
vehicle.
WARNING!
• Do not use a tire, wheel size, load rating,or speed rating other than that specified
for your vehicle. Some combinations of
unapproved tires and wheels may
change suspension dimensions and per-
formance characteristics, resulting in
changes to steering, handling, and brak-
ing of your vehicle. This can cause un-
predictable handling and stress to steer-
ing and suspension components. You
could lose control and have a collision
resulting in serious injury or death. Use
only the tire and wheel sizes with load
ratings approved for your vehicle.
• Never use a tire with a smaller load index
or capacity, other than what was origi-
nally equipped on your vehicle. Using a
WARNING!
tire with a smaller load index could re-
sult in tire overloading and failure. You
could lose control and have a collision.
• Failure to equip your vehicle with tires
having adequate speed capability can
result in sudden tire failure and loss of
vehicle control.
CAUTION!
Replacing original tires with tires of a
different size may result in false speedom-
eter and odometer readings.
Tire Types
All Season Tires — If Equipped
All Season tires provide traction for all sea-
sons (Spring, Summer, Fall, and Winter).
Traction levels may vary between different all
season tires. All season tires can be identified
by the M+S, M&S, M/S or MS designation on
the tire sidewall. Use all season tires only in
sets of four; failure to do so may adversely
affect the safety and handling of your vehicle.
Summer Or Three Season Tires —
If Equipped
Summer tires provide traction in both wet
and dry conditions, and are not intended to
be driven in snow or on ice. If your vehicle is
equipped with Summer tires, be aware these
tires are not designed for Winter or cold
driving conditions. Install Winter tires on your
vehicle when ambient temperatures are less
than 40°F (5°C) or if roads are covered with
ice or snow. For more information, contact an
authorized dealer.
Summer tires do not contain the all season
designation or mountain/snowflake symbol
on the tire sidewall. Use Summer tires only in
sets of four; failure to do so may adversely
affect the safety and handling of your vehicle.
WARNING!
Do not use Summer tires in snow/ice con-
ditions. You could lose vehicle control,
resulting in severe injury or death. Driving
too fast for conditions also creates the
possibility of loss of vehicle control.
203
Page 207 of 298

Since this tire has limited tread life, the
original equipment tire should be repaired (or
replaced) and reinstalled on your vehicle at
the first opportunity.
Do not install a wheel cover or attempt to
mount a conventional tire on the compact
spare wheel, since the wheel is designed
specifically for the compact spare tire. Do not
install more than one compact spare tire and
wheel on the vehicle at any given time.
WARNING!
Compact and collapsible spares are for
temporary emergency use only. With these
spares, do not drive more than 50 mph
(80 km/h). Temporary use spares have lim-
ited tread life. When the tread is worn to
the tread wear indicators, the temporary
use spare tire needs to be replaced. Be
sure to follow the warnings, which apply to
your spare. Failure to do so could result in
spare tire failure and loss of vehicle con-
trol.
Collapsible Spare Tire — If Equipped
The collapsible spare is for temporary emer-
gency use only. You can identify if your ve-
hicle is equipped with a collapsible spare by
looking at the spare tire description on the
Tire and Loading Information Placard located
on the driver’s side door opening or on the
sidewall of the tire.
Collapsible spare tire description example:
165/80-17 101P.
Since this tire has limited tread life, the
original equipment tire should be repaired (or
replaced) and reinstalled on your vehicle at
the first opportunity.
Inflate collapsible tire only after the wheel is
properly installed to the vehicle. Inflate the
collapsible tire using the electric air pump
before lowering the vehicle.
Do not install a wheel cover or attempt to
mount a conventional tire on the collapsible
spare wheel, since the wheel is designed
specifically for the collapsible spare tire.WARNING!
Compact and Collapsible spares are for
temporary emergency use only. With these
spares, do not drive more than 50 mph
(80 km/h). Temporary use spares have lim-
ited tread life. When the tread is worn to
the tread wear indicators, the temporary
use spare tire needs to be replaced. Be
sure to follow the warnings, which apply to
your spare. Failure to do so could result in
spare tire failure and loss of vehicle con-
trol.
Full Size Spare — If Equipped
The full size spare is for temporary emer-
gency use only. This tire may look like the
originally equipped tire on the front or rear
axle of your vehicle, but it is not. This spare
tire may have limited tread life. When the
tread is worn to the tread wear indicators, the
temporary use full size spare tire needs to be
replaced. Since it is not the same as your
original equipment tire, replace (or repair)
the original equipment tire and reinstall on
the vehicle at the first opportunity.
205
Page 208 of 298

Limited Use Spare — If Equipped
The limited use spare tire is for temporary
emergency use only. This tire is identified by
a label located on the limited use spare
wheel. This label contains the driving limita-
tions for this spare. This tire may look like the
original equipped tire on the front or rear axle
of your vehicle, but it is not. Installation of
this limited use spare tire affects vehicle
handling. Since it is not the same as your
original equipment tire, replace (or repair)
the original equipment tire and reinstall on
the vehicle at the first opportunity.
WARNING!
Limited use spares are for emergency use
only. Installation of this limited use spare
tire affects vehicle handling. With this tire,
do not drive more than the speed listed on
the limited use spare wheel. Keep inflated
to the cold tire inflation pressures listed on
your Tire and Loading Information Placard
located on the driver’s side B-Pillar or the
rear edge of the driver’s side door. Replace
(or repair) the original equipment tire at
the first opportunity and reinstall it on your
WARNING!
vehicle. Failure to do so could result in
loss of vehicle control.
Wheel And Wheel Trim Care
All wheels and wheel trim, especially alumi-
num and chrome plated wheels, should be
cleaned regularly using mild (neutral Ph)
soap and water to maintain their luster and to
prevent corrosion. Wash wheels with the
same soap solution recommended for the
body of the vehicle.
Your wheels are susceptible to deterioration
caused by salt, sodium chloride, magnesium
chloride, calcium chloride, etc., and other
road chemicals used to melt ice or control
dust on dirt roads. Use a soft cloth or sponge
and mild soap to wipe away promptly. Do not
use harsh chemicals or a stiff brush. They
can damage the wheel’s protective coating
that helps keep them from corroding and
tarnishing.
CAUTION!
Avoid products or automatic car washes
that use acidic solutions or strong alkaline
additives or harsh brushes. Many aftermar-
ket wheel cleaners and automatic car
washes may damage the wheel's protective
finish. Such damage is not covered by the
New Vehicle Limited Warranty. Only car
wash soap, Mopar Wheel Cleaner or
equivalent is recommended.
When cleaning extremely dirty wheels includ-
ing excessive brake dust, care must be taken
in the selection of tire and wheel cleaning
chemicals and equipment to prevent damage
to the wheels. Mopar Wheel Treatment or
Mopar Chrome Cleaner or their equivalent is
recommended or select a non-abrasive, non-
acidic cleaner for aluminum or chrome
wheels.
CAUTION!
Do not use scouring pads, steel wool, a
bristle brush, metal polishes or oven
cleaner. These products may damage the
SERVICING AND MAINTENANCE
206
Page 210 of 298

fied government test surfaces of as-
phalt and concrete. A tire marked C
may have poor traction performance.
WARNING!
The traction grade assigned to this
tire is based on straight-ahead brak-
ing traction tests, and does not in-
clude acceleration, cornering, hy-
droplaning, or peak traction
characteristics.
Temperature Grades
The Temperature grades are A (the
highest), B, and C, representing the
tire's resistance to the generation of
heat and its ability to dissipate heat,
when tested under controlled condi-
tions on a specified indoor laboratory
test wheel.
Sustained high temperature can cause
the material of the tire to degenerate
and reduce tire life, and excessive
temperature can lead to sudden tire
failure. The grade C corresponds to a
level of performance, which all pas-
senger vehicle tires must meet underthe Federal Motor Vehicle Safety Stan-
dard No. 109. Grades B and A repre-
sent higher levels of performance on
the laboratory test wheel, than the
minimum required by law.
WARNING!
The temperature grade for this tire
is established for a tire that is prop-
erly inflated and not overloaded. Ex-
cessive speed, under-inflation, or
excessive loading, either separately
or in combination, can cause heat
buildup and possible tire failure.
SERVICING AND MAINTENANCE
208
Page 213 of 298
Retighten the wheel nuts in the same se-
quence to the torques listed in the table. Go
through the sequence a second time to verify
that specific torque has been achieved. Re-
tighten to specifications after 25 miles
(40 km) and check the lug nut/bolt torque to
be sure that all the lug nuts/bolts are properly
seated against the wheel.
It is recommended that wheel stud nuts be
kept torqued to specifications at all times.
Torque wheel stud nuts to specifications at
each lubrication interval.
All wheel nuts should be tightened occasion-
ally to eliminate the possibility of wheel studs
being sheared or the bolt holes in the wheels
becoming elongated. This is especially im-
portant during the first few hundred miles/
kilometers of operation to allow the wheel
nuts to become properly set. All wheel nuts
should first be firmly seated against the
wheel. The wheel nuts should then be tight-
ened to recommended torque. Tighten the
wheel nuts to final torque in increments.Progress around the bolt circle, tightening
the wheel nut opposite to the wheel nut just
previously tightened until final torque is
achieved.
WARNING!
To avoid the risk of forcing the vehicle off
the jack, do not tighten the lug nuts fully
until the vehicle has been lowered. Failure
to follow this warning may result in per-
sonal injury.
Dual Rear Wheels
Slots in the wheels will assist in properly
orienting the inner and outer wheels. Align
these slots when assembling the wheels for
best access to the tire valve on the inner
wheel. The tires of both dual wheels must be
completely off the ground when tightening to
insure wheel centering and maximum wheel
clamping.
Dual wheel models require a special heavy-
duty lug nut tightening adapter (included
with the vehicle) to correctly tighten the lug
nuts. Also, when it is necessary to remove and
install dual rear wheels, use a proper vehicle
lifting device.
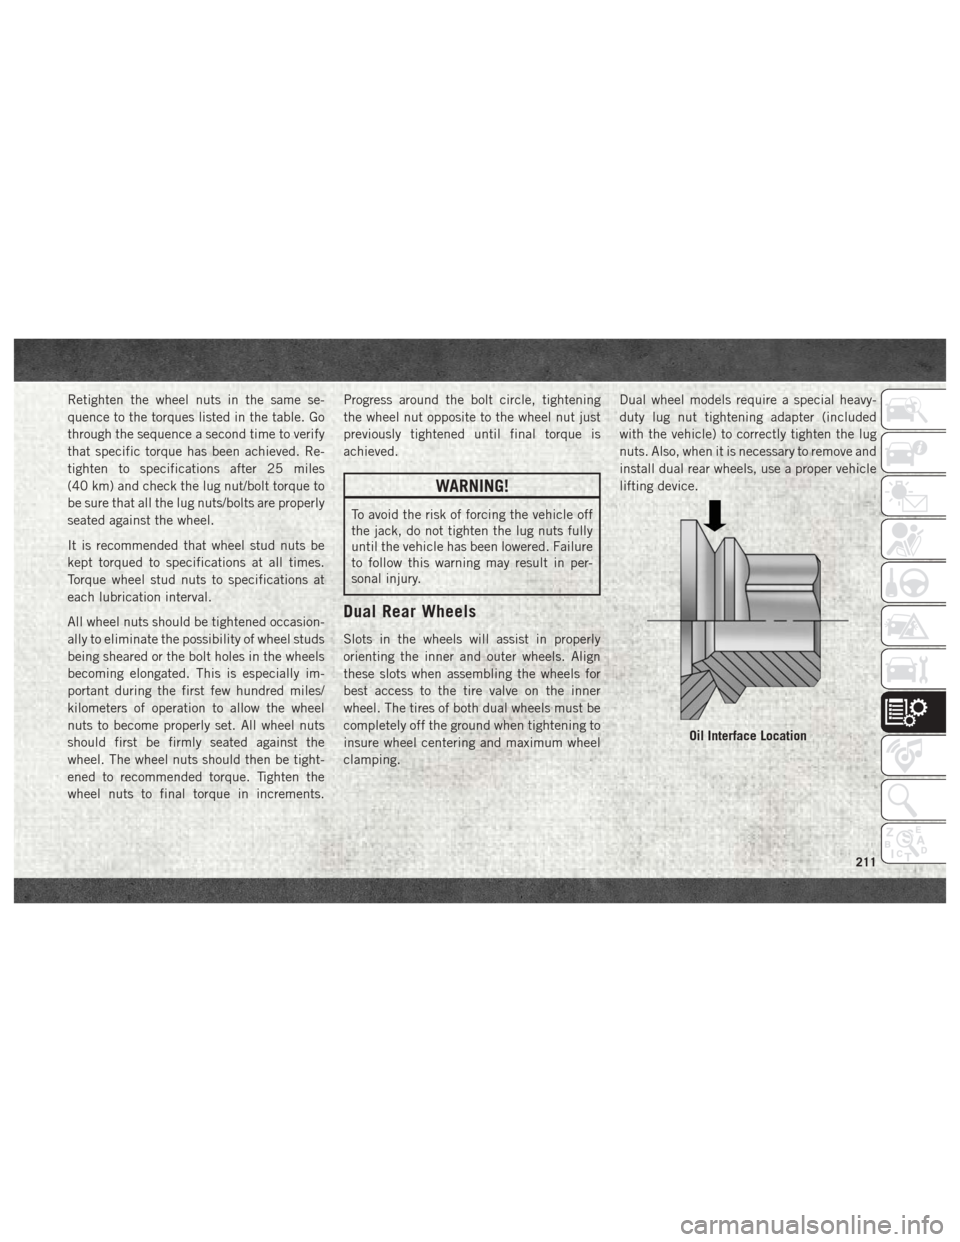
Oil Interface Location
211
Page 225 of 298
CYBERSECURITY
Your vehicle may be a connected vehicle and
may be equipped with both wired and wire-
less networks. These networks allow your ve-
hicle to send and receive information. This
information allows systems and features in
your vehicle to function properly.
Your vehicle may be equipped with certain
security features to reduce the risk of unau-
thorized and unlawful access to vehicle sys-
tems and wireless communications. Vehicle
software technology continues to evolve over
time and FCA US LLC, working with its sup-
pliers, evaluates and takes appropriate steps
as needed. Similar to a computer or other
devices, your vehicle may require software
updates to improve the usability and perfor-
mance of your systems or to reduce the po-
tential risk of unauthorized and unlawful ac-
cess to your vehicle systems.
The risk of unauthorized and unlawful access
to your vehicle systems may still exist, even if
the most recent version of vehicle software
(such as Uconnect software) is installed.
WARNING!
• It is not possible to know or to predict allof the possible outcomes if your vehi-
cle’s systems are breached. It may be
possible that vehicle systems, including
safety related systems, could be im-
paired or a loss of vehicle control could
occur that may result in an accident
involving serious injury or death.
• ONLY insert media (e.g., USB, SD card,
or CD) into your vehicle if it came from a
trusted source. Media of unknown origin
could possibly contain malicious soft-
ware, and if installed in your vehicle, it
may increase the possibility for vehicle
systems to be breached.
• As always, if you experience unusual
vehicle behavior, take your vehicle to
your nearest authorized dealer immedi-
ately.
NOTE:
• FCA US LLC or your dealer may contact you directly regarding software updates. • To help further improve vehicle security and
minimize the potential risk of a security
breach, vehicle owners should: – Routinely check
www.driveuconnect.com/
software-update to learn about
available Uconnect software updates.
– Only connect and use trusted media devices (e.g. personal mobile phones,
USBs, CDs).
Privacy of any wireless and wired communi-
cations cannot be assured. Third parties may
unlawfully intercept information and private
communications without your consent. For
further information, refer to “Data Collection
& Privacy” in “Uconnect + SiriusXM Guard-
ian” in your Uconnect Owner's Manual
Supplement and “Onboard Diagnostic Sys-
tem (OBD II) Cybersecurity” in “Getting To
Know Your Instrument Panel” in your Owner’s
Manual at www.mopar.com/en-us/care/
owners-manual.html (U.S Residents) or
www.owners.mopar.ca (Canadian Residents)
for further information.
223
Page 241 of 298
WARNING!
ALWAYS drive safely with your hands on
the wheel. You have full responsibility and
assume all risks related to the use of the
Uconnect features, SiriusXM Guardian
services, and applications in this vehicle.
Only use Uconnect features and SiriusXM
Guardian services when it is safe to do so.
Failure to do so may result in an accident
involving serious injury or death.
CAUTION!
Do NOT attach any object to the touch-
screen, doing so can result in damage to
the screen.
NOTE:
Uconnect screen images are for illustration
purposes only and may not reflect exact soft-
ware for your vehicle. Setting The Time
• Model 4C NAV synchronizes time automati-
cally via GPS, so it should not require any
time adjustment. If you do need to set the
time manually, follow the instructions be-
low for Model 4C NAV.
• For Model 4C, turn the unit on, and then press the time display at the top of the
screen. Press “Yes.”
• If the time is not displayed at the top of the screen, press the “Settings” button on the
touchscreen. In the Settings screen, press
the “Clock” button on the touchscreen,
then check or uncheck this option.
• Press “+” or “–” next to Set Time Hours and Set Time Minutes to adjust the time.
• If these features are not available, uncheck the Sync Time box.
• Press “X” to save your settings and exit out of the Clock Setting screen. Background Themes
• Screen background themes are selectable
from a pre-loaded list of themes. If you’d
like to set a theme, follow the instructions
below.
• Press the “Settings” button on the touch- screen.
• Press the “Display” button on the touch- screen.
• Then press “Set Theme” button on the touchscreen and select a theme.
Audio Settings
• Press of the “Audio” button on the touch- screen to activate the Audio settings screen
to adjust Balance\Fade, Equalizer, and
Speed Adjusted Volume.
• You can return to the Radio screen by pressing the “X” located at the top right.
239
Page 244 of 298
1. Press the “Apps” button to open the
App screen.
2. Press and hold, then drag the selected App to replace an existing shortcut in the
main menu bar.
The new app shortcut, that was dragged
down onto the main menu bar, will now
be an active App/shortcut.
NOTE:
This feature is only available if the vehicle is
in PARK.
Radio
WARNING!
ALWAYS drive safely with your hands on
the wheel. You have full responsibility and
assume all risks related to the use of the
Uconnect features, SiriusXM Guardian
services, and applications in this vehicle.
Only use Uconnect features and SiriusXM
Guardian services when it is safe to do so.
Failure to do so may result in an accident
involving serious injury or death. • To access the Radio mode, press the “Ra-
dio” button on the touchscreen.
Selecting Radio Stations
• Press the desired radio band (AM, FM or SXM) button on the touchscreen.
Seek Up/Seek Down
• Press the Seek up or down arrow buttons on the touchscreen for less than two seconds
to seek through radio stations.
• Press and hold either arrow button on the touchscreen for more than two seconds to
bypass stations without stopping. The radio
will stop at the next listenable station once
the arrow button on the touchscreen is
released.
Direct Tune
• Tune directly to a radio station by pressing the “Tune” button on the screen, and en-
tering the desired station number. Store Radio Presets Manually
Your radio can store 36 total preset stations,
12 presets per band (AM, FM and SXM). They
are shown at the top of your radio screen. To
see the 12 preset stations per band, press the
arrow button on the touchscreen at the top
right of the screen to toggle between the two
sets of six presets.
To store a radio preset manually, follow the
steps below:
1. Tune to the desired station.
2. Press and hold the desired numbered but-
ton on the touchscreen for more than two
seconds or until you hear a confirmation
beep.
HD Radio — If Equipped
• HD Radio (available on Uconnect 4C/4C NAV) operates similar to conventional radio
except it allows broadcasters to transmit a
high-quality digital signal.
• With an HD radio receiver, the listener is provided with a clear sound that enhances
the listening experience. HD radio can also
transmit data such as song title or artist.
MULTIMEDIA
242