maintenance Ram 4500 Chassis Cab 2018 Owner's Guide
[x] Cancel search | Manufacturer: RAM, Model Year: 2018, Model line: 4500 Chassis Cab, Model: Ram 4500 Chassis Cab 2018Pages: 298, PDF Size: 5.88 MB
Page 204 of 298
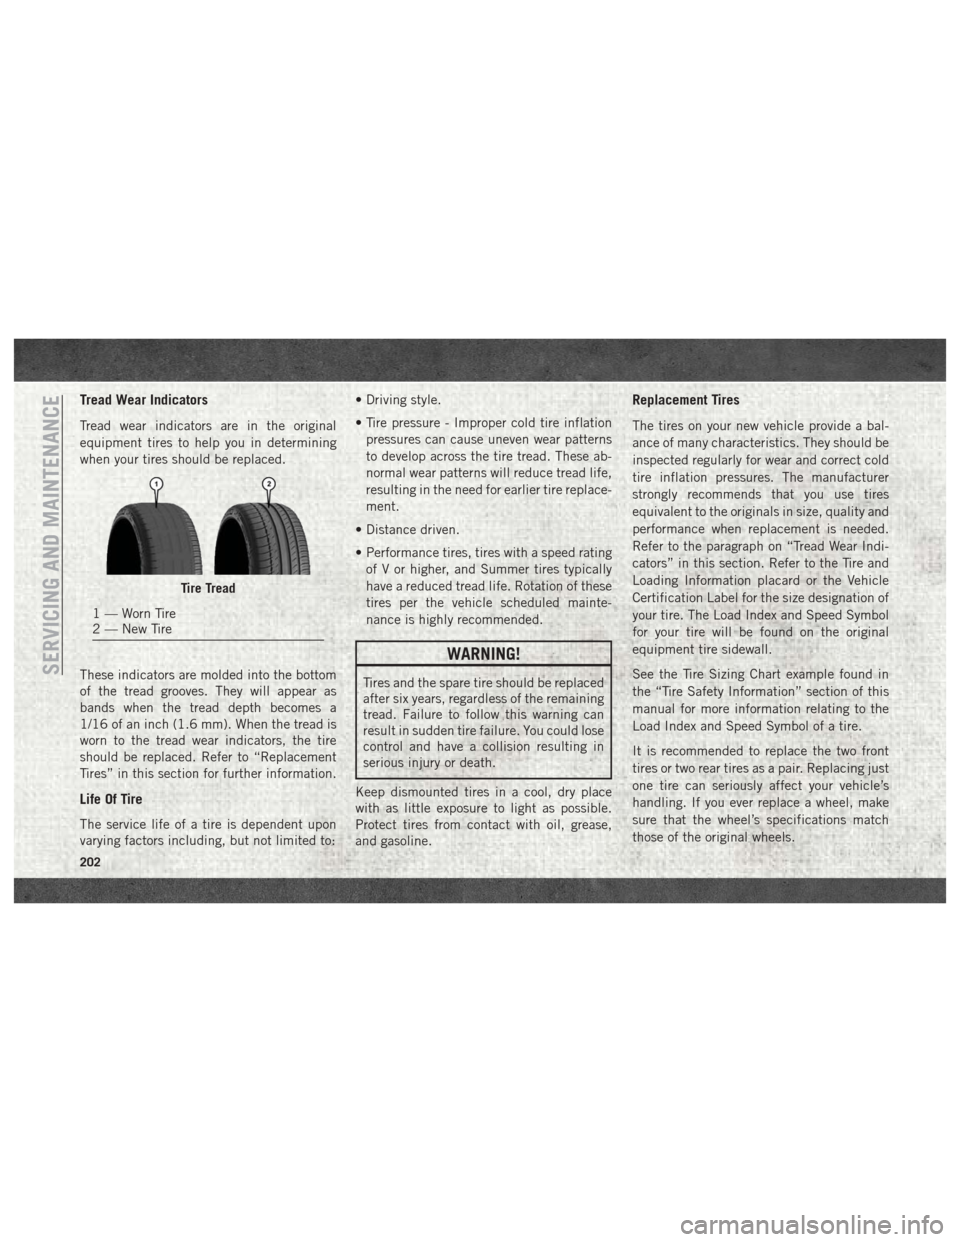
Tread Wear Indicators
Tread wear indicators are in the original
equipment tires to help you in determining
when your tires should be replaced.
These indicators are molded into the bottom
of the tread grooves. They will appear as
bands when the tread depth becomes a
1/16 of an inch (1.6 mm). When the tread is
worn to the tread wear indicators, the tire
should be replaced. Refer to “Replacement
Tires” in this section for further information.
Life Of Tire
The service life of a tire is dependent upon
varying factors including, but not limited to:• Driving style.
• Tire pressure - Improper cold tire inflation
pressures can cause uneven wear patterns
to develop across the tire tread. These ab-
normal wear patterns will reduce tread life,
resulting in the need for earlier tire replace-
ment.
• Distance driven.
• Performance tires, tires with a speed rating of V or higher, and Summer tires typically
have a reduced tread life. Rotation of these
tires per the vehicle scheduled mainte-
nance is highly recommended.
WARNING!
Tires and the spare tire should be replaced
after six years, regardless of the remaining
tread. Failure to follow this warning can
result in sudden tire failure. You could lose
control and have a collision resulting in
serious injury or death.
Keep dismounted tires in a cool, dry place
with as little exposure to light as possible.
Protect tires from contact with oil, grease,
and gasoline.
Replacement Tires
The tires on your new vehicle provide a bal-
ance of many characteristics. They should be
inspected regularly for wear and correct cold
tire inflation pressures. The manufacturer
strongly recommends that you use tires
equivalent to the originals in size, quality and
performance when replacement is needed.
Refer to the paragraph on “Tread Wear Indi-
cators” in this section. Refer to the Tire and
Loading Information placard or the Vehicle
Certification Label for the size designation of
your tire. The Load Index and Speed Symbol
for your tire will be found on the original
equipment tire sidewall.
See the Tire Sizing Chart example found in
the “Tire Safety Information” section of this
manual for more information relating to the
Load Index and Speed Symbol of a tire.
It is recommended to replace the two front
tires or two rear tires as a pair. Replacing just
one tire can seriously affect your vehicle’s
handling. If you ever replace a wheel, make
sure that the wheel’s specifications match
those of the original wheels.
Tire Tread
1 — Worn Tire
2 — New Tire
SERVICING AND MAINTENANCE
202
Page 206 of 298

Snow Tires
Some areas of the country require the use of
snow tires during the Winter. Snow tires can
be identified by a “mountain/snowflake”
symbol on the tire sidewall.If you need snow tires,
select tires equivalent
in size and type to the
original equipment
tires. Use snow tires
only in sets of four;
failure to do so may
adversely affect the
safety and handling of your vehicle.
Snow tires generally have lower speed ratings
than what was originally equipped with your
vehicle and should not be operated at sus-
tained speeds over 75 mph (120 km/h). For
speeds above 75 mph (120 km/h) refer to
original equipment or an authorized tire
dealer for recommended safe operating
speeds, loading and cold tire inflation pres-
sures. While studded tires improve performance on
ice, skid and traction capability on wet or dry
surfaces may be poorer than that of non-
studded tires. Some states prohibit studded
tires; therefore, local laws should be checked
before using these tire types.
Spare Tires — If Equipped
For vehicles equipped with Tire Service Kit
instead of a spare tire, please refer to “Tire
Service Kit” in “In Case Of Emergency” in
the Owner’s Manual at www.mopar.com/
en-us/care/owners-manual.html (U.S. Resi-
dents) or www.owners.mopar.ca (Canadian
Residents) for further information.
CAUTION!
Because of the reduced ground clearance,
do not take your vehicle through an auto-
matic car wash with a compact or limited
use temporary spare installed. Damage to
the vehicle may result.
Spare Tire Matching Original Equipped Tire
And Wheel — If Equipped
Your vehicle may be equipped with a spare
tire and wheel equivalent in look and func-
tion to the original equipment tire and wheel
found on the front or rear axle of your vehicle.
This spare tire may be used in the tire rota-
tion for your vehicle. If your vehicle has this
option, refer to an authorized tire dealer for
the recommended tire rotation pattern.
Compact Spare Tire — If Equipped
The compact spare is for temporary emer-
gency use only. You can identify if your ve-
hicle is equipped with a compact spare by
looking at the spare tire description on the
Tire and Loading Information Placard located
on the driver’s side door opening or on the
sidewall of the tire. Compact spare tire de-
scriptions begin with the letter “T” or “S”
preceding the size designation. Example:
T145/80D18 103M.
T,S=T
emporary Spare Tire
SERVICING AND MAINTENANCE
204
Page 208 of 298

Limited Use Spare — If Equipped
The limited use spare tire is for temporary
emergency use only. This tire is identified by
a label located on the limited use spare
wheel. This label contains the driving limita-
tions for this spare. This tire may look like the
original equipped tire on the front or rear axle
of your vehicle, but it is not. Installation of
this limited use spare tire affects vehicle
handling. Since it is not the same as your
original equipment tire, replace (or repair)
the original equipment tire and reinstall on
the vehicle at the first opportunity.
WARNING!
Limited use spares are for emergency use
only. Installation of this limited use spare
tire affects vehicle handling. With this tire,
do not drive more than the speed listed on
the limited use spare wheel. Keep inflated
to the cold tire inflation pressures listed on
your Tire and Loading Information Placard
located on the driver’s side B-Pillar or the
rear edge of the driver’s side door. Replace
(or repair) the original equipment tire at
the first opportunity and reinstall it on your
WARNING!
vehicle. Failure to do so could result in
loss of vehicle control.
Wheel And Wheel Trim Care
All wheels and wheel trim, especially alumi-
num and chrome plated wheels, should be
cleaned regularly using mild (neutral Ph)
soap and water to maintain their luster and to
prevent corrosion. Wash wheels with the
same soap solution recommended for the
body of the vehicle.
Your wheels are susceptible to deterioration
caused by salt, sodium chloride, magnesium
chloride, calcium chloride, etc., and other
road chemicals used to melt ice or control
dust on dirt roads. Use a soft cloth or sponge
and mild soap to wipe away promptly. Do not
use harsh chemicals or a stiff brush. They
can damage the wheel’s protective coating
that helps keep them from corroding and
tarnishing.
CAUTION!
Avoid products or automatic car washes
that use acidic solutions or strong alkaline
additives or harsh brushes. Many aftermar-
ket wheel cleaners and automatic car
washes may damage the wheel's protective
finish. Such damage is not covered by the
New Vehicle Limited Warranty. Only car
wash soap, Mopar Wheel Cleaner or
equivalent is recommended.
When cleaning extremely dirty wheels includ-
ing excessive brake dust, care must be taken
in the selection of tire and wheel cleaning
chemicals and equipment to prevent damage
to the wheels. Mopar Wheel Treatment or
Mopar Chrome Cleaner or their equivalent is
recommended or select a non-abrasive, non-
acidic cleaner for aluminum or chrome
wheels.
CAUTION!
Do not use scouring pads, steel wool, a
bristle brush, metal polishes or oven
cleaner. These products may damage the
SERVICING AND MAINTENANCE
206
Page 210 of 298

fied government test surfaces of as-
phalt and concrete. A tire marked C
may have poor traction performance.
WARNING!
The traction grade assigned to this
tire is based on straight-ahead brak-
ing traction tests, and does not in-
clude acceleration, cornering, hy-
droplaning, or peak traction
characteristics.
Temperature Grades
The Temperature grades are A (the
highest), B, and C, representing the
tire's resistance to the generation of
heat and its ability to dissipate heat,
when tested under controlled condi-
tions on a specified indoor laboratory
test wheel.
Sustained high temperature can cause
the material of the tire to degenerate
and reduce tire life, and excessive
temperature can lead to sudden tire
failure. The grade C corresponds to a
level of performance, which all pas-
senger vehicle tires must meet underthe Federal Motor Vehicle Safety Stan-
dard No. 109. Grades B and A repre-
sent higher levels of performance on
the laboratory test wheel, than the
minimum required by law.
WARNING!
The temperature grade for this tire
is established for a tire that is prop-
erly inflated and not overloaded. Ex-
cessive speed, under-inflation, or
excessive loading, either separately
or in combination, can cause heat
buildup and possible tire failure.
SERVICING AND MAINTENANCE
208
Page 223 of 298
MULTIMEDIA
CYBERSECURITY..............223
RADIO 3.0 ................. .224
Clock Setting.................225
Audio Setting .................225
Radio Operation ...............225
Disc Operation — If Equipped ......225
USB/Audio Jack (AUX) Manual
Operation ...................226
UCONNECT 3.0 ...............227
Clock Setting.................228
Audio Setting .................228
Radio Operation ...............228
Disc Operation — If Equipped ......228
USB/Audio Jack (AUX) Manual
Operation ...................229
UCONNECT 3 WITH 5-INCH DISPLAY . .230
Controls On The Front Panel .......230
Clock Setting .................231
Equalizer, Balance And Fade .......231
Radio Mode ..................232
Media Mode .................233 Bluetooth Source
..............236
UCONNECT 4C/4C NAV WITH
8.4-INCH DISPLAY .............237
Uconnect 4C/4C NAV At A Glance . . . .238
Personalized Menu Bar ...........241
Radio .....................242
Android Auto .................243
Apple CarPlay Integration .........246
SIRIUSXM GUARDIAN —
IF EQUIPPED................ .248
SiriusXM Guardian — If Equipped
(Available on Uconnect 4C NAV) .....248
SiriusXM Guardian Activation ......249
Download The Uconnect App .......250
Renewing Subscriptions
(Uconnect 4C NAV) .............250
Maintaining Your SiriusXM Guardian
Account ...................250
Built-In Features ..............250
SiriusXM Guardian Remote Features . .253
UCONNECT SETTINGS ...........256 TIPS CONTROLS AND GENERAL
INFORMATION
............... .257
Steering Wheel Audio Controls ......257
Reception Conditions ............257
Care And Maintenance ...........257
Anti-Theft Protection ............257
IPOD/USB/MEDIA PLAYER CONTROL . .257
Audio Jack (AUX)..............258
USB Port ...................258
Bluetooth Streaming Audio ........259
NAVIGATION................ .259
Changing The Navigation Voice Prompt
Volume....................259
Finding Points Of Interest .........261
Finding A Place By Spelling The Name .261
One-Step Voice Destination Entry . . . .261
Setting Your Home Location ........261
Home .....................261
Adding A Stop ................262
Taking A Detour ...............262
SiriusXM Traffic Plus (4C NAV) .....262
SiriusXM Travel Link (4C NAV) ......263
MULTIMEDIA
221
Page 259 of 298
TIPS CONTROLS AND GENERAL
INFORMATION
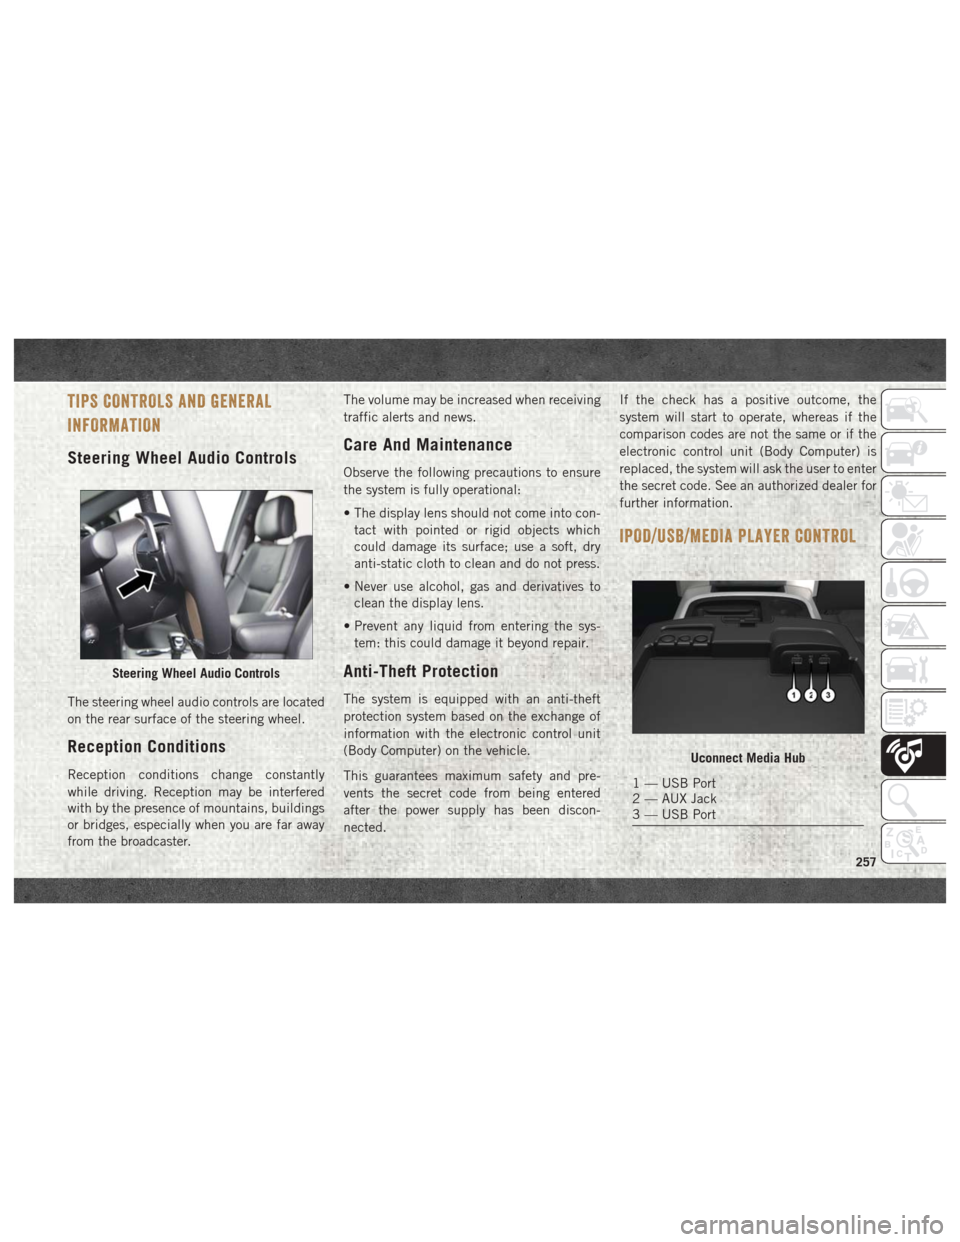
Steering Wheel Audio Controls
The steering wheel audio controls are located
on the rear surface of the steering wheel.
Reception Conditions
Reception conditions change constantly
while driving. Reception may be interfered
with by the presence of mountains, buildings
or bridges, especially when you are far away
from the broadcaster.The volume may be increased when receiving
traffic alerts and news.
Care And Maintenance
Observe the following precautions to ensure
the system is fully operational:
• The display lens should not come into con-
tact with pointed or rigid objects which
could damage its surface; use a soft, dry
anti-static cloth to clean and do not press.
• Never use alcohol, gas and derivatives to clean the display lens.
• Prevent any liquid from entering the sys- tem: this could damage it beyond repair.
Anti-Theft Protection
The system is equipped with an anti-theft
protection system based on the exchange of
information with the electronic control unit
(Body Computer) on the vehicle.
This guarantees maximum safety and pre-
vents the secret code from being entered
after the power supply has been discon-
nected. If the check has a positive outcome, the
system will start to operate, whereas if the
comparison codes are not the same or if the
electronic control unit (Body Computer) is
replaced, the system will ask the user to enter
the secret code. See an authorized dealer for
further information.
IPOD/USB/MEDIA PLAYER CONTROL
Steering Wheel Audio Controls
Uconnect Media Hub
1 — USB Port
2 — AUX Jack
3 — USB Port
257
Page 280 of 298
Register (4C NAV)
To unlock the full potential of SiriusXM
Guardian in your vehicle, you must activate
your SiriusXM Guardian services.
1. Press the Apps icon on the bottom of yourin-vehicle touchscreen.
2. Select the Activate Services icon from your list of apps.
3. Select “Customer Care” to speak with a SiriusXM Guardian Customer Care agent
who will activate services in your vehicle,
or select “Enter Email” to activate on the
web.
• U.S. residents visit: www.siriusxm.com/guardian.
• Canadian residents visit: www.siriusxm.com/guardian/ca.
Vehicle Health Report/Alert
(4C NAV)
Your vehicle will send you a monthly email
report, which summarizes the performance of
your vehicle’s key systems so you can stay on
top of your vehicle’s maintenance needs if
you are registered for SiriusXM Guardian.
Your vehicle will also send you Vehicle Health
Alerts when it detects issues with its key
systems that need your attention. For further
information go to the Owner Site website at
www.mopar.com/en-us/care/owners-manual.html
(U.S. residents) or www.owners.mopar.ca
(Canadian Residents).
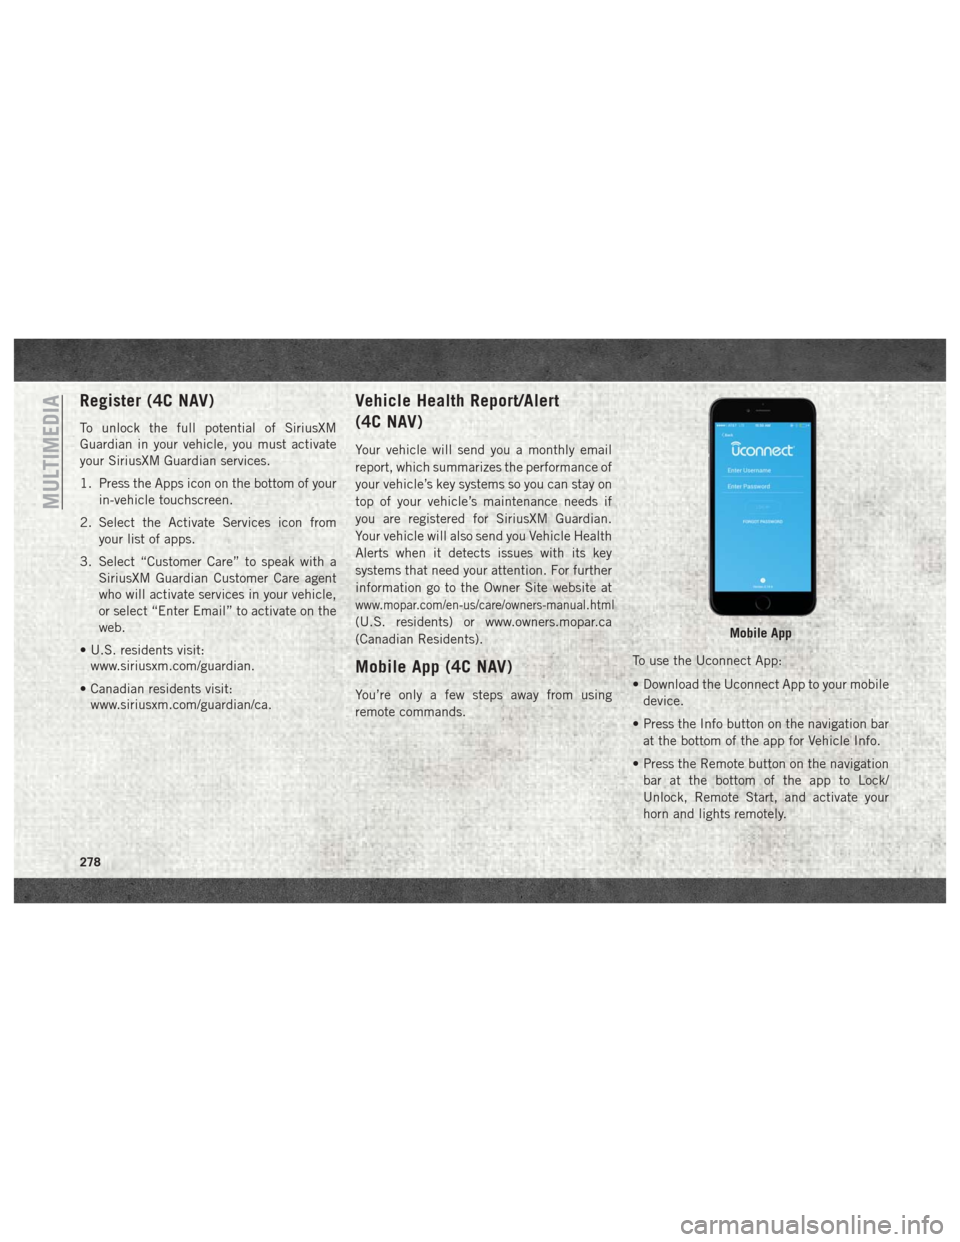
Mobile App (4C NAV)
You’re only a few steps away from using
remote commands. To use the Uconnect App:
• Download the Uconnect App to your mobile
device.
• Press the Info button on the navigation bar at the bottom of the app for Vehicle Info.
• Press the Remote button on the navigation bar at the bottom of the app to Lock/
Unlock, Remote Start, and activate your
horn and lights remotely.
Mobile App
MULTIMEDIA
278
Page 291 of 298
Accessories..................219
Mopar ...................219
Adding Fuel ..............138, 139
Additives, Fuel ................139
Adjustable Pedals ...............29
Air Bag Air Bag Operation .............90
Air Bag Warning Light ..........87
Enhanced Accident Response . .94, 171
Event Data Recorder (EDR) ......171
If A Deployment Occurs .........94
Knee Impact Bolsters ..........90
Maintaining Your Air Bag System . . .95
Transporting Pets ............115
Air Bag Light ............61, 87, 116
Air Bag Maintenance .............95
Air Cleaner, Engine (Engine Air Cleaner Filter) .......186
Air Conditioning Filter ............44
Air Conditioning, Operating Tips ......44
Air Conditioning System ...........43
Air Filter ...................186
Air Pressure, Tires ..............200
Alarm, Panic ..................15
Alarm (Security Alarm) .........17, 63 Alarm System (Security Alarm)
.......17
Antifreeze (Engine Coolant) Capacities ................213
Anti-Lock Warning Light ...........66
Audio Jack ..................257
Automatic Headlights ............33
Automatic High Beams ...........32
Automatic Temperature Control (ATC) . . .43
Automatic Transmission Fluid Type ............216, 218
Shifting .................129
Axle Fluid ...............216, 218
Back-Up ...................136
Back-Up Camera ..............136
Battery .....................62
Charging System Light .........62
Belts, Seat ..................116
Body Builders Guide ..............2
B-Pillar Location ..............196
Brake Fluid ................. .216
Brake
System
Warning Light ...............61
Brake/Transmission Interlock .......129
Bulb Replacement .............154 Bulbs, Light
..............118, 154
Camera ....................136
Camera, Rear ................136
Capacities, Antifreeze (Engine Coolant) .............213
Capacities, Fluid ..............213
Caps, Filler Oil (Engine) ...............184
Carbon Monoxide Warning .........115
Cargo Light ...................34
Changing A Flat Tire ............160
Chart, Tire Sizing ..............192
Checking Your Vehicle For Safety . . . .115
Checks, Safety ................115
Child Restraint ................96
Child Restraints Booster Seats ...............99
Child Restraints ..............96
Child Seat Installation .....107, 109
How To Stow An Unused
ALR Seat Belt ..............106
Infants And Child Restraints ......97
Locating The LATCH Anchorages . .104
INDEX
289
Page 294 of 298
Security Alarm..............63
Service ..................154
Tire Pressure Monitoring
(TPMS) ................65, 72
Turn Signal ..........34, 68, 118
Warning (Instrument
Cluster Description) ........63, 68
Loading Vehicle Tires ...................196
Low Tire Pressure System ..........72
Lug Nuts ............163, 210, 211
Maintenance Plan ..............180
Maintenance Schedule . . . .174, 178, 180
Malfunction Indicator Light (Check Engine) ...............63
Manual, Service ...............286
Memory Feature (Memory Seat) ......21
Memory Seat ..................21
Memory Seats And Radio ..........21
Mirrors .....................30
Memory ..................21
Monitor, Tire Pressure System .......72
Mopar .....................219
Mopar Accessories .............219
Multi-Function Control Lever ........32Navigation
...........259, 261, 262
Navigation System (Uconnect GPS) . . .136
New Vehicle Break-In Period .......127
Occupant Restraints ...........76, 77
Oil Change Indicator ............178
Oil, Engine ..............214, 216
Capacity .................213
Filter ................214, 216
Pressure Warning Light .........63
Oil Pressure Light ...............63
Onboard Diagnostic System .........69
Operating Precautions ............69
Overheating, Engine ............166
Owner's Manual (Operator Manual) . . .286
Panic Alarm ..................15
ParkSense System, Rear ..........136
Passive Entry .................19
Pedals, Adjustable ..............29
Perform Service Indicator, Reset .....179
Personalized Menu Bar ...........241
Pets ......................115
Phone,
Hands-Free (Uconnect) ......264
Phone (Pairing) ...............266
Phone (Uconnect) ..............264
Placard, Tire And Loading Information .196 Power
Distribution Center (Fuses) ......155
Outlet (Auxiliary
Electrical Outlet) ..........49, 51
Power Steering Fluid ............216
Pregnant Women And Seat Belts ......85
Radial Ply Tires ...............201
Radio Presets ........225, 228, 233, 242
Radio 3.0 ...................224
Radio Frequency General Information ......15, 17, 21
Radio Operation ...............232
Radio Screens ................238
Radio (Sound Systems) ..........232
Rain Sensitive Wiper System ........35
Rear ParkSense System ..........136
Rear Seat, Folding ..............21
Recreational Towing ............147
Shifting Into Transfer Case
Neutral (N) ...............148
Shifting Out Of Transfer Case
Neutral (N) ...............150
Release, Hood .................44
Reminder, Seat Belt .............78
Remote Keyless Entry ............15
INDEX
292
Page 295 of 298
Panic Alarm................15
Remote Starting Exit Remote Start Mode ........17
Replacement Tires .............202
Reporting Safety Defects ..........286
Resetting Perform Service Indicator . . .179
Restraint, Head ................26
Restraints, Child ...............96
Safety Checks Inside Vehicle .......116
Safety Checks Outside Vehicle ......117
Safety Defects, Reporting .........286
Safety, Exhaust Gas .............115
Safety Information, Tire ..........191
Safety Tips ..................115
Schedule, Maintenance ..........174
SD Card Port .................257
Seat Belt Adjustable Upper Shoulder
Belt Anchorage ..............81
Automatic Locking Retractor (ALR) . .85
Lap/Shoulder Belt Operation ......80
Lap/Shoulder Belt Untwisting .....81
Pregnant Women .............85
Seat Belt Extender ............84
Seat Belt Reminder ............78
Seat Belt Reminder ..............78 Seat Belts
................78, 116
Adjustable Shoulder Belt ........81
Adjustable Upper Shoulder
Anchorage .................81
Child Restraint ..............96
Extender ..................84
Front Seat ..............78, 80
Inspection ................116
Operating Instructions .........80
Pregnant Women .............85
Reminder .................61
Untwisting Procedure ..........81
Seats ......................21
Adjustment ................21
Easy Entry ..............21, 23
Heated ...................21
Memory ..................21
Rear Folding ...............21
Seatback Release ............21
Tilting ...................21
Vented ...................21
Ventilated .................21
Security Alarm ..............17,
63
Selection Of Coolant (Antifreeze) .............214, 216
Service Assistance .............284
Service Contract ...............285 Service Manuals
...............286
Shifting ....................128
Automatic Transmission ........129
Transfer Case, Shifting Into
Transfer Case Neutral (N) .......148
Transfer Case, Shifting Out Of
Transfer Case Neutral (N) .......150
Shift Lever Override .............167
Signals, Turn ............34, 68, 118
Sirius Satellite Radio Traffic & Weather ............262
Sirius Travel Link ..............263
SiriusXM Guardian .............248
Account ..................248
In Vehicle Features ...........250
Maintaining Your Account .......250
Registration ...............249
Remote Features ............253
Renewing Subscriptions ........250
Send&Go ................255
Vehicle Finder ..............255
Vehicle Health Alert ..........278
Snow Tires ..................204
Sound Systems (Radio) ........257, 259, 261, 262
Spare Tire ............204, 205, 206
Spark Plugs ..................214
293