bluetooth Ram 4500 Chassis Cab 2018 User Guide
[x] Cancel search | Manufacturer: RAM, Model Year: 2018, Model line: 4500 Chassis Cab, Model: Ram 4500 Chassis Cab 2018Pages: 298, PDF Size: 5.88 MB
Page 160 of 298
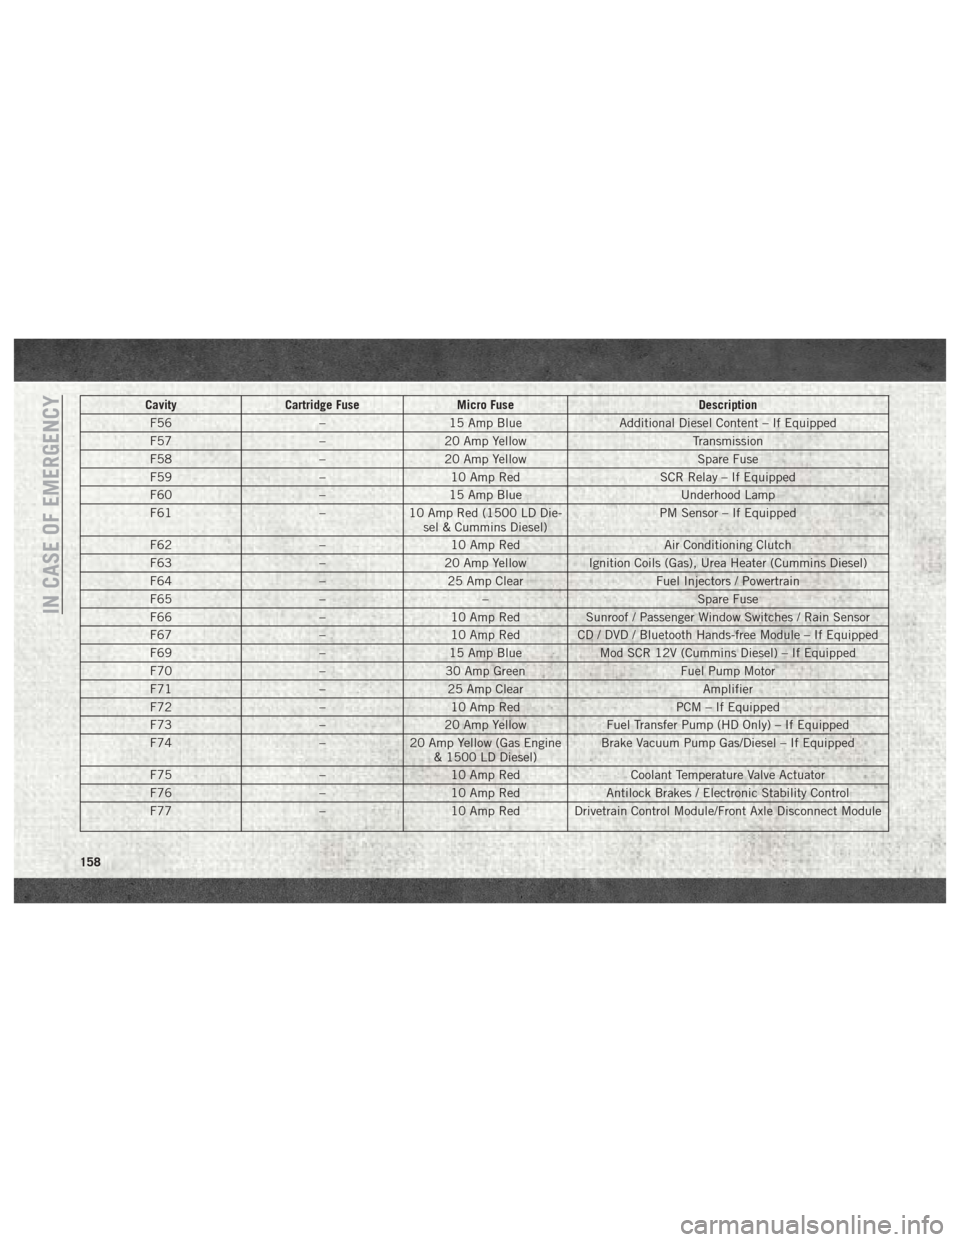
CavityCartridge Fuse Micro Fuse Description
F56 –15 Amp Blue Additional Diesel Content – If Equipped
F57 –20 Amp Yellow Transmission
F58 –20 Amp Yellow Spare Fuse
F59 –10 Amp Red SCR Relay – If Equipped
F60 –15 Amp Blue Underhood Lamp
F61 –10 Amp Red (1500 LD Die-
sel & Cummins Diesel) PM Sensor – If Equipped
F62 –10 Amp Red Air Conditioning Clutch
F63 –20 Amp Yellow Ignition Coils (Gas), Urea Heater (Cummins Diesel)
F64 –25 Amp Clear Fuel Injectors / Powertrain
F65 –– Spare Fuse
F66 –10 Amp Red Sunroof / Passenger Window Switches / Rain Sensor
F67 –10 Amp Red CD / DVD / Bluetooth Hands-free Module – If Equipped
F69 –15 Amp Blue Mod SCR 12V (Cummins Diesel) – If Equipped
F70 –30 Amp Green Fuel Pump Motor
F71 –25 Amp Clear Amplifier
F72 –10 Amp Red PCM – If Equipped
F73 –20 Amp Yellow Fuel Transfer Pump (HD Only) – If Equipped
F74 –20 Amp Yellow (Gas Engine
& 1500 LD Diesel) Brake Vacuum Pump Gas/Diesel – If Equipped
F75 –10 Amp Red Coolant Temperature Valve Actuator
F76 –10 Amp Red Antilock Brakes / Electronic Stability Control
F77 –10 Amp Red Drivetrain Control Module/Front Axle Disconnect Module
IN CASE OF EMERGENCY
158
Page 223 of 298
MULTIMEDIA
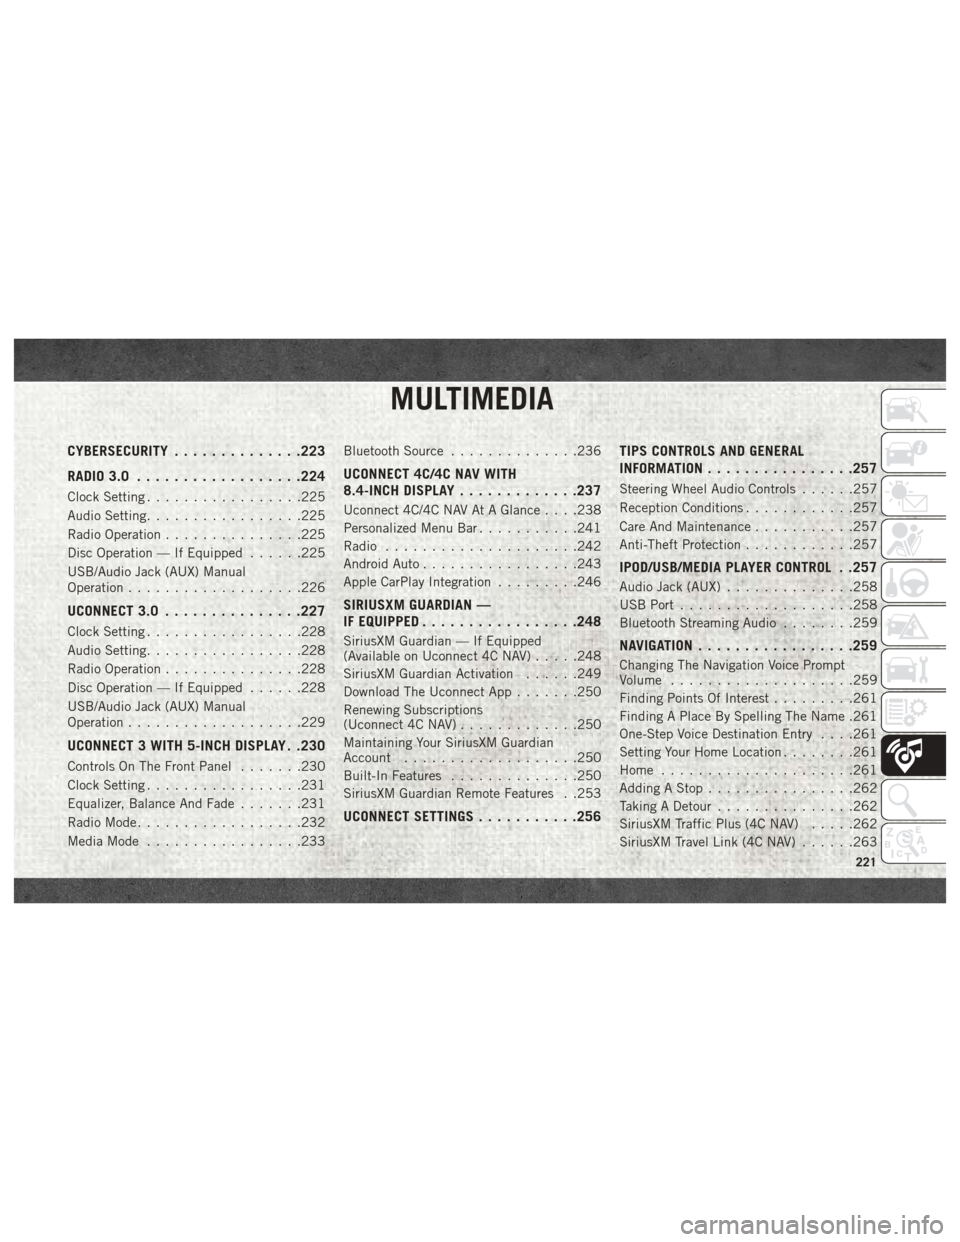
CYBERSECURITY..............223
RADIO 3.0 ................. .224
Clock Setting.................225
Audio Setting .................225
Radio Operation ...............225
Disc Operation — If Equipped ......225
USB/Audio Jack (AUX) Manual
Operation ...................226
UCONNECT 3.0 ...............227
Clock Setting.................228
Audio Setting .................228
Radio Operation ...............228
Disc Operation — If Equipped ......228
USB/Audio Jack (AUX) Manual
Operation ...................229
UCONNECT 3 WITH 5-INCH DISPLAY . .230
Controls On The Front Panel .......230
Clock Setting .................231
Equalizer, Balance And Fade .......231
Radio Mode ..................232
Media Mode .................233 Bluetooth Source
..............236
UCONNECT 4C/4C NAV WITH
8.4-INCH DISPLAY .............237
Uconnect 4C/4C NAV At A Glance . . . .238
Personalized Menu Bar ...........241
Radio .....................242
Android Auto .................243
Apple CarPlay Integration .........246
SIRIUSXM GUARDIAN —
IF EQUIPPED................ .248
SiriusXM Guardian — If Equipped
(Available on Uconnect 4C NAV) .....248
SiriusXM Guardian Activation ......249
Download The Uconnect App .......250
Renewing Subscriptions
(Uconnect 4C NAV) .............250
Maintaining Your SiriusXM Guardian
Account ...................250
Built-In Features ..............250
SiriusXM Guardian Remote Features . .253
UCONNECT SETTINGS ...........256 TIPS CONTROLS AND GENERAL
INFORMATION
............... .257
Steering Wheel Audio Controls ......257
Reception Conditions ............257
Care And Maintenance ...........257
Anti-Theft Protection ............257
IPOD/USB/MEDIA PLAYER CONTROL . .257
Audio Jack (AUX)..............258
USB Port ...................258
Bluetooth Streaming Audio ........259
NAVIGATION................ .259
Changing The Navigation Voice Prompt
Volume....................259
Finding Points Of Interest .........261
Finding A Place By Spelling The Name .261
One-Step Voice Destination Entry . . . .261
Setting Your Home Location ........261
Home .....................261
Adding A Stop ................262
Taking A Detour ...............262
SiriusXM Traffic Plus (4C NAV) .....262
SiriusXM Travel Link (4C NAV) ......263
MULTIMEDIA
221
Page 224 of 298
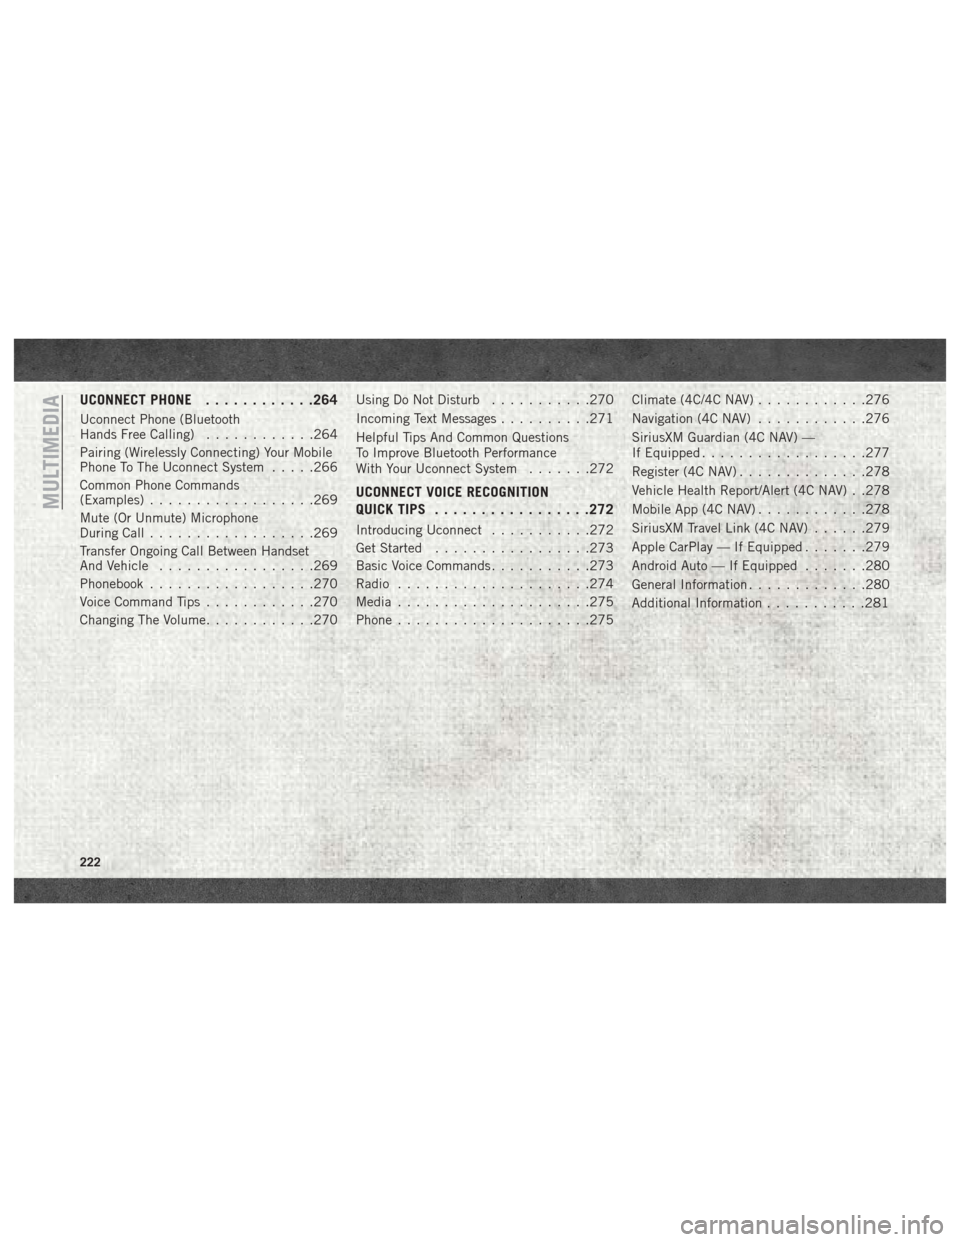
UCONNECT PHONE............264
Uconnect Phone (Bluetooth
Hands Free Calling) ............264
Pairing (Wirelessly Connecting) Your Mobile
Phone To The Uconnect System .....266
Common Phone Commands
(Examples) ..................269
Mute (Or Unmute) Microphone
During Call ..................269
Transfer Ongoing Call Between Handset
And Vehicle .................269
Phonebook ..................270
Voice Command Tips ............270
Changing The Volume ............270 Using Do Not Disturb
...........270
Incoming Text Messages ..........271
Helpful Tips And Common Questions
To Improve Bluetooth Performance
With Your Uconnect System .......272
UCONNECT VOICE RECOGNITION
QUICK TIPS................ .272
Introducing Uconnect...........272
Get Started .................273
Basic Voice Commands ...........273
Radio .....................274
Media .....................275
Phone .....................275 Climate (4C/4C NAV)
............276
Navigation (4C NAV) ............276
SiriusXM Guardian (4C NAV) —
If Equipped ..................277
Register (4C NAV) ..............278
Vehicle Health Report/Alert (4C NAV) . .278
Mobile App (4C NAV) ............278
SiriusXM Travel Link (4C NAV) ......279
Apple CarPlay — If Equipped .......279
Android Auto — If Equipped .......280
General Information .............280
Additional Information ...........281
MULTIMEDIA
222
Page 236 of 298
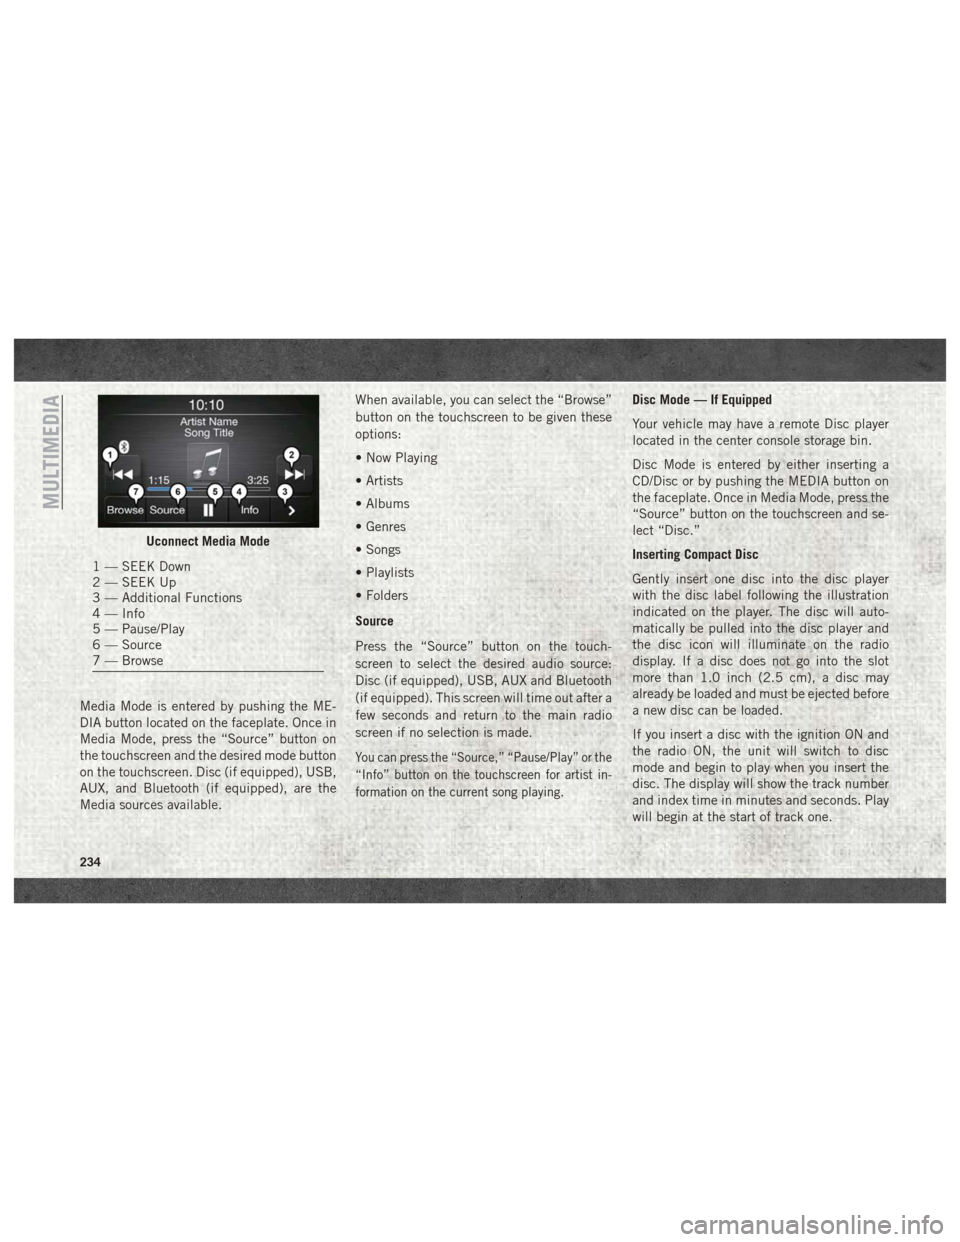
Media Mode is entered by pushing the ME-
DIA button located on the faceplate. Once in
Media Mode, press the “Source” button on
the touchscreen and the desired mode button
on the touchscreen. Disc (if equipped), USB,
AUX, and Bluetooth (if equipped), are the
Media sources available.When available, you can select the “Browse”
button on the touchscreen to be given these
options:
• Now Playing
• Artists
• Albums
• Genres
• Songs
• Playlists
• Folders
Source
Press the “Source” button on the touch-
screen to select the desired audio source:
Disc (if equipped), USB, AUX and Bluetooth
(if equipped). This screen will time out after a
few seconds and return to the main radio
screen if no selection is made.
You can press the “Source,” “Pause/Play” or the
“Info” button on the touchscreen for artist in-
formation on the current song playing.
Disc Mode — If Equipped
Your vehicle may have a remote Disc player
located in the center console storage bin.
Disc Mode is entered by either inserting a
CD/Disc or by pushing the MEDIA button on
the faceplate. Once in Media Mode, press the
“Source” button on the touchscreen and se-
lect “Disc.”
Inserting Compact Disc
Gently insert one disc into the disc player
with the disc label following the illustration
indicated on the player. The disc will auto-
matically be pulled into the disc player and
the disc icon will illuminate on the radio
display. If a disc does not go into the slot
more than 1.0 inch (2.5 cm), a disc may
already be loaded and must be ejected before
a new disc can be loaded.
If you insert a disc with the ignition ON and
the radio ON, the unit will switch to disc
mode and begin to play when you insert the
disc. The display will show the track number
and index time in minutes and seconds. Play
will begin at the start of track one.
Uconnect Media Mode
1 — SEEK Down
2 — SEEK Up
3 — Additional Functions
4 — Info
5 — Pause/Play
6 — Source
7 — Browse
MULTIMEDIA
234
Page 238 of 298
Track Selection
Seek Up/Seek Down
Press and release the “Right Arrow”but-
ton on the touchscreen for the next selection.
Press and release the “Left Arrow”
button
on the touchscreen to return to the beginning
of the current selection, or return to the
beginning of the previous selection if the
Disc is within the first second of the current
selection.
Fast Seek Up
Press and hold the “Right Arrow”button
on the touchscreen and the desired mode will
begin to fast forward through the current
track until the button on the touchscreen is
released.
Fast Seek Down
Press and hold the “Left Arrow”button
on the touchscreen and the desired mode will
begin to rewind through the current track
until the button on the touchscreen is re-
leased. Info
Press the “Info” button on the touchscreen to
display the current track information. Press
the “X” button on the touchscreen to cancel
this feature.
Shuffle
Press the “Shuffle” button on the touch-
screen to play the selections on the USB/iPod
device in random order to provide an interest-
ing change of pace. Press the “Shuffle” but-
ton on the touchscreen a second time to turn
this feature off.
Repeat
Press the “Repeat” button on the touch-
screen to repeat the song selection. To cancel
repeat, press the “Repeat” button on the
touchscreen a second time.
Bluetooth Source
Bluetooth Streaming Audio (BTSA) or
Bluetooth Mode is entered by pairing a
Bluetooth device containing music to the
Uconnect system.
Before proceeding, the Bluetooth device
must be paired with the Uconnect Phone to
communicate with the Uconnect system.
See the “Pairing Procedure” in this manual
for further details.
Once the Bluetooth device is paired to the
Uconnect system, push the MEDIA button
located on the faceplate. Once in Media
Mode, press the “Source” button on the
touchscreen and select “Bluetooth.”
NOTE:
For mobile phone compatibility and pairing in-
structions, please visit
UconnectPhone.com.
MULTIMEDIA
236
Page 239 of 298
Pairing A Bluetooth Audio Device
To begin using your audio device, you must
pair your compatible Bluetooth enabled au-
dio device. Pairing is the process of establish-
ing a wireless connection between a device
and the Uconnect system.
NOTE:
• You must have Bluetooth enabled on yourdevice to complete this procedure.
• The vehicle must be in PARK.
1. Place the ignition in the ACC or ON position.
2. Push the PHONE button on the faceplate.
• If there is no devices currently con-nected with the system, a pop-up will
appear asking if you would like to pair a
device.
3. Select “Yes” to begin the pairing process. 4. Search for available devices on your
Bluetooth enabled device.
• Select Bluetooth and ensure it is en- abled. Once enabled, the device will
begin to search for Bluetooth
connections.
5. If No is selected, and you still would like to pair a device, press the “Settings”
button from the Uconnect Phone main
screen.
• Select “Paired Phones” then press the “Add Device” button on the touch-
screen.
• Search for available devices on your Bluetooth enabled device (see below).
When prompted on the device, select
“Uconnect” and accept the connection
request.
6. Uconnect Phone will display an in prog- ress screen while the system is
connecting. 7. When your device finds the Uconnect sys-
tem, select “Uconnect.”
8. When prompted on the device, accept the connection request from Uconnect
Phone.
NOTE:
Some devices will require you to enter the
PIN number.
9. When the pairing process has successfully completed, the system will prompt you to
choose whether or not this is your favorite
device. Selecting “Yes” will make this
device the highest priority. This device
will take precedence over other paired
devices within range and will connect to
the Uconnect system automatically when
entering the vehicle. Only one Bluetooth
device can be connected to the Uconnect
system at a time. If “No” is selected,
simply select “Uconnect” from the device
Bluetooth screen, and the Uconnect sys-
tem will reconnect to the Bluetooth
device.
237
Page 258 of 298
UCONNECT SETTINGS
The Uconnect system allows you to access Cus-
tomer Programmable feature settings such as
Display, Voice, Clock, Safety & Driving Assis-
tance, Lights, Doors & Locks, Auto-On Comfort,
Engine Off Options, Compass Settings
(Uconnect 3 with 5–inch display), Trailer Brake,
Suspension, Audio, Phone/Bluetooth, SiriusXM
Setup, Restore Settings, Clear Personal Data,
and System Information through buttons on the
touchscreen.
• Push the SETTINGS button (Uconnect3 With 5–inch Display), or press the “Apps”
button (Uconnect 4/4C NAV With 8.4–inch
Display) located near the bottom of the
touchscreen, then press the “Settings”
button on the touchscreen to access the
Settings screen. When making a selection,
scroll up or down until the preferred setting
is highlighted, then press the preferred
setting until a check-mark appears next to
the setting, showing that setting has been
selected. NOTE:
Depending on the vehicles options, feature
settings may vary.
Refer to “Uconnect Settings” found within
“Multimedia” located in your Owner's Manual at
www.mopar.com/en-us/care/owners-manual.html
(U.S. Residents) or www.owners.mopar.ca
(Canadian Residents) for further information.
The following feature settings are available:
• Display • Suspension
• Voice • Audio
• Clock • Phone/Bluetooth
• Safety & Driving Assistance • SiriusXM Setup
• Lights • Restore Settings
• Doors & Locks • Clear Personal Data
• Auto-On Comfort • System Information
• Engine Off Options • Compass Settings (Uconnect 3)
• Trailer Brake
MULTIMEDIA
256
Page 261 of 298
Bluetooth Streaming Audio
If using a Bluetooth equipped device you may
also be able to stream music to your vehicle's
sound system. Your connected device must
be Bluetooth compatible and paired with your
system (see Uconnect Phone for pairing in-
structions). You can access the music from
your connected Bluetooth device by pressing
the Bluetooth button on the touchscreen
while in Media mode.
NAVIGATION
• The information in the section below is onlyapplicable if you have the Uconnect 4C
NAV system or the Navigation has been
activated on your Uconnect 4C with 8.4–
inch display system.
Press the “Nav” button on the touchscreen in
the menu bar to access the Navigation sys-
tem.
Changing The Navigation Voice
Prompt Volume
Changing The Navigation Voice Prompt Volume
1. Press the “Settings” button on the touch- screen in the lower right area of the
screen.
2. In the Settings menu, press the “Guid- ance” button on the touchscreen.
3. In the Guidance menu, adjust the Nav Volume by pressing the “+” or “–” buttons
on the touchscreen.
259
Page 266 of 298
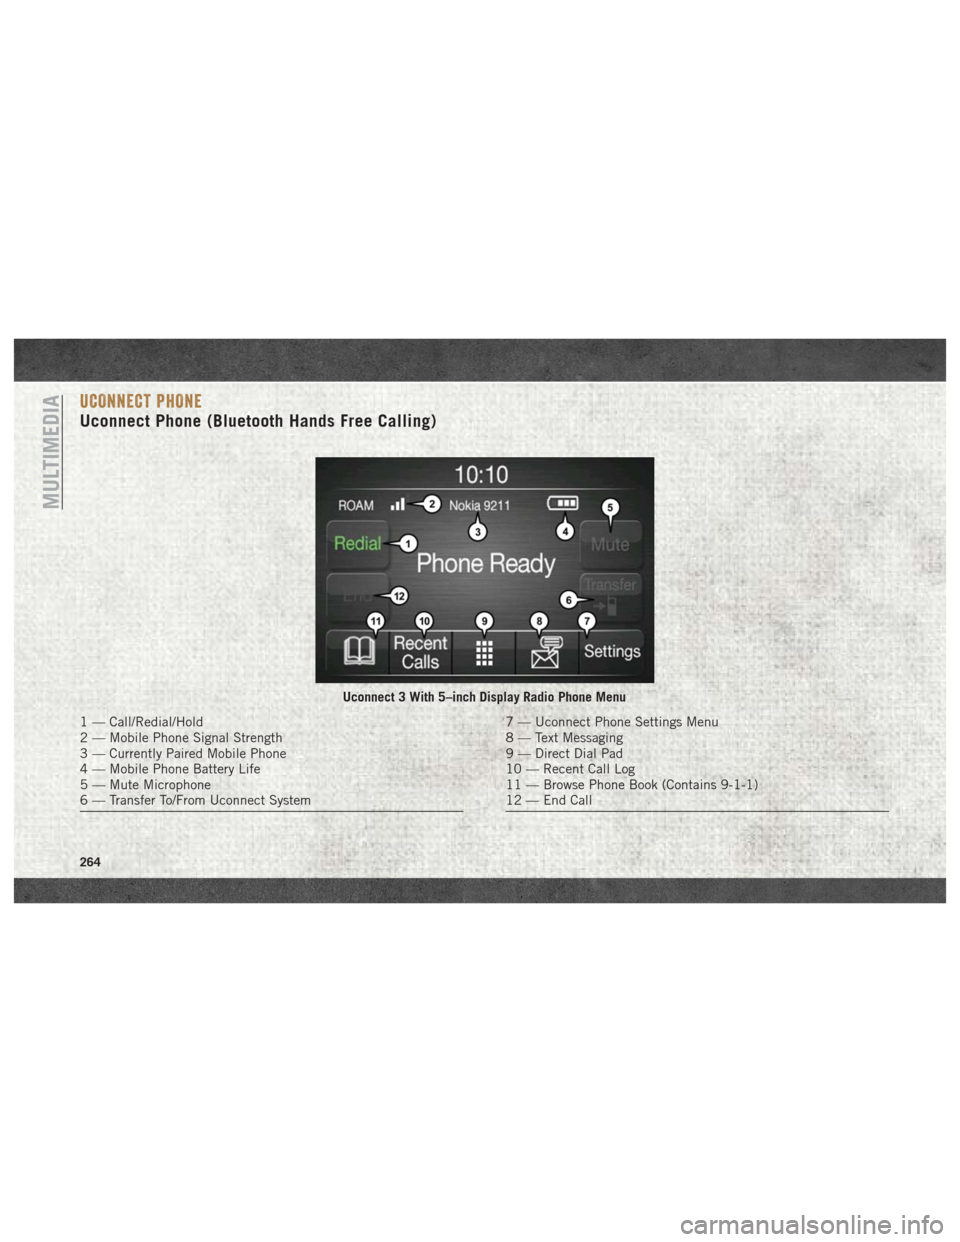
UCONNECT PHONE
Uconnect Phone (Bluetooth Hands Free Calling)
Uconnect 3 With 5–inch Display Radio Phone Menu
1 — Call/Redial/Hold
2 — Mobile Phone Signal Strength
3 — Currently Paired Mobile Phone
4 — Mobile Phone Battery Life
5 — Mute Microphone
6 — Transfer To/From Uconnect System7 — Uconnect Phone Settings Menu
8 — Text Messaging
9 — Direct Dial Pad
10 — Recent Call Log
11 — Browse Phone Book (Contains 9-1-1)
12 — End Call
MULTIMEDIA
264
Page 267 of 298
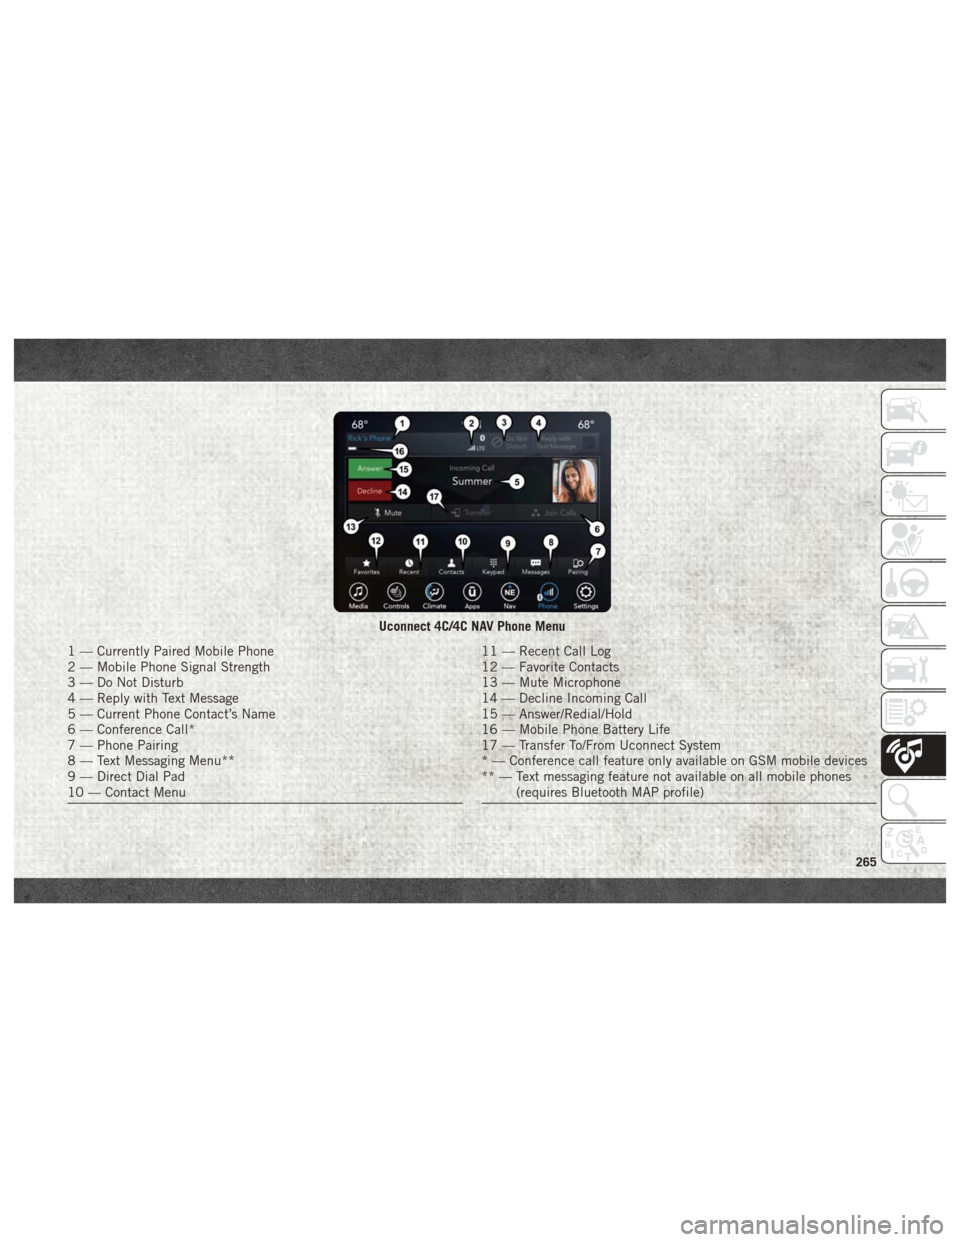
Uconnect 4C/4C NAV Phone Menu
1 — Currently Paired Mobile Phone
2 — Mobile Phone Signal Strength
3 — Do Not Disturb
4 — Reply with Text Message
5 — Current Phone Contact’s Name
6 — Conference Call*
7 — Phone Pairing
8 — Text Messaging Menu**
9 — Direct Dial Pad
10 — Contact Menu11 — Recent Call Log
12 — Favorite Contacts
13 — Mute Microphone
14 — Decline Incoming Call
15 — Answer/Redial/Hold
16 — Mobile Phone Battery Life
17 — Transfer To/From Uconnect System
* — Conference call feature only available on GSM mobile devices
** — Text messaging feature not available on all mobile phones(requires Bluetooth MAP profile)
265