audio RAM CHASSIS CAB 2021 User Guide
[x] Cancel search | Manufacturer: RAM, Model Year: 2021, Model line: CHASSIS CAB, Model: RAM CHASSIS CAB 2021Pages: 463, PDF Size: 21.5 MB
Page 228 of 463
226MULTIMEDIA
Uconnect System Support:
US residents visit
DriveUconnect.com
or call
1-877-855-8400 (24 hours a day, 7 days a week)
Canadian residents visit DriveUconnect.ca or
call 1-800-465-2001 (English) or
1-800-387-9983 (French)
Monday–Friday: 8:00 am – 8:00 pm, ET
Saturday: 9:00 am – 5:00 pm, ET
Sunday: Closed
Changing The Volume
1. Start a call by pushing the Phone button, then
adjust the volume during a normal call.
2. Use the radio On/Volume rotary knob to adjust the volume to a comfortable level. Please note the volume setting for
Uconnect phone is different than the
audio system volume setting.
Making A Phone Call
1. Push the Phone button on the steering wheel.
2. After the beep, say “dial” or “call” and then
the full name or phone number.
NOTE:
A phone call can also be made by pushing the Phone
button on the radio, and selecting a particular
contact in the phonebook or recent calls.
Mute (Or Unmute) Microphone During Call
Push the “Play/Pause/Mute” button on
the radio or during a call, push the Voice
Recognition button on the steering wheel.
After the beep, say “mute” (or “mute off”).
Pairing A Phone
To begin using your Uconnect Phone, you must
pair your compatible Bluetooth®-enabled mobile
phone. Mobile phone pairing is the process of
establishing a wireless connection between a
cellular phone and the Uconnect system. To complete the pairing process, you will need to
reference your mobile phone Owner's Manual.
Please visit
UconnectPhone.com
for complete
mobile phone compatibility information.
NOTE:
You must have Bluetooth® enabled on your
phone to complete this procedure.
The vehicle must be in PARK.
1. Place the ignition in the ACC or ON/RUN position.
2. Push the Phone button.
NOTE:
If there are no phones currently connected with
the system, a pop-up will appear asking if you
would like to pair a mobile phone.
3. Select “Yes” to begin the pairing process.
4. Search for available devices on your Bluetooth®-enabled mobile phone.
Press the Settings button on your mobile
phone.
Select “Bluetooth®” and ensure it is
enabled. Once enabled, the mobile
phone will begin to search for Bluetooth®
connections.
WARNING!
ALWAYS drive safely with your hands on the
wheel. You have full responsibility and
assume all risks related to the use of the
Uconnect features and applications in this
vehicle. Only use Uconnect when it is safe
to do so. Failure to do so may result in an
accident involving serious injury or death.
21_DPF_OM_EN_USC_t.book Page 226
Page 229 of 463
MULTIMEDIA227
5. If “No” is selected, and you still would like to
pair a mobile phone, press the Settings
button from the Uconnect Phone main
screen.
Select “Paired Phones”, and then select
“Add Device”.
Search for available devices on your
Bluetooth®-enabled mobile phone (see
below). When prompted on the phone,
select “Uconnect” and accept the
connection request.
6. Uconnect Phone will display an in-progress screen while the system is connecting.
7. When your mobile phone finds the Uconnect system, select “Uconnect”.
8. When prompted on the mobile phone, accept the connection request from
Uconnect Phone.
NOTE:
Some mobile phones will require you to enter
the PIN. 9. When the pairing process has successfully
completed, the system will prompt you to
choose whether or not this is your favorite
phone. Selecting “Yes” will make this phone
the highest priority. This phone will take
precedence over other paired phones within
range and will connect to the Uconnect
system automatically when entering the
vehicle. Only one mobile phone and/or one
Bluetooth® audio device can be connected
to the Uconnect system at a time. If “No” is
selected, simply select “Uconnect” from the
mobile phone/audio device Bluetooth®
screen, and the Uconnect system
reconnects to the Bluetooth® device.
NOTE:
Software updates on your phone or the
Uconnect system may interfere with the
Bluetooth® connection. If this happens, simply
repeat the pairing process. However, first, make
sure to delete the device from the list of phones
on your Uconnect system. Next, be sure to
remove Uconnect from the list of devices in your
phone’s Bluetooth® settings.
Phonebook Download — Phonebook
Transfer From Mobile Phone
If equipped and specifically supported by your
phone, Uconnect Phone will ask you if you want
to download names (text names) and number
entries from your mobile phone’s phonebook.
Specific Bluetooth® Phones with Phonebook
Access Profile may support this feature. See
UconnectPhone.com for supported phones.
Receiving A Call — Accept (And End)
1. When an incoming call rings or is announced on Uconnect, push the
Phone button on the faceplate.
2. To end a call, push the Phone button on the steering wheel or the Phone button on the
faceplate.
NOTE:
A phone call can also be accepted and ended by
pushing the steering wheel Phone button.
Transfer Ongoing Call Between Handset
And Vehicle
With a call in progress, use the Browse/Enter
knob to select “transfer” then push the enter
button or push the Phone Pick Up button on the
5
21_DPF_OM_EN_USC_t.book Page 227
Page 233 of 463
MULTIMEDIA231
Voice
When the Voice button is pressed on the touchscreen, the system displays the options related to the vehicle’s Voice Recognition feature.
Clock
When the Clock button is pressed on the touchscreen, the system displays the different options related to the vehicle’s internal clock.
Setting Name Description
Voice Response LengthT
his setting will change the response length for the Voice Recognition system. The “Brief”
setting provides a shortened audio description from the system. The “Detailed” setting
provides the full audio description from the system.
Show Command List
This setting will allow you to turn the command list on or off. The “Always” setting will always
show the command list. The “With Help” setting will show the command list and provide a brief
description of what the command does. The “Never” setting will turn the command list off.
Setting Name
Description
Sync Time With GPSThis setting will sync the time to the GPS receiver in the system. The system will control the
time via the GPS location.
Set Time And Format/Time Format This setting will allow you to set the time format (AM/PM). Sync Time With GPS must be off for
this setting to be available. The “12 hrs” setting will set the time to a 12-hour format. The
“24 hrs” setting will set the time to a 24-hour format.
Set Time Hours This setting will allow you to set the hours. Sync Time With GPS must be off for this setting to
be available. The “+” setting will increase the hours. The “-” setting will decrease the hours.
5
21_DPF_OM_EN_USC_t.book Page 231
Page 243 of 463

MULTIMEDIA241
Trailer Brake/Trailer
When the Trailer Brake/Trailer button is pressed on the touchscreen, the system will display settings related to trailer towing.
Audio
When the Audio button is pressed on the touchscreen, the system displays options related to the vehicle’s sound system. These settings can change
the audio location within the vehicle, adjust the bass or treble levels, and auto-play settings from an audio device or smartphone.
Setting Name Description
Trailer SelectSelect from “Trailer 1”, “Trailer 2”, “Trailer 3”, and “Trailer 4”. These trailer designations can
be used to save different trailer settings.
Trailer Brake Type
This setting will set the system to a specific trailer type. The available options are “Light
Electric”, “Heavy Electric”, “Light Electric-Over-Hydraulic”, and “Heavy Electric-Over-Hydraulic”.
Trailer Name This setting will personalize the trailer name depending on the type of trailer you are hauling.
Select the trailer name from the following list: trailer, boat, car, cargo, dump, equipment,
flatbed, gooseneck, horse, livestock, motorcycle, snowmobile, travel, utility, and 5th wheel.
Setting Name
Description
Balance/FadeThis setting will adjust audio levels from specific speakers in the front/back and left/right of
the vehicle. The Speaker icon can be moved to set audio location.
Equalizer This setting will adjust the “Bass”, “Mid”, and “Treble” ranges of the audio.
Speed Adjusted Volume This setting will adjust audio volume as speeds increase. At a higher setting, the volume will
increase more as the vehicle speeds up. The available settings are “Off”, “1”, “2”, and “3”.
Surround Sound This setting will turn the Surround Sound system on or off.
5
21_DPF_OM_EN_USC_t.book Page 241
Page 244 of 463
242MULTIMEDIA
Phone/Bluetooth®
When the Phone/Bluetooth® button is pressed on the touchscreen, the system displays the options related to Bluetooth® connectivity from an external
audio device or smartphone. The list of paired audio devices or smartphones can be accessed from this menu.AUX Volume Offset
This setting will tune the audio levels from a device connected through the AUX port.
The available settings are “+” and “-”.
Auto Play This setting will automatically begin playing audio from a connected device.
Loudness This setting will improve audio quality at lower volumes.
Setting Name Description
Phone Pop-Ups Displayed In ClusterThis setting will activate phone message pop-ups in the Instrument Cluster Display.
Do Not Disturb This setting will open the “Do Not Disturb” settings menu. The settings are “Auto Reply” (both,
text, call), “Auto Reply Message” (custom, default), and “Custom Auto Reply Message” (create
message).
Paired Phones This setting will show the list of paired phones.
Paired Audio Sources This setting will show the list of paired audio sources.
Paired Phones And Audio Devices This setting will show the list of paired phones and audio devices.
Setting Name Description
21_DPF_OM_EN_USC_t.book Page 242
Page 247 of 463
MULTIMEDIA245
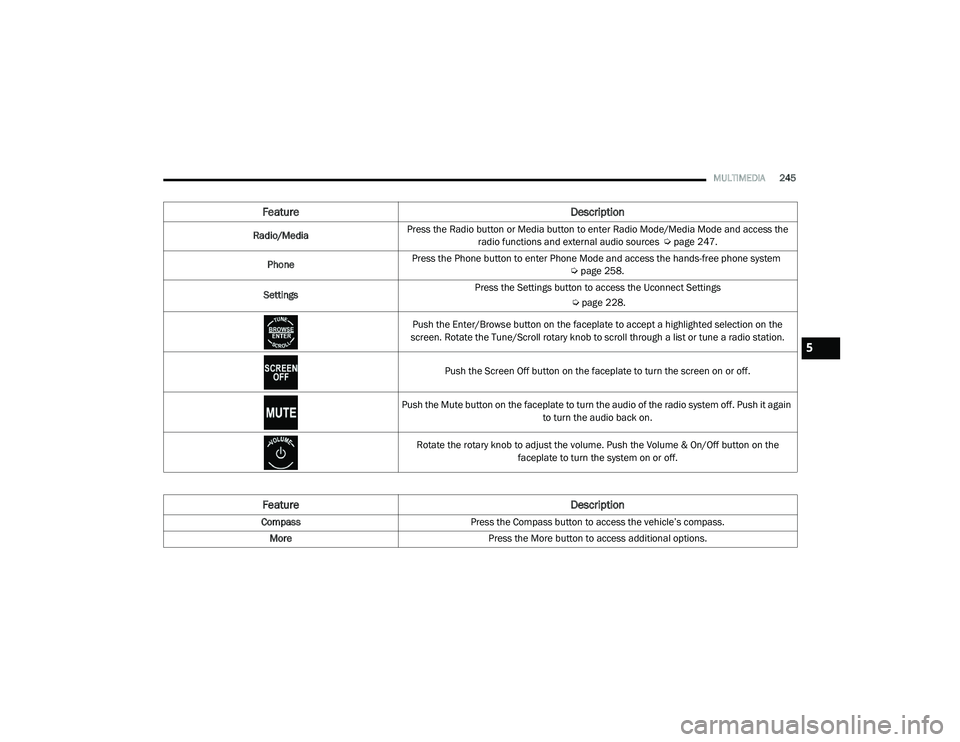
Feature Description
Radio/MediaPress the Radio button or Media button to enter Radio Mode/Media Mode and access the
radio functions and external audio sources Ú page 247.
Phone Press the Phone button to enter Phone Mode and access the hands-free phone system
Úpage 258.
Settings Press the Settings button to access the Uconnect Settings
Úpage 228.
Push the Enter/Browse button on the faceplate to accept a highlighted selection on the
screen. Rotate the Tune/Scroll rotary knob to scroll through a list or tune a radio station.
Push the Screen Off button on the faceplate to turn the screen on or off.
Push the Mute button on the faceplate to turn the audio of the radio system off. Push it again to turn the audio back on.
Rotate the rotary knob to adjust the volume. Push the Volume & On/Off button on the faceplate to turn the system on or off.
Feature Description
CompassPress the Compass button to access the vehicle’s compass.
More Press the More button to access additional options.
5
21_DPF_OM_EN_USC_t.book Page 245
Page 249 of 463
MULTIMEDIA247
UCONNECT MODES
STEERING WHEEL AUDIO CONTROLS
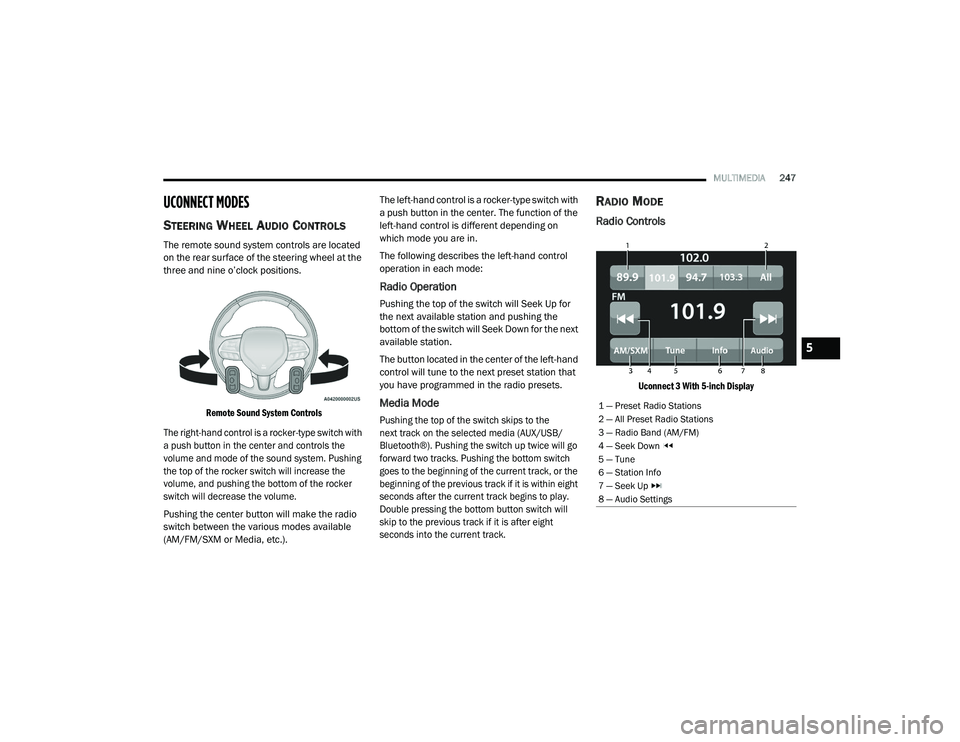
The remote sound system controls are located
on the rear surface of the steering wheel at the
three and nine o’clock positions.
Remote Sound System Controls
The right-hand control is a rocker-type switch with
a push button in the center and controls the
volume and mode of the sound system. Pushing
the top of the rocker switch will increase the
volume, and pushing the bottom of the rocker
switch will decrease the volume.
Pushing the center button will make the radio
switch between the various modes available
(AM/FM/SXM or Media, etc.). The left-hand control is a rocker-type switch with
a push button in the center. The function of the
left-hand control is different depending on
which mode you are in.
The following describes the left-hand control
operation in each mode:
Radio Operation
Pushing the top of the switch will Seek Up for
the next available station and pushing the
bottom of the switch will Seek Down for the next
available station.
The button located in the center of the left-hand
control will tune to the next preset station that
you have programmed in the radio presets.
Media Mode
Pushing the top of the switch skips to the
next track on the selected media (AUX/USB/
Bluetooth®). Pushing the switch up twice will go
forward two tracks. Pushing the bottom switch
goes to the beginning of the current track, or the
beginning of the previous track if it is within eight
seconds after the current track begins to play.
Double pressing the bottom button switch will
skip to the previous track if it is after eight
seconds into the current track.
RADIO MODE
Radio Controls
Uconnect 3 With 5-inch Display
1 — Preset Radio Stations
2 — All Preset Radio Stations
3 — Radio Band (AM/FM)
4 — Seek Down
5 — Tune
6 — Station Info
7 — Seek Up
8 — Audio Settings
5
21_DPF_OM_EN_USC_t.book Page 247
Page 250 of 463
248MULTIMEDIA
The radio is equipped with the following modes:
AM
FM
SiriusXM® Satellite Radio (if equipped)
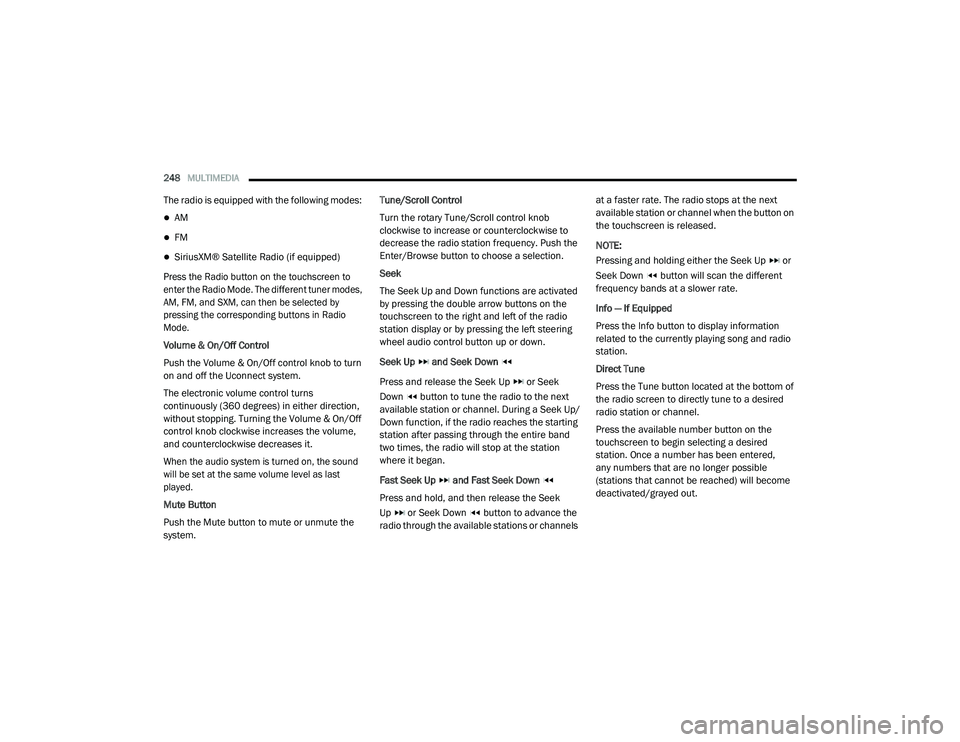
Press the Radio button on the touchscreen to
enter the Radio Mode. The different tuner modes,
AM, FM, and SXM, can then be selected by
pressing the corresponding buttons in Radio
Mode.
Volume & On/Off Control
Push the Volume & On/Off control knob to turn
on and off the Uconnect system.
The electronic volume control turns
continuously (360 degrees) in either direction,
without stopping. Turning the Volume & On/Off
control knob clockwise increases the volume,
and counterclockwise decreases it.
When the audio system is turned on, the sound
will be set at the same volume level as last
played.
Mute Button
Push the Mute button to mute or unmute the
system. Tune/Scroll Control
Turn the rotary Tune/Scroll control knob
clockwise to increase or counterclockwise to
decrease the radio station frequency. Push the
Enter/Browse button to choose a selection.
Seek
The Seek Up and Down functions are activated
by pressing the double arrow buttons on the
touchscreen to the right and left of the radio
station display or by pressing the left steering
wheel audio control button up or down.
Seek Up and Seek Down
Press and release the Seek Up or Seek
Down button to tune the radio to the next
available station or channel. During a Seek Up/
Down function, if the radio reaches the starting
station after passing through the entire band
two times, the radio will stop at the station
where it began.
Fast Seek Up and Fast Seek Down
Press and hold, and then release the Seek
Up or Seek Down button to advance the
radio through the available stations or channels at a faster rate. The radio stops at the next
available station or channel when the button on
the touchscreen is released.
NOTE:
Pressing and holding either the Seek Up or
Seek Down button will scan the different
frequency bands at a slower rate.
Info — If Equipped
Press the Info button to display information
related to the currently playing song and radio
station.
Direct Tune
Press the Tune button located at the bottom of
the radio screen to directly tune to a desired
radio station or channel.
Press the available number button on the
touchscreen to begin selecting a desired
station. Once a number has been entered,
any numbers that are no longer possible
(stations that cannot be reached) will become
deactivated/grayed out.
21_DPF_OM_EN_USC_t.book Page 248
Page 253 of 463

MULTIMEDIA251
Replay
The replay function provides a means to store and replay up to 22 minutes of music audio and 48 minutes of talk radio. Once the channel is switched,
content in replay memory is lost.
Press the Replay button on the touchscreen. The play/pause, rewind/forward and live buttons will display at the top of the screen, along with the replay time.
You can exit by pressing the Replay button on the touchscreen any time during the Replay Mode.
Play/Pause Press the Pause/Play button on the touchscreen to pause
the playing of live or rewound content at any time. Play can be resumed by pressing the Pause/Play button again on the touchscreen.
Rewind Press the Rewind button on the touchscreen to rewind the
content in steps of five seconds. Pressing the Rewind
button on the touchscreen for more than two seconds
rewinds the content. The radio begins playing the content at the point at which the press is released.
Forward Each press of the Forward button on the touchscreen
forwards the content in steps of five seconds. Forwarding of the content can only be done when the content is
previously rewound, and therefore, cannot be done for live content. A continuous press of the Forward button on the touchscreen also forwards the content. The radio begins playing the content at the point at which the press is release.
Live LivePress the Live button on the touchscreen to resume the
playing of live content.
5
21_DPF_OM_EN_USC_t.book Page 251
Page 255 of 463
MULTIMEDIA253
Add/Delete — If Equipped
Press the Add/Delete button on the touchscreen to
activate the League Scroll list. Press the chosen
league and a scroll list of all teams within the league
will appear, then you can select a team by pressing
the corresponding box. A check mark appears for all
teams that are chosen.
Remove Selection/Trash Can Icon
Press the Remove Selection tab at the top of
the screen. Press the Delete All button on the
touchscreen to delete all of the selections or press
the Trash Can icon next to the selection to be
deleted.
Alert Settings
Press the Alert Setting tab at the top of the
screen. The Alert Settings menu allows you to
choose from “Alert me to on-air games upon
start” or “Alert upon score update” or both when
one or more of your selections is airing on any
of the SiriusXM® channels.
Tune Start
Tune Start begins playing the current song from
the beginning when you tune to a music channel
using one of the 12 presets. This feature occurs
the first time the preset is selected during that
current song.
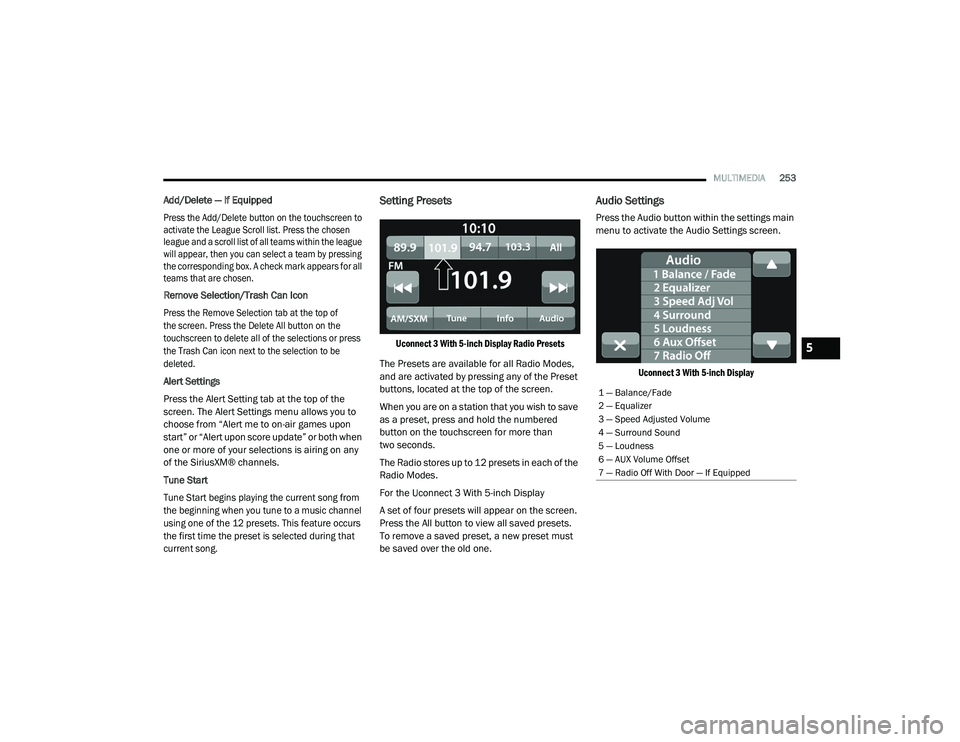
Setting Presets
Uconnect 3 With 5-inch Display Radio Presets
The Presets are available for all Radio Modes,
and are activated by pressing any of the Preset
buttons, located at the top of the screen.
When you are on a station that you wish to save
as a preset, press and hold the numbered
button on the touchscreen for more than
two seconds.
The Radio stores up to 12 presets in each of the
Radio Modes.
For the Uconnect 3 With 5-inch Display
A set of four presets will appear on the screen.
Press the All button to view all saved presets.
To remove a saved preset, a new preset must
be saved over the old one.
Audio Settings
Press the Audio button within the settings main
menu to activate the Audio Settings screen.
Uconnect 3 With 5-inch Display
1 — Balance/Fade
2 — Equalizer
3 — Speed Adjusted Volume
4 — Surround Sound
5 — Loudness
6 — AUX Volume Offset
7 — Radio Off With Door — If Equipped
5
21_DPF_OM_EN_USC_t.book Page 253