ESP RAM CHASSIS CAB 2021 Owner's Manual
[x] Cancel search | Manufacturer: RAM, Model Year: 2021, Model line: CHASSIS CAB, Model: RAM CHASSIS CAB 2021Pages: 463, PDF Size: 21.5 MB
Page 168 of 463

166STARTING AND OPERATING
(Continued)
The following conditions will also deactivate the
Cruise Control without erasing the set speed
from memory:
Vehicle parking brake is applied
Stability event occurs
Gear selector is moved out of DRIVE
Engine overspeed occurs
Pushing the on/off button, or placing the
ignition in the OFF position, erases the set
speed from memory.
ADAPTIVE CRUISE CONTROL (ACC) — IF
E
QUIPPED
Adaptive Cruise Control (ACC) increases the
driving convenience provided by Cruise Control
while traveling on highways and major roadways.
However, it is not a safety system and not
designed to prevent collisions. The Cruise Control
function performs differently if your vehicle is not
equipped with ACC
Ú
page 164.
ACC will allow you to keep Cruise Control
engaged in light to moderate traffic conditions
without the constant need to reset your speed.
ACC utilizes a radar sensor and a forward facing
camera designed to detect a vehicle directly
ahead of you to maintain a set speed.
NOTE:
If the ACC sensor detects a vehicle ahead,
ACC will apply limited braking or acceleration
(not to exceed the original set speed) auto
-
matically to maintain a preset following
distance, while matching the speed of the
vehicle ahead.
Any chassis/suspension or tire size modifica -
tions to the vehicle will affect the perfor -
mance of the Adaptive Cruise Control and
Forward Collision Warning system.
Fixed Speed Cruise Control alone (an ACC
distance not set) will not detect vehicles
directly ahead of you. Always be aware of the
mode selected.
WARNING!
Adaptive Cruise Control (ACC) is a conve -
nience system. It is not a substitute for active
driver involvement. It is always the driver’s
responsibility to be attentive of road, traffic,
and weather conditions, vehicle speed,
distance to the vehicle ahead; and, most
importantly, brake operation to ensure safe
operation of the vehicle under all road condi -
tions. Your complete attention is always
required while driving to maintain safe
control of your vehicle. Failure to follow these
warnings can result in a collision and death
or serious personal injury.
The ACC system:
Does not react to pedestrians,
oncoming vehicles, and stationary
objects (e.g., a stopped vehicle in a
traffic jam or a disabled vehicle).
Cannot take street, traffic, and weather
conditions into account, and may be
limited upon adverse sight distance
conditions.
21_DPF_OM_EN_USC_t.book Page 166
Page 185 of 463

STARTING AND OPERATING183
LANESENSE — IF EQUIPPED
LANESENSE OPERATION
The LaneSense system is operational at speeds
above 37 mph (60 km/h) and below 112 mph
(180 km/h). It uses a forward looking camera to
detect lane markings and measure vehicle
position within the lane boundaries.
When both lane markings are detected and the
driver drifts out of the lane (no turn signal has
been applied) OR the driver departs the lane on
the opposite side of the applied turn signal (if the left turn signal is applied and the vehicle
departs to the right), the LaneSense system
provides a haptic warning in the form of torque
applied to the steering wheel, as well as a visual
warning in the instrument cluster display to
prompt the driver to remain within the lane
boundaries.
The driver may manually override the haptic
warning by applying torque into the steering
wheel at any time.
When only a single lane marking is detected
and the driver drifts across that lane marking
(no turn signal applied), the LaneSense system
provides a visual warning through the
instrument cluster display to prompt the driver
to remain within the lane.
When only a single lane marking is detected, a
haptic (torque) warning will not be provided.
NOTE:
When operating conditions have been met, the
LaneSense system will monitor if the driver’s
hands are on the steering wheel and provide
an audible and visual warning to the driver if
removed. The system will cancel if the driver
does not return their hands to the wheel.
WARNING!
Drivers must be careful when backing up
even when using ParkSense. Always check
carefully behind your vehicle, look behind
you, and be sure to check for pedestrians,
animals, other vehicles, obstructions, and
blind spots before backing up. You are
responsible for safety and must continue to
pay attention to your surroundings. Failure to
do so can result in serious injury or death.
Before using ParkSense, it is strongly
recommended that the ball mount and
hitch ball assembly be disconnected from
the vehicle when the vehicle is not used for
towing. Failure to do so can result in injury
or damage to vehicles or obstacles
because the hitch ball will be much closer
to the obstacle than the rear fascia when
the vehicle sounds the continuous tone.
Also, the sensors could detect the ball
mount and hitch ball assembly, depending
on its size and shape, giving a false indica
-
tion that an obstacle is behind the vehicle.
CAUTION!
ParkSense is only a parking aid and it is
unable to recognize every obstacle, including
small obstacles. Parking curbs might be
temporarily detected or not detected at all.
Obstacles located above or below the
sensors will not be detected when they are in
close proximity.
The vehicle must be driven slowly when
using ParkSense in order to be able to stop
in time when an obstacle is detected. It is
recommended that the driver looks over
his/her shoulder when using ParkSense.4
21_DPF_OM_EN_USC_t.book Page 183
Page 189 of 463
STARTING AND OPERATING187
Cargo Camera Icons — If Equipped
Backup Camera Touchscreen Button
Cargo Camera Touchscreen Button
AUX Camera Touchscreen Button
If equipped with a Cargo Camera, a touchscreen
button is made available to indicate the current
active Camera image being displayed whenever
the Rear View Camera image is displayed.
If equipped with a Cargo Camera, a touchscreen
button to switch the display to Cargo Camera
image is made available whenever the Rear
View Camera image is displayed.
A touchscreen button "X" to disable display of
the camera image is made available when the
vehicle is not in REVERSE gear. When enabled, active guidelines are overlaid on
the backup camera image to illustrate the width
of the vehicle and its projected backup path
based on the steering wheel position. The active
guidelines will show separate zones that will
help indicate the distance to the rear of the
vehicle. These settings can be adjusted within
Uconnect Settings Ú
page 228.
A dashed center line overlay indicates the center
of the vehicle to assist with parking or aligning to
a hitch/receiver. The following table shows the
approximate distances for each zone:
Zones Distance To The Rear Of The
Vehicle
Red 0 - 1 ft (0 - 30 cm)
Yellow 1 ft - 6.5 ft (30 cm - 2m)
Green 6.5 ft or greater
(2 m or greater)
WARNING!
Drivers must be careful when backing up even
when using the ParkView Rear Back Up Camera.
Always check carefully behind your vehicle, and
be sure to check for pedestrians, animals, other
vehicles, obstructions, or blind spots before
backing up. You are responsible for the safety of
your surroundings and must continue to pay
attention while backing up. Failure to do so can
result in serious injury or death.
CAUTION!
To avoid vehicle damage, ParkView should
only be used as a parking aid. The ParkView
camera is unable to view every obstacle or
object in your drive path.
To avoid vehicle damage, the vehicle must
be driven slowly when using ParkView to be
able to stop in time when an obstacle is
seen. It is recommended that the driver
look frequently over his/her shoulder when
using ParkView.
4
21_DPF_OM_EN_USC_t.book Page 187
Page 192 of 463
190STARTING AND OPERATING
The arcs will change color from yellow to red
corresponding the distance zones to the
oncoming object.
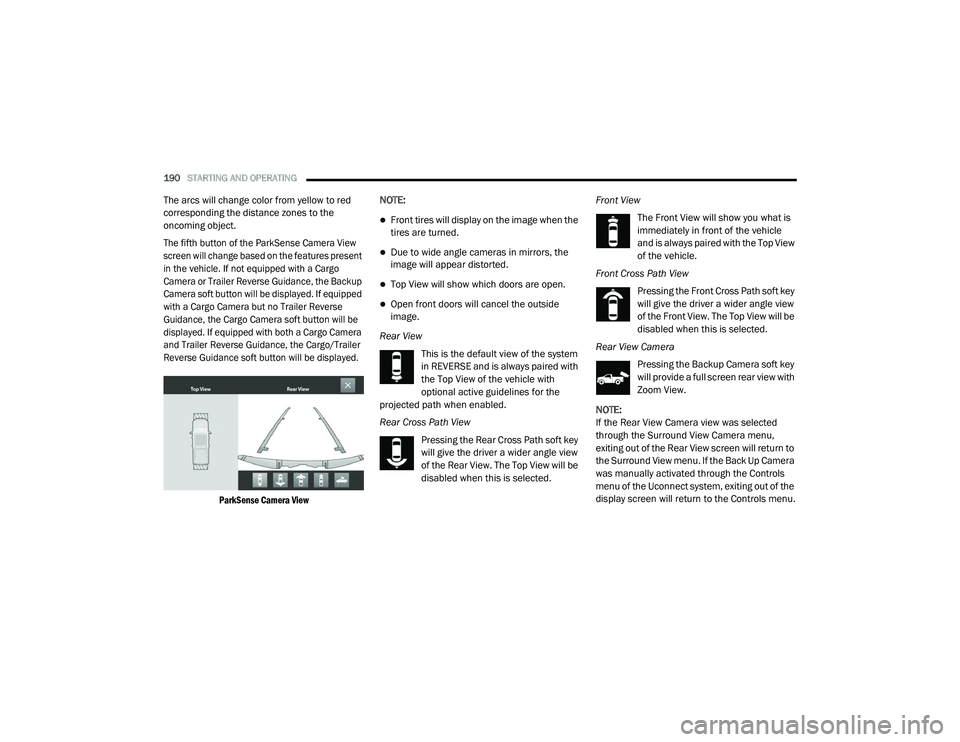
The fifth button of the ParkSense Camera View
screen will change based on the features present
in the vehicle. If not equipped with a Cargo
Camera or Trailer Reverse Guidance, the Backup
Camera soft button will be displayed. If equipped
with a Cargo Camera but no Trailer Reverse
Guidance, the Cargo Camera soft button will be
displayed. If equipped with both a Cargo Camera
and Trailer Reverse Guidance, the Cargo/Trailer
Reverse Guidance soft button will be displayed.
ParkSense Camera View
NOTE:
Front tires will display on the image when the
tires are turned.
Due to wide angle cameras in mirrors, the
image will appear distorted.
Top View will show which doors are open.
Open front doors will cancel the outside
image.
Rear View This is the default view of the system
in REVERSE and is always paired with
the Top View of the vehicle with
optional active guidelines for the
projected path when enabled.
Rear Cross Path View
Pressing the Rear Cross Path soft key
will give the driver a wider angle view
of the Rear View. The Top View will be
disabled when this is selected. Front View
The Front View will show you what is
immediately in front of the vehicle
and is always paired with the Top View
of the vehicle.
Front Cross Path View Pressing the Front Cross Path soft key
will give the driver a wider angle view
of the Front View. The Top View will be
disabled when this is selected.
Rear View Camera Pressing the Backup Camera soft key
will provide a full screen rear view with
Zoom View.
NOTE:
If the Rear View Camera view was selected
through the Surround View Camera menu,
exiting out of the Rear View screen will return to
the Surround View menu. If the Back Up Camera
was manually activated through the Controls
menu of the Uconnect system, exiting out of the
display screen will return to the Controls menu.
21_DPF_OM_EN_USC_t.book Page 190
Page 195 of 463

STARTING AND OPERATING193
Activation
The Forward Facing Camera can be activated by
pressing the Forward Camera soft button on the
touchscreen.
Once activated, the camera image will remain
on as long as the vehicle speed is below 8 mph
(13 km/h) and the vehicle is not in 4WD Low.
Deactivation
The Forward Facing Camera is deactivated in
the following conditions:
The vehicle is not in 4WD Low and the vehicle
speed exceeds 8 mph (13 km/h) for
10 seconds.
The “X” button on the display is pressed.
Vehicle is shifted into PARK.
Ignition is placed in the OFF position.
NOTE:
If the vehicle is in 4WD Low, the Forward Facing
Camera image will be displayed until the “X”
button is pressed or the ignition is placed in the
OFF position. If the vehicle goes out of 4WD
Low, then the Forward Facing Camera will deac -
tivate. Trailer Reverse Guidance — If Equipped
The Trailer Reverse Guidance feature assists
the driver in backing up a trailer by providing
adjustable camera views of the trailer and
surrounding area. The cameras are mounted on
the side mirrors and the images will be displayed
side-by-side on the touchscreen. Left and right
camera images are swapped and mirrored on the
touchscreen to show the equivalent area behind
the vehicle as though the driver is using the side
mirrors.
Activation
The Trailer Reverse Guidance feature can
be activated by pressing the Trailer Reverse
Guidance button on the Backup/Cargo Camera
Display.
Deactivation
When the vehicle is shifted out of REVERSE
(with camera delay turned on), the camera
image will continue to be displayed for up to
10 seconds unless the vehicle speed exceeds
8 mph (13 km/h), the vehicle is shifted into
PARK or the ignition is placed in the OFF
position. There is a touchscreen button “X” to
disable the display of the camera image.
If Trailer Reverse Guidance is selected through
manually activated Surround View, Backup
Camera, or Cargo Camera, the following
deactivation conditions apply:
The “X” button on the display is pressed
The vehicle is shifted into PARK
The ignition is placed in the OFF position
The vehicle speed is over 8 mph (13 km/h)
for 10 seconds
WARNING!
Drivers must be careful when backing up
even when using the Surround View Camera.
Always check carefully behind your vehicle,
and be sure to check for pedestrians,
animals, other vehicles, obstructions, or blind
spots before backing up. You are responsible
for the safety of your surroundings and must
continue to pay attention while backing up.
Failure to do so can result in serious injury or
death.
4
21_DPF_OM_EN_USC_t.book Page 193
Page 201 of 463
STARTING AND OPERATING199
Stop filling the DEF tank immediately if DEF
splashes or wells back in the filler neck.
Reinstall cap onto DEF filler tube. Filling The Def Tank In Cold Climates
Since DEF will begin to freeze at 12°F (-11°C),
your vehicle is equipped with an automatic DEF
heating system. This allows the DEF injection
system to operate properly at temperatures
below 12°F (-11°C). If your vehicle is not in
operation for an extended period of time with
temperatures below 12°F (-11°C), the DEF in
the tank may freeze. If the tank is overfilled and
freezes, it could be damaged. Therefore, do not
overfill the DEF tank.
Extra care should be taken when filling with
portable containers to avoid overfilling. Note the
level of the DEF gauge in your instrument cluster.
You may safely add a maximum of 2 gallons
(7.5 liters) of DEF from portable containers when
your DEF gauge is reading ½ full.
VEHICLE LOADING
GROSS VEHICLE WEIGHT RATING
(GVWR)
The GVWR is the total permissible weight of your
vehicle including driver, passengers, vehicle,
options and cargo. The label also specifies
maximum capacities of front and rear axle
systems (GAWR). Total load must be limited
so GVWR and front and rear GAWR are not
exceeded.
PAYLOAD
The payload of a vehicle is defined as the
allowable load weight a truck can carry,
including the weight of the driver, all
passengers, options and cargo.
Never add anything other than DEF to the
tank – especially any form of hydrocarbon
such as diesel fuel, fuel system additives,
gasoline, or any other petroleum-based
product. Even a very small amount of these,
less than 100 parts per million or less than
1 oz. per 78 gallons (295 liters) will contam -
inate the entire DEF system and will require
replacement. If owners use a container,
funnel or nozzle when refilling the tank, it
should either be new or one that is has only
been used for adding DEF. Mopar provides
an attachable nozzle with its DEF for this
purpose.
CAUTION! (Continued)
4
21_DPF_OM_EN_USC_t.book Page 199
Page 223 of 463
MULTIMEDIA221
NOTE:
FCA US LLC or your dealer may contact you
directly regarding software updates.
To help further improve vehicle security and
minimize the potential risk of a security
breach, vehicle owners should:
Routinely check www.driveuconnect.com
(US Residents) or www.driveuconnect.ca
(Canadian Residents) to learn about
available Uconnect software updates.
Only connect and use trusted media
devices (e.g. personal mobile phones,
USBs, CDs).
Privacy of any wireless and wired
communications cannot be assured. Third
parties may unlawfully intercept information
and private communications without your
consent Ú page 116.
UCONNECT 3.0
INTRODUCTION
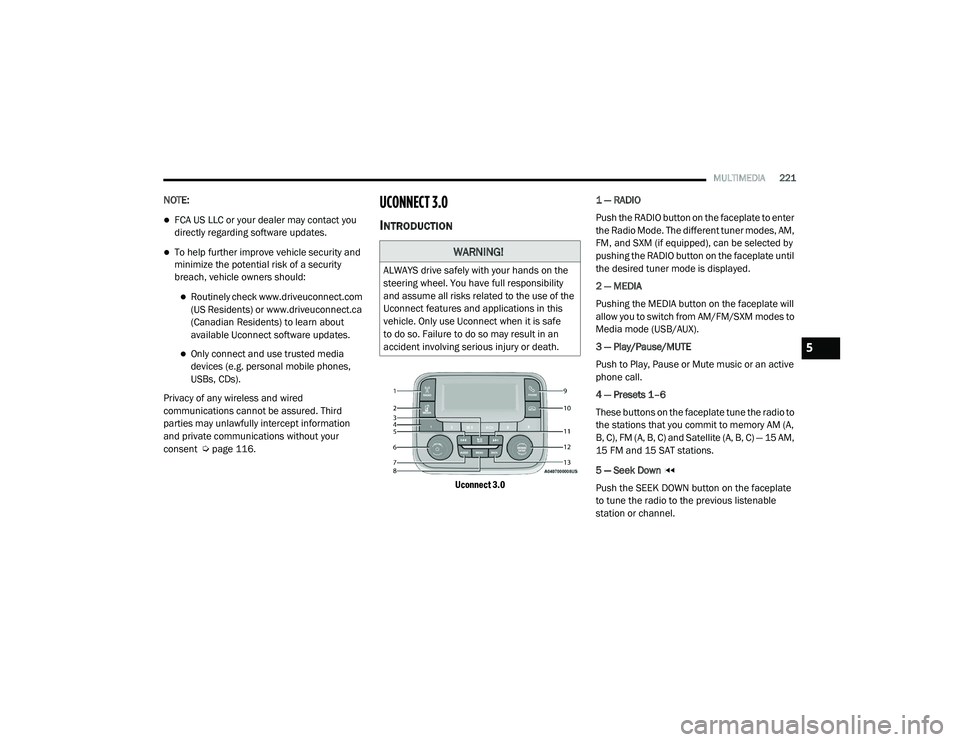
Uconnect 3.0
1 — RADIO
Push the RADIO button on the faceplate to enter
the Radio Mode. The different tuner modes, AM,
FM, and SXM (if equipped), can be selected by
pushing the RADIO button on the faceplate until
the desired tuner mode is displayed.
2 — MEDIA
Pushing the MEDIA button on the faceplate will
allow you to switch from AM/FM/SXM modes to
Media mode (USB/AUX).
3 — Play/Pause/MUTE
Push to Play, Pause or Mute music or an active
phone call.
4 — Presets 1–6
These buttons on the faceplate tune the radio to
the stations that you commit to memory AM (A,
B, C), FM (A, B, C) and Satellite (A, B, C) — 15 AM,
15 FM and 15 SAT stations.
5 — Seek Down
Push the SEEK DOWN button on the faceplate
to tune the radio to the previous listenable
station or channel.
WARNING!
ALWAYS drive safely with your hands on the
steering wheel. You have full responsibility
and assume all risks related to the use of the
Uconnect features and applications in this
vehicle. Only use Uconnect when it is safe
to do so. Failure to do so may result in an
accident involving serious injury or death.
5
21_DPF_OM_EN_USC_t.book Page 221
Page 228 of 463
226MULTIMEDIA
Uconnect System Support:
US residents visit
DriveUconnect.com
or call
1-877-855-8400 (24 hours a day, 7 days a week)
Canadian residents visit DriveUconnect.ca or
call 1-800-465-2001 (English) or
1-800-387-9983 (French)
Monday–Friday: 8:00 am – 8:00 pm, ET
Saturday: 9:00 am – 5:00 pm, ET
Sunday: Closed
Changing The Volume
1. Start a call by pushing the Phone button, then
adjust the volume during a normal call.
2. Use the radio On/Volume rotary knob to adjust the volume to a comfortable level. Please note the volume setting for
Uconnect phone is different than the
audio system volume setting.
Making A Phone Call
1. Push the Phone button on the steering wheel.
2. After the beep, say “dial” or “call” and then
the full name or phone number.
NOTE:
A phone call can also be made by pushing the Phone
button on the radio, and selecting a particular
contact in the phonebook or recent calls.
Mute (Or Unmute) Microphone During Call
Push the “Play/Pause/Mute” button on
the radio or during a call, push the Voice
Recognition button on the steering wheel.
After the beep, say “mute” (or “mute off”).
Pairing A Phone
To begin using your Uconnect Phone, you must
pair your compatible Bluetooth®-enabled mobile
phone. Mobile phone pairing is the process of
establishing a wireless connection between a
cellular phone and the Uconnect system. To complete the pairing process, you will need to
reference your mobile phone Owner's Manual.
Please visit
UconnectPhone.com
for complete
mobile phone compatibility information.
NOTE:
You must have Bluetooth® enabled on your
phone to complete this procedure.
The vehicle must be in PARK.
1. Place the ignition in the ACC or ON/RUN position.
2. Push the Phone button.
NOTE:
If there are no phones currently connected with
the system, a pop-up will appear asking if you
would like to pair a mobile phone.
3. Select “Yes” to begin the pairing process.
4. Search for available devices on your Bluetooth®-enabled mobile phone.
Press the Settings button on your mobile
phone.
Select “Bluetooth®” and ensure it is
enabled. Once enabled, the mobile
phone will begin to search for Bluetooth®
connections.
WARNING!
ALWAYS drive safely with your hands on the
wheel. You have full responsibility and
assume all risks related to the use of the
Uconnect features and applications in this
vehicle. Only use Uconnect when it is safe
to do so. Failure to do so may result in an
accident involving serious injury or death.
21_DPF_OM_EN_USC_t.book Page 226
Page 231 of 463
MULTIMEDIA229
Down Arrow button on the right side of the
screen will allow you to toggle up or down
through the available settings.Language
When the Language button is pressed on the
touchscreen, the system displays the different language options. Once an option is selected,
the system will display in the chosen language.
The available setting is:
Display
When the Display button is pressed on the touchscreen, the system will display the options related to the theme (if equipped), brightness, and color of
the touchscreen. The available settings are:
Setting Name
Description
LanguageThis setting will change the language of the Uconnect system. The available languages are
English, Français, and Español.
Setting Name
Description
Display ModeThis setting will allow you to set the brightness manually or have the system set it
automatically. The “Auto” setting has the system automatically adjust the display brightness.
The “Manual” setting will allow the user to adjust the brightness of the display.
Display Brightness With Headlights ON/Brightness This setting will allow you to set the brightness when the headlights are on. To access this
setting, Display Mode must be set to Manual. The “+” setting will increase the brightness; the
“-” will decrease the brightness.
Display Brightness With Headlights OFF/Brightness This setting will allow you to set the brightness when the headlights are off. To access this
setting, Display Mode must be set to Manual. The “+” setting will increase the brightness; the
“-” will decrease the brightness.
Set Theme This setting will allow you to change the display theme.
5
21_DPF_OM_EN_USC_t.book Page 229
Page 233 of 463
MULTIMEDIA231
Voice
When the Voice button is pressed on the touchscreen, the system displays the options related to the vehicle’s Voice Recognition feature.
Clock
When the Clock button is pressed on the touchscreen, the system displays the different options related to the vehicle’s internal clock.
Setting Name Description
Voice Response LengthT
his setting will change the response length for the Voice Recognition system. The “Brief”
setting provides a shortened audio description from the system. The “Detailed” setting
provides the full audio description from the system.
Show Command List
This setting will allow you to turn the command list on or off. The “Always” setting will always
show the command list. The “With Help” setting will show the command list and provide a brief
description of what the command does. The “Never” setting will turn the command list off.
Setting Name
Description
Sync Time With GPSThis setting will sync the time to the GPS receiver in the system. The system will control the
time via the GPS location.
Set Time And Format/Time Format This setting will allow you to set the time format (AM/PM). Sync Time With GPS must be off for
this setting to be available. The “12 hrs” setting will set the time to a 12-hour format. The
“24 hrs” setting will set the time to a 24-hour format.
Set Time Hours This setting will allow you to set the hours. Sync Time With GPS must be off for this setting to
be available. The “+” setting will increase the hours. The “-” setting will decrease the hours.
5
21_DPF_OM_EN_USC_t.book Page 231