weight RAM CHASSIS CAB 2021 Owners Manual
[x] Cancel search | Manufacturer: RAM, Model Year: 2021, Model line: CHASSIS CAB, Model: RAM CHASSIS CAB 2021Pages: 463, PDF Size: 21.5 MB
Page 7 of 463
5
LANESENSE — IF EQUIPPED ........................... 183 LaneSense Operation ................................183Turning LaneSense On Or Off ...................184LaneSense Warning Message ..................184
Changing LaneSense Status .....................186
PARKVIEW REAR BACK UP CAMERA ............ 186
AUX Camera — If Equipped .......................188
SURROUND VIEW CAMERA SYSTEM — IF
EQUIPPED ........................................................... 189
AUX Camera — If Equipped .......................194
ENGINE RUNAWAY ............................................ 195
REFUELING THE VEHICLE — GASOLINE
ENGINE ................................................................ 195
Loose Fuel Filler Cap Message ................196
REFUELING THE VEHICLE — DIESEL
ENGINE ............................................................... 196
Diesel Exhaust Fluid ..................................196
VEHICLE LOADING ............................................ 199
Gross Vehicle Weight Rating (GVWR) ......199Payload .......................................................199Gross Axle Weight Rating (GAWR) ............200
Tire Size ......................................................200
Rim Size......................................................200
Inflation Pressure ......................................200
Curb Weight................................................200
Loading .......................................................200 TRAILER TOWING ............................................... 200
Common Towing Definitions ..................... 201Trailer Hitch Type and Maximum Trailer
Weight ........................................................ 204 Trailer Towing Weights (Maximum Trailer
Weight Ratings) ......................................... 205 Trailer And Tongue Weight ....................... 205
Towing Requirements ............................... 205Towing Tips ................................................ 211
SNOWPLOW — IF EQUIPPED ............................ 212
Before Plowing ........................................... 212
Snowplow Prep Package Model
Availability .................................................. 212 Over The Road Operation With Snowplow
Attached ..................................................... 213 Operating Tips ............................................ 213General Maintenance................................ 213
RECREATIONAL TOWING (BEHIND
MOTORHOME) ...................................................214
Towing This Vehicle Behind Another
Vehicle ........................................................ 214 Recreational Towing — Two-Wheel Drive
Models ........................................................ 215 Recreational Towing — Four-Wheel Drive
Models ........................................................ 215
DRIVING TIPS ...................................................... 218
Driving On Slippery Surfaces ................... 218
Driving Through Water .............................. 218
MULTIMEDIA
UCONNECT SYSTEMS ....................................... 220
CYBERSECURITY ............................................... 220
UCONNECT 3.0 ................................................... 221 Introduction................................................ 221
Radio Mode ................................................ 222
Media Mode ............................................... 224
Phone Mode............................................... 225
UCONNECT SETTINGS ....................................... 228
Customer Programmable Features .......... 228
UCONNECT INTRODUCTION.............................. 244
System Overview ...................................... 244
Safety And General Information ............... 246
UCONNECT MODES ........................................... 247
Steering Wheel Audio Controls ................. 247
Radio Mode ............................................... 247
Media Mode .............................................. 255Phone Mode .............................................. 258
RADIO OPERATION AND MOBILE PHONES.... 269
Regulatory And Safety Information .......... 269
OFF-ROAD PAGES — IF EQUIPPED .................. 270
Off-Road Pages Status Bar ....................... 270Vehicle Dynamics ...................................... 271
Accessory Gauge ....................................... 271
Pitch & Roll................................................. 272Forward Facing Camera ............................ 272
21_DPF_OM_EN_USC_t.book Page 5
Page 69 of 463
GETTING TO KNOW YOUR VEHICLE67
(Continued)
Center Storage Compartment — If
Equipped
The center storage compartment is located between
the driver and passenger seats. The storage
compartment provides an armrest and contains
both an upper and lower storage area.
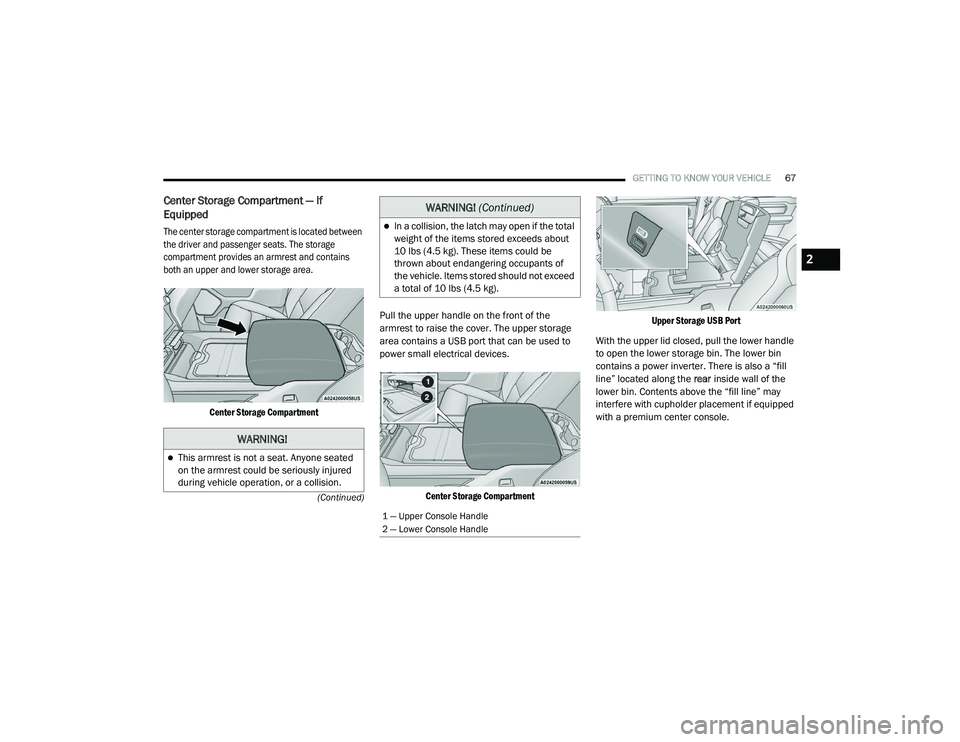
Center Storage Compartment
Pull the upper handle on the front of the
armrest to raise the cover. The upper storage
area contains a USB port that can be used to
power small electrical devices.
Center Storage Compartment Upper Storage USB Port
With the upper lid closed, pull the lower handle
to open the lower storage bin. The lower bin
contains a power inverter. There is also a “fill
line” located along the rear inside wall of the
lower bin. Contents above the “fill line” may
interfere with cupholder placement if equipped
with a premium center console.
WARNING!
This armrest is not a seat. Anyone seated
on the armrest could be seriously injured
during vehicle operation, or a collision.
In a collision, the latch may open if the total
weight of the items stored exceeds about
10 lbs (4.5 kg). These items could be
thrown about endangering occupants of
the vehicle. Items stored should not exceed
a total of 10 lbs (4.5 kg).
1 — Upper Console Handle
2 — Lower Console Handle
WARNING! (Continued)
2
21_DPF_OM_EN_USC_t.book Page 67
Page 139 of 463

STARTING AND OPERATING137
NOTE:
A new engine may consume some oil during its
first few thousand miles (kilometers) of opera -
tion. This should be considered a normal part of
the break-in and not interpreted as a problem.
Please check your oil level with the engine oil
indicator often during the break in period. Add
oil as required.
ENGINE BREAK-IN RECOMMENDATIONS —
DIESEL ENGINE
The Cummins® Turbo Diesel engine does not
require a break-in period due to its construction.
Normal operation is allowed, providing the
following recommendations are followed:
Warm up the engine before placing it under
load.
Do not operate the engine at idle for
prolonged periods.
Use the appropriate transmission gear to
prevent engine lugging.
Observe vehicle oil pressure and tempera -
ture indicators.
Check the coolant and oil levels frequently.
Vary throttle position at highway speeds
when carrying or towing significant weight.
NOTE:
Light duty operation such as light trailer towing
or no load operation will extend the time before
the engine is at full efficiency. Reduced fuel
economy and power may be seen at this time.
For additional vehicle break-in requirements
Ú page 205.
Because of the construction of the Cummins®
Turbo Diesel engine, engine run-in is enhanced
by loaded operating conditions which allow the
engine parts to achieve final finish and fit during
the first 6,000 miles (10,000 km).
PARKING BRAKE
Before leaving the vehicle, make sure that the
parking brake is fully applied. Also, be certain to
leave the transmission in PARK.
The foot operated parking brake is located
below the lower left corner of the instrument
panel. To apply the parking brake, firmly push
the parking brake pedal fully. To release the
parking brake, pull the parking brake release
handle.
Parking Brake Release
CAUTION!
Never use Non-Detergent Oil or Straight
Mineral Oil in the engine or damage may result.
4
21_DPF_OM_EN_USC_t.book Page 137
Page 201 of 463
STARTING AND OPERATING199
Stop filling the DEF tank immediately if DEF
splashes or wells back in the filler neck.
Reinstall cap onto DEF filler tube. Filling The Def Tank In Cold Climates
Since DEF will begin to freeze at 12°F (-11°C),
your vehicle is equipped with an automatic DEF
heating system. This allows the DEF injection
system to operate properly at temperatures
below 12°F (-11°C). If your vehicle is not in
operation for an extended period of time with
temperatures below 12°F (-11°C), the DEF in
the tank may freeze. If the tank is overfilled and
freezes, it could be damaged. Therefore, do not
overfill the DEF tank.
Extra care should be taken when filling with
portable containers to avoid overfilling. Note the
level of the DEF gauge in your instrument cluster.
You may safely add a maximum of 2 gallons
(7.5 liters) of DEF from portable containers when
your DEF gauge is reading ½ full.
VEHICLE LOADING
GROSS VEHICLE WEIGHT RATING
(GVWR)
The GVWR is the total permissible weight of your
vehicle including driver, passengers, vehicle,
options and cargo. The label also specifies
maximum capacities of front and rear axle
systems (GAWR). Total load must be limited
so GVWR and front and rear GAWR are not
exceeded.
PAYLOAD
The payload of a vehicle is defined as the
allowable load weight a truck can carry,
including the weight of the driver, all
passengers, options and cargo.
Never add anything other than DEF to the
tank – especially any form of hydrocarbon
such as diesel fuel, fuel system additives,
gasoline, or any other petroleum-based
product. Even a very small amount of these,
less than 100 parts per million or less than
1 oz. per 78 gallons (295 liters) will contam -
inate the entire DEF system and will require
replacement. If owners use a container,
funnel or nozzle when refilling the tank, it
should either be new or one that is has only
been used for adding DEF. Mopar provides
an attachable nozzle with its DEF for this
purpose.
CAUTION! (Continued)
4
21_DPF_OM_EN_USC_t.book Page 199
Page 202 of 463

200STARTING AND OPERATING
GROSS AXLE WEIGHT RATING (GAWR)
The GAWR is the maximum permissible load
on the front and rear axles. The load must be
distributed in the cargo area so that the GAWR
of each axle is not exceeded.
Each axle GAWR is determined by the
components in the system with the lowest load
carrying capacity (axle, springs, tires or wheels).
Heavier axles or suspension components
sometimes specified by purchasers for increased
durability does not necessarily increase the
vehicle's GVWR.
TIRE SIZE
The tire size on the Vehicle Certification Label
represents the actual tire size on your vehicle.
Replacement tires must be equal to the load
capacity of this tire size.
RIM SIZE
This is the rim size that is appropriate for the tire
size listed.
INFLATION PRESSURE
This is the cold tire inflation pressure for your
vehicle for all loading conditions up to full GAWR.
CURB WEIGHT
The curb weight of a vehicle is defined as the
total weight of the vehicle with all fluids, including
vehicle fuel, at full capacity conditions, and with
no occupants or cargo loaded into the vehicle.
The front and rear curb weight values are
determined by weighing your vehicle on a
commercial scale before any occupants or
cargo are added.
LOADING
The actual total weight and the weight of the
front and rear of your vehicle at the ground can
best be determined by weighing it when it is
loaded and ready for operation.
The entire vehicle should first be weighed on a
commercial scale to ensure that the GVWR has
not been exceeded. The weight on the front and
rear of the vehicle should then be determined
separately to be sure that the load is properly
distributed over the front and rear axles.
Weighing the vehicle may show that the GAWR
of either the front or rear axle has been
exceeded but the total load is within the
specified GVWR. If so, weight must be shifted
from front to rear or rear to front as appropriate
until the specified weight limitations are met. Store the heavier items down low and be sure
that the weight is distributed equally. Stow all
loose items securely before driving.
Improper weight distributions can have an
adverse effect on the way your vehicle steers
and handles and the way the brakes operate.
TRAILER TOWING
In this section you will find safety tips and
information on limits to the type of towing you
can reasonably do with your vehicle. Before
towing a trailer, carefully review this information
to tow your load as efficiently and safely as
possible.
To maintain the New Vehicle Limited Warranty
coverage, follow the requirements and
recommendations in this manual concerning
vehicles used for trailer towing.
CAUTION!
Do not load your vehicle any heavier than the
GVWR or the maximum front and rear GAWR. If
you do, parts on your vehicle can break, or it
can change the way your vehicle handles.
This could cause you to lose control. Also
overloading can shorten the life of your vehicle.
21_DPF_OM_EN_USC_t.book Page 200
Page 203 of 463

STARTING AND OPERATING201
COMMON TOWING DEFINITIONS
The following trailer towing related definitions
will assist you in understanding the following
information:
Gross Vehicle Weight Rating (GVWR)
The GVWR is the total allowable weight of your
vehicle. This includes driver, passengers, cargo
and tongue weight. The total load must be
limited so that you do not exceed the GVWR
Úpage 199.
Gross Trailer Weight (GTW)
The GTW is the weight of the trailer plus
the weight of all cargo, consumables and
equipment (permanent or temporary) loaded
in or on the trailer in its "loaded and ready for
operation" condition.
The recommended way to measure GTW is to
put your fully loaded trailer on a vehicle scale.
The entire weight of the trailer must be
supported by the scale.
Gross Combination Weight Rating (GCWR)
The GCWR is the total allowable weight of your
vehicle and trailer when weighed in combination.
Gross Axle Weight Rating (GAWR)
The GAWR is the maximum capacity of the front and
rear axles. Distribute the load over the front and rear
axles evenly. Make sure that you do not exceed
either front or rear GAWR
Ú
page 199.
Tongue Weight (TW)
The TW is the downward force exerted on the
hitch ball by the trailer. You must consider this
as part of the load on your vehicle.
Trailer Frontal Area
The frontal area is the maximum height
multiplied by the maximum width of the front
of a trailer.
Trailer Sway Control (TSC)
The TSC can be a mechanical telescoping link that
can be installed between the hitch receiver and the
trailer tongue that typically provides adjustable
friction associated with the telescoping motion to
dampen any unwanted trailer swaying motions
while traveling.
If equipped, the electronic TSC recognizes a
swaying trailer and automatically applies
individual wheel brakes and/or reduces engine
power to attempt to eliminate the trailer sway.
Weight-Carrying Hitch
A weight-carrying hitch supports the trailer tongue
weight, just as if it were luggage located at a hitch
ball or some other connecting point of the vehicle.
These kinds of hitches are commonly used to tow
small and medium sized trailers.
WARNING!
If the gross trailer weight is 5,000 lbs
(2,267 kg) or more, it is recommended to use
a weight-distributing hitch to ensure stable
handling of your vehicle. If you use a standard
weight-carrying hitch, you could lose control
of your vehicle and cause a collision.
WARNING!
It is important that you do not exceed the
maximum front or rear GAWR. A dangerous
driving condition can result if either rating
is exceeded. You could lose control of the
vehicle and have a collision.
4
21_DPF_OM_EN_USC_t.book Page 201
Page 204 of 463
202STARTING AND OPERATING
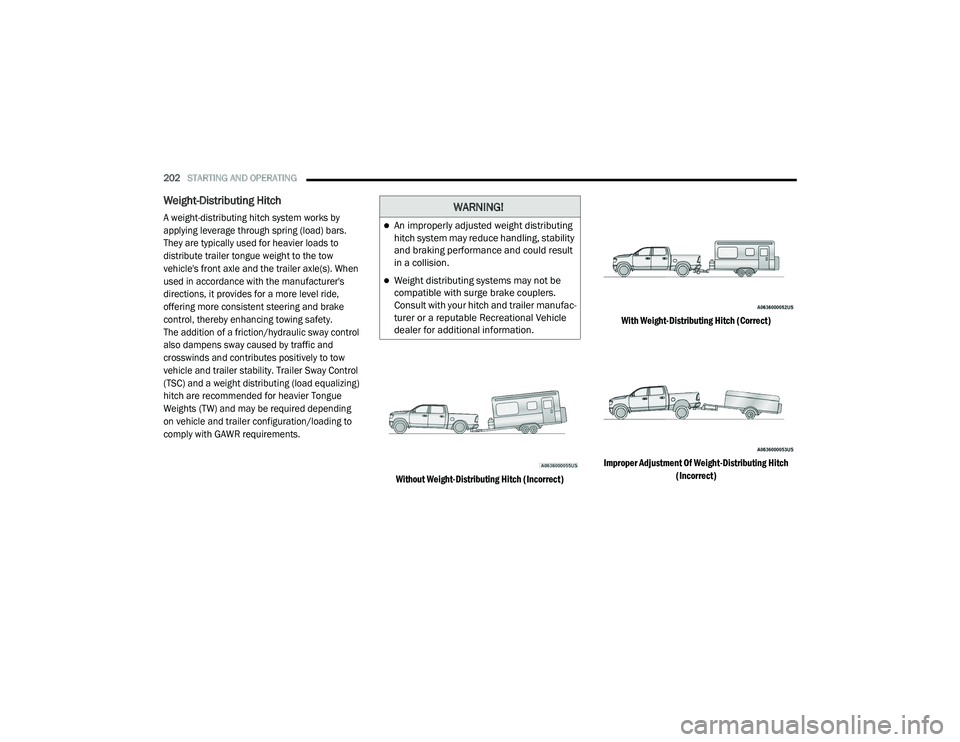
Weight-Distributing Hitch
A weight-distributing hitch system works by
applying leverage through spring (load) bars.
They are typically used for heavier loads to
distribute trailer tongue weight to the tow
vehicle's front axle and the trailer axle(s). When
used in accordance with the manufacturer's
directions, it provides for a more level ride,
offering more consistent steering and brake
control, thereby enhancing towing safety.
The addition of a friction/hydraulic sway control
also dampens sway caused by traffic and
crosswinds and contributes positively to tow
vehicle and trailer stability. Trailer Sway Control
(TSC) and a weight distributing (load equalizing)
hitch are recommended for heavier Tongue
Weights (TW) and may be required depending
on vehicle and trailer configuration/loading to
comply with GAWR requirements.
Without Weight-Distributing Hitch (Incorrect)With Weight-Distributing Hitch (Correct)
Improper Adjustment Of Weight-Distributing Hitch (Incorrect)
WARNING!
An improperly adjusted weight distributing
hitch system may reduce handling, stability
and braking performance and could result
in a collision.
Weight distributing systems may not be
compatible with surge brake couplers.
Consult with your hitch and trailer manufac -
turer or a reputable Recreational Vehicle
dealer for additional information.
21_DPF_OM_EN_USC_t.book Page 202
Page 205 of 463
STARTING AND OPERATING203
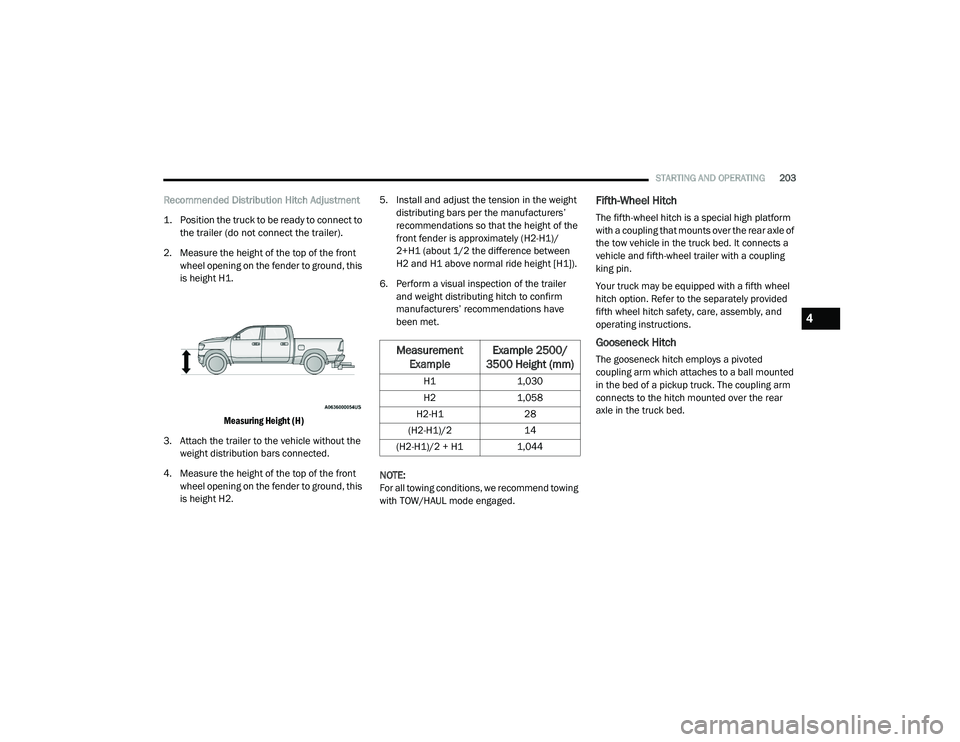
Recommended Distribution Hitch Adjustment
1. Position the truck to be ready to connect to
the trailer (do not connect the trailer).
2. Measure the height of the top of the front wheel opening on the fender to ground, this
is height H1.
Measuring Height (H)
3. Attach the trailer to the vehicle without the weight distribution bars connected.
4. Measure the height of the top of the front wheel opening on the fender to ground, this
is height H2. 5. Install and adjust the tension in the weight
distributing bars per the manufacturers’
recommendations so that the height of the
front fender is approximately (H2-H1)/
2+H1 (about 1/2 the difference between
H2 and H1 above normal ride height [H1]).
6. Perform a visual inspection of the trailer and weight distributing hitch to confirm
manufacturers’ recommendations have
been met.
NOTE:
For all towing conditions, we recommend towing
with TOW/HAUL mode engaged.Fifth-Wheel Hitch
The fifth-wheel hitch is a special high platform
with a coupling that mounts over the rear axle of
the tow vehicle in the truck bed. It connects a
vehicle and fifth-wheel trailer with a coupling
king pin.
Your truck may be equipped with a fifth wheel
hitch option. Refer to the separately provided
fifth wheel hitch safety, care, assembly, and
operating instructions.
Gooseneck Hitch
The gooseneck hitch employs a pivoted
coupling arm which attaches to a ball mounted
in the bed of a pickup truck. The coupling arm
connects to the hitch mounted over the rear
axle in the truck bed.Measurement Example Example 2500/
3500 Height (mm)
H1 1,030
H2 1,058
H2-H1 28
(H2-H1)/2 14
(H2-H1)/2 + H1 1,044
4
21_DPF_OM_EN_USC_t.book Page 203
Page 206 of 463

204STARTING AND OPERATING
TRAILER HITCH TYPE AND MAXIMUM TRAILER WEIGHT
The following chart provides the industry standard for the maximum trailer weight a given trailer hitch class can tow and should be used to assist you
in selecting the correct trailer hitch for your intended towing condition.
Trailer Hitch Classification Definitions
Class Max. Trailer Hitch Industry Standards
Class I - Light Duty 2,000 lbs (907 kg)
Class II - Medium Duty 3,500 lbs (1,587 kg)
Class III - Heavy Duty 6,000 lbs (2,722 kg)
Class IV - Extra Heavy Duty 10,000 lbs (4,535 kg)
Fifth Wheel/Gooseneck Greater than 10,000 lbs (4,535 kg)
Refer to the “Trailer Towing Weights (Maximum Trailer Weight Ratings)” for the Maximum Gross Trailer Weight (GTW) towable for your given drivetrain.
All trailer hitches should be professionally installed on your vehicle.
21_DPF_OM_EN_USC_t.book Page 204
Page 207 of 463

STARTING AND OPERATING205
TRAILER TOWING WEIGHTS (MAXIMUM
T
RAILER WEIGHT RATINGS)
NOTE:
For trailer towing information (maximum trailer
weight ratings) refer to the following website
addresses:
ramtrucks.com/en/towing_guide/
ramtruck.ca (Canada)
rambodybuilder.com
TRAILER AND TONGUE WEIGHT
Never exceed the maximum tongue weight
stamped on your bumper or trailer hitch.
Weight Distribution
Consider the following items when computing
the weight on the rear axle of the vehicle:The tongue weight of the trailer.
The weight of any other type of cargo or
equipment put in or on your vehicle.
The weight of the driver and all passengers.
NOTE:
Remember that everything put into or on the
trailer adds to the load on your vehicle. Also, addi -
tional factory-installed options or dealer-installed
options must be considered as part of the total
load on your vehicle. For the maximum combined
weight of occupants and cargo for your vehicle
Ú
page 411.
TOWING REQUIREMENTS
To promote proper break-in of your new vehicle
drivetrain components, the following guidelines
are recommended.
Perform the maintenance listed in the
“Scheduled Servicing” Ú page 353. When
towing a trailer, never exceed the GAWR or
GCWR ratings.
CAUTION!
Always load a trailer with 60% of the weight in
the front of the trailer. This places 10% of the
GTW on the tow hitch of your vehicle. Loads
balanced over the wheels or heavier in the
rear can cause the trailer to sway severely
side to side which will cause loss of control of
the vehicle and trailer. Failure to load trailers
heavier in front is the cause of many trailer
collisions.
CAUTION!
Do not tow a trailer at all during the first
500 miles (805 km) the new vehicle is driven. The engine, axle or other parts could
be damaged.
Then, during the first 500 miles (805 km)
that a trailer is towed, do not drive over
50 mph (80 km/h) and do not make starts
at full throttle. This helps the engine and
other parts of the vehicle wear in at the
heavier loads.
4
21_DPF_OM_EN_USC_t.book Page 205