steering wheel RAM CHASSIS CAB 2022 Owner's Guide
[x] Cancel search | Manufacturer: RAM, Model Year: 2022, Model line: CHASSIS CAB, Model: RAM CHASSIS CAB 2022Pages: 428, PDF Size: 20.18 MB
Page 176 of 428

174STARTING AND OPERATING
Gross Combination Weight Rating (GCWR)
The GCWR is the total allowable weight of your
vehicle and trailer when weighed in combination.
Gross Axle Weight Rating (GAWR)
The GAWR is the maximum capacity of the front
and rear axles. Distribute the load over the front
and rear axles evenly. Make sure that you do not
exceed either front or rear GAWR Ú page 172.
Tongue Weight (TW)
The TW is the downward force exerted on the hitch
ball by the trailer. You must consider this as part of
the load on your vehicle.
Trailer Frontal Area
The frontal area is the maximum height multiplied
by the maximum width of the front of a trailer.
Trailer Sway Control (TSC)
The TSC can be a mechanical telescoping link that
can be installed between the hitch receiver and the
trailer tongue that typically provides adjustable friction associated with the telescoping motion to
dampen any unwanted trailer swaying motions
while traveling.
If equipped, the electronic TSC recognizes a
swaying trailer and automatically applies individual
wheel brakes and/or reduces engine power to
attempt to eliminate the trailer sway.
Weight-Carrying Hitch
A weight-carrying hitch supports the trailer tongue
weight, just as if it were luggage located at a hitch
ball or some other connecting point of the vehicle.
These kinds of hitches are commonly used to tow
small and medium sized trailers.
Weight-Distributing Hitch
A weight-distributing hitch system works by
applying leverage through spring (load) bars. They
are typically used for heavier loads to distribute
trailer tongue weight to the tow vehicle's front axle
and the trailer axle(s). When used in accordance
with the manufacturer's directions, it provides for a
more level ride, offering more consistent steering
and brake control, thereby enhancing towing
safety. The addition of a friction/hydraulic sway
control also dampens sway caused by traffic and
crosswinds and contributes positively to tow
vehicle and trailer stability. Trailer Sway Control
(TSC) and a weight-distributing (load equalizing)
hitch are recommended for heavier Tongue
Weights (TW) and may be required depending on
vehicle and trailer configuration/loading to comply
with GAWR requirements.
Without Weight-Distributing Hitch (Incorrect)
WARNING!
It is important that you do not exceed the
maximum front or rear GAWR. A dangerous
driving condition can result if either rating is
exceeded. You could lose control of the vehicle
and have a collision.
WARNING!
An improperly adjusted weight-distributing
hitch system may reduce handling, stability
and braking performance and could result in a
collision.
Weight-distributing systems may not be
compatible with surge brake couplers. Consult
with your hitch and trailer manufacturer or a
reputable Recreational Vehicle dealer for
additional information.
22_DPF_OM_EN_USC_t.book Page 174
Page 179 of 428

STARTING AND OPERATING177
(Continued)
(Continued)
TRAILER AND TONGUE WEIGHT
Never exceed the maximum tongue weight
stamped on your bumper or trailer hitch.
Weight Distribution
Consider the following items when computing the
weight on the rear axle of the vehicle:The tongue weight of the trailer.
The weight of any other type of cargo or equip
-
ment put in or on your vehicle.
The weight of the driver and all passengers.
NOTE:Remember that everything put into or on the trailer
adds to the load on your vehicle. Also, additional
factory-installed options or dealer-installed options
must be considered as part of the total load on
your vehicle. For the maximum combined weight of
occupants and cargo for your vehicle Úpage 380.
TOWING REQUIREMENTS
To promote proper break-in of your new vehicle
drivetrain components, the following guidelines
are recommended. Perform the maintenance listed in the “Scheduled
Servicing” Ú
page 328. When towing a trailer,
never exceed the GAWR or GCWR ratings.CAUTION!
Always load a trailer with 60% of the weight in
the front of the trailer. This places 10% of the
GTW on the tow hitch of your vehicle. Loads
balanced over the wheels or heavier in the rear
can cause the trailer to sway severely side to
side which will cause loss of control of the
vehicle and trailer. Failure to load trailers heavier
in front is the cause of many trailer collisions.
CAUTION!
Do not tow a trailer at all during the first
500 miles (805 km) the new vehicle is driven.
The engine, axle or other parts could be
damaged.
Then, during the first 500 miles (805 km) that
a trailer is towed, do not drive over 50 mph
(80 km/h) and do not make starts at full
throttle. This helps the engine and other parts
of the vehicle wear in at the heavier loads.
WARNING!
Make certain that the load is secured in the
trailer and will not shift during travel. When
trailering cargo that is not fully secured,
dynamic load shifts can occur that may be
difficult for the driver to control. You could lose
control of your vehicle and have a collision.
When hauling cargo or towing a trailer, do not
overload your vehicle or trailer. Overloading
can cause a loss of control, poor performance
or damage to brakes, axle, engine, transmis -
sion, steering, suspension, chassis structure
or tires.
CAUTION!
4
22_DPF_OM_EN_USC_t.book Page 177
Page 181 of 428
STARTING AND OPERATING179
Integrated Trailer Brake Module (ITBM) —
If Equipped
Your vehicle may have an ITBM for Electric and
Electric Over Hydraulic (EOH) trailer brakes.
NOTE:This module has been designed and verified with
electric trailer brakes and new electric over
hydraulic systems. Some previous EOH systems
may not be compatible with ITBM.
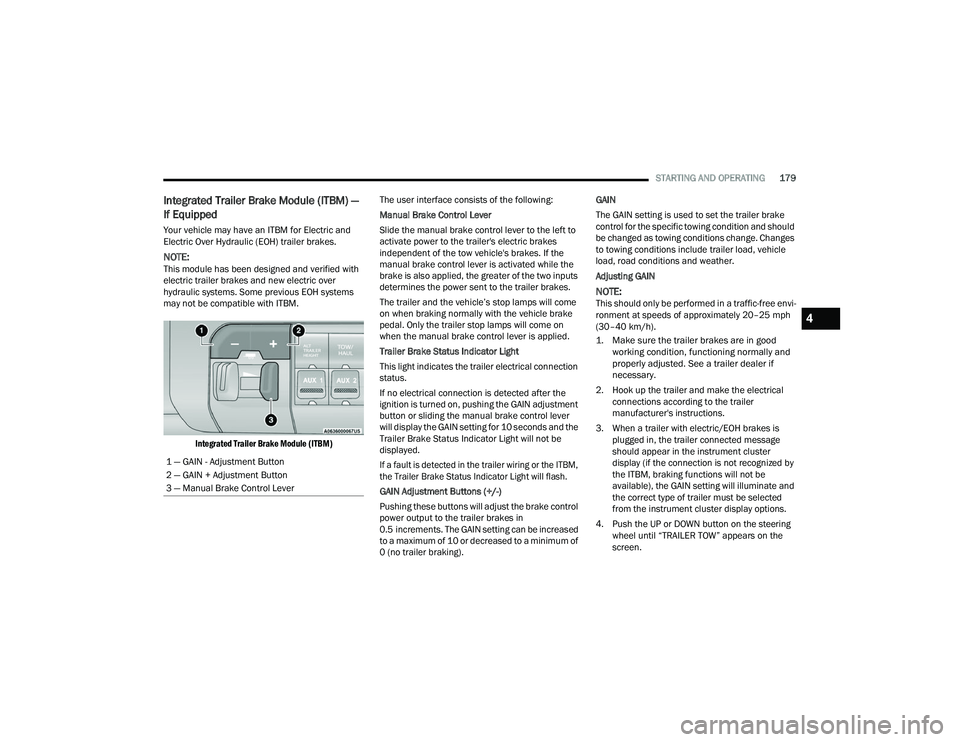
Integrated Trailer Brake Module (ITBM)
The user interface consists of the following:
Manual Brake Control Lever
Slide the manual brake control lever to the left to
activate power to the trailer's electric brakes
independent of the tow vehicle's brakes. If the
manual brake control lever is activated while the
brake is also applied, the greater of the two inputs
determines the power sent to the trailer brakes.
The trailer and the vehicle’s stop lamps will come
on when braking normally with the vehicle brake
pedal. Only the trailer stop lamps will come on
when the manual brake control lever is applied.
Trailer Brake Status Indicator Light
This light indicates the trailer electrical connection
status.
If no electrical connection is detected after the
ignition is turned on, pushing the GAIN adjustment
button or sliding the manual brake control lever
will display the GAIN setting for 10 seconds and the
Trailer Brake Status Indicator Light will not be
displayed.
If a fault is detected in the trailer wiring or the ITBM,
the Trailer Brake Status Indicator Light will flash.
GAIN Adjustment Buttons (+/-)
Pushing these buttons will adjust the brake control
power output to the trailer brakes in
0.5 increments. The GAIN setting can be increased
to a maximum of 10 or decreased to a minimum of
0 (no trailer braking). GAIN
The GAIN setting is used to set the trailer brake
control for the specific towing condition and should
be changed as towing conditions change. Changes
to towing conditions include trailer load, vehicle
load, road conditions and weather.
Adjusting GAIN
NOTE:This should only be performed in a traffic-free envi
-
ronment at speeds of approximately 20–25 mph
(30–40 km/h).
1. Make sure the trailer brakes are in good working condition, functioning normally and
properly adjusted. See a trailer dealer if
necessary.
2. Hook up the trailer and make the electrical connections according to the trailer
manufacturer's instructions.
3. When a trailer with electric/EOH brakes is plugged in, the trailer connected message
should appear in the instrument cluster
display (if the connection is not recognized by
the ITBM, braking functions will not be
available), the GAIN setting will illuminate and
the correct type of trailer must be selected
from the instrument cluster display options.
4. Push the UP or DOWN button on the steering wheel until “TRAILER TOW” appears on the
screen.
1 — GAIN - Adjustment Button
2 — GAIN + Adjustment Button
3 — Manual Brake Control Lever
4
22_DPF_OM_EN_USC_t.book Page 179
Page 182 of 428
180STARTING AND OPERATING
5. Push the RIGHT arrow on the steering wheel to enter “TRAILER TOW”.
6. Push the UP or DOWN buttons until the Trailer Brake Type appears on the screen.
7. Push the RIGHT arrow and then push the UP or DOWN buttons until the proper Trailer Brake
Type appears on the screen. 8. In a traffic-free environment, tow the trailer on
a dry, level surface at a speed of 20–25 mph
(30–40 km/h) and squeeze the manual brake
control lever completely.
9. If the trailer wheels lockup (indicated by squealing tires), reduce the GAIN setting; if the
trailer wheels turn freely, increase the GAIN
setting. Repeat steps 8 and 9 until the GAIN setting is at a
point just below trailer wheel lockup. If towing a
heavier trailer, trailer wheel lockup may not be
attainable even with the maximum GAIN setting of
10.
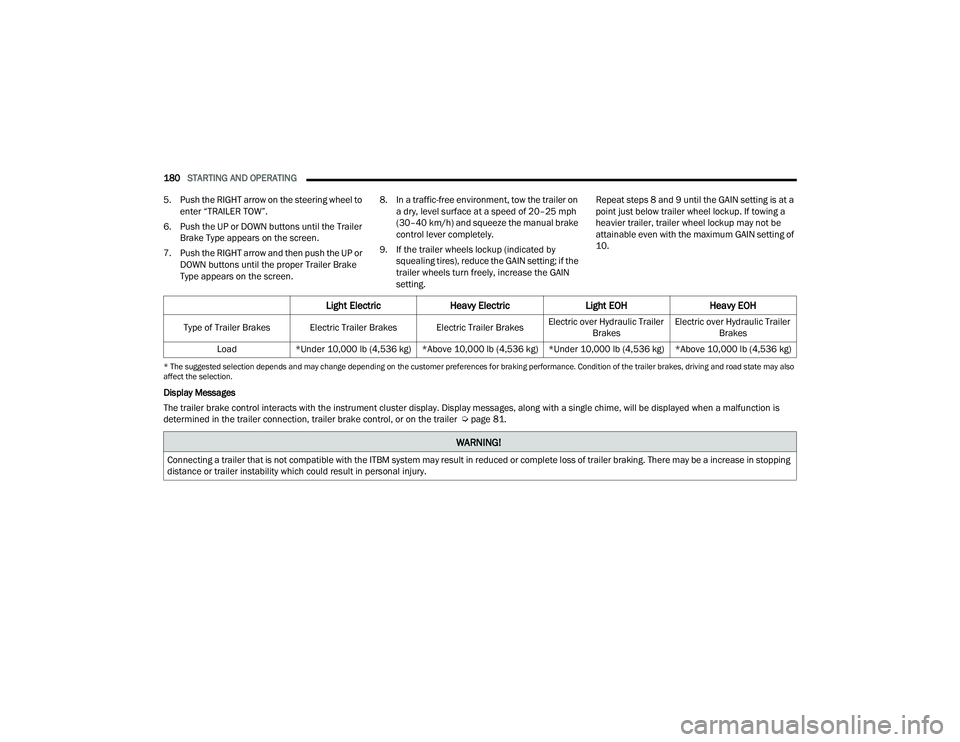
* The suggested selection depends and may change depending on the customer preferences for braking performance. Condition of the trailer brakes, driving and road state may also
affect the selection.
Display Messages
The trailer brake control interacts with the instrument cluster display. Display messages, along with a single chime, will be displayed when a malfunction is
determined in the trailer connection, trailer brake control, or on the trailer Ú
page 81.
Light ElectricHeavy Electric Light EOHHeavy EOH
Type of Trailer Brakes Electric Trailer Brakes Electric Trailer Brakes Electric over Hydraulic Trailer
Brakes Electric over Hydraulic Trailer
Brakes
Load *Under 10,000 lb (4,536 kg) *Above 10,000 lb (4,536 kg) *Under 10,000 lb (4,536 kg) *Above 10,000 lb (4,536 kg)
WARNING!
Connecting a trailer that is not compatible with the ITBM system may result in reduced or complete loss of trailer braking. There may be a increase in stopping
distance or trailer instability which could result in personal injury.
22_DPF_OM_EN_USC_t.book Page 180
Page 195 of 428
MULTIMEDIA193
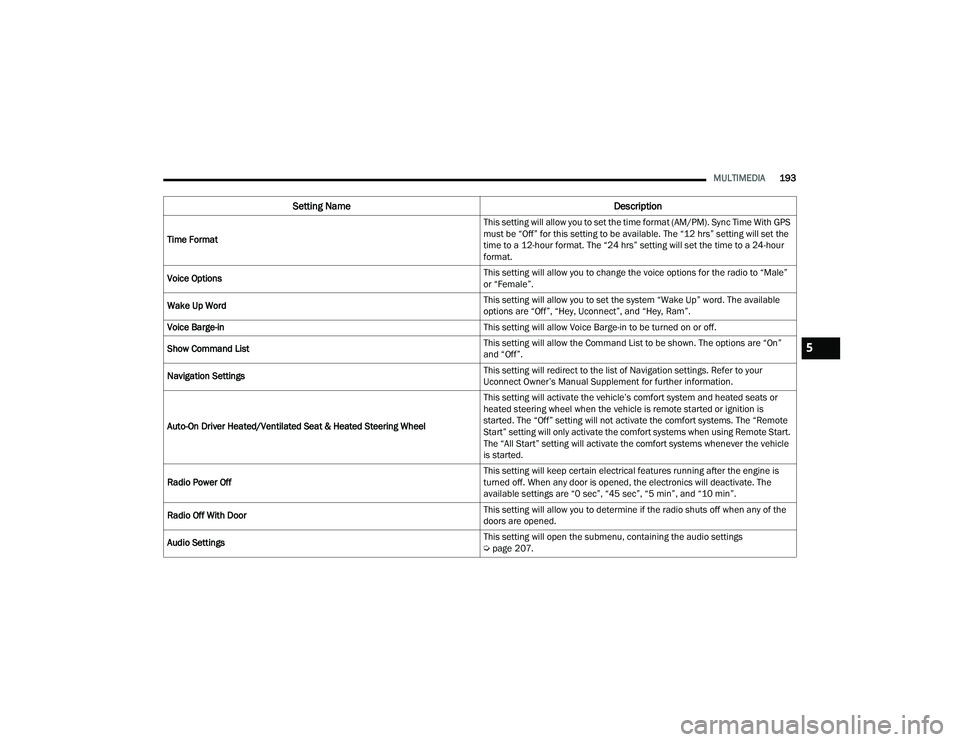
Time Format This setting will allow you to set the time format (AM/PM). Sync Time With GPS
must be “Off” for this setting to be available. The “12 hrs” setting will set the
time to a 12-hour format. The “24 hrs” setting will set the time to a 24-hour
format.
Voice Options This setting will allow you to change the voice options for the radio to “Male”
or “Female”.
Wake Up Word This setting will allow you to set the system “Wake Up” word. The available
options are “Off”, “Hey, Uconnect”, and “Hey, Ram”.
Voice Barge-in This setting will allow Voice Barge-in to be turned on or off.
Show Command List This setting will allow the Command List to be shown. The options are “On”
and “Off”.
Navigation Settings This setting will redirect to the list of Navigation settings. Refer to your
Uconnect Owner’s Manual Supplement for further information.
Auto-On Driver Heated/Ventilated Seat & Heated Steering Wheel This setting will activate the vehicle’s comfort system and heated seats or
heated steering wheel when the vehicle is remote started or ignition is
started. The “Off” setting will not activate the comfort systems. The “Remote
Start” setting will only activate the comfort systems when using Remote Start.
The “All Start” setting will activate the comfort systems whenever the vehicle
is started.
Radio Power Off This setting will keep certain electrical features running after the engine is
turned off. When any door is opened, the electronics will deactivate. The
available settings are “0 sec”, “45 sec”, “5 min”, and “10 min”.
Radio Off With Door This setting will allow you to determine if the radio shuts off when any of the
doors are opened.
Audio Settings This setting will open the submenu, containing the audio settings
Ú
page 207.
Setting Name Description
5
22_DPF_OM_EN_USC_t.book Page 193
Page 199 of 428

MULTIMEDIA197
Forward Collision Warning This setting will turn the Forward Collision Warning system on or off. The “Off”
setting will deactivate the FCW system. The “Warning Only” setting will provide
only an audible chime when a collision is detected. The “Warning + Active
Braking” setting will provide an audible chime and apply some brake pressure
when a collision is detected.
Pedestrian Emergency Braking This setting will turn the Pedestrian Emergency Braking system on or off.
LaneSense Warning This setting will change the distance at which the steering wheel will provide
lane departure feedback. The available settings are “Early”, “Medium”, and
“Late”.
LaneSense Strength This setting will change the strength of the steering wheel feedback during a
lane departure. The available settings are “Low”, “Medium”, and “High”.
ParkSense This setting will change the type of ParkSense alert when a close object is
detected and provide both an audible chime and a visual display.
Front ParkSense Volume This setting adjusts the volume of the Front ParkSense system. The available
settings are “Low”, “Medium”, and “High”.
Rear ParkSense Volume This setting adjusts the volume of the Rear ParkSense system. The available
settings are “Low”, “Medium”, and “High”.
Rear ParkSense Braking Assist This setting will turn the Rear ParkSense Braking Assist on or off.
Blind Spot Alert This setting will change the type of alert provided when an object is detected
in a vehicle’s blind spot. The “Off” setting will turn off Blind Spot Alert. The
“Lights” setting will activate the Blind Spot Alert lights on the outside mirrors.
The “Lights & Chime” setting will activate both the lights on the outside
mirrors and an audible chime.
Trailer Length For Blind Spot Alert This setting will auto detect the length of an attached trailer. The “Auto”
setting will have the system automatically set the trailer length. The “Max”
setting will always set the length to the maximum 39.5 ft (12 m).
Setting Name
Description
5
22_DPF_OM_EN_USC_t.book Page 197
Page 205 of 428
MULTIMEDIA203
Lights
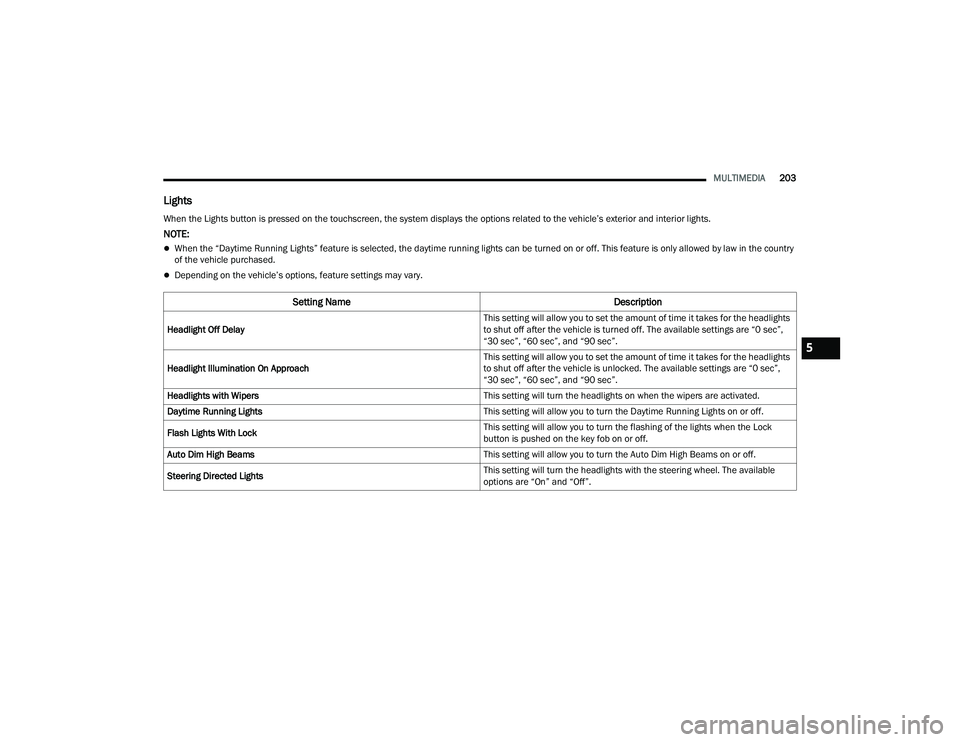
When the Lights button is pressed on the touchscreen, the system displays the options related to the vehicle’s exterior and interior lights.
NOTE:
When the “Daytime Running Lights” feature is selected, the daytime running lights can be turned on or off. This feature is only allowed by law in the country
of the vehicle purchased.
Depending on the vehicle’s options, feature settings may vary.
Setting Name Description
Headlight Off Delay This setting will allow you to set the amount of time it takes for the headlights
to shut off after the vehicle is turned off. The available settings are “0 sec”,
“30 sec”, “60 sec”, and “90 sec”.
Headlight Illumination On Approach This setting will allow you to set the amount of time it takes for the headlights
to shut off after the vehicle is unlocked. The available settings are “0 sec”,
“30 sec”, “60 sec”, and “90 sec”.
Headlights with Wipers This setting will turn the headlights on when the wipers are activated.
Daytime Running Lights This setting will allow you to turn the Daytime Running Lights on or off.
Flash Lights With Lock This setting will allow you to turn the flashing of the lights when the Lock
button is pushed on the key fob on or off.
Auto Dim High Beams This setting will allow you to turn the Auto Dim High Beams on or off.
Steering Directed Lights This setting will turn the headlights with the steering wheel. The available
options are “On” and “Off”.
5
22_DPF_OM_EN_USC_t.book Page 203
Page 207 of 428
MULTIMEDIA205
Seats & Comfort/Auto-On Comfort Systems
Sound Horn With Remote Start This setting will sound the horn when the remote start is activated from the
key fob.
Remote Door Unlock, Door Lock/1st Press Of Key Fob Unlocks This setting will change how many pushes of the Unlock button on the key fob
are needed to unlock all the doors. The “Driver Door” setting will only unlock
the driver door on the first push on the Unlock button. The “All Doors” setting
will unlock all doors with only one push of the Unlock button.
Passive Entry This setting will allow you to turn the Passive Entry feature (Keyless Enter ‘n
Go™) on or off.
Personal Settings Linked To Key Fob This setting will recall preset radio stations and driver seat position that have
been linked to the key fob.
When the Seats & Comfort/Auto-On Comfort Systems button is pressed on the touchscreen, the system displays the options related to the vehicle’s comfort
systems when remote start has been activated or the vehicle has been started.
NOTE:Depending on the vehicle’s options, feature settings may vary.
Setting Name Description
Auto-On Driver Heated/Ventilated Seat & Heated Steering Wheel With Vehicle
Start
This setting will activate the vehicle’s comfort systems and heated seats or
heated steering wheel when the vehicle is remote started or ignition is started.
The “Off” setting will not activate the comfort systems. The “Remote Start”
setting will only activate the comfort systems when using Remote Start. The “All
Start” setting will activate the comfort systems whenever the vehicle is started.
Easy Exit Seats This setting will automatically move the driver seat rearward when the engine
is shut off. The available settings are “On” and “Off”.
Setting Name
Description
5
22_DPF_OM_EN_USC_t.book Page 205
Page 215 of 428
MULTIMEDIA213
SAFETY AND GENERAL INFORMATION
Safety Guidelines
Please read this manual carefully before using the
system. It contains instructions on how to use the
system in a safe and effective manner.
Do NOT attach any object to the touchscreen.
Doing so can result in damage to the touchscreen.
Please read and follow these safety precautions.
Failure to do so may result in injury or property
damage.
Glance at the screen only when safe to do so. If
prolonged viewing of the screen is required,
park in a safe location and set the parking
brake.
Stop use immediately if a problem occurs.
Failure to do so may cause injury or damage to
the product. See an authorized dealer for repair.
Ensure the volume level of the system is set to a
level that still allows you to hear outside traffic
and emergency vehicles.
Safe Usage Of The Uconnect System
The Uconnect system is a sophisticated elec -
tronic device. Do not let young children use the
system.
Permanent hearing loss may occur if you play
your music or sound system at loud volumes.
Exercise caution when setting the volume on the
system.
Keep drinks, rain and other sources of moisture
away from the system. Besides damage to the
system, moisture can cause electric shocks as
with any electronic device.
NOTE:Many features of this system are speed
dependent. For your own safety, it is not possible to
use some of the touchscreen features while the
vehicle is in motion.
Care And Maintenance
Do not press the touchscreen with any hard or
sharp objects (pen, USB stick, jewelry, etc.),
which could scratch the surface.
Do not spray any liquid or chemicals directly on
the screen! Use a clean and dry microfiber lens
cleaning cloth in order to clean the touchscreen.
If necessary, use a lint-free cloth dampened
with a cleaning solution, such as isopropyl
alcohol or an isopropyl alcohol and water solu -
tion ratio of 50:50. Be sure to follow the solvent
manufacturer's precautions and directions
Ú page 412.
UCONNECT MODES
STEERING WHEEL AUDIO CONTROLS
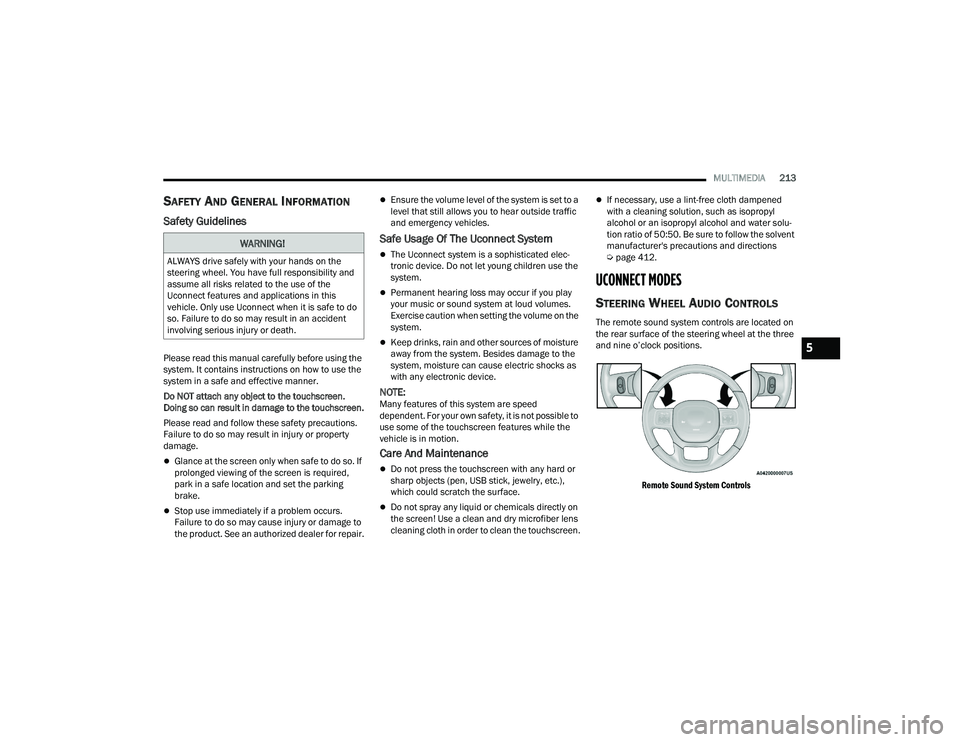
The remote sound system controls are located on
the rear surface of the steering wheel at the three
and nine o’clock positions.
Remote Sound System Controls
WARNING!
ALWAYS drive safely with your hands on the
steering wheel. You have full responsibility and
assume all risks related to the use of the
Uconnect features and applications in this
vehicle. Only use Uconnect when it is safe to do
so. Failure to do so may result in an accident
involving serious injury or death.
5
22_DPF_OM_EN_USC_t.book Page 213
Page 217 of 428
MULTIMEDIA215
Tune/Scroll Control
Turn the rotary TUNE/SCROLL control knob
clockwise to increase or counterclockwise to
decrease the radio station frequency. Push the
ENTER/BROWSE button to choose a selection.
Seek
The Seek Up and Down functions are activated by
pressing the double arrow buttons on the
touchscreen to the right and left of the radio
station display or by pushing the left steering wheel
audio control button up or down.
Seek Up and Seek Down
Press and release the Seek Up or Seek
Down button to tune the radio to the next
available station or channel. During a Seek Up/
Down function, if the radio reaches the starting
station after passing through the entire band two
times, the radio will stop at the station where it
began.
Fast Seek Up and Fast Seek Down
Press and hold, and then release the Seek Up
or Seek Down button to advance the radio
through the available stations or channels at a
faster rate. The radio stops at the next available
station or channel when the button on the
touchscreen is released.
NOTE:
Pressing and holding either the Seek Up or
Seek Down button will scan the different
frequency bands at a slower rate.
Info — If Equipped
Press the Info button to display information related
to the currently playing song and radio station.
Direct Tune
Press the Tune button located at the bottom of the
radio screen to directly tune to a desired radio
station or channel.
Press the available number button on the
touchscreen to begin selecting a desired station.
Once a number has been entered, any numbers
that are no longer possible (stations that cannot be
reached) will become deactivated/grayed out.
Undo
You can backspace an entry by pressing the
Back button on the touchscreen.
GO
Once the last digit of a station has been entered,
press “Ok”. The Direct Tune screen will close, and
the system will automatically tune to that station.
RADIO VOICE COMMANDS
Use your voice to quickly get to the AM, FM, or
SiriusXM® Satellite Radio stations you would like
to hear. (Subscription or included SiriusXM®
Satellite Radio trial required.)
Push the VR button on the steering wheel and
wait for the beep to say a command. See an
example below:
“ Tune to ninety-five-point-five FM”
“Tune to Satellite Channel Hits 1”
Did You Know: At any time, if you are not sure of
what to say or want to learn a Voice Command,
push the VR button and say “ Help”. The system
provides you with a list of commands.
SiriusXM® Satellite Radio Mode —
If Equipped
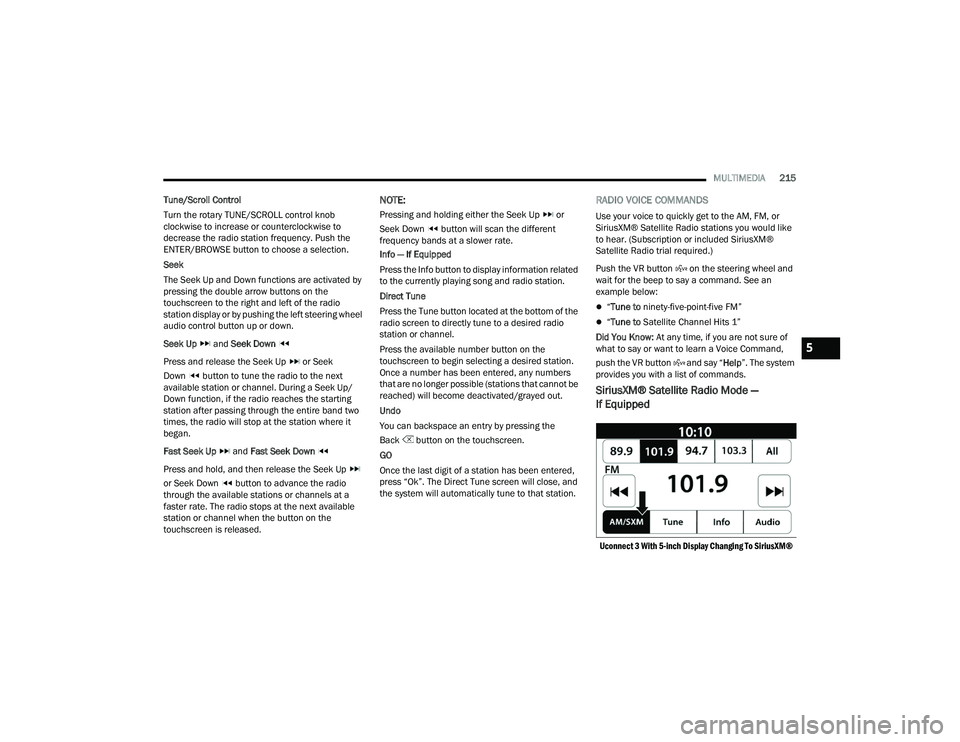
Uconnect 3 With 5-inch Display Changing To SiriusXM®
5
22_DPF_OM_EN_USC_t.book Page 215