engine RAM CHASSIS CAB 2023 Owner's Manual
[x] Cancel search | Manufacturer: RAM, Model Year: 2023, Model line: CHASSIS CAB, Model: RAM CHASSIS CAB 2023Pages: 444, PDF Size: 20.51 MB
Page 55 of 444
GETTING TO KNOW YOUR VEHICLE53
DIRECTIONAL LED HEADLAMP SYSTEM —
I
F EQUIPPED
This is a system consisting of LED (low/high beam)
headlights that incorporate dynamic cornering with
5-degree inboard/15-degree outboard swivel. The
headlights continuously and automatically adapt
to the driving conditions around bends or when
cornering based on steering wheel angle.
The system directs the headlights to light up the
road in the best way, taking into account the speed
of the vehicle and the bend or corner angle, as well
as the speed of the vehicle while the steering
wheel is being turned.
The adaptive lights are automatically activated
when the vehicle is traveling above approximately
5 mph (8 km/h).
This system can be turned on/off through the
Uconnect Settings under “Steering Directed
Lights” Ú page 199.
PARKING LIGHTS
To turn on the parking lights and instrument panel
lights, rotate the headlight switch clockwise. To
turn off the parking lights, rotate the headlight
switch back to the O (off) position.
NOTE:Vehicles sold in Canada are equipped with a head -
light switch with an AUTO and ON detent but without an OFF detent. Headlights will be deacti-
vated when the headlight switch is placed in the
parking lights position. However, the Daytime
Running Lights (DRLs) will be activated along with
the front and rear marker lights. The DRLs may be
deactivated when the parking brake is engaged.
HEADLIGHTS ON WITH WIPERS
If your vehicle is equipped with Automatic
Headlights, it also has this
customer-programmable feature. When your
headlights are in the automatic mode and the
engine is running, they will automatically turn on
when the wiper system is on. This feature is
programmable through the Uconnect system
Ú
page 199.
If your vehicle is equipped with the Rain Sensing
Wiper system Ú page 58, and it is activated, the
headlights will automatically turn on after the
wipers complete five wipe cycles within
approximately one minute. They will turn off
approximately four minutes after the wipers
completely stop.
NOTE:When your headlights come on during the daytime,
the instrument panel lights will automatically dim
to the lower nighttime intensity.
HEADLIGHT ILLUMINATION ON
A
PPROACH
When enabled, the headlights, exterior door
handle pocket lights (if equipped), and interior
lights will illuminate when the unlock button on the
key fob is pushed as the operator is approaching
the vehicle. This feature can be turned on/off, and
the length of time the headlights stay on can be
programmed for up to 90 seconds within Uconnect
Settings Ú page 199.
HEADLIGHT DELAY
To assist when exiting the vehicle, the headlight
delay feature will leave the headlights on for up to
90 seconds. This delay is initiated when the
ignition is placed in the OFF position while the
headlight switch is on, and then the headlight
switch is cycled off. Headlight delay can be
canceled by either turning the headlight switch on
then off, or by placing the ignition in the ON
position.
NOTE:
This feature can be programmed through the
Uconnect system Ú page 199.
The headlight delay feature is automatically
activated if the headlight switch is left in the
AUTO position when the ignition is placed in the
OFF position.
2
23_DPF_OM_EN_USC_t.book Page 53
Page 66 of 444
64GETTING TO KNOW YOUR VEHICLE
Mix Mode
Air is directed through the floor, defrost,
and side window demister outlets. This
setting works best in cold or snowy
conditions that require extra heat to the
windshield. This setting is good for maintaining
comfort while reducing moisture on the
windshield.
AUTOMATIC TEMPERATURE CONTROL
(ATC)
Automatic Operation
1. Push the AUTO button on the faceplate, or the
AUTO button on the touchscreen on the
Automatic Temperature Control (ATC) Panel.
2. Next, adjust the temperature you would like the system to maintain by adjusting the driver
and passenger temperature control buttons.
Once the desired temperature is displayed, the
system will achieve and automatically
maintain that comfort level.
3. When the system is set up for your comfort level, it is not necessary to change the
settings. You will experience the greatest
efficiency by simply allowing the system to
function automatically.
NOTE:
It is not necessary to move the temperature
settings for cold or hot vehicles. The system
automatically adjusts the temperature, mode,
and blower speed to provide comfort as quickly
as possible.
The temperature can be displayed in U.S. or
Metric units by selecting the U.S./Metric within
Uconnect Settings Ú page 199.
To provide you with maximum comfort in the
Automatic mode during cold start-ups, the blower
fan will remain on low until the engine warms up.
The blower will increase in speed and transition
into Auto mode.
Manual Operation Override
This system offers a full complement of manual
override features. The AUTO symbol in the front
ATC display will be turned off when the system is
being used in the manual mode.
CLIMATE VOICE RECOGNITION —
I
F EQUIPPED
Adjust vehicle temperatures hands-free and keep
everyone comfortable while you keep moving
ahead. Push the VR button on the steering wheel. After the
beep, say one of the following commands:
“
Set driver temperature to 70 degrees ”
“Set passenger temperature to 70 degrees ”
Did you know: Voice Command for Climate may
only be used to adjust the interior temperature of
your vehicle. Voice Command will not work to
adjust the heated seats or steering wheel if
equipped.
OPERATING TIPS
Refer to the chart at the end of this section for
suggested control settings for various weather
conditions.
Summer Operation
The engine cooling system must be protected with
a high-quality antifreeze coolant to provide proper
corrosion protection and to protect against engine
overheating. OAT coolant (conforming to
MS.90032) is recommended.
Winter Operation
To ensure the best possible heater and defroster
performance, make sure the engine cooling
system is functioning properly and the proper
amount, type, and concentration of coolant is
used. Use of the Air Recirculation mode during
Winter months is not recommended, because it
may cause window fogging.
23_DPF_OM_EN_USC_t.book Page 64
Page 74 of 444
72GETTING TO KNOW YOUR VEHICLE
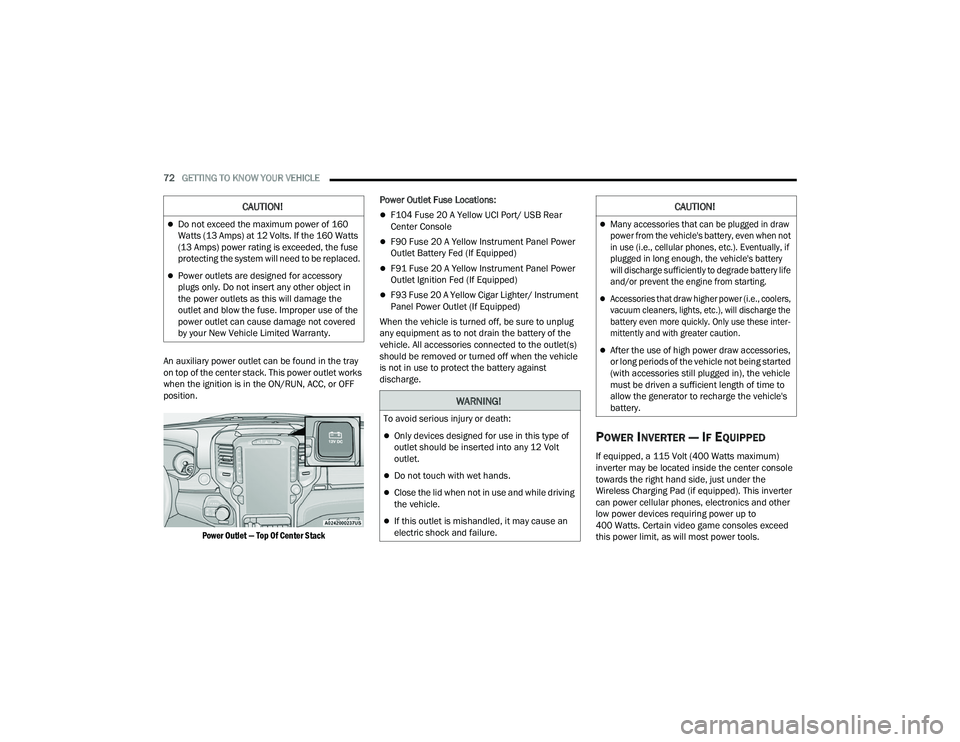
An auxiliary power outlet can be found in the tray
on top of the center stack. This power outlet works
when the ignition is in the ON/RUN, ACC, or OFF
position.
Power Outlet — Top Of Center Stack
Power Outlet Fuse Locations:
F104 Fuse 20 A Yellow UCI Port/ USB Rear
Center Console
F90 Fuse 20 A Yellow Instrument Panel Power
Outlet Battery Fed (If Equipped)
F91 Fuse 20 A Yellow Instrument Panel Power
Outlet Ignition Fed (If Equipped)
F93 Fuse 20 A Yellow Cigar Lighter/ Instrument
Panel Power Outlet (If Equipped)
When the vehicle is turned off, be sure to unplug
any equipment as to not drain the battery of the
vehicle. All accessories connected to the outlet(s)
should be removed or turned off when the vehicle
is not in use to protect the battery against
discharge.
POWER INVERTER — IF EQUIPPED
If equipped, a 115 Volt (400 Watts maximum)
inverter may be located inside the center console
towards the right hand side, just under the
Wireless Charging Pad (if equipped). This inverter
can power cellular phones, electronics and other
low power devices requiring power up to
400 Watts. Certain video game consoles exceed
this power limit, as will most power tools.
CAUTION!
Do not exceed the maximum power of 160
Watts (13 Amps) at 12 Volts. If the 160 Watts
(13 Amps) power rating is exceeded, the fuse
protecting the system will need to be replaced.
Power outlets are designed for accessory
plugs only. Do not insert any other object in
the power outlets as this will damage the
outlet and blow the fuse. Improper use of the
power outlet can cause damage not covered
by your New Vehicle Limited Warranty.
WARNING!
To avoid serious injury or death:
Only devices designed for use in this type of
outlet should be inserted into any 12 Volt
outlet.
Do not touch with wet hands.
Close the lid when not in use and while driving
the vehicle.
If this outlet is mishandled, it may cause an
electric shock and failure.
CAUTION!
Many accessories that can be plugged in draw
power from the vehicle's battery, even when not
in use (i.e., cellular phones, etc.). Eventually, if
plugged in long enough, the vehicle's battery
will discharge sufficiently to degrade battery life
and/or prevent the engine from starting.
Accessories that draw higher power (i.e., coolers,
vacuum cleaners, lights, etc.), will discharge the
battery even more quickly. Only use these inter -
mittently and with greater caution.
After the use of high power draw accessories,
or long periods of the vehicle not being started
(with accessories still plugged in), the vehicle
must be driven a sufficient length of time to
allow the generator to recharge the vehicle's
battery.
23_DPF_OM_EN_USC_t.book Page 72
Page 81 of 444
GETTING TO KNOW YOUR INSTRUMENT PANEL79
Use this QR code to access your
digital experience.
MIDLINE INSTRUMENT
C
LUSTER DESCRIPTIONS
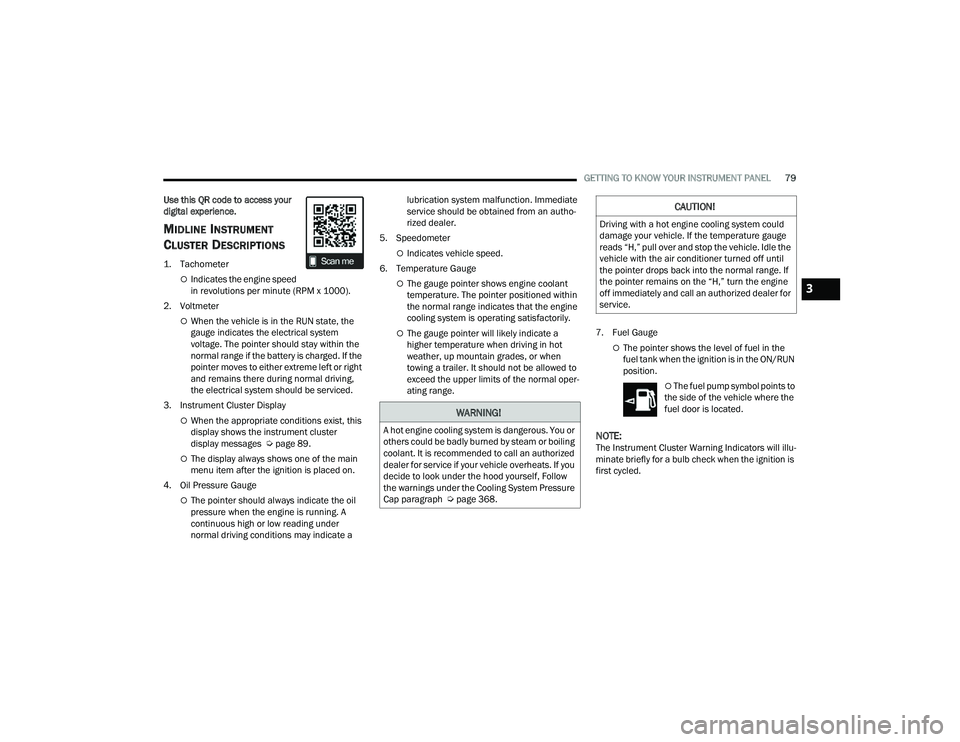
1. Tachometer
Indicates the engine speed
in revolutions per minute (RPM x 1000).
2. Voltmeter
When the vehicle is in the RUN state, the
gauge indicates the electrical system
voltage. The pointer should stay within the
normal range if the battery is charged. If the
pointer moves to either extreme left or right
and remains there during normal driving,
the electrical system should be serviced.
3. Instrument Cluster Display
When the appropriate conditions exist, this
display shows the instrument cluster
display messages Ú page 89.
The display always shows one of the main
menu item after the ignition is placed on.
4. Oil Pressure Gauge
The pointer should always indicate the oil
pressure when the engine is running. A
continuous high or low reading under
normal driving conditions may indicate a lubrication system malfunction. Immediate
service should be obtained from an autho
-
rized dealer.
5. Speedometer
Indicates vehicle speed.
6. Temperature Gauge
The gauge pointer shows engine coolant
temperature. The pointer positioned within
the normal range indicates that the engine
cooling system is operating satisfactorily.
The gauge pointer will likely indicate a
higher temperature when driving in hot
weather, up mountain grades, or when
towing a trailer. It should not be allowed to
exceed the upper limits of the normal oper -
ating range. 7. Fuel Gauge
The pointer shows the level of fuel in the
fuel tank when the ignition is in the ON/RUN
position.
The fuel pump symbol points to
the side of the vehicle where the
fuel door is located.
NOTE:The Instrument Cluster Warning Indicators will illu -
minate briefly for a bulb check when the ignition is
first cycled.
WARNING!
A hot engine cooling system is dangerous. You or
others could be badly burned by steam or boiling
coolant. It is recommended to call an authorized
dealer for service if your vehicle overheats. If you
decide to look under the hood yourself, Follow
the warnings under the Cooling System Pressure
Cap paragraph Ú page 368.
CAUTION!
Driving with a hot engine cooling system could
damage your vehicle. If the temperature gauge
reads “H,” pull over and stop the vehicle. Idle the
vehicle with the air conditioner turned off until
the pointer drops back into the normal range. If
the pointer remains on the “H,” turn the engine
off immediately and call an authorized dealer for
service.
3
23_DPF_OM_EN_USC_t.book Page 79
Page 83 of 444
GETTING TO KNOW YOUR INSTRUMENT PANEL81
HIGHLINE INSTRUMENT CLUSTER
D
ESCRIPTIONS
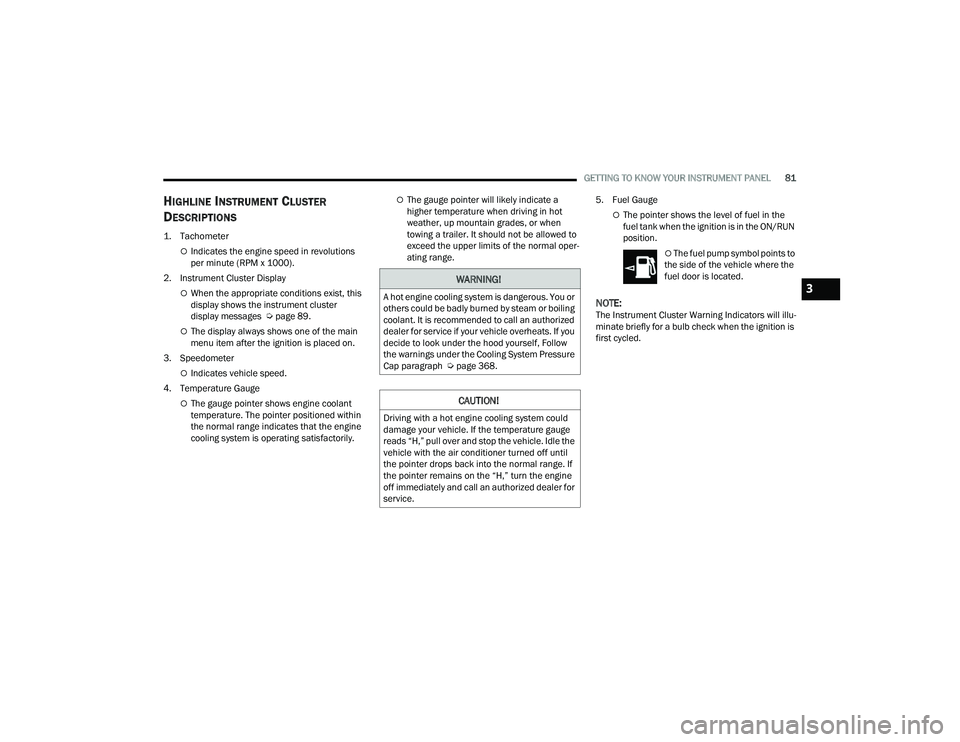
1. Tachometer
Indicates the engine speed in revolutions
per minute (RPM x 1000).
2. Instrument Cluster Display
When the appropriate conditions exist, this
display shows the instrument cluster
display messages Ú page 89.
The display always shows one of the main
menu item after the ignition is placed on.
3. Speedometer
Indicates vehicle speed.
4. Temperature Gauge
The gauge pointer shows engine coolant
temperature. The pointer positioned within
the normal range indicates that the engine
cooling system is operating satisfactorily.
The gauge pointer will likely indicate a
higher temperature when driving in hot
weather, up mountain grades, or when
towing a trailer. It should not be allowed to
exceed the upper limits of the normal oper -
ating range. 5. Fuel Gauge
The pointer shows the level of fuel in the
fuel tank when the ignition is in the ON/RUN
position.
The fuel pump symbol points to
the side of the vehicle where the
fuel door is located.
NOTE:The Instrument Cluster Warning Indicators will illu -
minate briefly for a bulb check when the ignition is
first cycled.
WARNING!
A hot engine cooling system is dangerous. You or
others could be badly burned by steam or boiling
coolant. It is recommended to call an authorized
dealer for service if your vehicle overheats. If you
decide to look under the hood yourself, Follow
the warnings under the Cooling System Pressure
Cap paragraph Ú page 368.
CAUTION!
Driving with a hot engine cooling system could
damage your vehicle. If the temperature gauge
reads “H,” pull over and stop the vehicle. Idle the
vehicle with the air conditioner turned off until
the pointer drops back into the normal range. If
the pointer remains on the “H,” turn the engine
off immediately and call an authorized dealer for
service.
3
23_DPF_OM_EN_USC_t.book Page 81
Page 85 of 444
GETTING TO KNOW YOUR INSTRUMENT PANEL83
PREMIUM INSTRUMENT CLUSTER
D
ESCRIPTIONS — GASOLINE
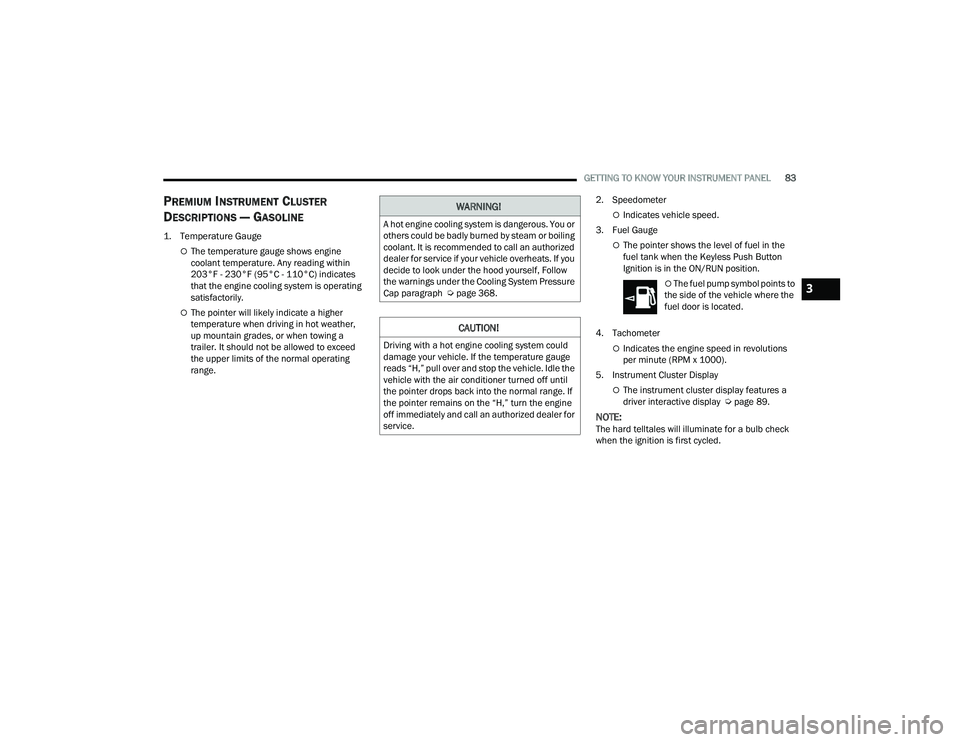
1. Temperature Gauge
The temperature gauge shows engine
coolant temperature. Any reading within
203°F - 230°F (95°C - 110°C) indicates
that the engine cooling system is operating
satisfactorily.
The pointer will likely indicate a higher
temperature when driving in hot weather,
up mountain grades, or when towing a
trailer. It should not be allowed to exceed
the upper limits of the normal operating
range. 2. Speedometer
Indicates vehicle speed.
3. Fuel Gauge
The pointer shows the level of fuel in the
fuel tank when the Keyless Push Button
Ignition is in the ON/RUN position.
The fuel pump symbol points to
the side of the vehicle where the
fuel door is located.
4. Tachometer
Indicates the engine speed in revolutions
per minute (RPM x 1000).
5. Instrument Cluster Display
The instrument cluster display features a
driver interactive display Ú page 89.
NOTE:The hard telltales will illuminate for a bulb check
when the ignition is first cycled.
WARNING!
A hot engine cooling system is dangerous. You or
others could be badly burned by steam or boiling
coolant. It is recommended to call an authorized
dealer for service if your vehicle overheats. If you
decide to look under the hood yourself, Follow
the warnings under the Cooling System Pressure
Cap paragraph Úpage 368.
CAUTION!
Driving with a hot engine cooling system could
damage your vehicle. If the temperature gauge
reads “H,” pull over and stop the vehicle. Idle the
vehicle with the air conditioner turned off until
the pointer drops back into the normal range. If
the pointer remains on the “H,” turn the engine
off immediately and call an authorized dealer for
service.
3
23_DPF_OM_EN_USC_t.book Page 83
Page 87 of 444
GETTING TO KNOW YOUR INSTRUMENT PANEL85
DIESEL INSTRUMENT CLUSTER
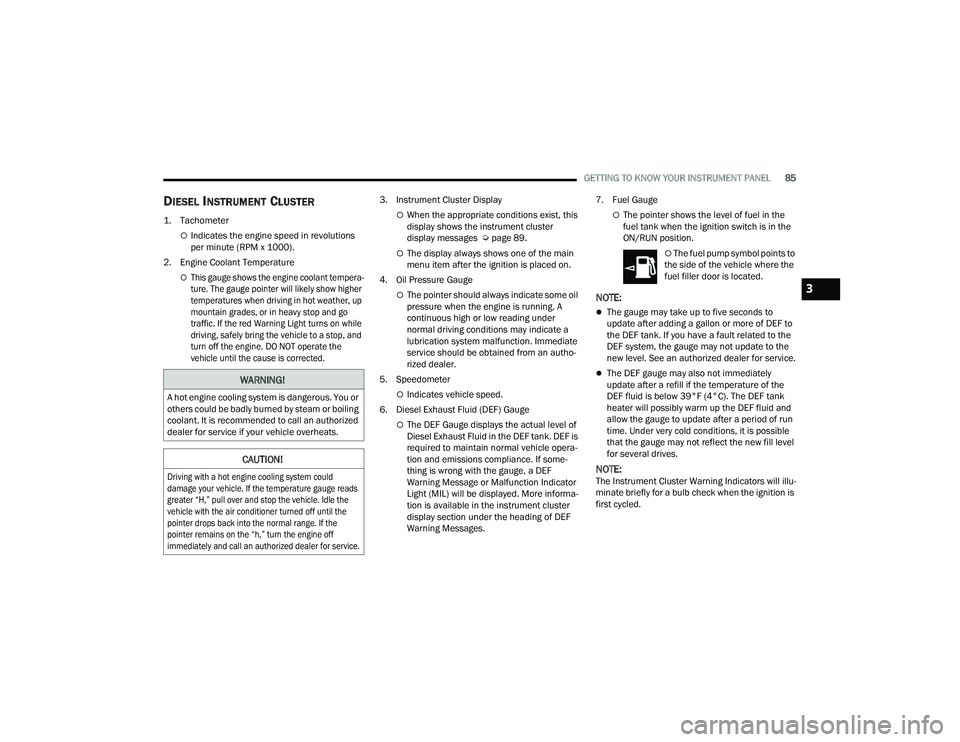
1. Tachometer
Indicates the engine speed in revolutions
per minute (RPM x 1000).
2. Engine Coolant Temperature
This gauge shows the engine coolant tempera -
ture. The gauge pointer will likely show higher
temperatures when driving in hot weather, up
mountain grades, or in heavy stop and go
traffic. If the red Warning Light turns on while
driving, safely bring the vehicle to a stop, and
turn off the engine. DO NOT operate the
vehicle until the cause is corrected.
3. Instrument Cluster Display
When the appropriate conditions exist, this
display shows the instrument cluster
display messages Ú
page 89.
The display always shows one of the main
menu item after the ignition is placed on.
4. Oil Pressure Gauge
The pointer should always indicate some oil
pressure when the engine is running. A
continuous high or low reading under
normal driving conditions may indicate a
lubrication system malfunction. Immediate
service should be obtained from an autho -
rized dealer.
5. Speedometer
Indicates vehicle speed.
6. Diesel Exhaust Fluid (DEF) Gauge
The DEF Gauge displays the actual level of
Diesel Exhaust Fluid in the DEF tank. DEF is
required to maintain normal vehicle opera -
tion and emissions compliance. If some -
thing is wrong with the gauge, a DEF
Warning Message or Malfunction Indicator
Light (MIL) will be displayed. More informa -
tion is available in the instrument cluster
display section under the heading of DEF
Warning Messages. 7. Fuel Gauge
The pointer shows the level of fuel in the
fuel tank when the ignition switch is in the
ON/RUN position.
The fuel pump symbol points to
the side of the vehicle where the
fuel filler door is located.
NOTE:
The gauge may take up to five seconds to
update after adding a gallon or more of DEF to
the DEF tank. If you have a fault related to the
DEF system, the gauge may not update to the
new level. See an authorized dealer for service.
The DEF gauge may also not immediately
update after a refill if the temperature of the
DEF fluid is below 39°F (4°C). The DEF tank
heater will possibly warm up the DEF fluid and
allow the gauge to update after a period of run
time. Under very cold conditions, it is possible
that the gauge may not reflect the new fill level
for several drives.
NOTE:The Instrument Cluster Warning Indicators will illu -
minate briefly for a bulb check when the ignition is
first cycled.
WARNING!
A hot engine cooling system is dangerous. You or
others could be badly burned by steam or boiling
coolant. It is recommended to call an authorized
dealer for service if your vehicle overheats.
CAUTION!
Driving with a hot engine cooling system could
damage your vehicle. If the temperature gauge reads
greater “H,” pull over and stop the vehicle. Idle the
vehicle with the air conditioner turned off until the
pointer drops back into the normal range. If the
pointer remains on the “h,” turn the engine off
immediately and call an authorized dealer for service.
3
23_DPF_OM_EN_USC_t.book Page 85
Page 89 of 444
GETTING TO KNOW YOUR INSTRUMENT PANEL87
DIESEL INSTRUMENT CLUSTER
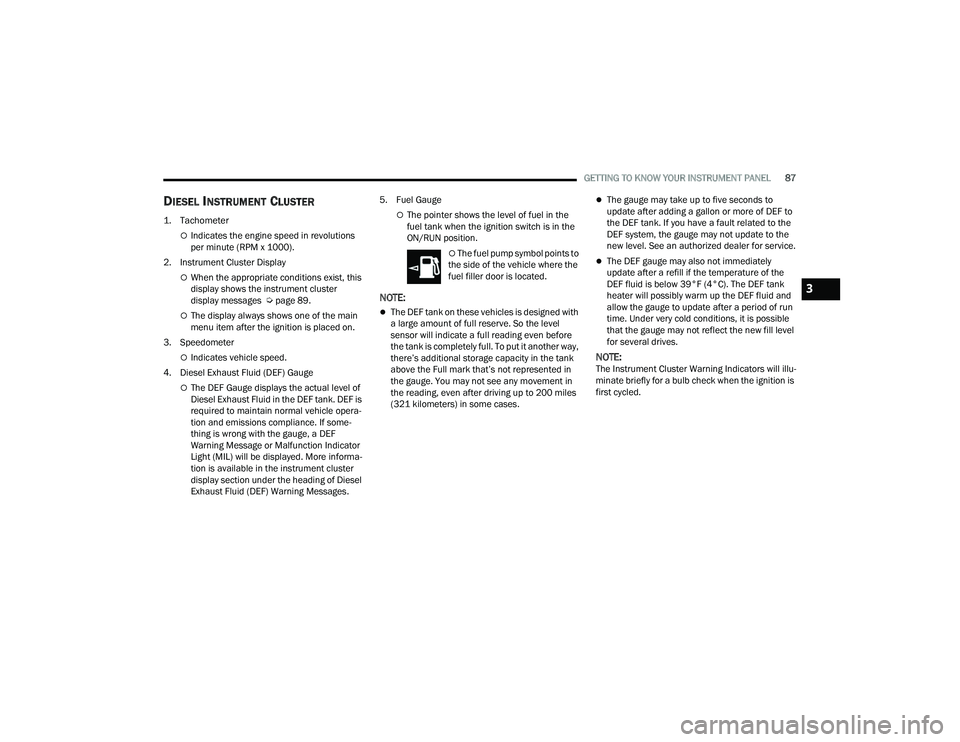
1. Tachometer
Indicates the engine speed in revolutions
per minute (RPM x 1000).
2. Instrument Cluster Display
When the appropriate conditions exist, this
display shows the instrument cluster
display messages Ú page 89.
The display always shows one of the main
menu item after the ignition is placed on.
3. Speedometer
Indicates vehicle speed.
4. Diesel Exhaust Fluid (DEF) Gauge
The DEF Gauge displays the actual level of
Diesel Exhaust Fluid in the DEF tank. DEF is
required to maintain normal vehicle opera -
tion and emissions compliance. If some -
thing is wrong with the gauge, a DEF
Warning Message or Malfunction Indicator
Light (MIL) will be displayed. More informa -
tion is available in the instrument cluster
display section under the heading of Diesel
Exhaust Fluid (DEF) Warning Messages. 5. Fuel Gauge
The pointer shows the level of fuel in the
fuel tank when the ignition switch is in the
ON/RUN position.
The fuel pump symbol points to
the side of the vehicle where the
fuel filler door is located.
NOTE:
The DEF tank on these vehicles is designed with
a large amount of full reserve. So the level
sensor will indicate a full reading even before
the tank is completely full. To put it another way,
there’s additional storage capacity in the tank
above the Full mark that’s not represented in
the gauge. You may not see any movement in
the reading, even after driving up to 200 miles
(321 kilometers) in some cases.
The gauge may take up to five seconds to
update after adding a gallon or more of DEF to
the DEF tank. If you have a fault related to the
DEF system, the gauge may not update to the
new level. See an authorized dealer for service.
The DEF gauge may also not immediately
update after a refill if the temperature of the
DEF fluid is below 39°F (4°C). The DEF tank
heater will possibly warm up the DEF fluid and
allow the gauge to update after a period of run
time. Under very cold conditions, it is possible
that the gauge may not reflect the new fill level
for several drives.
NOTE:The Instrument Cluster Warning Indicators will illu -
minate briefly for a bulb check when the ignition is
first cycled.
3
23_DPF_OM_EN_USC_t.book Page 87
Page 91 of 444
GETTING TO KNOW YOUR INSTRUMENT PANEL89
PREMIUM INSTRUMENT CLUSTER
D
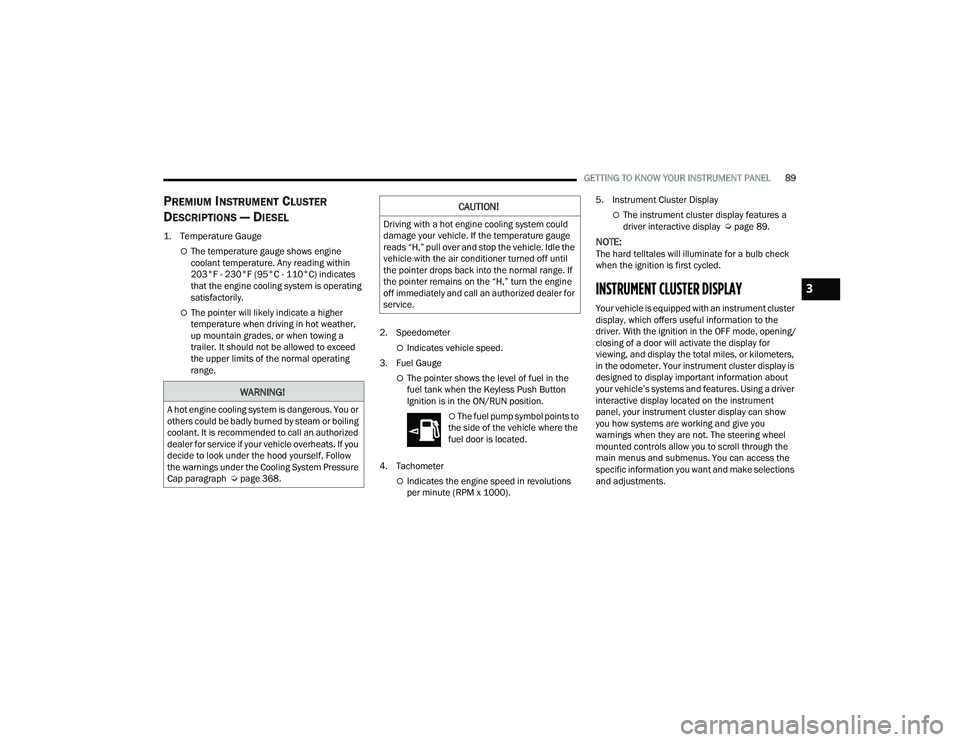
ESCRIPTIONS — DIESEL
1. Temperature Gauge
The temperature gauge shows engine
coolant temperature. Any reading within
203°F - 230°F (95°C - 110°C) indicates
that the engine cooling system is operating
satisfactorily.
The pointer will likely indicate a higher
temperature when driving in hot weather,
up mountain grades, or when towing a
trailer. It should not be allowed to exceed
the upper limits of the normal operating
range. 2. Speedometer
Indicates vehicle speed.
3. Fuel Gauge
The pointer shows the level of fuel in the
fuel tank when the Keyless Push Button
Ignition is in the ON/RUN position.
The fuel pump symbol points to
the side of the vehicle where the
fuel door is located.
4. Tachometer
Indicates the engine speed in revolutions
per minute (RPM x 1000). 5. Instrument Cluster Display
The instrument cluster display features a
driver interactive display Ú
page 89.
NOTE:The hard telltales will illuminate for a bulb check
when the ignition is first cycled.
INSTRUMENT CLUSTER DISPLAY
Your vehicle is equipped with an instrument cluster
display, which offers useful information to the
driver. With the ignition in the OFF mode, opening/
closing of a door will activate the display for
viewing, and display the total miles, or kilometers,
in the odometer. Your instrument cluster display is
designed to display important information about
your vehicle’s systems and features. Using a driver
interactive display located on the instrument
panel, your instrument cluster display can show
you how systems are working and give you
warnings when they are not. The steering wheel
mounted controls allow you to scroll through the
main menus and submenus. You can access the
specific information you want and make selections
and adjustments.
WARNING!
A hot engine cooling system is dangerous. You or
others could be badly burned by steam or boiling
coolant. It is recommended to call an authorized
dealer for service if your vehicle overheats. If you
decide to look under the hood yourself, Follow
the warnings under the Cooling System Pressure
Cap paragraph Úpage 368.
CAUTION!
Driving with a hot engine cooling system could
damage your vehicle. If the temperature gauge
reads “H,” pull over and stop the vehicle. Idle the
vehicle with the air conditioner turned off until
the pointer drops back into the normal range. If
the pointer remains on the “H,” turn the engine
off immediately and call an authorized dealer for
service.
3
23_DPF_OM_EN_USC_t.book Page 89
Page 94 of 444
92GETTING TO KNOW YOUR INSTRUMENT PANEL
You can customize your Instrument Cluster Display
with up to five tiles that may consist of the
following:
NOTE:These options may vary based on your vehicle trim
level.
Navigation
Route Set / Route Not Set
Trip A / Trip B
Vehicle Info
Coolant Temp
Trans Temp
Oil Temp
Oil Pressure
Battery Voltage
Oil Life
Tire Pressure
Fuel Economy
Air Suspension
Driver Info
Driver Assist
Audio
Audio Info
Off Road
Selec-Terrain / Air Suspension Status
Steering Angle
Pitch
Roll
Trailer Tow
Trailer Trip
Trailer Brake
Trailer Tire Pressure Monitor
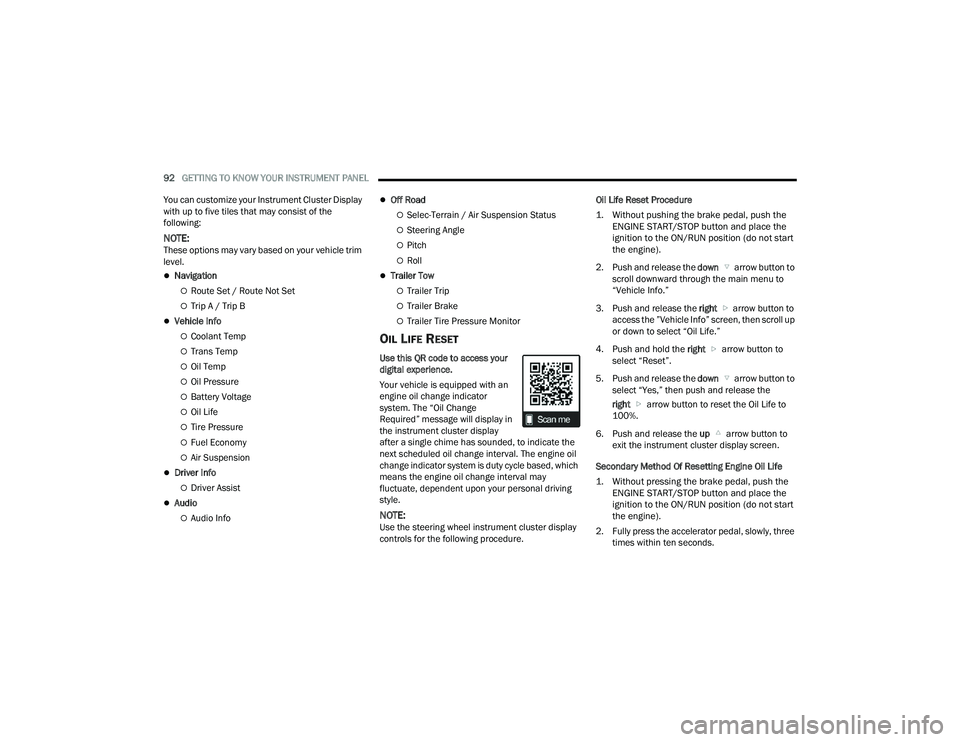
OIL LIFE RESET
Use this QR code to access your
digital experience.
Your vehicle is equipped with an
engine oil change indicator
system. The “Oil Change
Required” message will display in
the instrument cluster display
after a single chime has sounded, to indicate the
next scheduled oil change interval. The engine oil
change indicator system is duty cycle based, which
means the engine oil change interval may
fluctuate, dependent upon your personal driving
style.
NOTE:Use the steering wheel instrument cluster display
controls for the following procedure. Oil Life Reset Procedure
1. Without pushing the brake pedal, push the
ENGINE START/STOP button and place the
ignition to the ON/RUN position (do not start
the engine).
2. Push and release the down arrow button to
scroll downward through the main menu to
“Vehicle Info.”
3. Push and release the right arrow button to
access the ”Vehicle Info” screen, then scroll up
or down to select “Oil Life.”
4. Push and hold the right arrow button to
select “Reset”.
5. Push and release the down arrow button to
select “Yes,” then push and release the
right arrow button to reset the Oil Life to
100%.
6. Push and release the up arrow button to
exit the instrument cluster display screen.
Secondary Method Of Resetting Engine Oil Life
1. Without pressing the brake pedal, push the ENGINE START/STOP button and place the
ignition to the ON/RUN position (do not start
the engine).
2. Fully press the accelerator pedal, slowly, three times within ten seconds.
23_DPF_OM_EN_USC_t.book Page 92