ECO mode RAM CHASSIS CAB 2023 Workshop Manual
[x] Cancel search | Manufacturer: RAM, Model Year: 2023, Model line: CHASSIS CAB, Model: RAM CHASSIS CAB 2023Pages: 444, PDF Size: 20.51 MB
Page 227 of 444
MULTIMEDIA225
The radio is equipped with the following modes:
AM
FM
SiriusXM® Satellite Radio (If Equipped)
Press the Radio button on the touchscreen to enter
the Radio Mode. The different tuner modes, AM,
FM, and SXM, can then be selected by pressing the
corresponding button in Radio Mode.
Volume & On/Off Control
Push the VOLUME & On/Off control knob to turn on
and off the Uconnect system.
The electronic volume control turns continuously
(360 degrees) in either direction, without stopping.
Turning the VOLUME & On/Off control knob
clockwise increases the volume, and
counterclockwise decreases it.
When the audio system is turned on, the sound will
be set at the same volume level as last played.
Mute Button
Push the MUTE button to mute or unmute the
system.
Tune/Scroll Control
Turn the rotary TUNE/SCROLL control knob
clockwise to increase or counterclockwise to
decrease the radio station frequency. Push the
ENTER/BROWSE button to choose a selection. Seek
The Seek Up and Down functions are activated by
pressing the double arrow buttons on the
touchscreen to the right and left of the radio
station display or by pushing the left steering wheel
audio control button up or down.
Seek Up
and Seek Down
Press and release the Seek Up or Seek
Down button to tune the radio to the next
available station or channel. During a Seek Up/
Down function, if the radio reaches the starting
station after passing through the entire band two
times, the radio will stop at the station where it
began.
Fast Seek Up and Fast Seek Down
Press and hold, and then release the Seek Up
or Seek Down button to advance the radio
through the available stations or channels at a
faster rate. The radio stops at the next available
station or channel when the button on the
touchscreen is released.
NOTE:
Pressing and holding either the Seek Up or
Seek Down button will scan the different
frequency bands at a slower rate. Info — If Equipped
Press the Info button to display information related
to the currently playing song and radio station.
Direct Tune
Press the Tune button located at the bottom of the
radio screen to directly tune to a desired radio
station or channel.
Press the available number button on the
touchscreen to begin selecting a desired station.
Once a number has been entered, any numbers
that are no longer possible (stations that cannot be
reached) will become deactivated/grayed out.
Undo
You can backspace an entry by pressing the
Back button on the touchscreen.
GO
Once the last digit of a station has been entered,
press “Ok”. The Direct Tune screen will close, and
the system will automatically tune to that station.
RADIO VOICE COMMANDS
Use your voice to quickly get to the AM, FM, or
SiriusXM® Satellite Radio stations you would like
to hear. (Subscription or included SiriusXM®
Satellite Radio trial required.)
5
23_DPF_OM_EN_USC_t.book Page 225
Page 230 of 444

228MULTIMEDIA
REPLAY
Replay provides a means to store and replay up to 22 minutes of music audio and 48 minutes of talk radio. Once the channel is switched, content in replay
memory is lost.
Press the Replay button on the touchscreen. The Play/Pause, Rewind/Forward and Live buttons will display at the top of the screen, along with the replay time.
You can exit by pressing the Replay button on the touchscreen any time during the Replay Mode.
Play/Pause Press the Pause/Play button on the touchscreen to
pause the playing of live or rewound content at any
time. Play can be resumed by pressing the Pause/ Play button again on the touchscreen.
Rewind Press the Rewind button on the touchscreen to
rewind the content in steps of five seconds.
Pressing the Rewind button on the touchscreen for more than two seconds rewinds the content. The radio begins playing the content at the point at which the press is released.
Forward Each press of the Forward button on the
touchscreen forwards the content in steps of five seconds. Forwarding of the content can only be
done when the content is previously rewound, and therefore, cannot be done for live content. A
continuous press of the Forward button on the
touchscreen also forwards the content. The radio
begins playing the content at the point at which the press is released.
Live Press the Live button on the touchscreen to
resume the playing of live content.
23_DPF_OM_EN_USC_t.book Page 228
Page 232 of 444
230MULTIMEDIA
Add/Delete — If Equipped
Press the Add/Delete button on the touchscreen to
activate the League Scroll list. Press the chosen
league and a scroll list of all teams within the
league will appear, then you can select a team by
pressing the corresponding box. A check mark
appears for all teams that are chosen.
Remove Selection/Trash Can Icon
Press the Remove Selection tab at the top of the
screen. Press the Delete All button on the
touchscreen to delete all of the selections or press
the Trash Can icon next to the selection to be
deleted.
Alert Settings
Press the Alert Setting tab at the top of the screen.
The Alert Settings menu allows you to choose from
“Alert me to on-air games upon start” or “Alert
upon score update” or both when one or more of
your selections is airing on any of the SiriusXM®
channels.
Tune Start
Tune Start begins playing the current song from
the beginning when you tune to a music channel
using one of the 12 presets. This feature occurs
the first time the preset is selected during that
current song.
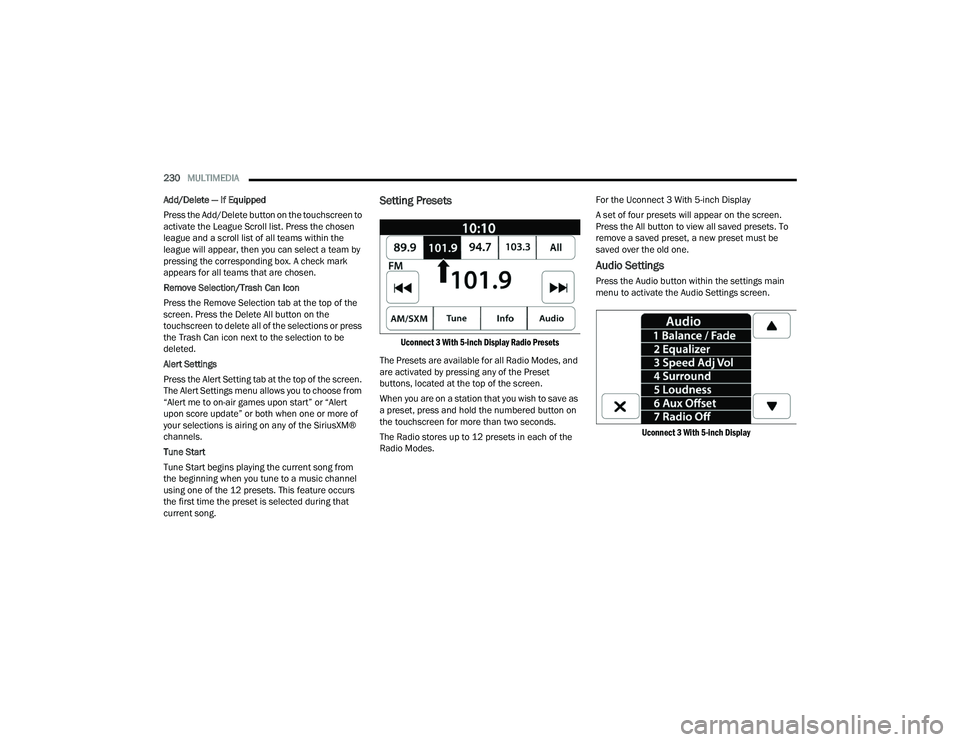
Setting Presets
Uconnect 3 With 5-inch Display Radio Presets
The Presets are available for all Radio Modes, and
are activated by pressing any of the Preset
buttons, located at the top of the screen.
When you are on a station that you wish to save as
a preset, press and hold the numbered button on
the touchscreen for more than two seconds.
The Radio stores up to 12 presets in each of the
Radio Modes. For the Uconnect 3 With 5-inch Display
A set of four presets will appear on the screen.
Press the All button to view all saved presets. To
remove a saved preset, a new preset must be
saved over the old one.
Audio Settings
Press the Audio button within the settings main
menu to activate the Audio Settings screen.
Uconnect 3 With 5-inch Display
23_DPF_OM_EN_USC_t.book Page 230
Page 234 of 444
232MULTIMEDIA
MEDIA MODE
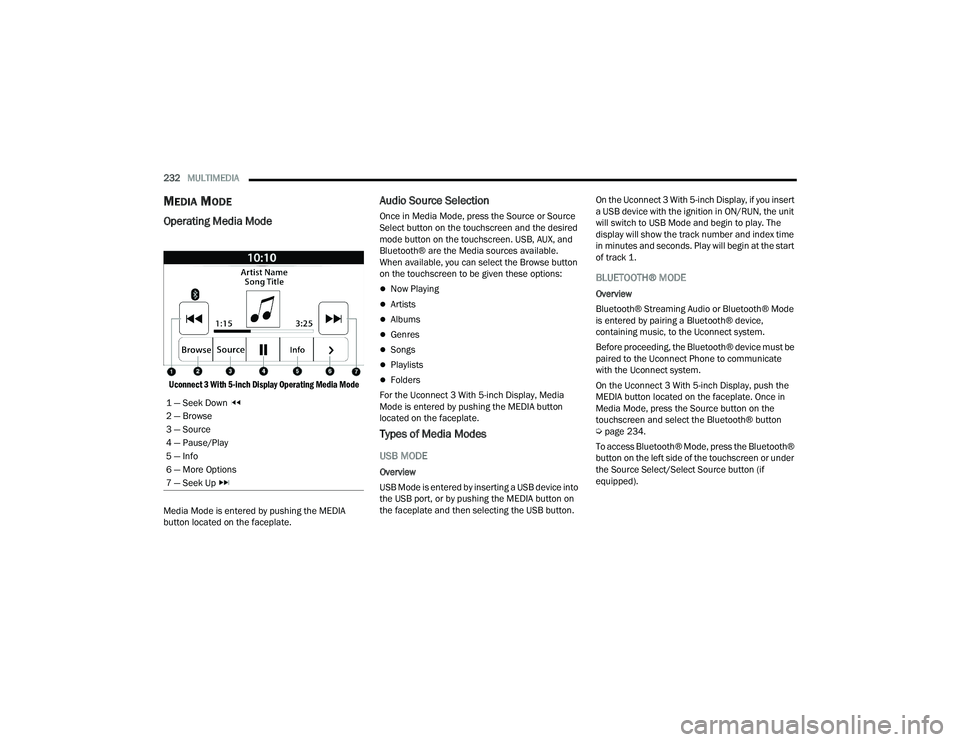
Operating Media Mode
Uconnect 3 With 5-inch Display Operating Media Mode
Media Mode is entered by pushing the MEDIA
button located on the faceplate.
Audio Source Selection
Once in Media Mode, press the Source or Source
Select button on the touchscreen and the desired
mode button on the touchscreen. USB, AUX, and
Bluetooth® are the Media sources available.
When available, you can select the Browse button
on the touchscreen to be given these options:
Now Playing
Artists
Albums
Genres
Songs
Playlists
Folders
For the Uconnect 3 With 5-inch Display, Media
Mode is entered by pushing the MEDIA button
located on the faceplate.
Types of Media Modes
USB MODE
Overview
USB Mode is entered by inserting a USB device into
the USB port, or by pushing the MEDIA button on
the faceplate and then selecting the USB button. On the Uconnect 3 With 5-inch Display, if you insert
a USB device with the ignition in ON/RUN, the unit
will switch to USB Mode and begin to play. The
display will show the track number and index time
in minutes and seconds. Play will begin at the start
of track 1.
BLUETOOTH® MODE
Overview
Bluetooth® Streaming Audio or Bluetooth® Mode
is entered by pairing a Bluetooth® device,
containing music, to the Uconnect system.
Before proceeding, the Bluetooth® device must be
paired to the Uconnect Phone to communicate
with the Uconnect system.
On the Uconnect 3 With 5-inch Display, push the
MEDIA button located on the faceplate. Once in
Media Mode, press the Source button on the
touchscreen and select the Bluetooth® button
Ú
page 234.
To access Bluetooth® Mode, press the Bluetooth®
button on the left side of the touchscreen or under
the Source Select/Select Source button (if
equipped).
1 — Seek Down
2 — Browse
3 — Source
4 — Pause/Play
5 — Info
6 — More Options
7 — Seek Up
23_DPF_OM_EN_USC_t.book Page 232
Page 235 of 444
MULTIMEDIA233
AUX MODE
Overview
Auxiliary Mode (AUX) is entered by inserting an AUX
device using a cable with a 3.5 mm audio jack into
the AUX port, or by pushing the MEDIA button on
the faceplate, selecting the Source button and
then the AUX button.
To insert an Auxiliary device, gently insert the
Auxiliary device cable into the AUX port. If you
insert an Auxiliary device with the ignition and the
radio on, the unit will switch to AUX Mode and
begin to play.
Controlling The Auxiliary Device
Auxiliary Mode (AUX) is entered by inserting an AUX
device using a cable with a 3.5 mm audio jack into
the AUX port or by pushing the MEDIA button on the
faceplate, selecting the Source button, and then
the AUX button.
NOTE:The radio unit is acting as the amplifier for audio
output from the Auxiliary device. Therefore, if the
volume control on the Auxiliary device is set too
low, there will be insufficient audio signal for the
radio unit to play the music on the device. Seek Up
/Seek Down
In USB Mode, press the Seek Up button on the
touchscreen for the next selection on the USB
device. Press and release the Seek Down button
on the touchscreen to return to the beginning of
the current selection, or to return to the beginning
of the previous selection if the USB device is within
the first three seconds of the current selection.
In Bluetooth® Mode, press and release the Seek
Up button on the touchscreen for the next
selection on the Bluetooth® device. Press and
release the Seek Down button on the touchscreen
to return to the beginning of the current selection,
or return to the beginning of the previous selection
if the Bluetooth® device is within the first second
of the current selection.
Browse
In USB Mode, press the Browse button on the
touchscreen to display the browse window. In USB
Mode, the left side of the browse window displays
a list of ways you can browse through the contents
of the USB device. If supported by the device, you
can browse by Folder, Artist, Playlist, Album, Song,
etc. Press the desired button on the touchscreen
on the left side of the screen. The center of the
browse window shows items and their
sub-functions, which can be scrolled through by
pressing the Up and Down buttons to the right. The
TUNE/SCROLL knob can also be used to scroll. On the Uconnect 3 With 5-inch Display, rotate the
ENTER/BROWSE button on the faceplate or press
the Browse button on the touchscreen to scroll
through and select a desired track on the device.
Press the Exit button on the touchscreen if you
wish to cancel the Browse function.
Media Mode
In USB Mode, press the Media button on the
touchscreen to select the desired audio source:
USB.
In Bluetooth® Mode, press the Media button on
the touchscreen to select the desired audio
source: Bluetooth®.
In AUX Mode, press the Media button on the
touchscreen to select the desired audio source:
AUX.
Repeat
In USB Mode, press the Repeat button on the
touchscreen to toggle the repeat functionality. The
Repeat button on the touchscreen is highlighted
when active. The Radio will continue to play the
current track, repeatedly, as long as the repeat is
active. Press the Repeat button again to enter
Repeat All. The radio will continue to play all the
current tracks, repeatedly, as long as the repeat
function is active. To cancel Repeat, press the
Repeat button a third time.
5
23_DPF_OM_EN_USC_t.book Page 233
Page 236 of 444
234MULTIMEDIA
Shuffle
In USB Mode, press the Shuffle button on the
touchscreen to play the selections on the USB
device in random order to provide an interesting
change of pace. Press the Shuffle button on the
touchscreen a second time to turn this feature off.
Audio
Audio settings can be accessed by pressing the
Audio button Ú page 224.
Info
In USB Mode, press the Info button on the
touchscreen to display the current track
information. Press the Info or X button on the
touchscreen a second time to cancel this feature.
Tracks
In USB Mode, press the Tracks button on the
touchscreen to display a pop-up with the Song List.
The song currently playing is indicated by an arrow
and lines above and below the song title. When in
the Tracks List screen you can rotate the TUNE/
SCROLL knob to highlight a track (indicated by the
line above and below the track name) and then
push the ENTER/BROWSE knob to start playing
that track. In Bluetooth® Mode, if the Bluetooth® device
supports this feature, press the Tracks button on
the touchscreen to display a pop-up with the Song
List. The currently playing song is indicated by a red
arrow and lines above and below the song title.
Pressing the Tracks button on the touchscreen
while the pop-up is displayed will close the pop-up.
MEDIA VOICE COMMANDS
Uconnect offers connections via USB, Bluetooth®,
and auxiliary (AUX) ports. Voice operation is only
available for connected USB and AUX devices.
Push the VR button located on the steering
wheel. After the beep, say one of the following
commands and follow the prompts to switch your
media source or choose an artist:
“
Change source to Bluetooth®”
“Change source to AUX”
“Change source to USB”
“Play artist Beethoven”; “ Play album Greatest
Hits”; “ Play song Moonlight Sonata”; “ Play genre
Classical”
Did You Know: Press the Browse button on the
touchscreen to see all of the music on your USB
device. Your Voice Command must match exactly
how the artist, album, song, and genre information
is displayed.
PHONE MODE
Overview
Uconnect Phone is a voice-activated, hands-free,
in-vehicle communications system. It allows you to
dial a phone number with your mobile phone.
The feature supports the following:
Voice Activated Features
Hands-Free dialing via Voice (“Call John Smith
Mobile” or “Dial 248-555-1212”).
Hands-Free text-to-speech listening of your
incoming SMS messages.
Hands-Free Text Message Replying: Forward
one of 18 predefined SMS messages to
incoming calls/text messages.
Redialing last dialed numbers (“Redial”).
Calling Back the last incoming call number
(“Call Back”).
Viewing call logs on screen (“Show Incoming
Calls,” “Show Outgoing Calls,” “Show Missed
Calls,” or “Show Recent Calls”).
Searching Contacts phone number (“Search for
John Smith Mobile”).
23_DPF_OM_EN_USC_t.book Page 234
Page 239 of 444
MULTIMEDIA237
To complete the pairing process, you will need to
reference your mobile phone’s manual. Please
visit
UconnectPhone.com for complete mobile
phone compatibility information.
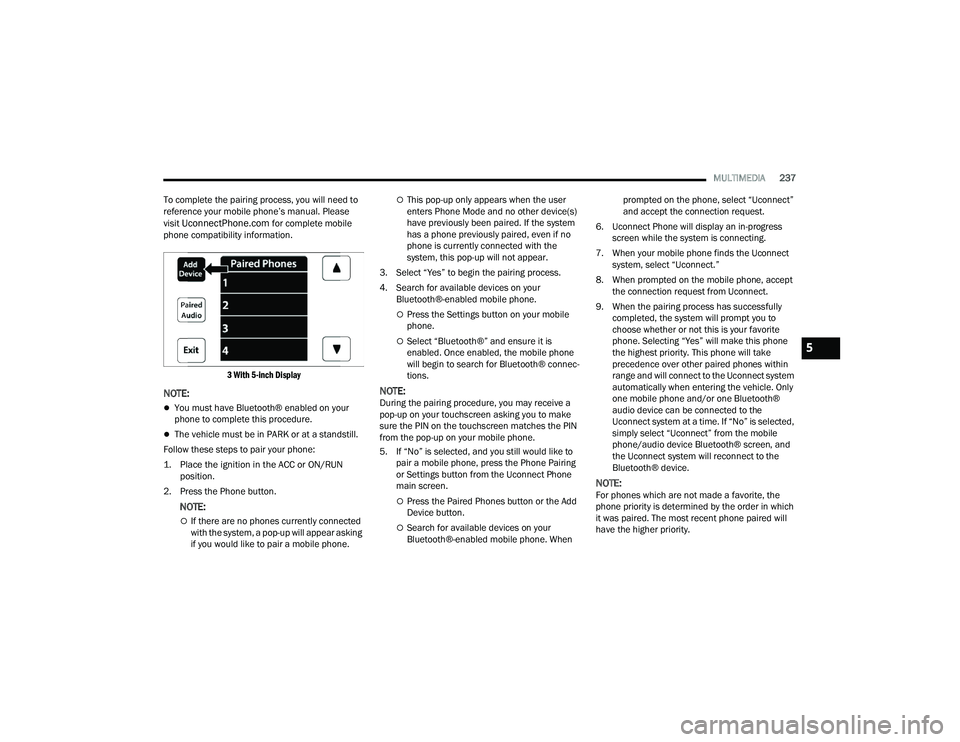
3 With 5-inch Display
NOTE:
You must have Bluetooth® enabled on your
phone to complete this procedure.
The vehicle must be in PARK or at a standstill.
Follow these steps to pair your phone:
1. Place the ignition in the ACC or ON/RUN position.
2. Press the Phone button.
NOTE:
If there are no phones currently connected
with the system, a pop-up will appear asking
if you would like to pair a mobile phone.
This pop-up only appears when the user
enters Phone Mode and no other device(s)
have previously been paired. If the system
has a phone previously paired, even if no
phone is currently connected with the
system, this pop-up will not appear.
3. Select “Yes” to begin the pairing process.
4. Search for available devices on your Bluetooth®-enabled mobile phone.
Press the Settings button on your mobile
phone.
Select “Bluetooth®” and ensure it is
enabled. Once enabled, the mobile phone
will begin to search for Bluetooth® connec -
tions.
NOTE:During the pairing procedure, you may receive a
pop-up on your touchscreen asking you to make
sure the PIN on the touchscreen matches the PIN
from the pop-up on your mobile phone.
5. If “No” is selected, and you still would like to pair a mobile phone, press the Phone Pairing
or Settings button from the Uconnect Phone
main screen.
Press the Paired Phones button or the Add
Device button.
Search for available devices on your
Bluetooth®-enabled mobile phone. When prompted on the phone, select “Uconnect”
and accept the connection request.
6. Uconnect Phone will display an in-progress screen while the system is connecting.
7. When your mobile phone finds the Uconnect system, select “Uconnect.”
8. When prompted on the mobile phone, accept the connection request from Uconnect.
9. When the pairing process has successfully completed, the system will prompt you to
choose whether or not this is your favorite
phone. Selecting “Yes” will make this phone
the highest priority. This phone will take
precedence over other paired phones within
range and will connect to the Uconnect system
automatically when entering the vehicle. Only
one mobile phone and/or one Bluetooth®
audio device can be connected to the
Uconnect system at a time. If “No” is selected,
simply select “Uconnect” from the mobile
phone/audio device Bluetooth® screen, and
the Uconnect system will reconnect to the
Bluetooth® device.
NOTE:For phones which are not made a favorite, the
phone priority is determined by the order in which
it was paired. The most recent phone paired will
have the higher priority.
5
23_DPF_OM_EN_USC_t.book Page 237
Page 246 of 444
244MULTIMEDIA
Did You Know: Voice Text Reply is not compatible
with iPhone®, but if your vehicle is equipped with
Siri® Eyes Free, you can use your voice to send a
text message.
Siri® Eyes Free — If Equipped
When used with your Apple® iPhone® connected
to your vehicle via Bluetooth®, Siri lets you use
your voice to send text messages, select media,
place phone calls and much more. Siri uses your
natural language to understand what you mean
and responds back to confirm your requests. The
system is designed to keep your eyes on the road
and your hands on the wheel by letting Siri help you
perform useful tasks.
To enable Siri, push and hold, then release the
Uconnect Voice Recognition (VR) button on the
steering wheel. After you hear a double beep, you
can ask Siri to play podcasts and music, get
directions, read text messages, and many other
useful requests.
BLUETOOTH® COMMUNICATION LINK
Mobile phones may lose connection to the
Uconnect Phone. When this happens, the
connection can generally be re-established by
restarting the mobile phone. Your mobile phone is
recommended to remain in Bluetooth® ON mode.
POWER-UP
After switching the ignition key from OFF to either
the ON/RUN or ACC position, or after a language
change, you must wait at least 15 seconds prior to
using the system Ú page 427.
CONNECTED VEHICLE SERVICES —
IF EQUIPPED
IS MY VEHICLE CONNECTED?
If equipped, vehicles with an ASSIST and an SOS
button are connected vehicles. These buttons will
be located on either the rearview mirror or
overhead console, depending on the vehicle. If
these buttons are present in your vehicle, you have
a connected radio and can take advantage of the
many connected vehicle features.
For further information about the ASSIST and SOS
buttons Úpage 326.
INTRODUCTION TO CONNECTED VEHICLE
S
ERVICES
One of the many benefits of your vehicle’s
Uconnect system is that you can now take
advantage of SiriusXM Guardian™ connected
services. To unlock the full potential of SiriusXM
Guardian™ in your vehicle, you first need to
activate SiriusXM Guardian™ connected services.
NOTE:SiriusXM Guardian™ involves the collection, trans -
mission and use of data from your vehicle
Ú page 263.
SiriusXM Guardian™ Contact Information
SiriusXM Guardian™/Care
US residents visit: https://www.driveucon -
nect.com/sirius-xm-guardian.html or call
1-844-796-4827
Canadian residents visit: https://www.driveu -
connect.ca/en/sirius-xm-guardian or call
1-877-324-9091
What Is SiriusXM Guardian™?
SiriusXM Guardian™ uses an embedded device in
the Uconnect system installed in your vehicle,
which receives GPS signals and communicates
with the SiriusXM Guardian™ Customer Care
center via wireless and landline communications
WARNING!
ALWAYS obey traffic laws and pay attention to
the road. Your complete attention is always
required while driving to maintain safe control of
your vehicle. Only use and interact with the
features and applications when it is safe to do
so. Failure to follow these warnings can result in
a collision and death or serious personal injury.
23_DPF_OM_EN_USC_t.book Page 244
Page 261 of 444
MULTIMEDIA259
CONNECTED SERVICES SOS FAQS —
I
F EQUIPPED
1.
What happens if I accidentally push the SOS
Call button on the mirror or overhead console?
You have 10 seconds after pushing the SOS
Call button to cancel the call. To cancel the
call, either push the SOS Call button again, or
press the Cancel button on the in-vehicle
touchscreen.
2. What type of information is sent when I use the
SOS Call button from my vehicle? Certain
vehicle information, such as make and model,
is transmitted along with the last known GPS
location.
3. When could I use the SOS Call button? You can
use the SOS Call button to make a call if you or
someone else needs emergency assistance.
CONNECTED SERVICES REMOTE DOOR
L
OCK/UNLOCK FAQS
1.
How long does it take to unlock or lock the
door?
Depending on various conditions, it can
take up to three minutes or more for the
request to get to your vehicle.
2. Which is faster, my key fob or the Vehicle
Branded App? Your key fob will lock/unlock
the door more quickly, however its range is limited and your Vehicle Branded App comes
in handy for these and other situations.
3. Will my vehicle be safe if I lose my device?
People sometimes lose their mobile devices,
which is why security measures have been
engineered into the Vehicle Branded App.
Asking for your username, password and
SiriusXM Guardian™ Security PIN are required
for the activation of Remote services through
your mobile device. It is your responsibility to
protect your passwords and PINs.
4. Why can’t all mobile devices use the Vehicle
Branded App? The Vehicle Branded App is
compatible with most devices with the Apple®
and Android™ operating systems. The
capabilities of these devices allow us to
remotely command your vehicle. Other
operating systems may be supported in the
future.
5. Why is the Vehicle Branded App running slow?
The Vehicle Branded App relies on a mobile
network connection from your device to send
commands to your vehicle which must have an
operable LTE (voice/data), 4G (data), or 5G
(data) network connection. If either your
device or your vehicle is in an area with below
average coverage, it may take longer to log in
and send commands.
CONNECTED SERVICES ROADSIDE
A
SSISTANCE FAQS
1.
What is the phone number for roadside
assistance call? The phone number is:
US: 1-800-521-2779
Canada: 1-800-363-4869
2. If I am subscribed to SiriusXM Guardian™,
does it cover towing or other expenses
incurred by using roadside assistance? No,
however your new vehicle may include
Roadside Assistance Call services.
CONNECTED SERVICES SEND & GO
FAQ
S — IF EQUIPPED
1.
How long does it take to send the route and
destination to my vehicle?
Depending on
various conditions, it can take up to three
minutes for the request to get through to your
vehicle.
2. Can I cancel a route I sent to my vehicle? Yes,
once you enter your vehicle, and start the
engine, the pop-up message stating that you
have a new route will appear. There is an exit
button on the pop-up that will cancel the route
if selected.
5
23_DPF_OM_EN_USC_t.book Page 259
Page 272 of 444

270 (Continued)
SAFETY
SAFETY FEATURES
ANTI-LOCK BRAKE SYSTEM (ABS)
The ABS provides increased vehicle stability and
brake performance under most braking conditions.
The system automatically prevents wheel lock and
enhances vehicle control during braking.
The ABS performs a self-check cycle to ensure that
the ABS is working properly each time the vehicle
is started and driven. During this self-check, you
may hear a slight clicking sound as well as some
related motor noises.
The ABS is activated during braking when the
system detects one or more wheels are beginning
to lock. Road conditions such as ice, snow, gravel,
bumps, railroad tracks, loose debris, or panic stops
may increase the likelihood of ABS activation(s).
You also may experience the following normal
characteristics when the ABS activates:
ABS motor noise or clicking sounds (you may
continue to hear for a short time after the stop)
Brake pedal pulsations
A slight drop of the brake pedal at the end of the
stopThe ABS is designed to function with the Original
Equipment Manufacturer (OEM) tires. Modification
may result in degraded ABS performance.
Anti-Lock Brake System (ABS) Warning Light
The yellow ABS Warning Light will turn on when the
ignition is placed in the ON/RUN mode and may
stay on for as long as four seconds.
If the ABS Warning Light remains on or comes on
while driving, it indicates that the anti-lock portion
of the brake system is not functioning and that
service is required. However, the conventional
brake system will continue to operate normally if
the ABS Warning Light is on.
If the ABS Warning Light is on, the brake system
should be serviced as soon as possible to restore
the benefits of anti-lock brakes. If the ABS Warning
Light does not come on when the ignition is placed
in the ON/RUN mode, have the light repaired as
soon as possible.
WARNING!
The ABS contains sophisticated electronic
equipment that may be susceptible to interfer
-
ence caused by improperly installed or high
output radio transmitting equipment. This
interference can cause possible loss of
anti-lock braking capability. Installation of
such equipment should be performed by qual -
ified professionals.
Pumping of the Anti-Lock Brakes will diminish
their effectiveness and may lead to a collision.
Pumping makes the stopping distance longer.
Just press firmly on your brake pedal when you
need to slow down or stop.
The ABS cannot prevent the natural laws of
physics from acting on the vehicle, nor can it
increase braking or steering efficiency beyond
that afforded by the condition of the vehicle
brakes and tires or the traction afforded.
The ABS cannot prevent collisions, including those
resulting from excessive speed in turns, following
another vehicle too closely, or hydroplaning.
The capabilities of an ABS equipped vehicle
must never be exploited in a reckless or
dangerous manner that could jeopardize the
user’s safety or the safety of others.
WARNING!
23_DPF_OM_EN_USC_t.book Page 270