brake Ram ProMaster 2018 Owner's Manual
[x] Cancel search | Manufacturer: RAM, Model Year: 2018, Model line: ProMaster, Model: Ram ProMaster 2018Pages: 204, PDF Size: 4 MB
Page 88 of 204

Instrument Cluster Messages
Messages will be displayed in the instrument
cluster to alert the driver when certain un-
usual conditions occur. These messages are
described below.
MESSAGEDESCRIPTION
Service Transmission When the ignition key is turned to ON/RUN/MAR, the Transmission Fault Indicator light turns on and
should go off after a few seconds.
The Transmission Fault Indicator illuminates either steady or blinking (together with this message and a buzzer) to indicate a transmission fault.
Contact your authorized dealer if the message continues to appear.
Reduce Gear Changes This message indicates that the driver is operating the transmission incorrectly.
Incorrect use (by the driver) could automatically activate a procedure for protecting the system. Contact you authorized dealer if the message continues to appear.
Manual Unavailable MANUAL (M) mode is not available, due to a fault or other condition. Use the DRIVE (D) position to op-
erate the vehicle.
Contact your authorized dealer if the message continues to appear.
Automatic Unavailable Automatic (DRIVE) mode is not available due to a fault or other condition. Use MANUAL (M) mode to
operate the vehicle.
Contact your authorized dealer if the message continues to appear.
Transmission Temperature High This message appears, together with a buzzer, when the clutch overheats.
In this situation, limit stop and go driving and gear shifts or if necessary stop the vehicle and turn the engine off to allow the clutch to cool.
If the message continues to appear, contact your authorized dealer.
To avoid clutch malfunction, do not use the accelerator to keep the vehicle at a standstill (for example
holding on a hill); the clutch could be damaged by overheating. Use the brake pedal instead and operate the accelerator only when you are ready to drive away.
STARTING AND OPERATING
86
Page 89 of 204

MESSAGEDESCRIPTION
Press Brake Pedal / Startup Delayed This message appears when the key is first turned ON, if the brake pedal is not depressed and/or the gear selector is not in NEUTRAL (N). The gear selector must be in the NEUTRAL (N) position, and thebrake pedal must be pressed, to allow engine cranking. Place the gear selector in NEUTRAL (N) and
apply the brake pedal BEFORE turning the key to the START/AVV position; otherwise, the engine will not crank and the key must be cycled OFF, then back on, before cranking is allowed.
Gear Unavailable This message appears, along with a warning buzzer:
• When it is not possible to change gear due to a fault in the system.
• When, due a fault in the system, it is only possible to engage 1st (1), 2nd (2), 3rd (3) or REVERSE (R).
Contact your authorized dealer if the message continues to appear.
Shift Not Allowed This message may appear when starting the engine at low temperature. In this case the Automated
Manual transmission isn't able to engage first gear, in this situation either use the engine block/
transmission heater or allow the engine to idle in NEUTRAL (N) until the transmission has warmed.
Press Brake And Try Again This message appears accompanied, in some cases, by a warning buzzer, if you attempt to change gear with the vehicle parked without pressing the brake pedal.
To shift the transmission (with key on/engine off), press and hold the brake pedal, move the gear selec- tor to NEUTRAL (N), then move the gear selector to the desired position.
Shift To Neutral This message appears, when the gear selector must be moved to the NEUTRAL (N) position.
When the gear selector is moved to NEUTRAL (N) the message on the display should go off.
Press Brake Pedal This message is shown in the display together with an acoustic signal, when the brake pedal is not
pressed during a starting attempt.
Press Brake Shift to N key to start This message appears, when the drivers door is first opened, to remind to Press the Brake pedal and shift the lever in N to permit the cranking.
87
Page 90 of 204

Towing The Vehicle
NOTE:
• The information in this section is for Auto-mated Manual Transmission (Diesel En-
gine) models ONLY. DO NOT flat tow any
model with a gasoline engine. Gasoline
engine models MUST be towed with front
wheels OFF the ground. See "Recreational
Towing" for additional information.
• For vehicles equipped with Electric Park Brake, you must ensure that the Auto Park
Brake feature is disabled before being
towed, to avoid inadvertent Electric Park
Brake engagement. The Auto Park Brake
feature can be temporarily disabled by
holding the park brake switch in the off
position while turning the ignition key from
ON/RUN to “OFF”.
• Vehicles with a discharged battery or total electrical failure when the Electric Park
Brake (EPB) is engaged, will need a wheel
dolly or jack to raise the rear wheels off the
ground when moving the vehicle onto a
flatbed. • The manufacturer recommends towing your
vehicle with all four wheels OFFthe ground
using a flatbed.
• Automated Manual transmission vehicles can also be flat towed (all four wheels on
the ground) with the transmission in NEU-
TRAL. Ensure the transmission is in NEU-
TRAL (N) (by checking that the vehicle
moves when pushed) and tow in the same
way as a normal vehicle with a manual
transmission.
If it is not possible to shift the transmission to
NEUTRAL (N), do not flat tow the vehicle and
contact your authorized dealer.
If you must use the accessories (wipers, de-
frosters, etc.) while being towed, the ignition
must be in the ON/RUN mode. NOTE:
For vehicles equipped with Electric Park
Brake the SafeHold feature will engage the
Electric Park Brake whenever the driver's
door is opened (if the ignition is ON and the
brake pedal is released). If you are towing
this vehicle with the ignition in the ON/RUN
position, you must manually disable the Elec-
tric Park Brake each time the driver's door is
opened, by pressing the brake pedal and then
releasing the EPB.
CAUTION!
• DO NOT flat tow any disabled vehicle if
condition is related to the clutch,
transmission or driveline. Additional
damage to the drivetrain could result.
• Towing this vehicle in violation of the
above requirements can cause severe
engine, transmission, or drivetrain
damage. Damage from improper tow-
ing is not covered under the New Ve-
hicle Limited Warranty.
• Ensure that the electric park brake (if
equipped) is released, and remains re-
leased, while being towed.STARTING AND OPERATING
88
Page 93 of 204

WARNING!
ditions, and you could lose control and
have an accident. Do not use Speed Con-
trol in heavy traffic or on roads that are
winding, icy, snow-covered or slippery.
To Resume Speed
To resume a previously set speed, push the
RES button and release. Resume can be used
at any speed above 20 mph (32 km/h) up to
the maximum speed of 100 mph (160 km/h).
To Deactivate
A soft tap on the brake pedal, pushing the
RES button, or normal brake pressure while
slowing the vehicle will deactivate Speed
Control without erasing the set speed
memory. Rotating the center ring upward to
turn the system off or turning the ignition
switch OFF erases the set speed memory.
PARKSENSE REAR PARK ASSIST
If an obstacle is behind the vehicle when
REVERSE gear is engaged, an audible alert is
activated.The tones emitted by the loudspeaker inform
the driver that the vehicle is approaching an
obstacle. The pauses between the tones are
directly proportional to the distance from the
obstacle. Pulses emitted in quick succession
indicate the presence of a very close ob-
stacle. A continuous tone indicates that the
obstacle is less than 12 inches (30 cm) away.
PARKVIEW REAR BACK-UP CAMERA
You can see an on-screen image of the rear of
your vehicle whenever the gear selector is put
into REVERSE. The ParkView Rear Back-Up
Camera image is displayed on the touch-
screen display located on the center stack of
the instrument panel.
NOTE:
If the touchscreen display appears foggy,
clean the camera lens located on the top rear
of the vehicle below the center light.
WARNING!
Drivers must be careful when backing up
even when using the Rear Back-Up Cam-
era. Always check carefully behind your
WARNING!
vehicle, and be sure to check for pedestri-
ans, animals, other vehicles, obstructions,
or blind spots before backing up. You are
responsible for the safety of your surround-
ings and must continue to pay attention
while backing up. Failure to do so can
result in serious injury or death.
REFUELING THE VEHICLE — GAS
ENGINE
The gas cap is located behind the fuel filler
door on the left side of the vehicle. If the gas
cap is lost or damaged, be sure the replace-
ment cap is for use with this vehicle.
WARNING!
• Never have any smoking materials lit in
or near the vehicle when the fuel door is
open or the tank is being filled.
• Never add fuel when the engine is run-
ning. This is in violation of most state
and federal fire regulations and may
91
Page 98 of 204

RECREATIONAL TOWING (BEHIND MOTORHOME, ETC.)
Towing This Vehicle Behind Another Vehicle
Towing ConditionWheels OFF the Ground Gasoline Engine All Models Diesel Engine All Models
Flat Tow NONENOT ALLOWED
Trans InNEUTRAL
Dolly Tow Front
OKOK
Rear NOT ALLOWED
Trans InNEUTRAL
On Trailer ALLOKOK
NOTE:
When towing your vehicle, always follow applicable state and provincial laws. Contact state and provincial Highway Safety offices for additional
details.
NOTE:
For vehicles equipped with diesel engine and
electric park brake, see important informa-
tion under “Automated Manual Transmis-
sion”.STARTING AND OPERATING
96
Page 99 of 204

Recreational Towing — Gasoline
Engine All Models
Recreational towing is allowedONLYif the
front wheels are OFFthe ground. This may be
accomplished using a tow dolly or vehicle
trailer. If using a tow dolly, follow this proce-
dure:
1. Properly secure the dolly to the tow ve- hicle, following the dolly manufacturer's
instructions.
2. Drive the front wheels onto the tow dolly.
3. Firmly apply the parking brake. Place the transmission in PARK.
4. Properly secure the front wheels to the dolly, following the dolly manufacturer's
instructions.
5. Release the parking brake.
CAUTION!
• DO NOT flat tow this vehicle. Damage to the drivetrain will result. If this vehicle
requires towing, make sure the drive
wheels are OFF the ground.
• Towing this vehicle in violation of the
above requirements can cause severe
transmission damage. Damage from im-
proper towing is not covered under the
New Vehicle Limited Warranty.
Recreational Towing —
Diesel Engine All Models
NOTE:
Automated Manual transmission (diesel) ve-
hicles can also be flat towed (all four wheels
on the ground) with the transmission in NEU-
TRAL. Ensure the transmission is in neutral
(N) (by checking that the vehicle moves when
pushed) and tow in the same way as a normal
vehicle with a manual transmission.
97
Page 108 of 204

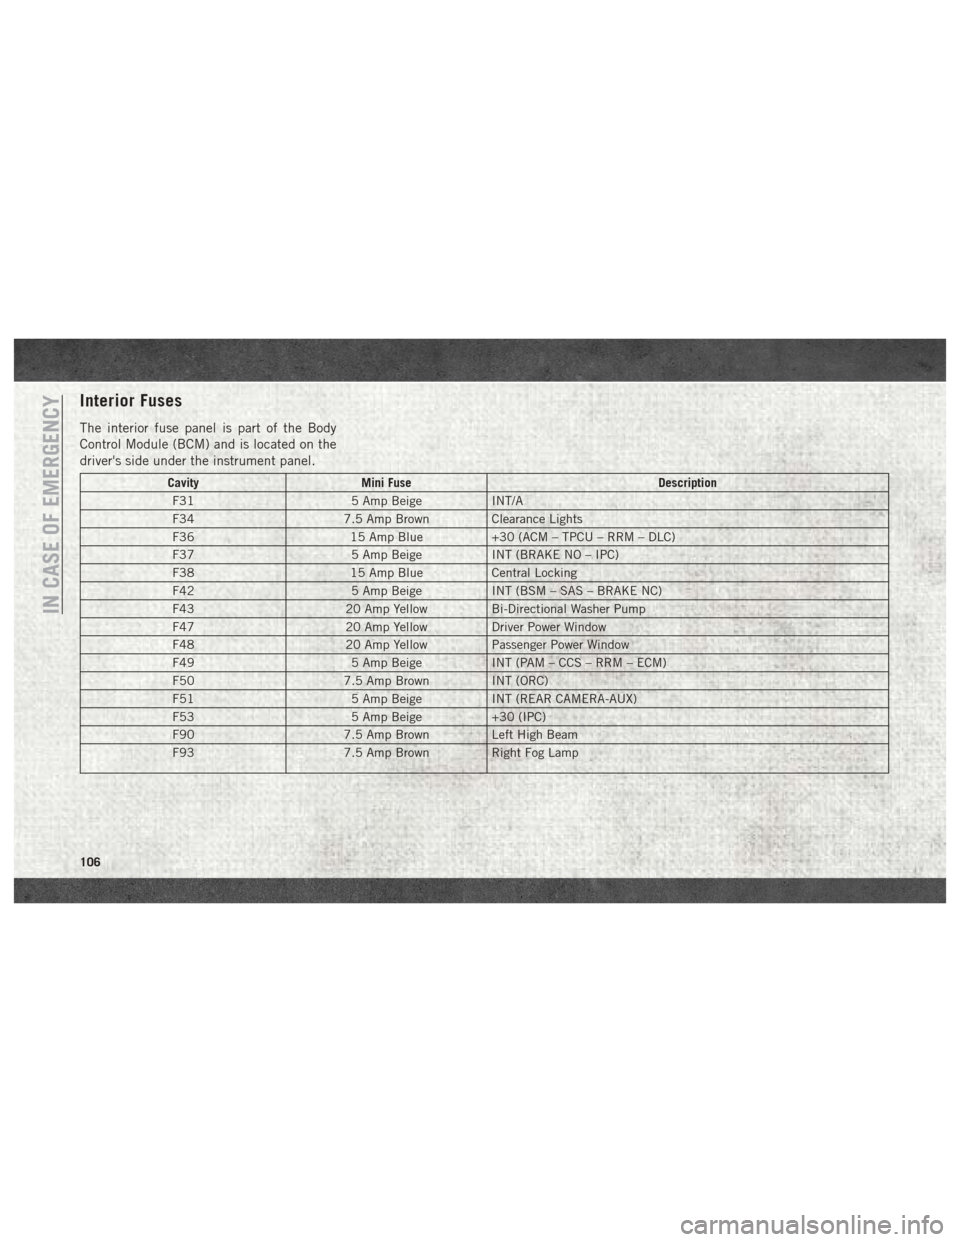
Interior Fuses
The interior fuse panel is part of the Body
Control Module (BCM) and is located on the
driver's side under the instrument panel.
CavityMini Fuse Description
F31 5 Amp BeigeINT/A
F34 7.5 Amp Brown Clearance Lights
F36 15 Amp Blue+30 (ACM – TPCU – RRM – DLC)
F37 5 Amp BeigeINT (BRAKE NO – IPC)
F38 15 Amp BlueCentral Locking
F42 5 Amp BeigeINT (BSM – SAS – BRAKE NC)
F43 20 Amp YellowBi-Directional Washer Pump
F47 20 Amp YellowDriver Power Window
F48 20 Amp YellowPassenger Power Window
F49 5 Amp BeigeINT (PAM – CCS – RRM – ECM)
F50 7.5 Amp Brown INT (ORC)
F51 5 Amp BeigeINT (REAR CAMERA-AUX)
F53 5 Amp Beige+30 (IPC)
F90 7.5 Amp Brown Left High Beam
F93 7.5 Amp Brown Right Fog Lamp
IN CASE OF EMERGENCY
106
Page 113 of 204

3. Pull the spare tire out from under thevehicle to gain access to the spare tire
retainer. 4. Lift the spare tire with one hand to give
clearance to tilt the retainer at the end of
the cable.
5. Pull the retainer through the center of the wheel.
Preparations For Jacking
1. Park the vehicle on a firm, level surface.
Avoid ice or slippery areas.
WARNING!
Do not attempt to change a tire on the side
of the vehicle close to moving traffic, pull
far enough off the road to avoid being hit
when operating the jack or changing the
wheel.
2. Turn on the Hazard Warning flasher.
3. Apply the parking brake firmly.
4. Place the transmission in PARK (RE- VERSE for manual transmission) .
5. Turn the ignition OFF.
6. Block both the front and rear of the wheel diagonally opposite the jacking position.
For example, if the right front wheel is
being changed, block the left rear wheel.
Lowering Spare Tire
Spare Tire
Retainer
111
Page 114 of 204

NOTE:
Passengers should not remain in the vehicle
when the vehicle is being jacked.
Jacking Instructions
WARNING!
Carefully follow these tire changing warn-
ings to help prevent personal injury or
damage to your vehicle:
• Always park on a firm, level surface asfar from the edge of the roadway as
possible before raising the vehicle.
WARNING!
• Turn on the Hazard Warning flashers.
• Block the wheel diagonally opposite thewheel to be raised.
• Set the parking brake firmly and set an
automatic transmission in PARK; a
manual transmission in REVERSE.
• Never start or run the engine with the
vehicle on a jack.
• Do not let anyone sit in the vehicle when
it is on a jack.
• Do not get under the vehicle when it is
on a jack. If you need to get under a
raised vehicle, take it to a service center
where it can be raised on a lift.
• Only use the jack in the positions indi-
cated and for lifting this vehicle during a
tire change.
• If working on or near a roadway, be
extremely careful of motor traffic.
• To assure that spare tires, flat or in-
flated, are securely stowed, spares must
be stowed with the valve stem facing the
ground.
CAUTION!
Do not attempt to raise the vehicle by
jacking on locations other than those indi-
cated in the Jacking Instructions for this
vehicle.
Wheel Blocked
Jack Warning Label
IN CASE OF EMERGENCY
112
Page 118 of 204

WARNING!
Do not attempt jump starting if the battery
is frozen. It could rupture or explode and
cause personal injury.
CAUTION!
Do not use a portable battery booster pack
or any other booster source with a system
voltage greater than 12 Volts or damage to
the battery, starter motor, alternator or
electrical system may occur.
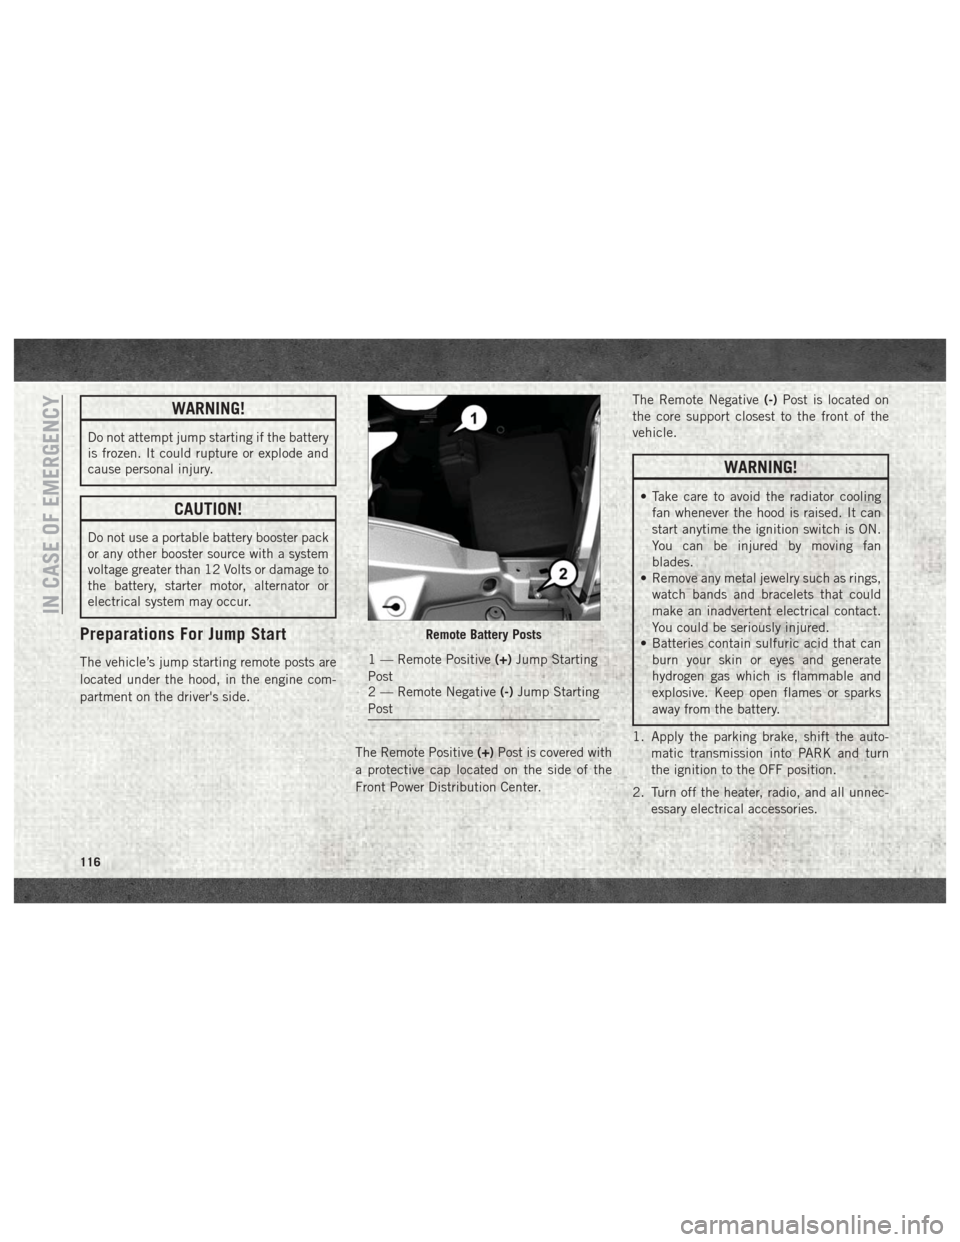
Preparations For Jump Start
The vehicle’s jump starting remote posts are
located under the hood, in the engine com-
partment on the driver's side.The Remote Positive(+)Post is covered with
a protective cap located on the side of the
Front Power Distribution Center. The Remote Negative
(-)Post is located on
the core support closest to the front of the
vehicle.
WARNING!
• Take care to avoid the radiator cooling fan whenever the hood is raised. It can
start anytime the ignition switch is ON.
You can be injured by moving fan
blades.
• Remove any metal jewelry such as rings,
watch bands and bracelets that could
make an inadvertent electrical contact.
You could be seriously injured.
• Batteries contain sulfuric acid that can
burn your skin or eyes and generate
hydrogen gas which is flammable and
explosive. Keep open flames or sparks
away from the battery.
1. Apply the parking brake, shift the auto- matic transmission into PARK and turn
the ignition to the OFF position.
2. Turn off the heater, radio, and all unnec- essary electrical accessories.
Remote Battery Posts
1 — Remote Positive (+)Jump Starting
Post
2 — Remote Negative (-)Jump Starting
Post
IN CASE OF EMERGENCY
116